Today, I have another one of Laura’s Quick Tips! This one is used in my craft room/stamp class about once a week. It has been a lifesaver….okay maybe not that dramatic. Using Dental Floss for card making might sound crazy but it totally works!!!!
All you need is some dental floss to fix your crooked placement of cardstock. Pull out a piece that is plenty big so it will go the length of your cardstock and have enough on both ends to hold on to. Place the floss under between the cardstock layers and just shimmy it down. Sometimes I pull a lot on the left and then a lot on the right but sometimes I just work it back and forth evenly. It will slowly break the seal of the adhesive so you can position it. The awesome thing about this trick is that it doesn’t rip the cardstock or curl it like when you pull it off from one corner.
I hope you found this helpful and let me know in the comments if you have tired this before or if you will be trying it soon!
If you would like to see this all in action, check out the video below or click here! Be sure to give the video a thumbs up if you liked it and don’t forget to subscribe if you are new. If you would like a notification when I post a new video, be sure to click the bell right next to the subscribe!!!
Happy Technique Tuesday, everyone!!! You all know I am loving butterflies right now! I also know that you all are loving them too because the Butterfly Duet Punch flew off the shelves like magic. Wowza there were so many sold so quickly, Stampin’ Up couldn’t keep up and trust me they were ordering more just as fast as we were buying. So for those of you who have this amazing bundle, check this out. For those of you still waiting, Pin This or save it for later! Sponging butterflies is soooooo much fun and endless color options! A big shout out to Patty Bennett for the fabulous inspiration!
Are these not the most stunning things you have ever seen??? LOVE IT!!!!! It is super easy to do too which is just icing on the cupcake!
I started with a Basic Black card base. Next, I layered a piece of the Botanical Butterfly Sale-A-Bration Designer Paper (3-3/4″ x 5″) onto a piece of colored cardstock (4″ x 5-1/4″). I used Gorgeous Grape and Mango Melody for the samples above! Before adding this layer to the card front, I tied some Black/Silver Striped Ribbon around the bottom. I love the little hint of shimmer in this ribbon but still sticking to a black and white with pops of color theme!
Also, since the card base is black, I had to add a piece of Whisper White to the inside of the card. Using the Well Said Stamp Set, I stamped the coordinating greeting from the front on the bottom of the inside. The 4th little butterfly that is punched out fits perfectly on the inside as well for a fabulous look!!! The greeting on the front was just stamped, trimmed around and layered on to coordinating cardstock to really make it POP! I added the greeting with Stampin’ Dimensionals. For the card above, I used Pumpkin Pie on the greeting!
Okay now for sponging butterflies to make them look stunning! Simply stamp your favorite butterfly style from the Butterfly Gala Stamp Set in Black Ink onto Whisper White cardstock. Then using a Sponge Dauber, add some color down the center. For the big butterfly, I was able to just dauber up and down. For the little butterfly, I had to sort of tilt it to the side to only add a little bit of color. If I used the full dauber, it would have covered the whole butterfly. As you can see, I used Gorgeous Grape and Bermuda Bay for one of the butterflies and Pumpkin Pie and Mango Melody for the other. After the centers are complete, take the second color and brush the edges, making sure to blend into the center color a bit. Don’t worry, it will look a bit messy but once you punch them out. AMAZING!
If you are dying to recreate this and don’t have the Butterfly Duet Punch yet, you can always fussy cut the butterflies! Which color combination is your favorite?
If you would like to see this all in action, check out the video below or click here! Be sure to give the video a thumbs up if you liked it and don’t forget to subscribe if you are new. If you would like a notification when I post a new video, be sure to click the bell right next to the subscribe!!!
Happy Valentine’s Day!!!! What do you love today?? Is it chocolate? Is it someone in your life? Is it your craft supplies? I’m going to go with the last 2 and I could exchange chocolate for a cupcake! 🙂 Today, I wanted to share what I am loving right now with Stampin’ Up!!!
We are right in the middle of Sale-A-Bration and the Occasions Mini Catalog and it’s been fabulous! There is so much amazing product to play with and color combinations I would have never thought to use! There is also fabulous free stuff with every $50 order and additional $25 in Hostess Goodies when your order/party is over $250. The best deal yet though is when you join Stampin’ Up and get $175 in product for just $99! That is an amazing steal! Free shipping on top of that makes it even better! Gather together with some friends and let’s stamp. Then you can use your Hostess goodies towards signing up to make it an even better deal!
Today, I’m sharing what I would pick out for my Starter Kit totaling $175!!! There is also a 2nd option to the kit to add on the Craft Carry Tote Bag for $129 rather than $99! Being the bag lady that I am, I’m going with that option!!! So that’s $175 in any product and the Craft & Carry Tote for just $129!
If you would like to see this all, check out the video below or click here! Be sure to give the video a thumbs up if you liked it and don’t forget to subscribe if you are new. If you would like a notification when I post a new video, be sure to click the bell right next to the subscribe!!! Join my team and let’s have fun stamping together!!!!
Happy Tuesday!!! I am sharing another one of Laura’s Quick Tips today!!! It is all about basic card measurements!!! I get asked this question a lot especially at my classes since I have already done all the cutting for everyone. These measurements are stuck in my head as I use them daily. Here and there I modify and go with something different just to mix it up but otherwise 98% of my cards use these measurements!
For a basic card base, all you have to remember is to cut a piece of 8-1/2″ x 11″ in half. It could be in half along the 11″ side, making the cut at 5-1/2″. This will create a 5-1/2″ x 8-1/2″ card base. This style can open up like a calendar or to the side like a book. If you cut along the 8-1/2″ side at 4-1/4″, this creates a 4-1/4″ x 11″ card. This looks more like an easel card and again it can open up or to the side. In the photo above, I have the Grapefruit Grove card on the far left opening on the left side like a book.
When it comes to layers, I like to work with 1/4″ rather than 1/8″ mostly because I like a bit of a bigger gap to allow more color/pattern to show. Also, I am not a fan of 1/8″ as I tend to get confused and it isn’t as easy to read on my Stampin’ Trimmer! For the Gorgeous Grape card in the center, I went in a 1/4″ making the Whisper White piece 4″ x 5-1/4″. The Balmy Blue card on the far right is a 1/2″ in making it 3-3/4″ x 5″. This all depends on how much of the card base you want to show!
For additional layers on your card, I tend to go in increments that divide by 6″. This is done because Stampin’ Up’s designer paper, glimmer paper, foil paper, etc. is either 6″ x 6″ or 12″ x 12″. I don’t like to waste any of these gorgeous stuff so cutting pieces like 2″ x 4″ or 3″ square or 3″ x 4″ gives me a chance to use it all up with no waste. That is perfect to me!!!
I hope you found this helpful! Let me know in the comments if this was helpful! Also, let me know if you like to work with 1/4″ or 1/8″!
If you would like to see this all in action, check out the video below or click here! Be sure to give the video a thumbs up if you liked it and don’t forget to subscribe if you are new. If you would like a notification when I post a new video, be sure to click the bell right next to the subscribe!!!
Today, I’m sharing another one of Laura’s Quick Tips!!!! Since ribbon is my favorite embellishment for sure, I used it for almost all of my project. How much ribbon do I need is a question I get asked a lot. Let me show you my trick for that…
The way to know how much ribbon you will need when tying a knot around something is to simply wrap it around. Take the ribbon and go across the front, around to the back, back around to the front and across. The two ends of the ribbon should be going in opposite directions across the front. Now you can cut your ribbon off the spool and tie it into a knot. There will be some excess ribbon that you will need to trim off but very minimal. Of course this may seem a bit confusing which is why I posted a video below for you to see!!!!
If you would like to see this all in action, check out the video below or click here! Be sure to give the video a thumbs up if you liked it and don’t forget to subscribe if you are new. If you would like a notification when I post a new video, be sure to click the bell right next to the subscribe!!!
Happy Tuesday!!! I have a fabulous technique to share with you today! This banner front card is fun and different from just a regular card! It’s also a fabulous masculine card which I struggle with! Luckily it works for Valentine’s Day, Father’s Day, and even Birthdays and Graduation. Just mix up the greeting!!! Also, a shout out to Karla Endris for the inspiration on this card!
Which one do you like best?? Let me know in the comments below! Not only is the greeting different but I have a different color banner for each. On the Smoky Slate banner card, I stamped off once with the grease spots. For the Basic Gray banner, I stamped in full strength Smoky Slate!!!
I started with a 7-3/4″ X 4-1/4″ card base and scored it at 5-1/2″ (or 2-1/4″) depending on which way you prefer to measure). This allows for just a small flap for the card front. Next, I layered on a piece of the Classic Garage Designer Series Paper measuring 2″ x 4″. With this size, you can get 4 pieces from one sheet of 6″ x 6″. Then I die cut the gears from the Garage Gears Framelits in Real Red cardstock. Using the Fine Tip Glue Pen, I added the gears to the card front!
Using the grease spot stamp from the Geared Up Garage Stamp Set, I stamped it along the right inside edge in Smoky Slate. You can either go full strength or stamped off once or a little bit of both! For the banner, I cut a piece of Basic Gray (or Smoky Slate) measuring 2″ x 5-3/4″. Using the Banner Triple Punch, I punched the banner tips and then placed it inside the card. I closed that front flap and placed my finger along the edge as a guide. Then I added adhesive up to that edge where my finger was. This is to make sure I don’t have too much adhesive that it peaks out of the flap. Then simply close the flap over the banner with adhesive to adhere it. Using the coordinating Garage Gears Framelits, I die cut the greeting pieces and stamped it. Of course, I added it to the card front with Stampin’ Dimensionals for some texture.
For this version of the card, I stamped the greeting on a banner that is 1″ wide and used the Banner Triple Punch. Adhere the two banners together before adhering it to the card base.
If you would like to see this all in action, check out the video below or click here! Be sure to give the video a thumbs up if you liked it and don’t forget to subscribe if you are new. If you would like a notification when I post a new video, be sure to click the bell right next to the subscribe!!!
Today I’m sharing another one of Laura’s Quick Tips! Are you always super organized?? Yeah me neither even though I am a rather organizational freak. It happens though. I get to playing so much in the stamp room. I’m pulling out everything to try and when the mess gets about 2 feet deep, it’s time to clean up and start again! There are 10 inks pads on the desk, cardstock in 15 colors, 4 stamp sets opened up, and framelits all over. Unless it is the Layering Ovals/Circles/Squares, it can be tricky figuring out which ones go with with set.
Not anymore after you hear about this cool tip! If you look real close to the top side of the framelit, there will be a number. That number is actually the item number for the set of Framelits. You will see in the catalog, there is a number usually starting with 14 and then the name and price of the item. If you find a random framelit on your desk….or gasp the floor. lol Take that number and enter into the Stampin’ Up website and it will tell you which set it is. Try it out with this number and let me know in the comments below which set it is. The number is 146828 and click here to find out what set it is! (There might be a prize drawn for all of the answers.) 🙂
DISCLAIMER: This will not work for sets that have retired. So here are a few tips for your retired items. Keep your old catalogs for the awesome ideas as well as looking up framelit numbers. You can browse the back and find the number in the section with all of the framelits. Another option is to download the catalog to your computer/device and save it. When you need to find a set, simply hit Control F or (FIND) and type in the number there. Then it will pop up really quick!
I hope this if super useful and you can rest assure you aren’t alone in trying to figure out the missing piece! If you would like to see this all in action, check out the video below or click here! Be sure to give the video a thumbs up if you liked it and don’t forget to subscribe if you are new. If you would like a notification when I post a new video, be sure to click the bell right next to the subscribe!!!
Happy Tuesday, everyone! I have a little bit of a Technique Tuesday and a little Laura’s Quick Tips today! If this has happened to me, surely it has happened to you. I have my Stamparatus all lined up and ready to go. After stamping a few, I line up the next one and just as a go to stamp it down, I realize it is not lined up correctly. Did My Stamp Just Move???
Nope!!! The stamp didn’t move but the grid/scrap paper did or the foam mat did. My mind has been boggled so much on this and wondering how it moved and I could have thought I lined it up correctly. Then after looking at it more, I realize the paper or foam moved and it’s like Ahhh Hah!!! So when you think the stamp moved……check your paper and foam mat! 🙂
This fabulous card was created using the Stamparatus for that 2 step stamped image of flowers! The Stamparatus makes that image a breeze. One plate holds the folders for a fun color of your choice and the other plate holds the greenery piece! Boom Boom and you have a fabulous stamped image…..just make sure your grid and foam mat are in place!
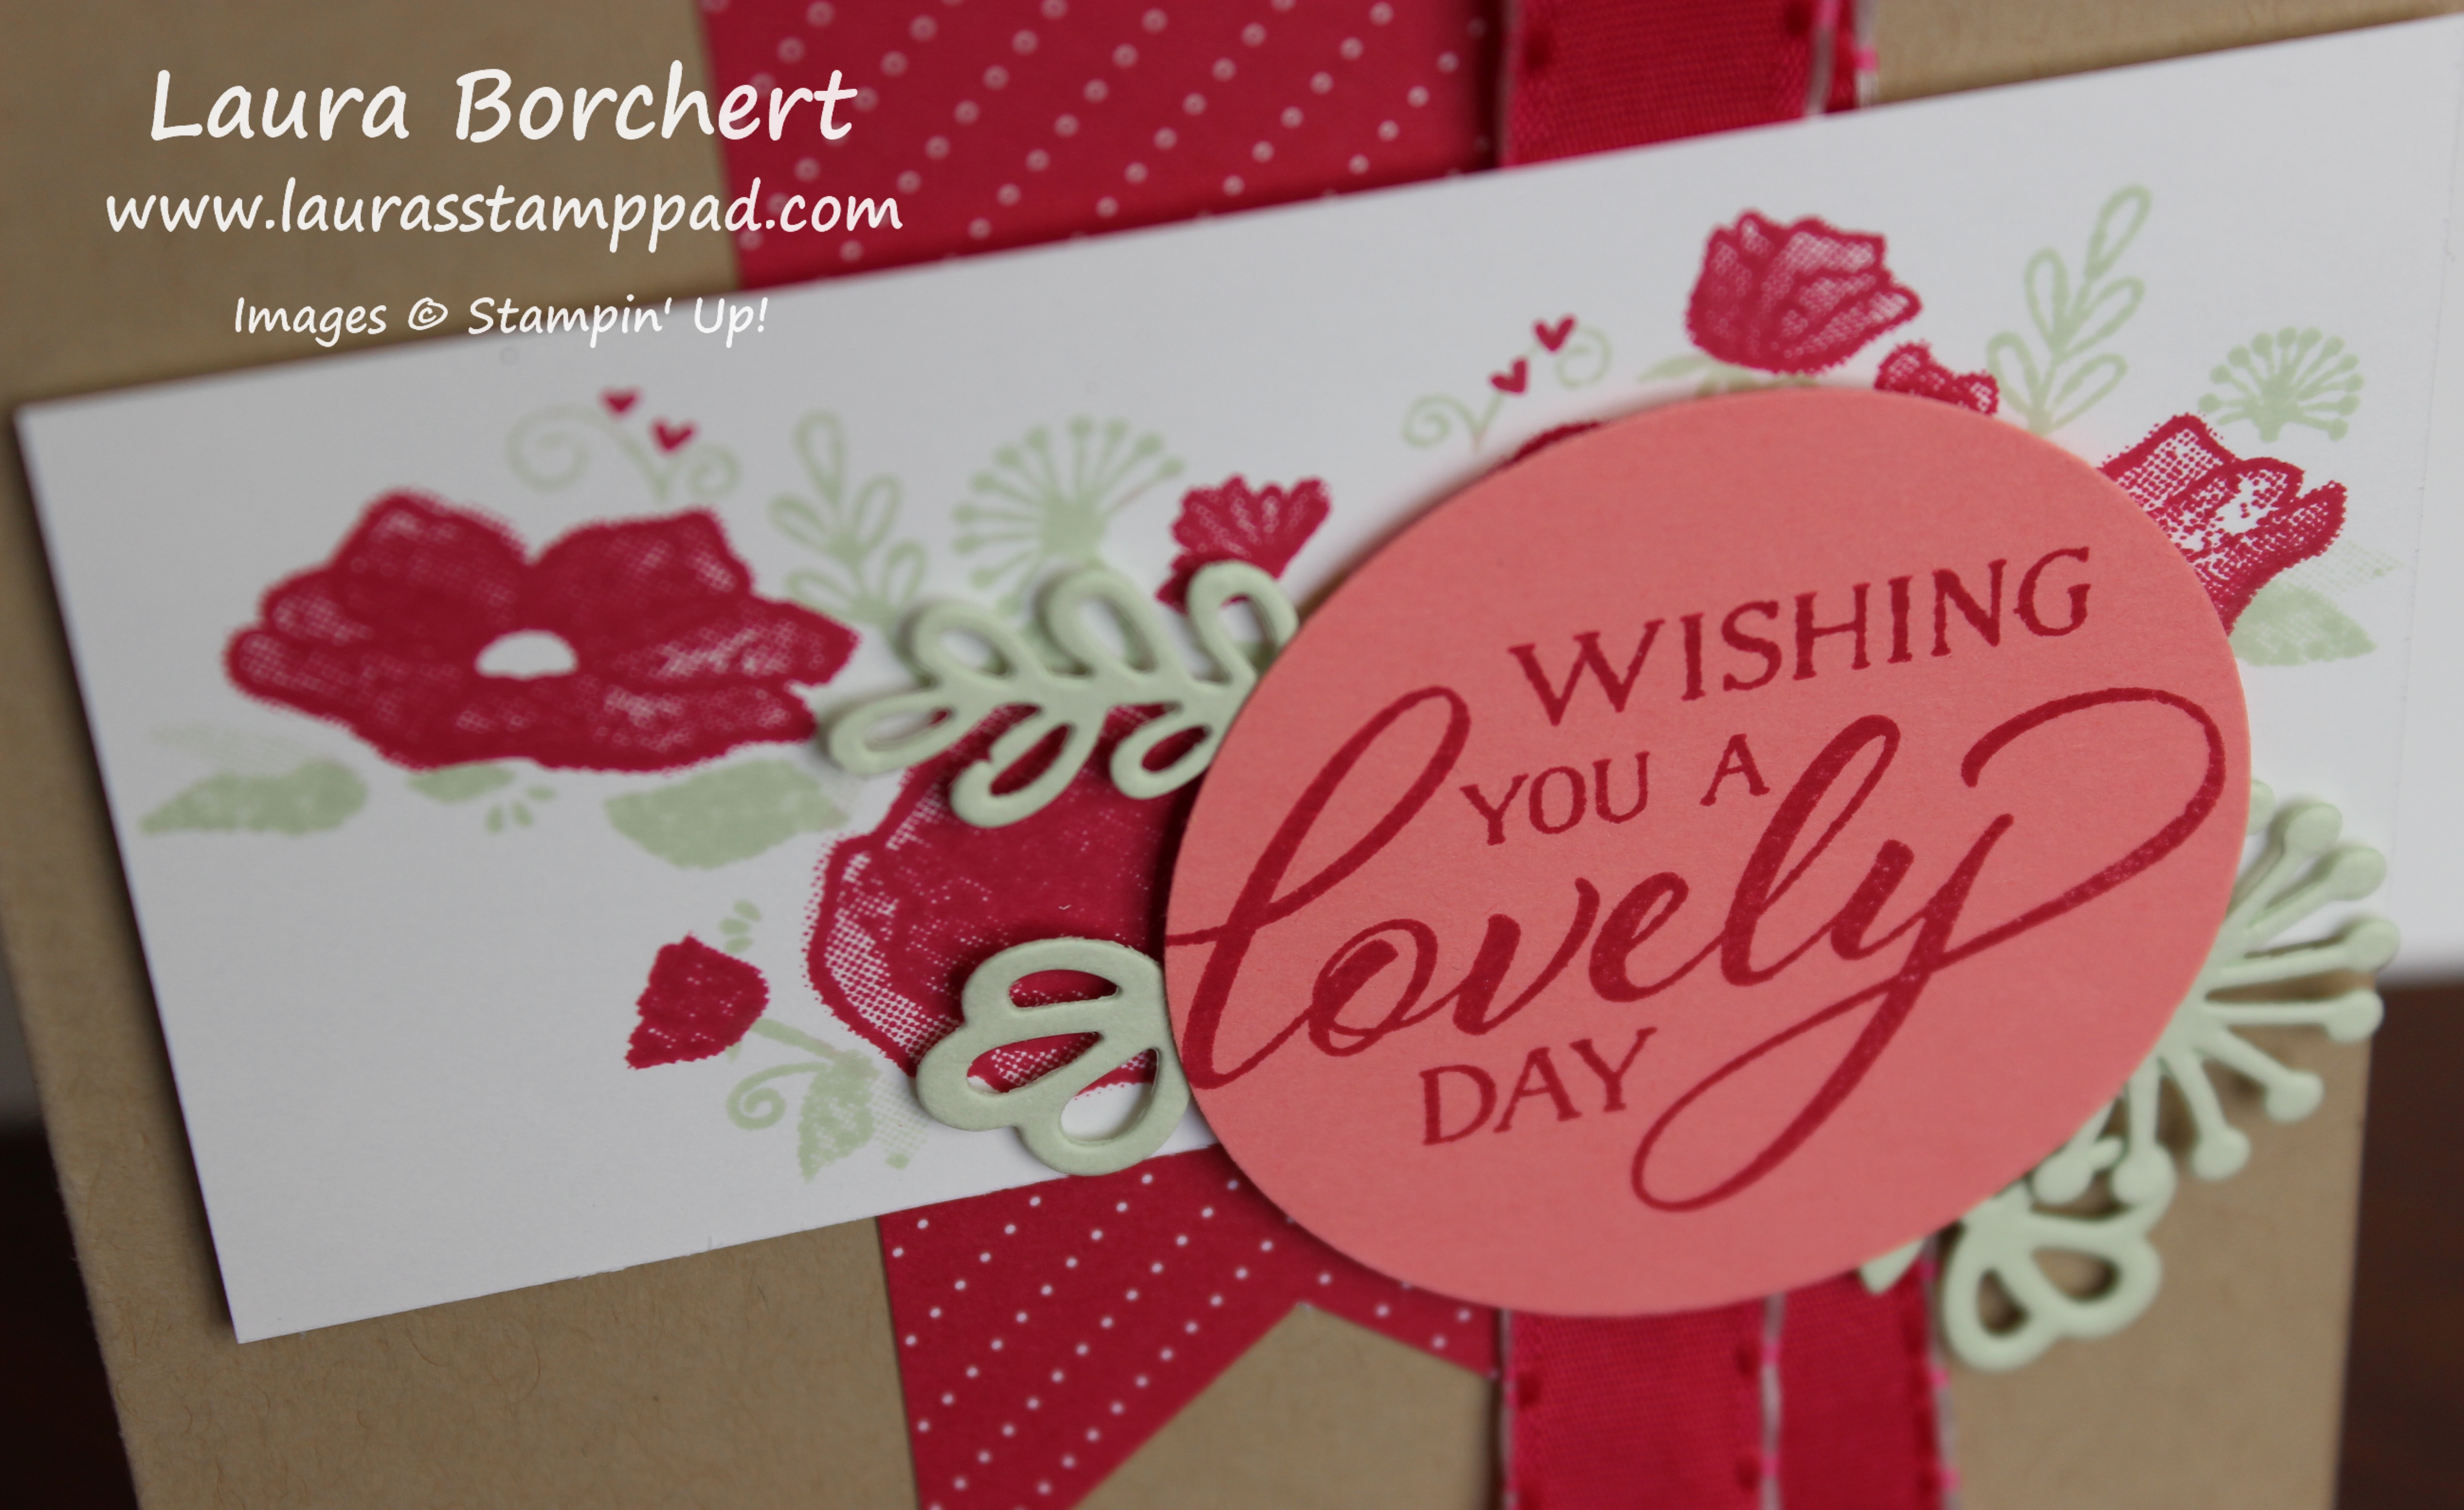
I started with a Crumb Cake card base and then added a 2″ strip of the All My Love Designer Series Paper. I punched the bottom of it with the Banner Triple Punch to get those banner tips! Next, I added a piece of the All My Love Ribbon by just putting a little bit of Snail Adhesive down the banner and pressing the loop into it. It won’t feel secure at this time but when you place the stamped floral image over the top with Stampin’ Dimensionals, that will secure it better. For the floral piece I used Soft Sea Foam and Lovely Lipstick Inks.
For the greeting, I stamped it from the Forever Lovely Stamp Set in Lovely Lipstick. Can I say Lovely any more in one sentence?!?!? Then I punched it out with the 1-3/4″ Circle Punch! For a little texture, I die cut some of the greenery pieces from the coordinating Lovely Flowers Framelits. One of the framelits is actually a 2 for 1 piece. There are 2 of that greenery piece in the 1 framelit. I die cut the 3 framelits in Soft Sea Foam and got the 4 pieces to use around the greeting! The greeting piece was added to the card front with Stampin’ Dimensionals as well! Just lovely! (I had to do it.)
If you would like to see this all in action, check out the video below or click here! Be sure to give the video a thumbs up if you liked it and don’t forget to subscribe if you are new. If you would like a notification when I post a new video, be sure to click the bell right next to the subscribe!!!
Today, I have another fabulous Laura’s Quick Tips! Are you loving the Simply Shammy as much as me?? I have finally gotten over the fact that it is forever stained with the stamped images but I still have fun stamping an image all around to make it show off more! Has your Shammy dried, curled, and gotten hard as a rock???? Don’t worry, it is not broke!!!
If your Shammy is out in the open air, it will dry up like a rock and look all warped. At first when you add water, it just beads right off. That’s okay, you just need to work it a little bit. Allow the water to really get into the Shammy. Press the Shammy or submerge it allow it to really soak. Once it is all wet and soaks up all the water, wring it out and you are golden to use it all over again!
Another tip is to store it in a Clear Mount Stamp Case. It fits in there perfectly and this keeps more moisture in there. Also, you don’t have to worry about having something damp on your work surface. I had a question about mold and the Shammy smelling. I have not had a problem with mold. I think because it can breath and the case isn’t air tight, it won’t mold. At least I’m hoping it won’t. I have been doing this for 7 months now and all is good. As for smell, there is none at all. I don’t think the Shammy smells when it’s wet or dry. All good there! Get your Simply Shammy by clicking here!
If you would like to see this in action, check out the video below or click here! Be sure to give the video a thumbs up if you liked it and don’t forget to subscribe if you are new. If you would like a notification when I post a new video, be sure to click the bell right next to the subscribe!!!
Do you love butterflies??? I find them to be so beautiful, fun to watch, a sign of hope, and Spring!!! Today, I’m going to show you all kinds of butterflies that you can create with the Butterfly Gala Stamp Set and coordinating Butterfly Duet Punch!
The Butterfly Gala Stamp Set has 4 styles of butterflies that are each intricate and stunning. They look amazing stamped in 1 color on white or colored cardstock. You can also color them in with Watercolor Pencils, Blends, or other watercolor tools. Another option is to stamp the solid butterfly stamp to fill in the butterfly with color. This can be done in the same color but stamped off once for a lighter shade or it can be in a different color. I love how the butterfly images are a big one and little one combined. This way they go into the punch perfectly and you can make multiples really fast! I love it!!!
If you would like to see all of these butterflies in action, check out the video below or click here! Be sure to give the video a thumbs up if you liked it and don’t forget to subscribe if you are new. If you would like a notification when I post a new video, be sure to click the bell right next to the subscribe!!!


 Striped Metallic Ribbon")


 Designer Series Paper")

 Satin Ribbon")
 Grosgrain Ribbon")


 Designer Series Paper")


 Designer Series Paper")


