Splendid Day!!!

Posted on

I LOVE Summer but this one has been HOT HOT HOT! I’m kind of over it. Any day that it is still in the 80’s at 10 a.m. now is a splendid day! I can’t believe it will be cold soon though. That makes me sad. If you are staying inside because it’s hot, here is the perfect thing for you – August Online Card Class!!!

Splendid Day Suite Stampin Up, www.LaurasStampPad.com

Here is one of the cards that we will be creating at the August Online Card Class – Splendid Day! The colors Soft Seafoam, Pool Party, Calypso Coral, and a foil shine are the perfect combination! Honestly, I loved creating these cards and looked at all 5 of them and thought this is so not my style but I love them! Just goes to show that sometimes you need to mix it up and try new colors, styles, and designs!

This class uses the Spendid Thoughts Stamp Set and coordinating dies. There are a few fun card techniques and styles thrown in there too! Don’t forget that it is FREE for anyone to watch the Online Card Class on YouTube or Facebook. You can also stamp along with me by purchasing the card kit or the PDF Tutorial! Click here for all of the details on how you can participate.

If you would like to check out past months Online Card Classes or purchase the PDF Tutorials, check out my Online Card Class tab here on my blog!

I hope to see you on Friday, August 19th at 7:30 p.m. CT which is when the August Online Card Class is going to be. Stamp with me, chat with me, or just watch me! It will be loads of fun and full of stamping tips and ideas! Share with your friends so they can join in the fun too!

Happy Stampin’ and have a Splendid Day!

~Laura


Pocket Style Card!!!

Posted on

Sometimes I just get bored with a regular card. It’s like I need something new to mix it up and make it fun. This pocket style card is just that. Super cute and different from the traditional card. I love it and plan to make a lot more with this style!

Pocket Style Card, www.LaurasStampPad.com

The Smoky Slate card base measures 8-1/2 x 5-1/2 and I scored it at 2″ from one side and 2-1/2″ from the other side. So this is actually a 4″ x 5-1/2″ card which is just 1/4″ smaller than usual but it creates that nice overlap for the pocket! On the bottom portion, I used Tear And Tape along the sides to secure the pocket. I just like that stronger adhesive to ensure the pocket will stay together as a piece of paper slides in and out of it. Then I added a piece of the Simply Elegant Designer Series Paper to the bottom piece (5-1/4″ x 1-3/4″).

Next, I used the Elegantly Said Stamp Set for all of the images. The corner image was stamped in Basic Gray and the flower stamped in Cherry Cobbler. For the inside card, I stamped the flower image off twice and then onto the cardstock for that super subtle look. You don’t want it to overpower your greeting! I love getting images and greetings out of one stamp set!!

Elegantly Said Stampin' Up Stamp Set, www.LaurasStampPad.com

The front focal point was stamped on Basic White (2-1/4″ x 2-1/4″) and layered onto Cherry Cobbler cardstock (2-1/2″ x 2-1/2″). The inside card measures 3″ x 4-1/4″ layered onto Cherry Cobbler measuring 3-1/4″ x 4-1/2″.

Elegant Pocket Style Card, www.LaurasStampPad.com

If you would like to recreate this pocket style card, check out the supplies listed below that you need or select ADD ALL TO CART and then you can always delete the items you don’t need. Easy, quick ordering!

Happy Stampin’

~Laura

Product List

So Glad We Are Friends!!!

Posted on

Happy Wednesday!!! Do you follow someone on social media and you feel like you really know them? When talking to someone, you say oh yeah my friend recommends this or my friend did this but really you have never met that person. This happens to me all the time. I have lots of friends like that. If I am your friend that way, give me a shout out in the comments and know I would LOVE to be your friend online and maybe even some day in person! This card says it all….So Glad We Are Friends!!!

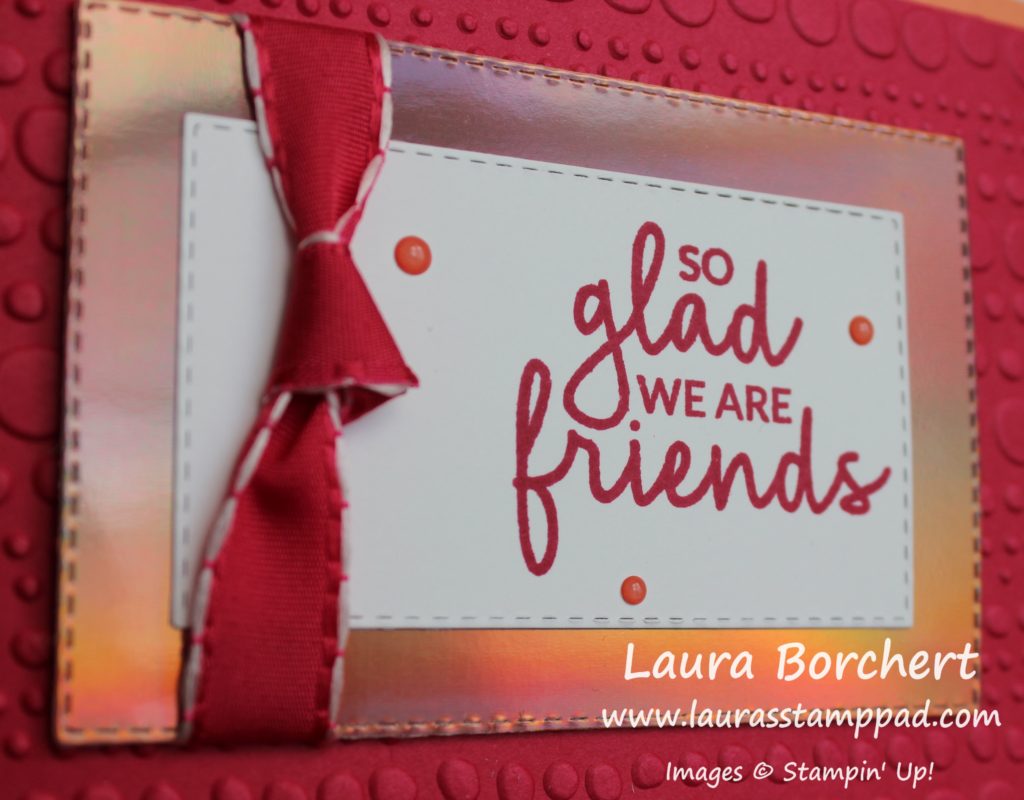
Grapefruit Grove Foil Paper, www.LaurasStampPad.com

How fabulous is this card?? The Lovely Lipstick and Grapefruit Grove color combination is amazing and oh that shiny foil! YUM!!!

I started with a Grapefruit Grove card base measuring 11″ x 4-1/4″. It opens like a book. Next, I took a piece of Lovely Lipstick and ran it through the Big Shot in the NEW Dot To Dot Embossing Folder. I layered this onto the card front! Then using the Stitched Rectangles Framelits, I die cut some of the Sale-A-Bration Grapefruit Grove Foil Paper and Whisper White cardstock.

So Glad We Are Friends, www.LaurasStampPad.com

The greeting is from the Incredible Like You Stamp Set from the Occasions Mini Catalog. I stamped  it in Lovely Lipstick Ink towards the right side. Then I layered the white rectangle onto the foil piece. Then using the Lovely Lipstick Ribbon from the All My Love Ribbon Pack, I looped a knot and placed it on the rectangles. Then I simply secured the ends on the back with some Stampin’ Dimensionals. Finish off adding more dimensionals so it’s even and I added this to the card front!


Stitched Rectangles, www.LaurasStampPad.com

I finished off the card by adding a few Enamel Shapes from the Happiness Blooms Enamel Dots. It’s just perfect! I had to share all of these photos so you could really see how fabulous that foil paper is and the ways it shines! Earn this foil paper for FREE through Sale-A-Bration with a $50 order! Click the supplies for this card listed below to start earning!!!

Happy Stampin’

~Laura

Product List


Technique Tuesday – Dashing Deer Duplicates!!!

Posted on

Happy Tuesday!!! You all know what that means! I have a fabulous Technique to share with you today! I’m sharing this fun idea of creating Dashing Deer Duplicates!!! Today I’ll be sharing one card today and then the coordinating one tomorrow!!! Get a sneak peak of it in the video below!

Dashing Deer Duplicates, www.LaurasStampPad.com

For this card, I used Gold Foil, Whisper White, and Merry Merlot paper. The only ink used was Merry Merlot Ink and the only stamp set was the Dashing Deer Stamp Set. I also, used the Detailed Deer Framelits (Bundle & Save 10%). With these products I created this card and then used a similar layout and the die cut deer to create another card. Come back tomorrow for that one!

I started with a Whisper White card base which is great for writing on the inside of the card too! Next, I layered on a piece of Merry Merlot cardstock after stamping the floral image on the top and bottom. The image was stamped in Merry Merlot for that subtle look. Then I took a 4″ x 4″ piece of Gold Foil Paper and die cut the deer out with the Detailed Deer Framelits. I also die cut out a few flowers in Merry Merlot cardstock. BONUS: Stampin’ Up put a few of the flower framelits in the set so that you can die cut multiples at the same time. So I got all 3 of these flowers with just 1 crank through the Big Shot!

Detailed Deer Framelits, www.LaurasStampPad.com

Using the Fine Tip Glue Pen, I added the flowers around the deer! For the greeting, I stamped it in Merry Merlot from the Dashing Deer Stamp Set. To make the banner tips, I just used the Banner Triple Punch! Since I hadn’t used any Stampin’ Dimensionals just yet, I thought I needed to for the greeting! 🙂 You all know how much I love those things!

Come back again tomorrow to see how I used the die cut deer to create another card with the same stamps, ink, and paper!!!

If you would like to see this all in action, check out the video below or click here! Be sure to give the video a thumbs up if you liked it and don’t forget to subscribe if you are new. If you would like a notification when I post a new video, be sure to click the bell right next to the subscribe!!!

Happy Stampin’

~Laura

Product List


Can’t Get Enough Copper!!!

Posted on

Gold and Silver have been around forever….or it seems to me…but Copper hasn’t and I’m in love lately. I just can’t get enough Copper!!! The Joyous Noel Suite from the Holiday Mini Catalog has lots of Copper!

Can't Get Enough Copper, www.LaurasStampPad.com

The texture and shine on this card is just stunning!!! It’s also super easy too so this is a great card to make multiples for Christmas!

I started with a piece of Sahara Sand for my card base. Next I cut a piece of Copper Foil Paper (2″ x 5-1/4″) and ran it through the Big Shot with the Tufted Embossing Folder. That is my favorite folder right now as well as the Tin Tile Embossing Folder. Also, I cut a piece of the Joyous Noel Designer Series Paper in a 2″ x 5-1/4″ piece. Then I added these two pieces to the card front!

Copper & Merlot Ribbon, www.LaurasStampPad.com

For the greeting, I die cut an oval using the Stitched Shapes Framelits and stamped the greeting in Merry Merlot Ink. The greeting is from the Peaceful Noel Stamp Set. I added the greeting with Stampin’ Dimensionals. To finish it off, I added a bow made from the Merry Merlot and Copper Ribbon. I used Mini Glue Dots to adhere it to the card front. I love it!

Are you a big Copper fan? Or do you like Silver or Gold more? Let me know in the comments below!

Happy Stampin’

~Laura

Product List


Tin Tile Embossing Folder!!!

Posted on

Oh my goodness, my favorite product by far in the Holiday Mini Catalog is the Tin Tile Embossing Folder. It is just stunning on a project and looks amazing with foils!

Tin Tile Embossing Folder, www.LaurasStampPad.com

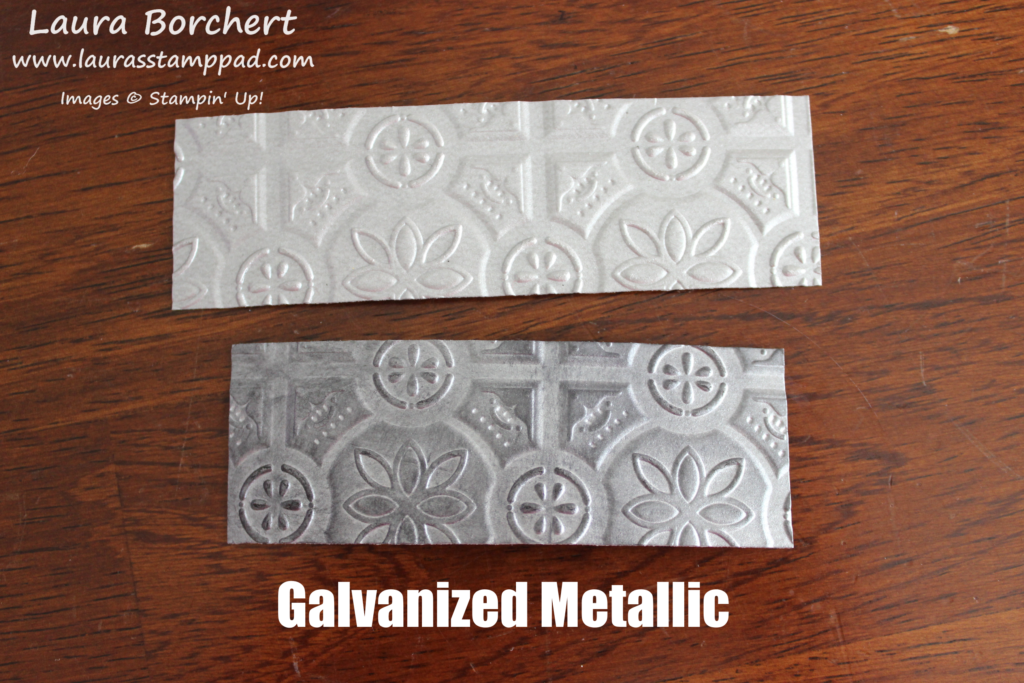
The intricate details in the folder are just amazing! I love all the texture and the elegant look! To me, this folder was meant to be for foil papers!!! It’s just stunning! As you can see I used different foils in the photo above. I even used this new Galvanized Metallic Paper!!! It’s like the perfect brushed silver look.

Copper & Champagne, www.LaurasStampPad.com

Then I had some fun adding some black ink with a Sponge Dauber for a more rustic look. I really like the look on some of the foils and not so much on others.

Galvanized Metallic, www.LaurasStampPad.com

The Galvanized Metallic looks super cool since it has that rustic look and a less shine and glitz.

Silver & Gold, www.LaurasStampPad.com

I kinda love this technique a bit! Of course some of them are darker and others are lighter. I simply rubbed some black on very quickly. I could always go back and add more or keep it light and dark for a more rustic look! Which one is your favorite?? Let me know in the comments below!

Check back tomorrow to see a sample using the Tin Tile Embossing Folder!!! Don’t have this folder in your collection yet, click the photo below to get it!!

If you would like to see this all in action, check out the video below or click here! Be sure to give the video a thumbs up if you liked it and don’t forget to subscribe if you are new. If you would like a notification when I post a new video, be sure to click the bell right next to the subscribe!!!

Happy Stampin’

~Laura

Product List


Copper Leaves!!!

Posted on

Happy Wednesday!!! This has been one heck of a busy week and it’s only Wednesday! Seeing all the back to school photos is making my head spin….how is it that time of year already?!?!

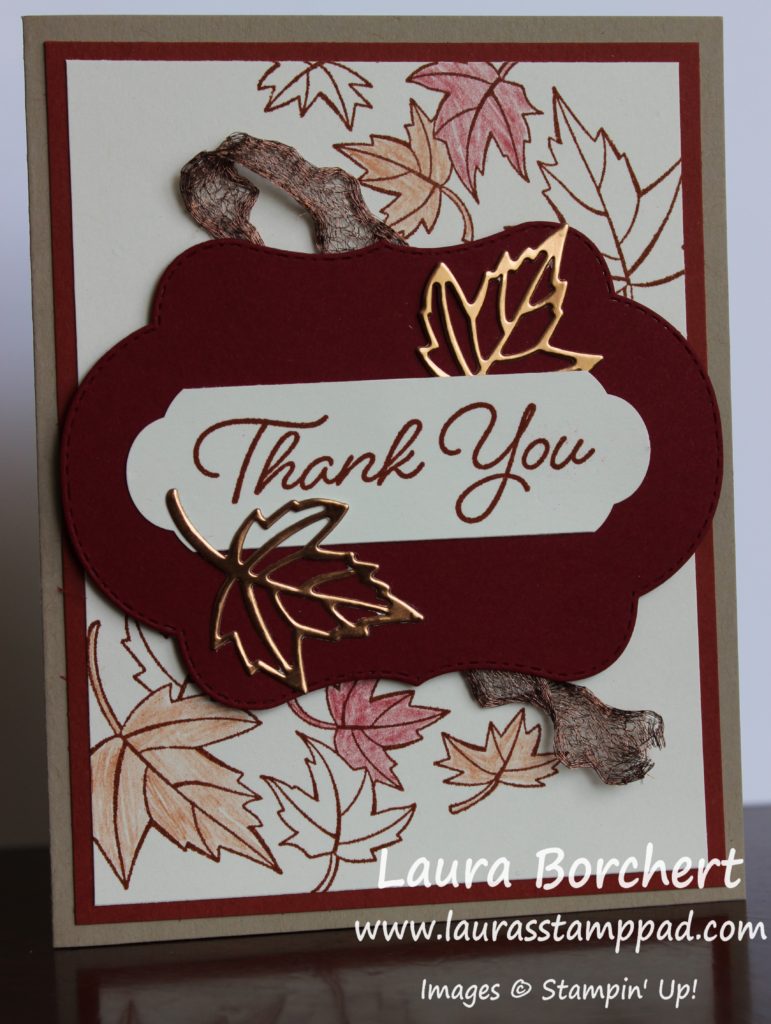
Copper Leaves, www.LaurasStampPad.com

I really struggled with this card and all of the different options. Did I like the Copper Foil with the rustic Copper Trim? Did I want to color in the leaves or leave them alone? Was the greeting piece to plain or too much?

I started with a Crumb Cake card base. Next, I layered on a piece of Cajun Craze measuring 4″ x 5-1/4″. Then I took a piece of Very Vanilla (3-3/4″ x 5″) and stamped the leaves from the Blended Seasons Stamp Set in Cajun Craze Ink. Using the NEW Watercolor Pencils Assortment 2, I colored in a few leaves with the Cajun Craze and Cherry Cobbler Pencils.

Texture & Shine, www.LaurasStampPad.com

For the focal point, I die cut out a label with the coordinating Stitched Seasons Framelits. (Save back the outline/negative to use for another project like this one.) On the back of the label, I placed some pieces of the Copper Trim on the edge and secured them in place with Stampin’ Dimensionals. Then I added this piece to the card front.

For the center greeting, I took a scrap strip of Very Vanilla and slide in the back of the Pretty Label Punch to get those rounded edges. Next, I stamped the greeting from the Blended Seasons Stamp Set in Cajun Craze Ink. Now that I know how long my greeting piece needs to be, I slide the other end into the punch and rounded those corners as well. This is just another fun way to use your punches on different sized greetings. I die cut out the Copper Foil leaves with the Stitched Seasons Framelits and added those around the center greeting!

Don’t forget that the Blended Seasons Stamp Set and coordinating Stitched Seasons Framelits are only available this month (August) and while supplies last so don’t wait long. You can check out more samples using it here and here! Click the photos below to shop for the items used in this card!

Happy Stampin’

~Laura
Product List


City of Bethlehem!!!

Posted on

Happy Monday!!! Awhile back I showed you this simple, all stamping card with the Night in Bethlehem Stamp Set! Today, I’m showing this City of Bethlehem “stepped up” card using the coordinating Bethlehem Framelits!!!

City of Bethlehem, www.LaurasStampPad.com

This card is just stunning with that double layer of the city but does require a little bit more work with using the Big Shot.

I started with a Night of Navy card base. Next, I cut two pieces of Whisper White measuring 4″ x 5-1/4″. One piece is for the front and the other is for the inside since Night of Navy is such a dark color so writing on white is better! Before adding the white to the front, I did all of the stamping. This way if I make a mistake I can flip it over or grab another piece. First, I die cut the two villages with the Bethlehem Framelits; one in Night of Navy and the other in Silver Foil Paper. I adhered the two together and then added Stampin’ Dimensionals on the back to add it to the card front.

Blessed Christmas Wishes, www.LaurasStampPad.com

Now for the stamping!! First, I stamped the star in Crushed Curry Ink and then the greeting in Night of Navy Ink. If you wish to stamp before adding the city, you can place it there as a guide, stamp, and then add it. Just go with whatever you are more comfortable with. Be sure that the greeting is low enough to add the ribbon! Next, I added this piece to the card front and tied the Night of Navy Crinkled Seam Binding around the card. To finish it off, I added some Rhinestones for a little more bling!!!

Assemble Bethlehem, www.LaurasStampPad.com

I did play around with this one for a while wondering what to add and my spacing. Mary and Joseph just looked so big in front of the city but I was trying to get them in there. I could have put the city up higher and it would have looked more “in the background” but I was happy with what I came up with. Do you ever have that where you spend forever trying to get the placement and idea to all come together?? Let me know in the comments below! Also, let me know if you prefer the simple stamped one or this stepped up version!!!

Happy Stampin’

~Laura

Product List


Embossed Champagne Foil Paper!!!

Posted on

When I first saw the Champagne Foil Paper I fell in love and then I embossed Champagne Foil Paper and my heart exploded!!! So simple but yet very stunning!

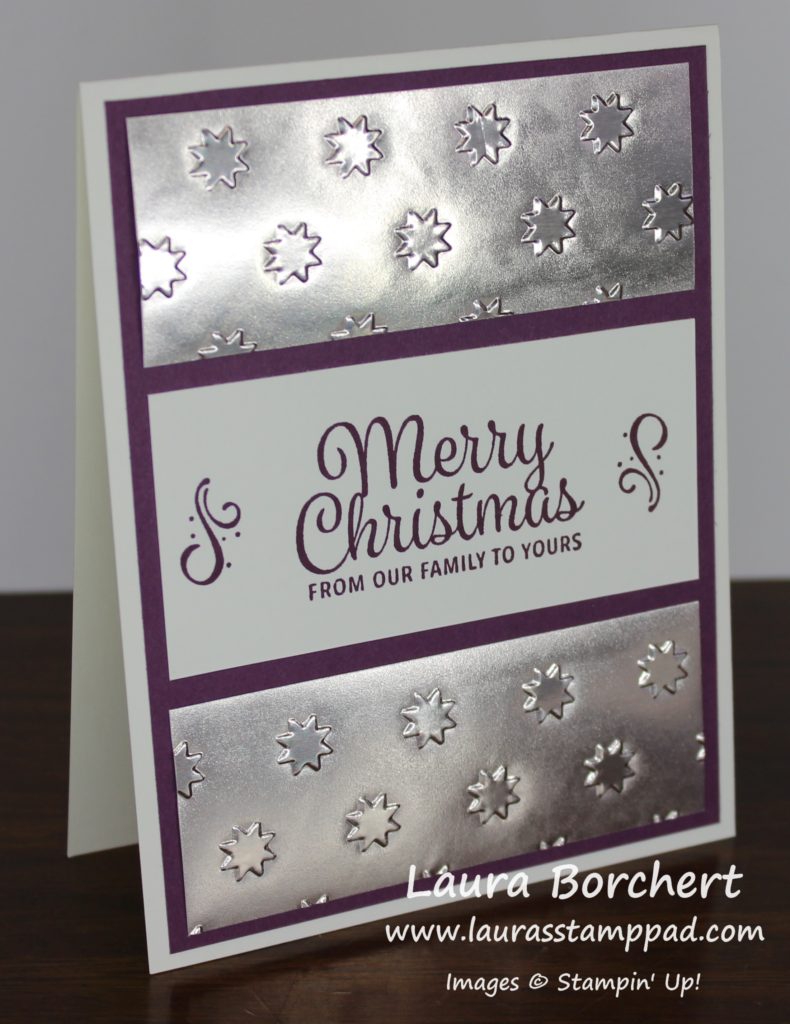
Embossed Champagne Foil Paper, www.LaurasStampPad.com

I love the colors of this card. That Fresh Fig is just stunning with the new Champagne Foil. (PS: I went to the University of Illinois in Champaign/Urbana and every time I type for this foil, I want to spell it Champaign. Gets me every time!!! So please forgive me if I happen to spell it that way at some point!)

I started with a piece of Very Vanilla (4-1/4″ x 11″) for a card base. Next, I cut a piece of Fresh Fig (4″ x 5-1/4″) and added it to the front. Then, I took 2 pieces of Champagne Foil measuring 1-1/2″ x  3-3/4″. Using the Big Shot, I ran them through in the Oh My Stars Embossing Folder. I added one to the top and one to the bottom of the card front. By placing these one first, I found that my spacing was better. Working towards the middle rather than top to bottom (or vice versa) helped with my spacing more.

For the greeting in the middle, I cut a piece of Very Vanilla measuring 1-3/4″ x 3-3/4″.  Using the Snowflake Sentiments Stamp Set, I stamped the greeting in Fresh Fig Ink. Then using the little scroll, I stamped one up and one down to border the greeting!

This card is super simple and easy to duplicate this season. You can actually emboss 3 of those pieces of foil in the folder each crank through. So that means 2 cranks through the Big Shot for 3 cards! I’m all about getting the most out of each crank. Time is not on our side during this time of year so making the most of it is best. Am I right?? 🙂

Happy Stampin’

~Laura

Product List


Technique Tuesday – Adding a Foil Border!!!

Posted on

Happy Tuesday!!! That means  I have a fabulous technique for you today….or in this case, it is kind of like a hack! Adding a foil border to your project with the Year of Cheer Designer Washi Tape is simple, less layers than adding foil paper, and more cost effective!!! Woot Woot!

Adding a Foil Border, www.LaurasStampPad.com

Isn’t this card just stunning and perfect for any Fall occasion?!?!? It was super simple using the Washi Tape rather than cutting a large piece of Foil Paper to cover up most and just allow the border!

I started with a Crumb Cake card base. Next, I took a piece of Always Artichoke (5-1/2″ x 2″) and placed it on my card front. You can go ahead and adhere it down and place the Washi Tape next to it or simple place it there as a guide and then add it later. Add a strip of the Copper Washi Tape from the Year of Cheer Washi Tape Pack on the top and bottom. Then you can add the strip of green if you haven’t already.

For the leaves, I stamped 2 of them on Very Vanilla squares measuring 1-3/4″ x 1-3/4″ from the Colorful Seasons Stamp Set. I used Cajun Craze Ink and Cherry Cobbler Ink. Be sure to stamp off once on the solid image and then go full strength on the outline image. The center leaf was die cut with the coordinating Seasonal Layers Framelits from Copper Foil Paper. I used the Fine Tip Glue Pen to adhere it. When placing the squares onto the card front, I started with the outside ones making them flush with the edge of the card. Then I added the center one. To finish off the card, I added the greeting at the bottom in Early Espresso Ink!

You can purchase the Colorful Seasons Stamp Set at 15% off with the World Card Making Day Special going on till October 10th! Be sure to check out those deals here as well as the Buy 3, Get 1 Free Designer Series Paper Special here.

If you would like to see this in action, check out the Video Tutorial below or click here! Be sure to give the video a thumbs up if you liked it and don’t forget to subscribe if you are new. If you would like a notification when I post a new video, be sure to click the bell right next to the subscribe!!!

Happy Stampin’

~Laura

Product List