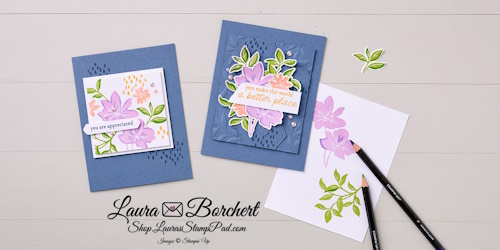
It’s hot out there and everyone is looking for things to do inside in the middle of the afternoon! Here is a fun new technique you can try and it’s perfect for summer! This ombre dip dye technique looks like a popsicle to me!!! Check it out!
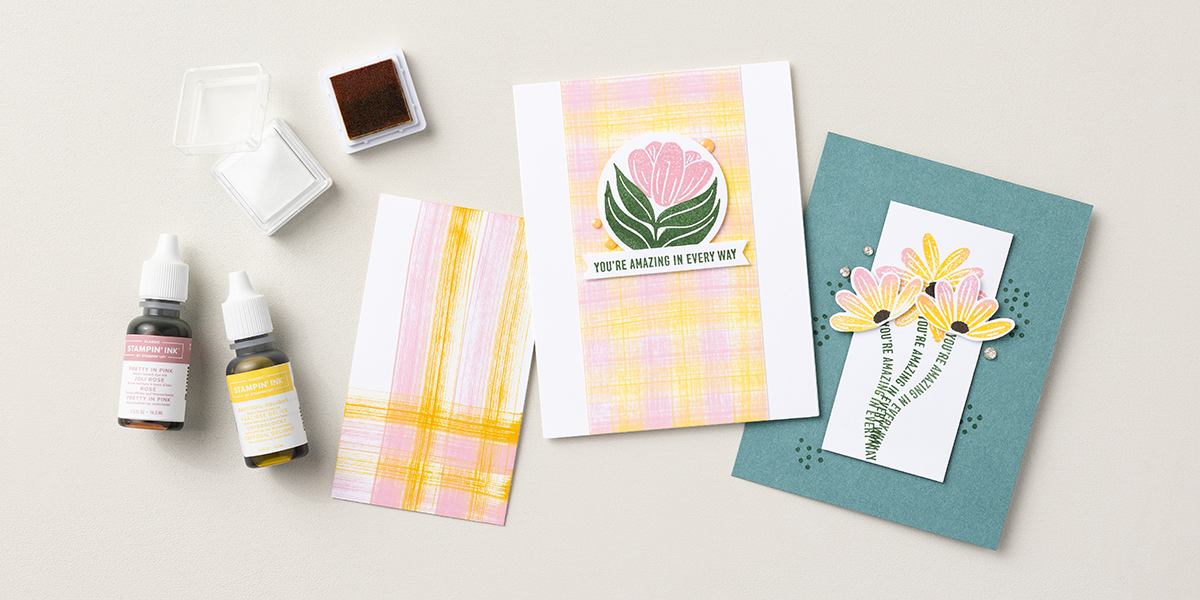
Step 1 – Add 30–40 drops of ink refill to approximately 32 ounces of water and stir. Tear a piece of watercolor paper along the bottom, dip it in color, and then hold it in place for 30–60 seconds. Let the paper air dry (or dry on a low setting using the Heat Tool to speed things up)!
Step 2 – Add 10–15 more drops of ink and stir. Dip the paper again, but not quite as far as the first time so that you can that lighter to dark ombre look! Allow it to dry or use your Heat Tool again! Dip tip: tilt your paper to one side when dipping for added interest.
Step 3 – Add another 10–15 drops of ink to your water and stir. Dip the final section—but this time, only submerge it a little. Dip tip: tilt your paper in the opposite direction for interest. Allow to dry or use your Heat Tool!
Now you have a fun piece to add to any project! This would be fun to do with so many different colors and even possibly different colors. I’m thinking yellow, orange and red for a beautiful sunset perhaps! 🙂 Give this Ombre Dip Dye technique next time you are crafting! Come back and let me know in the comments what color you used!!!
Happy Stampin’
~Laura
Product List![Heirloom Boutique Bundle (English) [ 167731 ]](https://assets1.tamsnetwork.com/images/EC042017NF/167731s.jpg "Heirloom Boutique Bundle (English) [ 167731 ]")
![Daffodil Delight Classic Stampin' Pad [ 147094 ]](https://assets1.tamsnetwork.com/images/EC042017NF/147094s.jpg "Daffodil Delight Classic Stampin' Pad [ 147094 ]")
![Lemon Lime Twist Classic Stampin' Pad [ 147145 ]](https://assets1.tamsnetwork.com/images/EC042017NF/147145s.jpg "Lemon Lime Twist Classic Stampin' Pad [ 147145 ]")
![Old Olive Classic Stampin' Pad [ 147090 ]](https://assets1.tamsnetwork.com/images/EC042017NF/147090s.jpg "Old Olive Classic Stampin' Pad [ 147090 ]")
![Timid Tiger Classic Stampin' Pad [ 165278 ]](https://assets1.tamsnetwork.com/images/EC042017NF/165278s.jpg "Timid Tiger Classic Stampin' Pad [ 165278 ]")
![Berry Burst Classic Stampin' Ink Refill [ 144089 ]](https://assets1.tamsnetwork.com/images/EC042017NF/144089s.jpg "Berry Burst Classic Stampin' Ink Refill [ 144089 ]")
![Berry Burst 8-1/2" X 11" Cardstock [ 144243 ]](https://assets1.tamsnetwork.com/images/EC042017NF/144243s.jpg "Berry Burst 8-1/2\" X 11\" Cardstock [ 144243 ]")
![Brights Painted Patterns 12" X 12" (30.5 X 30.5 Cm) Designer Series Paper [ 167754 ]](https://assets1.tamsnetwork.com/images/EC042017NF/167754s.jpg "Brights Painted Patterns 12\" X 12\" (30.5 X 30.5 Cm) Designer Series Paper [ 167754 ]")
![Gold Foil Sheets [ 132622 ]](https://assets1.tamsnetwork.com/images/EC042017NF/132622s.jpg "Gold Foil Sheets [ 132622 ]")
![Water Painters [ 168253 ]](https://assets1.tamsnetwork.com/images/EC042017NF/168253s.jpg "Water Painters [ 168253 ]")
![Dreamy Flowers [ 167916 ]](https://assets1.tamsnetwork.com/images/EC042017NF/167916s.jpg "Dreamy Flowers [ 167916 ]")
![Words & Wishes Dies (English) [ 167894 ]](https://assets1.tamsnetwork.com/images/EC042017NF/167894s.jpg "Words & Wishes Dies (English) [ 167894 ]")
![Heat Tool (Us And Canada) [ 129053 ]](https://assets1.tamsnetwork.com/images/EC042017NF/129053s.jpg "Heat Tool (Us And Canada) [ 129053 ]")
![Stampin' Spritzer [ 126185 ]](https://assets1.tamsnetwork.com/images/EC042017NF/126185s.jpg "Stampin' Spritzer [ 126185 ]")
![Fluid 100 Watercolor Paper [ 149612 ]](https://assets1.tamsnetwork.com/images/EC042017NF/149612s.jpg "Fluid 100 Watercolor Paper [ 149612 ]")
![Flirty Flamingo Classic Stampin' Pad [ 147052 ]](https://assets1.tamsnetwork.com/images/EC042017NF/147052s.jpg "Flirty Flamingo Classic Stampin' Pad [ 147052 ]")
![Flirty Flamingo 8-1/2" X 11" Cardstock [ 141416 ]](https://assets1.tamsnetwork.com/images/EC042017NF/141416s.jpg "Flirty Flamingo 8-1/2\" X 11\" Cardstock [ 141416 ]")
![Secret Sea Classic Stampin' Pad [ 165285 ]](https://assets1.tamsnetwork.com/images/EC042017NF/165285s.jpg "Secret Sea Classic Stampin' Pad [ 165285 ]")
![Thoughtful Octopus Photopolymer Stamp Set (English) [ 167955 ]](https://assets1.tamsnetwork.com/images/EC042017NF/167955s.jpg "Thoughtful Octopus Photopolymer Stamp Set (English) [ 167955 ]")
![Everyday Arches Dies [ 164629 ]](https://assets1.tamsnetwork.com/images/EC042017NF/164629s.jpg "Everyday Arches Dies [ 164629 ]")
![Timid Tiger 8 1/2" X 11" Cardstock [ 165626 ]](https://assets1.tamsnetwork.com/images/EC042017NF/165626s.jpg "Timid Tiger 8 1/2\" X 11\" Cardstock [ 165626 ]")
![Stampin' Dimensionals [ 104430 ]](https://assets1.tamsnetwork.com/images/EC042017NF/104430s.jpg "Stampin' Dimensionals [ 104430 ]")
![Azure Afternoon Classic Stampin' Ink Refill [ 161668 ]](https://assets1.tamsnetwork.com/images/EC042017NF/161668s.jpg "Azure Afternoon Classic Stampin' Ink Refill [ 161668 ]")
![Peaceful Pine Shimmer Brush [ 167665 ]](https://assets1.tamsnetwork.com/images/EC042017NF/167665s.jpg "Peaceful Pine Shimmer Brush [ 167665 ]")
![Golden Glow Shimmer Brush [ 167662 ]](https://assets1.tamsnetwork.com/images/EC042017NF/167662s.jpg "Golden Glow Shimmer Brush [ 167662 ]")
![Barely Blush Shimmer Brush [ 167664 ]](https://assets1.tamsnetwork.com/images/EC042017NF/167664s.jpg "Barely Blush Shimmer Brush [ 167664 ]")
![Hydrangea Hue Shimmer Brush [ 167663 ]](https://assets1.tamsnetwork.com/images/EC042017NF/167663s.jpg "Hydrangea Hue Shimmer Brush [ 167663 ]")
![Crisp Cantaloupe Shimmer Brush [ 167661 ]](https://assets1.tamsnetwork.com/images/EC042017NF/167661s.jpg "Crisp Cantaloupe Shimmer Brush [ 167661 ]")
![Just Peachy Photopolymer Stamp Set (English) [ 167965 ]](https://assets1.tamsnetwork.com/images/EC042017NF/167965s.jpg "Just Peachy Photopolymer Stamp Set (English) [ 167965 ]")
![Basic White 8 1/2" X 11" Cardstock [ 166780 ]](https://assets1.tamsnetwork.com/images/EC042017NF/166780s.jpg "Basic White 8 1/2\" X 11\" Cardstock [ 166780 ]")
![Golden Glow 12" X 12" (30.5 X 30.5 Cm) Two Tone Cardstock [ 167695 ]](https://assets1.tamsnetwork.com/images/EC042017NF/167695s.jpg "Golden Glow 12\" X 12\" (30.5 X 30.5 Cm) Two Tone Cardstock [ 167695 ]")
![White Stampin' Emboss Powder [ 109132 ]](https://assets1.tamsnetwork.com/images/EC042017NF/109132s.jpg "White Stampin' Emboss Powder [ 109132 ]")
![Sweet Bugs Photopolymer Stamp Set (English) [ 166995 ]](https://assets1.tamsnetwork.com/images/EC042017NF/166995s.jpg "Sweet Bugs Photopolymer Stamp Set (English) [ 166995 ]")
![Endless Love Dies [ 167061 ]](https://assets1.tamsnetwork.com/images/EC042017NF/167061s.jpg "Endless Love Dies [ 167061 ]")
![Cute As A Bug 12" X 12" (30.5 X 30.5 Cm) Designer Series Paper [ 166994 ]](https://assets1.tamsnetwork.com/images/EC042017NF/166994s.jpg "Cute As A Bug 12\" X 12\" (30.5 X 30.5 Cm) Designer Series Paper [ 166994 ]")
![Old Olive 8-1/2" X 11" Cardstock [ 100702 ]](https://assets1.tamsnetwork.com/images/EC042017NF/100702s.jpg "Old Olive 8-1/2\" X 11\" Cardstock [ 100702 ]")
![Petal Pink 8-1/2" X 11" Cardstock [ 146985 ]](https://assets1.tamsnetwork.com/images/EC042017NF/146985s.jpg "Petal Pink 8-1/2\" X 11\" Cardstock [ 146985 ]")
![Basic Black Hybrid Stampin' Pad [ 166648 ]](https://assets1.tamsnetwork.com/images/EC042017NF/166648s.jpg "Basic Black Hybrid Stampin' Pad [ 166648 ]")
![Versamark Pad [ 102283 ]](https://assets1.tamsnetwork.com/images/EC042017NF/102283s.jpg "Versamark Pad [ 102283 ]")
![Cloud Cover Stampin’ Blends Combo Pack [ 165287 ]](https://assets1.tamsnetwork.com/images/EC042017NF/165287s.jpg "Cloud Cover Stampin’ Blends Combo Pack [ 165287 ]")
![Lemon Lolly Stampin’ Blends Combo Pack [ 161673 ]](https://assets1.tamsnetwork.com/images/EC042017NF/161673s.jpg "Lemon Lolly Stampin’ Blends Combo Pack [ 161673 ]")
![Petal Pink Stampin' Blends Combo Pack [ 154893 ]](https://assets1.tamsnetwork.com/images/EC042017NF/154893s.jpg "Petal Pink Stampin' Blends Combo Pack [ 154893 ]")
![Pool Party Stampin' Blends Combo Pack [ 154894 ]](https://assets1.tamsnetwork.com/images/EC042017NF/154894s.jpg "Pool Party Stampin' Blends Combo Pack [ 154894 ]")
![Basics Wow! Embossing Powder [ 165679 ]](https://assets1.tamsnetwork.com/images/EC042017NF/165679s.jpg "Basics Wow! Embossing Powder [ 165679 ]")
![Silicone Craft Sheet [ 127853 ]](https://assets1.tamsnetwork.com/images/EC042017NF/127853s.jpg "Silicone Craft Sheet [ 127853 ]")
![Paradise Garden Bundle (English) [ 167121 ]](https://assets1.tamsnetwork.com/images/EC042017NF/167121s.jpg "Paradise Garden Bundle (English) [ 167121 ]")
![Misty Moonlight 8-1/2" X 11" Cardstock [ 153081 ]](https://assets1.tamsnetwork.com/images/EC042017NF/153081s.jpg "Misty Moonlight 8-1/2\" X 11\" Cardstock [ 153081 ]")
![Crushed Curry Classic Stampin' Pad [ 147087 ]](https://assets1.tamsnetwork.com/images/EC042017NF/147087s.jpg "Crushed Curry Classic Stampin' Pad [ 147087 ]")
![Fresh Freesia Classic Stampin' Pad [ 155611 ]](https://assets1.tamsnetwork.com/images/EC042017NF/155611s.jpg "Fresh Freesia Classic Stampin' Pad [ 155611 ]")
![Granny Apple Green Stampin' Pad [ 147095 ]](https://assets1.tamsnetwork.com/images/EC042017NF/147095s.jpg "Granny Apple Green Stampin' Pad [ 147095 ]")
![Misty Moonlight Classic Stampin' Pad [ 153118 ]](https://assets1.tamsnetwork.com/images/EC042017NF/153118s.jpg "Misty Moonlight Classic Stampin' Pad [ 153118 ]")
![Petal Pink Classic Stampin' Pad [ 147108 ]](https://assets1.tamsnetwork.com/images/EC042017NF/147108s.jpg "Petal Pink Classic Stampin' Pad [ 147108 ]")
![Watercolor Pencils Assortment 2 [ 149014 ]](https://assets1.tamsnetwork.com/images/EC042017NF/149014s.jpg "Watercolor Pencils Assortment 2 [ 149014 ]")
![Pearlized Faceted Circles [ 166978 ]](https://assets1.tamsnetwork.com/images/EC042017NF/166978s.jpg "Pearlized Faceted Circles [ 166978 ]")
![Filled With Sweetness Photopolymer Stamp Set (English) [ 167469 ]](https://assets1.tamsnetwork.com/images/EC042017NF/167469s.jpg "Filled With Sweetness Photopolymer Stamp Set (English) [ 167469 ]")
![Simple Alphabet Photopolymer Stamp Set [ 167541 ]](https://assets1.tamsnetwork.com/images/EC042017NF/167541s.jpg "Simple Alphabet Photopolymer Stamp Set [ 167541 ]")
![Homemade Sweetness Designer Series Paper & Sticker Sheet (English) [ 167496 ]](https://assets1.tamsnetwork.com/images/EC042017NF/167496s.jpg "Homemade Sweetness Designer Series Paper & Sticker Sheet (English) [ 167496 ]")
![Daffodil Delight 12" X 12" (30.5 X 30.5 Cm) Two Tone Cardstock [ 166669 ]](https://assets1.tamsnetwork.com/images/EC042017NF/166669s.jpg "Daffodil Delight 12\" X 12\" (30.5 X 30.5 Cm) Two Tone Cardstock [ 166669 ]")
![Joyful Squares Bundle (English) [ 166850 ]](https://assets1.tamsnetwork.com/images/EC042017NF/166850s.jpg "Joyful Squares Bundle (English) [ 166850 ]")
![Stylish Shapes Dies [ 159183 ]](https://assets1.tamsnetwork.com/images/EC042017NF/159183s.jpg "Stylish Shapes Dies [ 159183 ]")
![Beautiful Gallery 6" X 6" (15.2 X 15.2 Cm) Designer Series Paper [ 165196 ]](https://assets1.tamsnetwork.com/images/EC042017NF/165196s.jpg "Beautiful Gallery 6\" X 6\" (15.2 X 15.2 Cm) Designer Series Paper [ 165196 ]")
![Very Vanilla 8 1/2" X 11" Cardstock [ 166784 ]](https://assets1.tamsnetwork.com/images/EC042017NF/166784s.jpg "Very Vanilla 8 1/2\" X 11\" Cardstock [ 166784 ]")
![Metallics Wow! Embossing Powder [ 165678 ]](https://assets1.tamsnetwork.com/images/EC042017NF/165678s.jpg "Metallics Wow! Embossing Powder [ 165678 ]")
![Linen Thread [ 104199 ]](https://assets1.tamsnetwork.com/images/EC042017NF/104199s.jpg "Linen Thread [ 104199 ]")
![Adhesive Backed Metallic Gems [ 163780 ]](https://assets1.tamsnetwork.com/images/EC042017NF/163780s.jpg "Adhesive Backed Metallic Gems [ 163780 ]")
![Beautifully Celebrated Bundle (English) [ 166975 ]](https://assets1.tamsnetwork.com/images/EC042017NF/166975s.jpg "Beautifully Celebrated Bundle (English) [ 166975 ]")
![Gears & Textures Photopolymer Stamp Set [ 166851 ]](https://assets1.tamsnetwork.com/images/EC042017NF/166851s.jpg "Gears & Textures Photopolymer Stamp Set [ 166851 ]")
![Bubble Bath 8 1/2" X 11" Cardstock [ 161718 ]](https://assets1.tamsnetwork.com/images/EC042017NF/161718s.jpg "Bubble Bath 8 1/2\" X 11\" Cardstock [ 161718 ]")
![Pretty In Pink Classic Stampin Pad [ 163807 ]](https://assets1.tamsnetwork.com/images/EC042017NF/163807s.jpg "Pretty In Pink Classic Stampin Pad [ 163807 ]")
![Gray Granite Classic Stampin' Pad [ 147118 ]](https://assets1.tamsnetwork.com/images/EC042017NF/147118s.jpg "Gray Granite Classic Stampin' Pad [ 147118 ]")
![Bubble Bath Classic Stampin' Pad [ 161664 ]](https://assets1.tamsnetwork.com/images/EC042017NF/161664s.jpg "Bubble Bath Classic Stampin' Pad [ 161664 ]")
![Shaded Spruce Classic Stampin' Pad [ 147088 ]](https://assets1.tamsnetwork.com/images/EC042017NF/147088s.jpg "Shaded Spruce Classic Stampin' Pad [ 147088 ]")
![Basics Embossing Powders [ 155554 ]](https://assets1.tamsnetwork.com/images/EC042017NF/155554s.jpg "Basics Embossing Powders [ 155554 ]")
![Shy Shamrock Stampin’ Blends Combo Pack [ 163825 ]](https://assets1.tamsnetwork.com/images/EC042017NF/163825s.jpg "Shy Shamrock Stampin’ Blends Combo Pack [ 163825 ]")
![Baker's Twine Essentials Pack [ 155475 ]](https://assets1.tamsnetwork.com/images/EC042017NF/155475s.jpg "Baker's Twine Essentials Pack [ 155475 ]")
![A Round Of Hellos Photopolymer Stamp Set (English) [ 167227 ]](https://assets1.tamsnetwork.com/images/EC042017NF/167227s.jpg "A Round Of Hellos Photopolymer Stamp Set (English) [ 167227 ]")
![Garden Green Classic Stampin' Pad [ 147089 ]](https://assets1.tamsnetwork.com/images/EC042017NF/147089s.jpg "Garden Green Classic Stampin' Pad [ 147089 ]")
![Daffodil Delight Classic Stampin' Ink Refill [ 119672 ]](https://assets1.tamsnetwork.com/images/EC042017NF/119672s.jpg "Daffodil Delight Classic Stampin' Ink Refill [ 119672 ]")
![Pretty In Pink Classic Stampin’ Ink Refill [ 163816 ]](https://assets1.tamsnetwork.com/images/EC042017NF/163816s.jpg "Pretty In Pink Classic Stampin’ Ink Refill [ 163816 ]")
![Uninked Stampin' Spots [ 141822 ]](https://assets1.tamsnetwork.com/images/EC042017NF/141822s.jpg "Uninked Stampin' Spots [ 141822 ]")
![2" (5.1 Cm) Circle Punch [ 133782 ]](https://assets1.tamsnetwork.com/images/EC042017NF/133782s.jpg "2\" (5.1 Cm) Circle Punch [ 133782 ]")
![2024 2026 In Color™ Flat Pearls [ 165266 ]](https://assets1.tamsnetwork.com/images/EC042017NF/165266s.jpg "2024 2026 In Color™ Flat Pearls [ 165266 ]")

![Loveliest Tree Cling Stamp Set (English) [ 163714 ]](https://assets1.tamsnetwork.com/images/EC042017NF/163714s.jpg "Loveliest Tree Cling Stamp Set (English) [ 163714 ]")
![Peaceful View Cling Stamp Set [ 165310 ]](https://assets1.tamsnetwork.com/images/EC042017NF/165310s.jpg "Peaceful View Cling Stamp Set [ 165310 ]")
![Forever Plaid 3 D Embossing Folder [ 164049 ]](https://assets1.tamsnetwork.com/images/EC042017NF/164049s.jpg "Forever Plaid 3 D Embossing Folder [ 164049 ]")
![1 7/8" (4.8 Cm) Circle Punch [ 165259 ]](https://assets1.tamsnetwork.com/images/EC042017NF/165259s.jpg "1 7/8\" (4.8 Cm) Circle Punch [ 165259 ]")
![Cloud Cover 8 1/2" X 11" Cardstock [ 165621 ]](https://assets1.tamsnetwork.com/images/EC042017NF/165621s.jpg "Cloud Cover 8 1/2\" X 11\" Cardstock [ 165621 ]")
![Mossy Meadow 8-1/2" X 11" Cardstock [ 133676 ]](https://assets1.tamsnetwork.com/images/EC042017NF/133676s.jpg "Mossy Meadow 8-1/2\" X 11\" Cardstock [ 133676 ]")
![Pecan Pie 8 1/2" X 11" Cardstock [ 161717 ]](https://assets1.tamsnetwork.com/images/EC042017NF/161717s.jpg "Pecan Pie 8 1/2\" X 11\" Cardstock [ 161717 ]")
![Pecan Pie Classic Stampin' Pad [ 161665 ]](https://assets1.tamsnetwork.com/images/EC042017NF/161665s.jpg "Pecan Pie Classic Stampin' Pad [ 161665 ]")
![2025–2027 In Color™ Flat Pearls [ 165192 ]](https://assets1.tamsnetwork.com/images/EC042017NF/165192s.jpg "2025–2027 In Color™ Flat Pearls [ 165192 ]")