The July 2026 Paper Pumpkin Kit was called Hooray for Birthdays and they were pop up cards! Sooooo fabulous and perfect to send to someone so they can display it all month long!!! Wondering what Paper Pumpkin is? It is a monthly subscription kit with a craft project and everything needed to create it all in a fabulous box. These kits are typically cards but sometimes include treat boxes, home decor, etc.
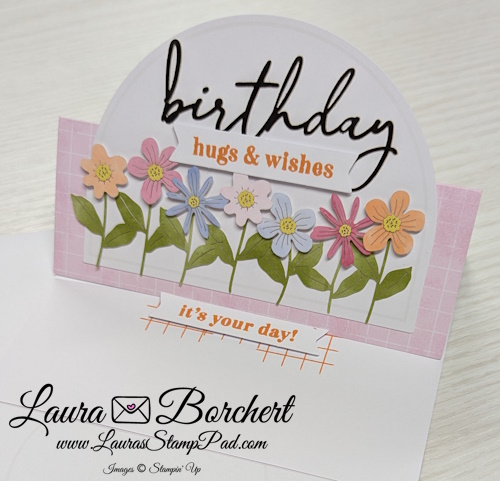
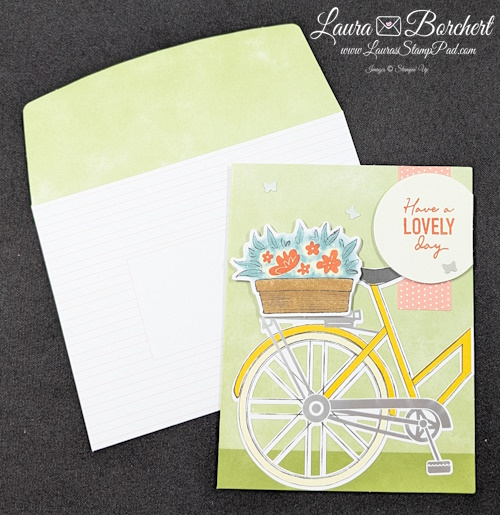
This card is probably my favorite because I just love all of the little flowers! I couldn’t believe at how much of a difference that little yellow center made to the look of the flowers! Stunning without it and WOWZA with it! This card was the first one Claire and I created and it did take some time sorting out which flowers went with which card!
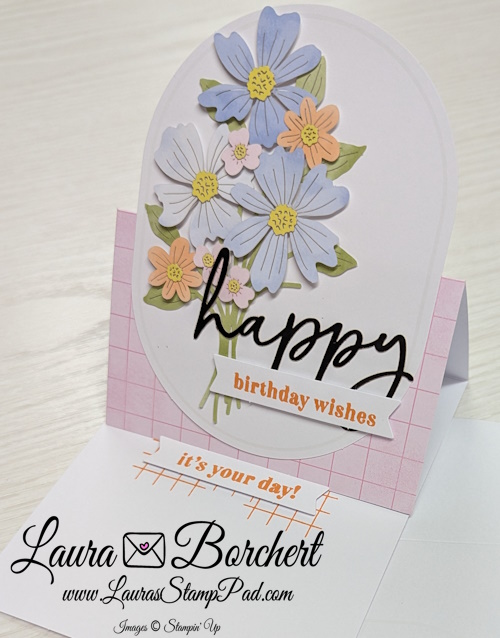
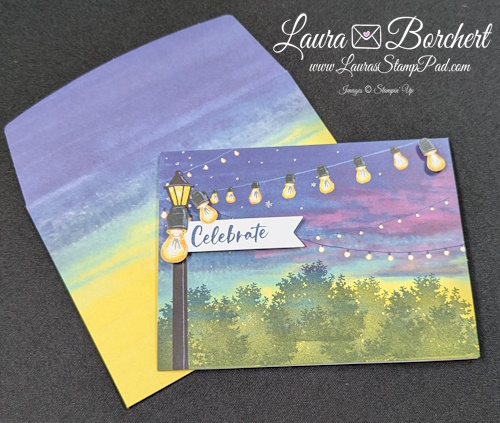
This card is my second favorite! I love the blues and bouquet look of the flowers! I will say my biggest tip is to place the bouquet stems on the card on the far left side and then add the Happy greeting! This will ensure you have enough room for the greeting and won’t get into the flowers like I did!

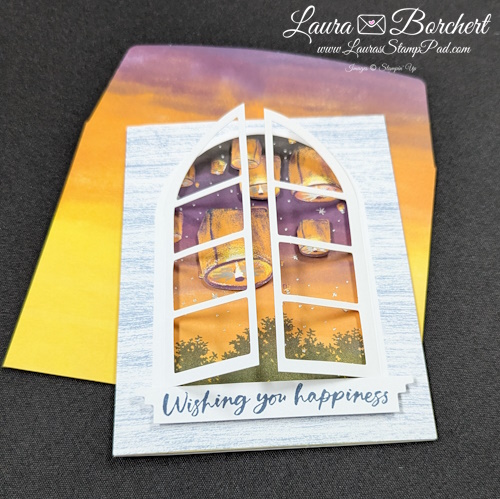
Even though this is the last card, I still loved it!!! My biggest tip for this one is to place the Hooray down first in order to help with spacing! It was tight as I did the flowers first! Another funny thing about these cards is that because they are a pop up card with the inside greeting holding it up, getting that inside greeting straight is more important. I just popped mine in like I always do and then I finished the card and popped it up and you can see it’s a hint off if your greeting is crooked! LOL Handmade with love, not perfection!
Which card was your favorite card from the July 2026 Hooray for Birthdays Kit?!?
If you want to join the Paper Pumpkin fun, click here to get signed up! As a new subscriber, you can give it a try for 25% off! Woot Woot!!!
Happy Stampin’
~Laura
![Heirloom Boutique Bundle (English) [ 167731 ]](https://assets1.tamsnetwork.com/images/EC042017NF/167731s.jpg "Heirloom Boutique Bundle (English) [ 167731 ]")
![Daffodil Delight Classic Stampin' Pad [ 147094 ]](https://assets1.tamsnetwork.com/images/EC042017NF/147094s.jpg "Daffodil Delight Classic Stampin' Pad [ 147094 ]")
![Lemon Lime Twist Classic Stampin' Pad [ 147145 ]](https://assets1.tamsnetwork.com/images/EC042017NF/147145s.jpg "Lemon Lime Twist Classic Stampin' Pad [ 147145 ]")
![Old Olive Classic Stampin' Pad [ 147090 ]](https://assets1.tamsnetwork.com/images/EC042017NF/147090s.jpg "Old Olive Classic Stampin' Pad [ 147090 ]")
![Timid Tiger Classic Stampin' Pad [ 165278 ]](https://assets1.tamsnetwork.com/images/EC042017NF/165278s.jpg "Timid Tiger Classic Stampin' Pad [ 165278 ]")
![Berry Burst Classic Stampin' Ink Refill [ 144089 ]](https://assets1.tamsnetwork.com/images/EC042017NF/144089s.jpg "Berry Burst Classic Stampin' Ink Refill [ 144089 ]")
![Berry Burst 8-1/2" X 11" Cardstock [ 144243 ]](https://assets1.tamsnetwork.com/images/EC042017NF/144243s.jpg "Berry Burst 8-1/2\" X 11\" Cardstock [ 144243 ]")
![Brights Painted Patterns 12" X 12" (30.5 X 30.5 Cm) Designer Series Paper [ 167754 ]](https://assets1.tamsnetwork.com/images/EC042017NF/167754s.jpg "Brights Painted Patterns 12\" X 12\" (30.5 X 30.5 Cm) Designer Series Paper [ 167754 ]")
![Gold Foil Sheets [ 132622 ]](https://assets1.tamsnetwork.com/images/EC042017NF/132622s.jpg "Gold Foil Sheets [ 132622 ]")
![Water Painters [ 168253 ]](https://assets1.tamsnetwork.com/images/EC042017NF/168253s.jpg "Water Painters [ 168253 ]")
![Dreamy Flowers [ 167916 ]](https://assets1.tamsnetwork.com/images/EC042017NF/167916s.jpg "Dreamy Flowers [ 167916 ]")
![Words & Wishes Dies (English) [ 167894 ]](https://assets1.tamsnetwork.com/images/EC042017NF/167894s.jpg "Words & Wishes Dies (English) [ 167894 ]")
![Heat Tool (Us And Canada) [ 129053 ]](https://assets1.tamsnetwork.com/images/EC042017NF/129053s.jpg "Heat Tool (Us And Canada) [ 129053 ]")
![Stampin' Spritzer [ 126185 ]](https://assets1.tamsnetwork.com/images/EC042017NF/126185s.jpg "Stampin' Spritzer [ 126185 ]")
![Fluid 100 Watercolor Paper [ 149612 ]](https://assets1.tamsnetwork.com/images/EC042017NF/149612s.jpg "Fluid 100 Watercolor Paper [ 149612 ]")
![Flirty Flamingo Classic Stampin' Pad [ 147052 ]](https://assets1.tamsnetwork.com/images/EC042017NF/147052s.jpg "Flirty Flamingo Classic Stampin' Pad [ 147052 ]")
![Flirty Flamingo 8-1/2" X 11" Cardstock [ 141416 ]](https://assets1.tamsnetwork.com/images/EC042017NF/141416s.jpg "Flirty Flamingo 8-1/2\" X 11\" Cardstock [ 141416 ]")
![Secret Sea Classic Stampin' Pad [ 165285 ]](https://assets1.tamsnetwork.com/images/EC042017NF/165285s.jpg "Secret Sea Classic Stampin' Pad [ 165285 ]")
![Thoughtful Octopus Photopolymer Stamp Set (English) [ 167955 ]](https://assets1.tamsnetwork.com/images/EC042017NF/167955s.jpg "Thoughtful Octopus Photopolymer Stamp Set (English) [ 167955 ]")
![Everyday Arches Dies [ 164629 ]](https://assets1.tamsnetwork.com/images/EC042017NF/164629s.jpg "Everyday Arches Dies [ 164629 ]")
![Timid Tiger 8 1/2" X 11" Cardstock [ 165626 ]](https://assets1.tamsnetwork.com/images/EC042017NF/165626s.jpg "Timid Tiger 8 1/2\" X 11\" Cardstock [ 165626 ]")
![Stampin' Dimensionals [ 104430 ]](https://assets1.tamsnetwork.com/images/EC042017NF/104430s.jpg "Stampin' Dimensionals [ 104430 ]")
![Azure Afternoon Classic Stampin' Ink Refill [ 161668 ]](https://assets1.tamsnetwork.com/images/EC042017NF/161668s.jpg "Azure Afternoon Classic Stampin' Ink Refill [ 161668 ]")
![Peaceful Pine Shimmer Brush [ 167665 ]](https://assets1.tamsnetwork.com/images/EC042017NF/167665s.jpg "Peaceful Pine Shimmer Brush [ 167665 ]")
![Golden Glow Shimmer Brush [ 167662 ]](https://assets1.tamsnetwork.com/images/EC042017NF/167662s.jpg "Golden Glow Shimmer Brush [ 167662 ]")
![Barely Blush Shimmer Brush [ 167664 ]](https://assets1.tamsnetwork.com/images/EC042017NF/167664s.jpg "Barely Blush Shimmer Brush [ 167664 ]")
![Hydrangea Hue Shimmer Brush [ 167663 ]](https://assets1.tamsnetwork.com/images/EC042017NF/167663s.jpg "Hydrangea Hue Shimmer Brush [ 167663 ]")
![Crisp Cantaloupe Shimmer Brush [ 167661 ]](https://assets1.tamsnetwork.com/images/EC042017NF/167661s.jpg "Crisp Cantaloupe Shimmer Brush [ 167661 ]")
![Just Peachy Photopolymer Stamp Set (English) [ 167965 ]](https://assets1.tamsnetwork.com/images/EC042017NF/167965s.jpg "Just Peachy Photopolymer Stamp Set (English) [ 167965 ]")
![Basic White 8 1/2" X 11" Cardstock [ 166780 ]](https://assets1.tamsnetwork.com/images/EC042017NF/166780s.jpg "Basic White 8 1/2\" X 11\" Cardstock [ 166780 ]")
![Golden Glow 12" X 12" (30.5 X 30.5 Cm) Two Tone Cardstock [ 167695 ]](https://assets1.tamsnetwork.com/images/EC042017NF/167695s.jpg "Golden Glow 12\" X 12\" (30.5 X 30.5 Cm) Two Tone Cardstock [ 167695 ]")
![White Stampin' Emboss Powder [ 109132 ]](https://assets1.tamsnetwork.com/images/EC042017NF/109132s.jpg "White Stampin' Emboss Powder [ 109132 ]")
![Heirloom Boutique Scrapbooking Workshop Kit (English) [ 167723 ]](https://assets1.tamsnetwork.com/images/EC042017NF/167723s.jpg "Heirloom Boutique Scrapbooking Workshop Kit (English) [ 167723 ]")
![Made With Sweetness Scrapbooking Workshop Kit (English) [ 167484 ]](https://assets1.tamsnetwork.com/images/EC042017NF/167484s.jpg "Made With Sweetness Scrapbooking Workshop Kit (English) [ 167484 ]")
![Life In Bloom Scrapbooking Workshop Kit (English) [ 167862 ]](https://assets1.tamsnetwork.com/images/EC042017NF/167862s.jpg "Life In Bloom Scrapbooking Workshop Kit (English) [ 167862 ]")