Beary Merry Christmas!!!

Posted on

beary merry christmas, www.LaurasStampPad.com

This may not look like the traditional Christmas card but it sure does feel warm, cozy, and full of love. That is what a card is suppose to be anyway, isn’t it??? How precious!!!!

I started with a Crumb Cake card base and added a strip of Candy Cane Lane Designer Series Paper (1-1/2″ x 5-1/2″). I cut a piece of Very Vanilla cardstock measuring 2″ x 3″ and stamped the teddy bear (body and ears) from the Cookie Cutter Christmas Stamp Set in Crumb Cake Ink. This image is very solid and you might find that you don’t get a nice solid image. The image in the sample above even has a few spots on the top side of the teddy’s head. I stamped the face in Basic Black. If you are getting this, ink it up, stamp it off onto scrap paper a few times and then repeat 2-3 more times. This will help roughen it up a little and then you should get a nice clean, solid look. I punched out the heart from the coordinating punch – Cookie Cutter Builder Punch (Bundle & Save 10%). I used a little dab of the Fine Tip Glue Pen to adhere the heart. I took a Delicate White Doily and but it into 3 pieces (like a pie piece). Just add one of these pieces to the left side of the teddy bear rectangle. Then I added this to the middle of the card with Stampin’ Dimensionals. For the greeting, I cut a Real Red strip (1″ x 3-1/2″) and a Very Vanilla strip (3/4″ x 3-1/2″). I added banner tips to the ends of both of them and added the red strip to the card front with Snail Adhesive. I stamped the greeting from the Cookie Cutter Christmas Stamp Set in Real Red Ink and added it to the card front as well. Simple, fabulous and uses up lots of little scraps you have saved….come on, we all know you save every scrap! 🙂

Stay tuned to many more samples using the Cookie Cutter Christmas Bundle because I am loving it.

Happy Stampin’

~Laura

Seasonal Offer, www.LaurasStampPad.com

Check out my Cut For Christmas offer to help you with your Christmas Cards this season!!!


Flower Pots on a Shelf!!!

Posted on

Flowers on a Shelf, www.LaurasStampPad.com

This card is just stunning – the coloring, pink, flowers, and that cool texture of the wall! Doesn’t the background look like wall paneling? I sure do and love the added texture! So let’s get started on this beautiful card!

I started with a Flirty Flamingo card base and added a piece of Dapper Denim measuring 5″ x 3-3/4″. Then I took a piece of scrap Very Vanilla and stamped the flower pots from the Sitting Here Stamp Set in Basic Gray Archival Ink. I used this ink so that it wouldn’t bleed when I watercolored the image and because I wanted a lighter shade than black. I used an Aqua Painter to color using Dapper Denim for the pots, Emerald Envy for the greenery and Flirty Flamingo and Crushed Curry for the flowers. If you would like to see a Video Tutorial on coloring with Aqua Painters, check this out! Set the flowers aside to dry before cutting them out. While they are drying, you can die cut the background with the Lots of Labels Framelits. To add the lines for a panel look, I placed it in the Stampin’ Trimmer and scored every 1/2″ inch. You could also use a straight edge and a Bone Folder. I added this to the card front!

Flower Pots, www.LaurasStampPad.com

For the shelf, I took a scrap piece of Chocolate Chip cardstock and stamped the bottom of the swing from the Sitting Here Stamp Set in Chocolate Chip. Then I cut off that bottom piece of the swing below the cushion. This gives the shelf some texture and wood look! I added the shelf to the “wall” and then I added the potted flowers with Stampin’ Dimensionals. For the greeting, I used the Thoughtful Banners Stamp Set. I stamped the border in Crushed Curry and the greeting in Flirty Flamingo. I punched it out with the Classic Label Punch. I added the greeting the to the card with Stampin’ Dimensionals! Love it!!!!

Do you love flower cards as much as me too? Do you like watercoloring? Let me know in the comments below if I’m all alone here or if you all love it too!!!

Happy Stampin’

~Laura

Bonus Days

Bonus Days are here!! For every $50 you spend, you will earn $5 to use from August 2nd – 31st!!! Click here to start shopping!!!


Pineapples = Friendship!!!

Posted on

Pineapple, www.LaurasStampPad.com

The Pineapple….many see it as a fruit, some see it as tropical, and others see it as a sign of hospitality and friendship. Did you know that the pineapple is a symbol of warmth, welcome, friendship and hospitality?? It makes it even more fabulous for a hand-stamped card or any home decor piece!

For this card, I started with a Whisper White card base and added a of Pop of Pink Designer Paper to the top (4-1/4″ x 1-1/2″) and bottom (4-1/4″ x 2″). By splitting it up, you don’t have to waste Designer Paper on your card when it will be covered! Then I took a piece of Whisper White measuring 4-1/4″ x 2-1/4″ and stamped the pineapple from the Pop of Paradise Stamp Set in Melon Mambo (center) and then in Pink Pirouette on either side. I added Snail Adhesive along the top and bottom of this piece and placed a small piece of Gold Foil Paper on the top and bottom. This is a great way to use your scraps or just a smaller piece. My Gold Foil pieces are only 3/4″ wide rather than 2-3/4″ if I did the entire back of the Whisper White piece. I placed this piece onto my card front between the two pieces of Designer Paper (filling that gap)! I stamped the Thank You greeting from the Pop of Paradise Stamp Set onto scrap white paper in Basic Black….then I fussy cut it out! It wasn’t the most fun thing to cut out but it was small and quick! 🙂 I added it to the card with Stampin’ Dimensionals! To finish off the card, I ripped a little bit of the Pop of Pink Designer Washi Tape and added it above the pineapples. I love the little gold bling and added texture!

I love the Pop of Pink Suite and those little pineapples are so fitting for a thank you card! I love it! Are you loving the Pop of Pink Suite or do you prefer one of the other suites? Let me know your favorite in the comments below!

Happy Stampin’

~Laura

Click here to start shopping and earning Bonus Bucks!!!

Bonus Days


Happy 8th Birthday!!!

Posted on

8th Birthday, www.LaurasStampPad.com

I just couldn’t not share this card with you all. I know that the Birthday Bouquet Designer Series Paper is no longer available but it’s too cute to not share. Also, I know we all have tons of Designer Paper that we are hoarding so you can always use your favorite!

I started with a Pool Party card base and added a piece of the Birthday Bouquet Designer Series Paper (4″ x 5-1/4″). For the greeting banners, I cut a strip of Blushing Bride cardstock into a 1″ strip and added the banner tips to the right hand side. I stamped the Happy in Watermelon Wonder close to the right hand side banners. Then I trimmed off on the left hand side. I then added banner tips on the left side, stamped the Birthday and trimmed it off. I found it easier to cut around the greeting rather than trying to make it fit. Also, it’s a great way to use up those little scraps. I added these banners to the card front. For the main part, I die cut out a 2-1/2″ Circle with the Layering Circles Framelits. I brushed the edges of the circle with a Sponge Dauber and Watermelon Wonder Ink. I added this to the center of my card front. For the 8, I stamped it from the Number of Years Stamp Set onto Whisper White cardstock and die cut it with the Large Numbers Framelits. I stamped the “th” and banner from the same set and die cut it out as well. I added the 8 to my card front with Stampin’ Dimensionals. You will have to cut the hexagons in half or use some of the edging. The “th banner” was added to the card flat! You could always create this card but leave off the number until it is time to use it. You could create this girly card and a more masculine card to always have on hand, then die cut the numbers as needed!

Stock up on the NEW Designer Series Paper and lots of the other items in the New Catalog this month with all of these special offers. Have you checked out the New Catalog? Click here to see it all! As a Hostess, you can earn an additional $35 in Free Product when your party reached $350. That can be a single order, catalog party, online party, or private class with your friends. If you Want It All, you can join Stampin’ Up in June and get $125 in any product of your choice for $99 PLUS 2 additional stamp sets!!! Click here for more information!

Happy Stampin’

~Laura


Technique Tuesday – Red, White, & Blue One Sheet Wonder

Posted on

Happy Tuesday everyone!! You know what that means! I have a fabulous technique to share. It isn’t a new one but it’s a popular one. I had a request to do a One Sheet Wonder in Red, White and Blue!!! This One Sheet Wonder was created by me! I stamped a sheet of 12″ x 12″ Whisper White cardstock to create all 14 cards!

Stars Thank You, www.LaurasStampPad.com

Aren’t they beautiful??? Quick, simple and super fun!!! I started with 1 sheet of 12″ x 12″ Whisper White cardstock and stamped the stars image from the Perpetual Birthday Calendar Stamp Set all over in Night of Navy ink. Yes I did stamp that image like 500 million times. 🙂 It was totally worth it though!!! Now I have my “designer paper” and it is time to cut it into pieces. Here is a template!

12 x 12 One Sheet Wonder Template

You can always change your’s up and create any style of pieces you would like. I usually leave that little 1/4″ on there rather than cutting it off the bottom left corner. I cut the top portion into two 5-1/2″ x 2″ pieces to get even more cards. It’s all up to you!

Red, White, & Blue, www.LaurasStampPad.com

Once I had all of the designer paper cut into pieces, I cut 14 card bases in Real Red cardstock! I also pulled out some scrap white cardstock and stamped the greeting. I used the Thoughtful Banners Stamp Set and coordinating Duet Banner Punch (Bundle & Save 10%). Now it’s time to assemble!

Stars, www.LaurasStampPad.com  I added all of the designer pieces to the cards and then attached the greeting. Some of the pieces I added a little bit of Night of Navy to layer and add some more color! Of course the greetings were added with Stampin’ Dimensionals.

Red.White.Blue, www.LaurasStampPad.com

These cards would be perfect to make for party invites for a 4th of July Party, July Birthdays, or a thank you to our service men and women!! There are endless possibilities with cards like these!

One Sheet Wonder, www.LaurasStampPad.com

I made all 14 cards with just one sheet of 12″ x 12″ paper. How amazing is that?!?!?! I love it! You could use lots of the images from the Perpetual Birthday Calendar Stamp Set to have cards for all seasons and events!

If you would like to see this in action, check out my Video Tutorial below or click here! Don’t forget to give it a thumbs up if you liked it and be sure to subscribe if you are new. I post every Tuesday and Thursday!

If you would like to see other One Sheet Wonders, check them out here! Let me know in the comments below which one your favorite is. Also, let me know if you have any requests for what the next one will be! 🙂

Also, don’t forget all of the fabulous deals going on in June! The New Catalog is out! Have you checked it out? Click here to see it all! June is a great time to get lots of items on your wish list. As a Hostess, you can earn an additional $35 in Free Product when your party reached $350. That can be a single order, catalog party, online party, or private class with your friends. If you Want It All, you can join Stampin’ Up in June and get $125 in any product of your choice for $99 PLUS 2 additional stamp sets!!! Click here for more information!

Happy Stampin’

~Laura


Circle, Circle, Dot, Dot!!!

Posted on

Rows of Dots, www.LaurasStampPad.com

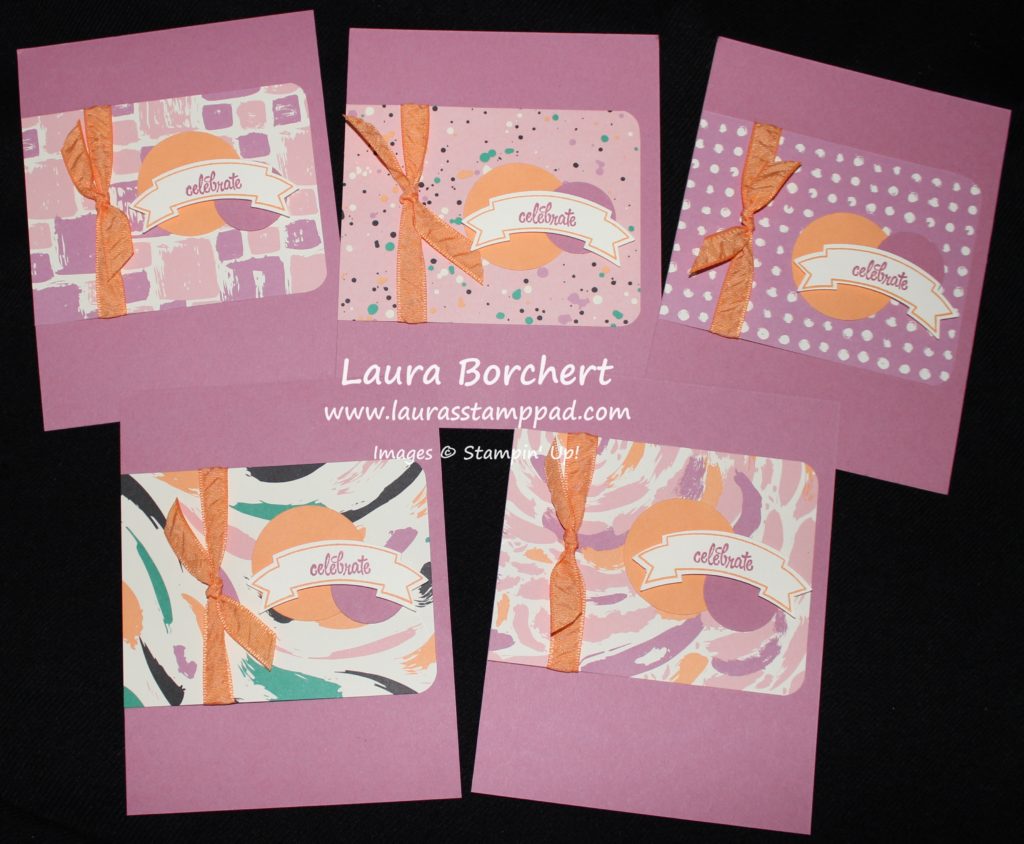
The Playful Palette Designer Series Paper Stack is full of bright colors! I created this adorable card, which is my favorite of all of them. When making multiples though, there are only  4 sheets of every pattern in the stack. Have no fear though, you can use any of the other designs as well! Check out all of these!

Playful Palette, www.LaurasStampPad.com

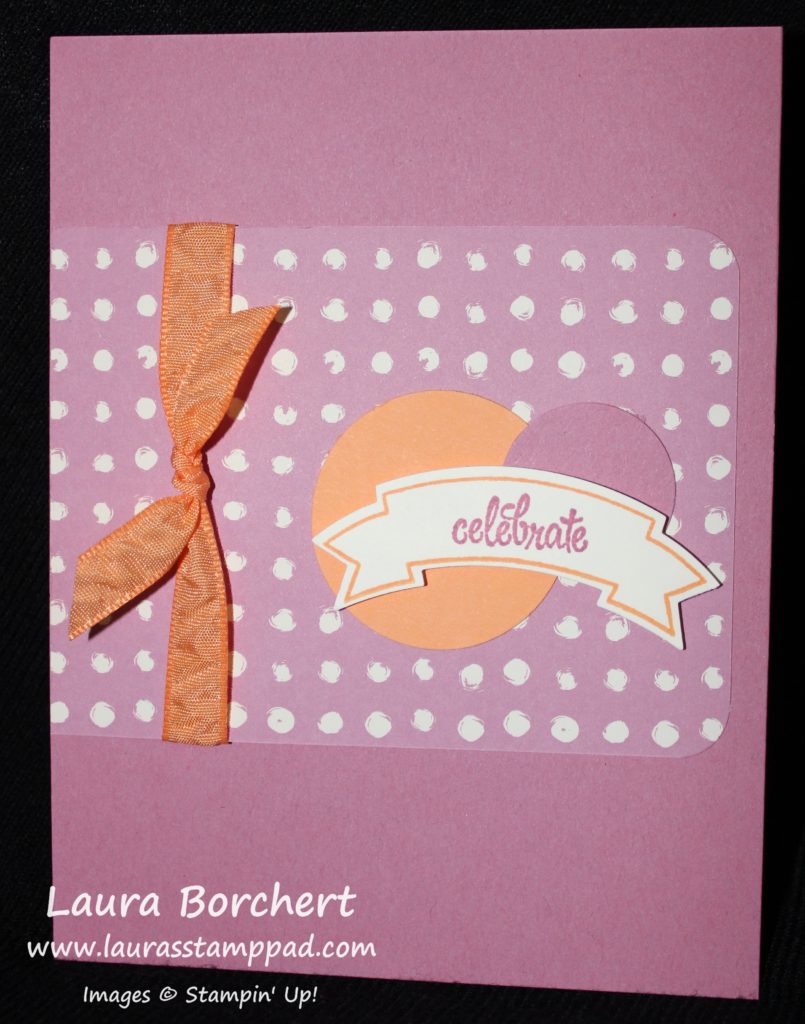
I started with a Sweet Sugarplum card base. Then I took a piece of the Playful Palette Designer Series Paper measuring 4″ x 3″. I rounded the 2 right side corners with the Corner Punch. I wrapped some of the Peekaboo Peach Ruched Ribbon around and tied a knot. I am loving this new ribbon. It is fun, elegant, and super easy to use! Then I placed this piece on the card in the upper portion but you could always center it. For the greeting, I used the Thoughtful Banners Stamp Set and coordinating Duet Banner Punch (Bundle & Save 10%). I stamped the banner edge in Peekaboo Peach and the Celebrate in Sweet Sugarplum. I am loving the new In-Colors! When I placed the greeting on the card, I thought it got lost a little bit with the background paper so I added some punched circles. I used Peekaboo Peach and Sweet Sugar Plum circles and overlapped them. I placed the greeting on top with Stampin’ Dimensionals. Quick and simple cards that could be used for any occasion! I love it! You could use this style with any designer paper and greeting stamp set!

Now that the New Catalog has been out for a bit, what is your favorite Designer Series Paper?? Let me know in the comments below. Pop of Pink is my favorite and there are a lot in 2nd place! 🙂

Happy Stampin’

~Laura


I Am Much More Me…

Posted on

So Much More with You, www.LaurasStampPad.com

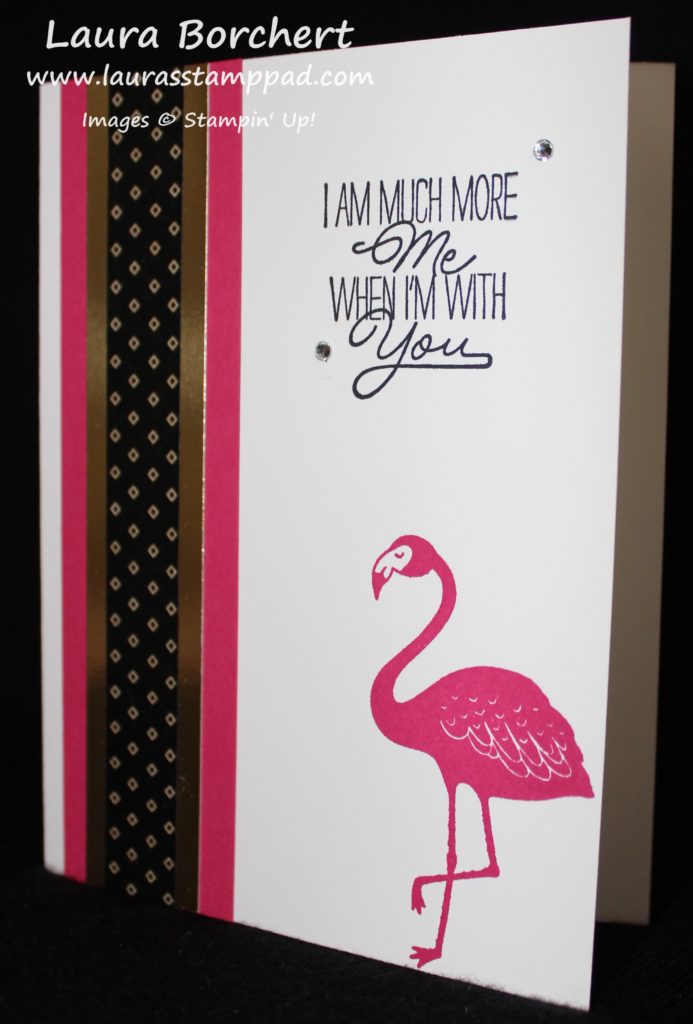
This card is just amazing! The greeting is so sweet, the colors are bright and that washi tape is fabulous! I love it! BONUS: It’s quick and simple!

I started with a Whisper White card base and stamped the flamingo from the Pop of Paradise Stamp Set in Melon Mambo. I stamped the greeting in Basic Black from the Layering Love Stamp Set. For the side panel, I took a piece of scrap Melon Mambo measuring 1-1/2″ x 5-1/2″ and adhered it to the left side of the card! I took a scrap piece of Gold Foil Paper (see, keep those scraps) measuring 1″ x 5-1/2″ and I placed a strip of the Pop of Pink Washi Tape down the middle. I used the black one with the diamond image. That diamond image is like clear/white so you can see the gold pop though. It is super fabulous and a great way to add another lay of color without another layer of cardstock. It is a great way to use your washi tape! I then attached this piece to the card front over the Melon Mambo strip. I finished off the card by adding a few Rhinestones around the greeting. Honestly…..I made a stamp boo boo and needed to cover it up! 🙂 See, we all do it! Simple, quick, and truly a WOW card!!!

I sure hope you all love PINK like me because there are lots of cards I will be sharing with the Pop of Pink Suite! I just love it so much! 🙂

Happy Stampin’

~Laura


Fast Friday Cards!!!

Posted on

Just Because, www.LaurasStamppad.com

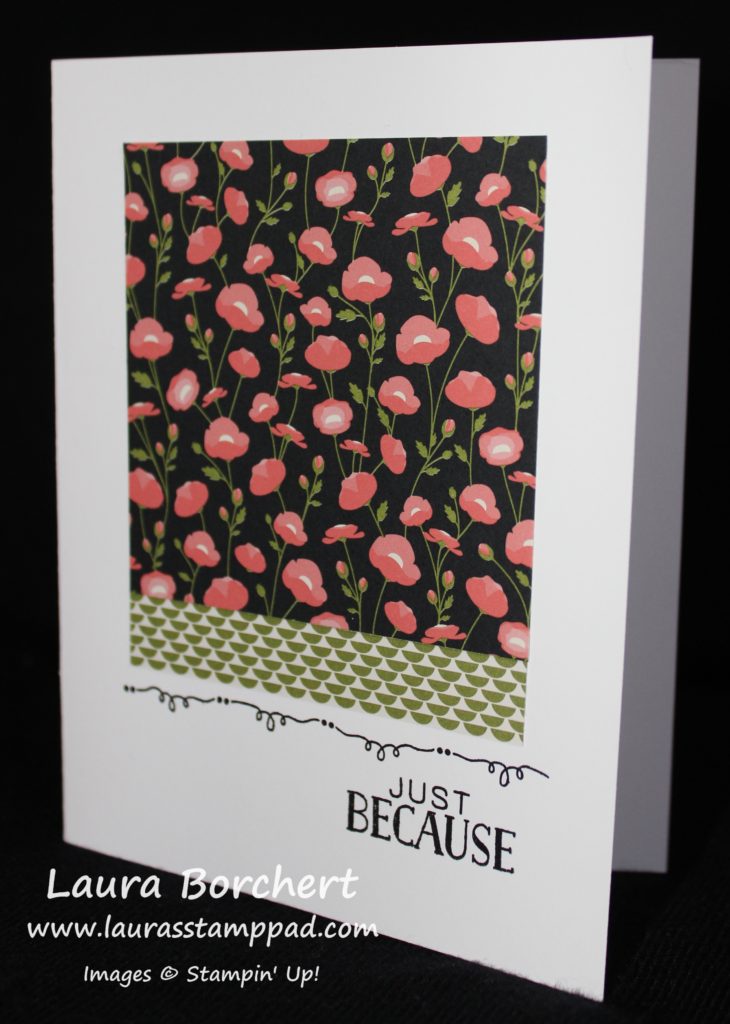
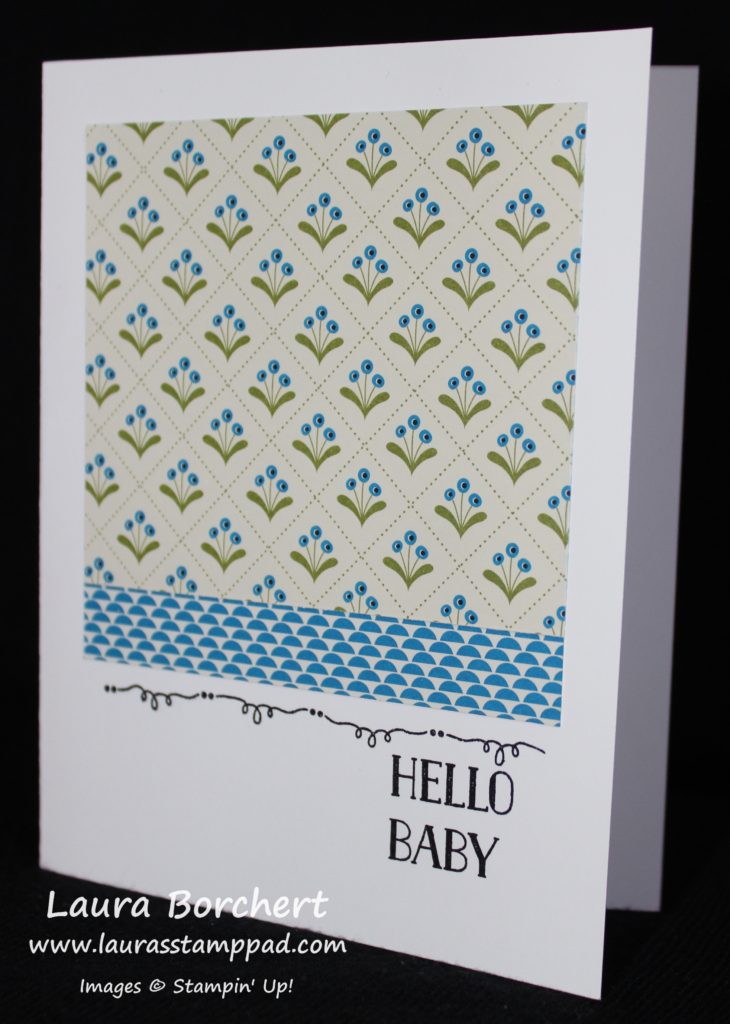
Happy Friday everyone! It’s finally here! It’s a Holiday Weekend! Ain’t nobody got time for detailed stamping today! Let’s whip up a few cards and then enjoy the weekend!!! I created these cards with a little bit of Pretty Petals Designer Series Paper and the Tin of Cards Stamp Set! Super Simple!

I started with some Whisper White card bases measuring 5-1/2″ x 8-1/2″. Now for the cutting of the Pretty Petals Designer Series Paper, I did each one in a different size just to play with it. Just Because is 3-1/2″ x 3″ and then I cut the bottom 1/2″ off and flipped it over. Happy Wedding is 4-1/2″ x 3-1/2″ and then I cut the bottom 1″ off and flipped it over. Hello Baby is 3-1/2″ x 3-1/2″ and I cut the bottom 1/2″ off and flipped it over. They all look fabulous so this just means use what ever scraps you have laying around and have fun with it. I adhered the paper to the middle of the card or a smidge up so I had room for the greeting on the bottom (unlike the one below).

Happy Wedding, www.LaurasStampPad.com

Since I only had room at the bottom for the cute little scroll image from the Tin of Card Stamp Set, I stamped the greeting on a scrap piece of white cardstock, ripped both ends, and placed it on the card! I did all of the stamping in Basic Black which also made these cards easy!

Hello Baby, www.LaurasStampPad.com

You can whip up all of these cards in a matter of minutes and with a great greeting set like Tin of Cards, you have one for every occasion!!!

I hope you enjoyed this tutorial on simple cards. Have an amazing weekend! I’m running a 5K at our Church Festival, grilling out with friends and spending time with family! I couldn’t ask for a better weekend – just hoping the weather is nice and I don’t trip and fall while running. 🙂 See you back here on Monday!

Happy Stampin’

~Laura


Technique Tuesday – One Sheet Wonder Flower Bouquet!!!

Posted on

Happy Tuesday!!! You know what that means…..I have a fabulous technique to share with you today! This isn’t a new one but it is with a new look! I know how much you all love my One Sheet Wonder Techniques so I am sharing another fabulous one!

Flower OSW, www.LaurasStampPad.com

Look at these beauties!!! You all know I love flowers and this paper from the Birthday Bouquet Designer Series Paper Stack is amazing!!! What better way to use this amazing paper than with a One Sheet Wonder Technique so you can use every bit of it and both sides!! I made 14 cards with this ONE piece of 12″ x 12″ paper. Here is the template!

12 x 12 One Sheet Wonder Template

I have modified it a little bit but cutting 2 pieces of 2″ x 5-1/2″ with that leftover gray piece on top. Also, I don’t always cut those little bits off in the second row either. You can do whatever you want to create these amazing cards!

Birthday Bouquet OSW, www.LaurasStampPad.com

These 6 cards were created with most of the bottom row on the template and those 2 pieces cut from the top gray portion. Quick and simple cards. I looked at the list of colors that are printed on the Designer Series Paper Pack for card bases – Blushing Bride, Mint Macaron, and Pool Party. I pulled out some scraps of each of those colors as well to use for layering and the greetings.

Diagonal Designer Paper, www.LaurasStampPad.com

Here are the 2 samples using that far right corner. I just ripped it corner to corner and added it to my card base. I stamped the greeting from the Rose Wonder Stamp Set and added some ribbon – Whisper White Cotton Ribbon and Venetian Trim.

One Sheet Wonder Squares, www.LaurasStampPad.com

You can always leave the square pieces as strips if you don’t like this look. Here I took the little squares and backed them with cardstock for a little extra pop of color. I added some Linen Thread to the one in the middle.

Quick and Simple OSW, www.LaurasStampPad.com

Here I used some of the strips from the 2nd row on the template. You will notice that the Thoughts & Prayers image doesn’t fit in the Decorative Label Punch so I used that greeting when I could stamp it directly onto the card. I love how you can mix and match and create so many amazing cards so quickly!

If you would like to see this all in action, check out the Video Tutorial below or click here! Be sure to give it a thumbs up if you liked it and don’t forget to subscribe if you are new! I post every Tuesday and Thursday!

If you would like to see other One Sheet Wonder samples, click here, here and here! This technique is perfect for whipping up lots of cards quickly and beautifully!

Happy Stampin’

~Laura


Hearts and Flowers???

Posted on

Anniversary Hearts, www.LaurasStampPad.com

I’m not really a hearts and flowers type of girl…..BUT I am a show the love, give a hug type of girl. I think hand shakes are awkward but I will give a hug to anyone I meet. That’s just me. 🙂 I cry at weddings because the amount of love in the room is amazing. I cry at graduations because they have accomplished so much and are moving on to the next step in their life. That’s me!!

Now let’s chat about this amazing this card and not crazy me! I love those interlocking hearts and think they are just fabulous! So simple and yet so sweet! I started with a Bermuda Bay card base and added just a little scrap piece of Have a Cuppa Designer Series Paper (1″ x 5-1/2″). I layered the DSP with a little Melon Mambo scrap peaking out on the right hand side. For the greeting, I die cut one of the Lots of Labels images and cut off the right side bumps to be a flat edge. You can see another sample and how I did that here! I stamped the greeting in Melon Mambo Ink from the Teeny Tiny Wishes Stamp Set! Then I die cut the hearts from the Cups and Kettle Framelit Set (sold out). I interlocked them and adhered them on with the Fine Tip Glue Pen. I added the greeting to the lower right hand side of my card and then I thought it needed a little bling! I added some Candy Dots and Rhinestones for a little POP!

Are you Hearts and Flowers? Chocolate? Just a good card? Let me know in the comments below! Don’t leave me hanging, I know there are others out there like me! 🙂

Happy Stampin’

~Laura

Going Going Gone, www.LaurasStampPad.com

Be sure to check out the Retiring Items before they are gone at the end of May!