12 Days of Christmas!!!

Posted on

December is here and Christmas is getting closer each day…..just ask my kids!!! I thought I would give my followers 12 Days of Christmas fun with emails including tutorials and fun details!!!

12 Days of Christmas, www.LaurasStampPad.com

Be sure to join my mailing list so you don’t miss out on this!!! Click here to join now! Inspiration, product detail, specials, and upcoming events are just a few things I share in my emails and these 12 Days are sure to be fun!

Free Shipping, www.LaurasStampPad.com

Don’t forget that Stampin’ Up! is also offering FREE SHIPPING on orders of $75 or more through the end of the day tomorrow, December 11th! Woot Woot! Now is a great time to snag those Holiday Mini Catalog items that are while supplies last for the next few weeks and then gone for good. There are also NEW Online Exclusives that are fabulous and perfect for the upcoming holidays in 2025!!! So much fabulous product!!!

Today is also the last day to sign up for the December Paper Pumpkin Kit! Click here to sign up! Remember that this is a fabulous gift item for anyone of any age too!!! It’s all inclusive and consumable. It also it something no one will have already!!! 🙂 Claire and I look forward to creating Paper Pumpkin each month!! Join in the fun!

Enjoy the 12 Days of Christmas and Happy Stampin’

~Laura


Snowy Scenes

Posted on

I have used the Snowy Scenes Suite soooo much this season! It has been my favorite by far and I wouldn’t have guessed that back in August! Check out this fun card!!!

Snowy Scenes Stampin' Up Suite, www.LaurasStampPad.com

Poppy Parade and Petal Pink might not be your typical holiday colors but it looks fabulous here!!! You could also use Pool Party and Basic White…..or another combination. Share in the comments what color combination you would use!!!

SUPPLIES & MEASUREMENTS:

  • Poppy Parade Cardstock – 8 ½” x 5 ½” and scrap for punching
  • Petal Pink Cardstock – (2) 4” x 5 ¼”
  • Garden Green Cardstock – scrap for die cutting
  • Snowy Scenes Designer Paper – 1” x 3”
  • Basic White Cardstock – 2 ¾” x ¾” and scrap for die cutting

CARD INSTRUCTIONS:

  1. Fold Poppy Parade Cardstock in half for the card base. Emboss one piece of Petal Pink Cardstock (4” x 5 ¼”) with embossing folder of your choice and add it to card front! I used the Forever Plaid Folder. Also, I like to use Tear And Tape to adhere embossed images because I feel like it helps to keep the impression in tact and secures it well.
  2. Adhere strip of Designer Paper with Tear And Tape to the top 1/3” of the card front. Punch a scrap piece of Poppy Parade Cardstock with the Heartfelt Hexagon Punch or use a punch/die cut of your choice!  Adhere to the card front over the Designer Paper.
  3. Die cut 2 trees from the scrap Garden Green Cardstock using the Snowy Wonder Dies. Stamp the Penguin in Memento Black Ink onto scrap Basic White and die cut as well. Add the trees flat to the hexagon and add the penguin with Stampin’ Dimensionals. Also, feel free to add some color to the feet and beak of the penguin with a Pumpkin Pie Stampin’ Blends.
  4. Stamp greeting and candy canes in Poppy Parade Ink onto Basic White Cardstock (2 ¾” x ¾”) and add to the card front with Stampin’ Dimensionals.
  5. Embellish with Snowflakes as desired. I used the Fine Tip Glue Pen to secure these on.
  6. Stamp greeting of your choice and/or candy canes in Poppy Parade Ink onto the Petal Pink Cardstock for the inside of the card.

If you would like to see this card in action, check out the Video Tutorial below! You can also get the PDF Tutorial for this card and 4 others on my Etsy Shop here!

Happy Stampin’

~Laura

Product List

Christmas in July!

Posted on

WHAT?!?!?!?! I am so not ready for Christmas but that is why this is called Christmas IN JULY! It’s never to early to get started on your holiday cards after all! The July-December Mini Catalog launched this month and my Online Stamp Class is Christmas in July – Lights Aglow!

Christmas in July, Lights Aglow, www.LaurasStampPad.com

This stunning cards uses products from the Lights Aglow Suite! It is one of the 5 cards that I will be making in the July Online Card Class! This class takes place on Friday, July 22nd at 7:30 p.m. CT on Facebook and YouTube Live! Anyone can watch for FREE! In fact, you can check out past Online Card Classes here! Share with all of your friends because I love chatting and stamping with everyone as if we were all in the same room together!

If you would like to stamp along with me there are 2 options for you to pick from! You can purchase the PDF Tutorial for instant download and cut the cardstock and supplies yourself OR you can purchase a card kit and I will mail it all out to you! No die cut/punched images or stamped images will be provided. You will need the Lights Aglow Bundle or stamp set of your choice! Click here for all of the details and to get registered!

The In Person Class for this one has filled up fast so I’m super excited to do it online with all of you as well! Save the Date for the Christmas in July – Lights Aglow Online Stamp Class on June 22nd at 7:30 p.m. CT!

Happy Stampin’

~Laura


Peppermint Kisses!!!

Posted on

At Target the other day and I see Sugar Cookie Kisses…..Yes please! Omg you all they were AMAZING and gone within a few days! Heavenly!!! Accepting all Sugar Cookie Kisses this season! 🙂 I also have this cute Peppermint Kisses card to share with you today!!!

Peppermint Kisses, www.LaurasStampPad.com

I got this card idea from the amazing, Kim Peck!!! It uses the Gingerbread and Peppermint Suite!!! You can check out more cards using this Suite here.

I started with a Real Red card base! Next, I took 2 pieces of Basic White measuring 3-3/4″ x 5″ – one for the front and one for the inside! I added a piece of the Gingerbread & Peppermint Designer Paper along the left hand side and stamped the greeting from the Frosted Gingerbread Stamp Set up top! NOTE: If you wish to stamp first, just make sure it is a bit off center since it is centered in the area after the designer paper is placed down!

Stampin' Up! Gingerbread & Peppermint Suite, www.LaurasStampPad.com

For the kisses, I stamped 3 of the ornament baubles in Real Red Ink onto Basic White cardstock and then die cut them out! Then I flipped them upside down and placed the 2 on the bottom of the card front with the scallop at the bottom edge of the white cardstock. Using the cardstock as a guide, I trimmed off the tops of the ornaments to create a kiss! Next, I took the third ornament and trimmed less off so it looks bigger and placed it on the card front with Stampin’ Dimensionals! To finish off the look, I added a little piece of White Crinkled Seam Binding to the tops of each one. I used Mini Glue Dots to adhere the ribbon.

Happy Holidays Peppermint Greeting Card, www.LaurasStampPad.com

On the inside I decorated with a few of the peppermint candies from the stamp set and the greeting!!! I love the coordination of the front to the inside!

If you would like to recreate this Peppermint Kisses card, check out the supplies listed below! Don’t forget about the Seasonal Sale going on right now! It ends TONIGHT! Click here to get ink, cardstock, and dies on sale!!!

Happy Stampin’

~Laura

Product List

Squirrel!!!

Posted on

Distracted by cute things? Yeah me too! Squirrel….I might not be that bad but I do think they are super cute! I was so excited to use one in this adorable Fall card too!! Hilarious side story for you! When I was attending the Leaders Summit, the Leadership Team was all together on a video and they were sharing about their position with the company and stories. One of the questions was who gets off topic the most and they all agreed it was the Finance Guy and they even have a stuffed animal squirrel that they bring out when he goes off on a tangent. I laughed so hard and immediately thought of this post!

Squirrel, www.LaurasStampPad.com

This card uses the Free Stamp Set of the Month for September – Banner Year!!! It’s so easy and super cute!!!

Each little square is 1 inch and I stamped various images from the Banner Year Stamp Set into each one. For the leaf, I used Mint Macaron and stamped the leaf twice without going back to the ink. The acorn was stamped in Crumb Cake, full strength for both. Then for the pumpkin, I used Cajun Craze and Early Espresso. That one is a 2 step stamped image. Finally, on the squirrel, I inked him up completely in Crumb Cake and then before stamping him down I inked just the tail in Early Espresso. There is enough gap between his tail and head to lightly touch the edge of the ink pad and ink just the tail!

Fall Card with the Banner Year Stamp Set, www.LaurasStampPad.com

When layering the squares onto the Crumb Cake square, place them all out and then pick up one at a time to adhere down. This helps with spacing. Then I layered that onto a piece of the Gilded Autumn Designer Series Paper. This all goes onto a piece of Very Vanilla that I stamped the greeting on the bottom in Early Espresso Ink! There are a couple different greeting options in this set that work perfectly! For the ribbon, I used the Mint Macaron Basket Weave Ribbon which is so amazing! For the top card, I wrapped the ends to the back side. In the card above, I forgot to add the ribbon till the end so I just trimmed the ends for a diagonal look!

Wooden Elements for Fall, www.LaurasStampPad.com

To finish off the card, I added a little wooden element from the In Good Taste Elements pack. There are lots of options in the pack so no worries about only having a few. You can make lots of these cards! Check out all of the supplies listed below to make your adorable Squirrel card!

Happy Stampin’

~Laura

Product List

It Snowed!!!

Posted on

Happy Wednesday! 1 more week till Christmas. I thought since it snowed this is a good card to share with you all! Now I’m chanting, let it melt! 🙂

It Snowed, www.LaurasStampPad.com

This is a quick card that I created with a little bit of stamping and punching. Punching out cardstock that is….I’m not a violent person. 🙂

I started with a Shaded Spruce card base. Next, I stamped the snowflakes from the Snowman Season Stamp Set in Pool Party all over a piece of Whisper White. Before laying it on the card front, I added some of the Let It Snow Designer Paper (2″ x 5-1/4″) across the lower part.

Red Ribbon, www.LaurasStampPad.com

For the greeting, I stamped it from the Snowman Season Stamp Set in Real Red Ink. Then using the Timeless Label Punch, I punched it out and added Stampin’ Dimensionals on the back. Before adding it to the card front, I placed a piece of the Real Red Ruched Ribbon down and added the greeting on top. This adds a little bit of texture to the card. Since this ribbon is so wide, tying it would make a large knot of your card so using it this way makes it nice and flat.

You can check out more samples like this by clicking here and here! Also, let me know in the comments below whether you are excited that it snowed or counting down the days till Spring??

Happy Stampin!

~Laura

Product List

Silly Snowman!!!

Posted on

Happy Monday!!! We are one week closer to Christmas and things seem to be getting crazier. Stamping is my getaway from the chaos and relaxing time of the day! What about you?? Check out this cute silly snowman card I made!

Silly Snowman, www.LaurasStampPad.com

I got this card idea from Laura Milligan and just fell in love. It’s adorable and it’s simple! Thank you, Laura!!! We, Lauras, are pretty awesome! 🙂

I started with a Whisper White card base and added a layer of Real Red (4″ x 5-1/4″). Next, I took a 3″ x 4″ piece of the Let It Snow Designer Paper (stripes) and added it to the upper left corner. Using the 2-1/4″ Circle Punch, I punched another sheet of the designer paper for this adorable snowman. He is already cute, glittered, and ready to go. I layered a Basic Black circle behind him to make it pop a little more.

For the greeting, I stamped it from the Snowman Season Stamp Set in Memento Black Ink. Then using the Banner Triple Punch, I added banner tips to the end. I actually recommend punching first and then stamping so you don’t end up cutting off your stamped greeting. The greeting was added to the card front with Stampin’ Dimensionals. I finished it off with some of the Toile Tidings Glittered Enamel Dots. It’s perfect!!!

I hope you like this little silly snowman card as much as me. While the paper is no longer available to purchase. You can create this card if you already got your hands on it over the past few months! Here are some more samples too!

Happy Stampin’

~Laura

Product List

Whip It Up!!!

Posted on

Check out these quick and simple cards for Christmas that can be made in no time at all. Just whip it up and send it out!!!

Whip It Up, www.LaurasStampPad.com

I used the Night Before Christmas 6″ x 6″ Designer Series Paper Stack for these cards! Simply cut a piece that is 5-1/2″ x 1-1/2″ and mix and match which side you use for each card! The paper pack states that these colors are used in the pack so you can pick those for the accent cardstock and ink color!
Cherry Cobbler, Crumb Cake, Crushed Curry, Early Espresso, Mossy Meadow, Night of Navy, Old Olive, Poppy Parade, Pretty Peacock, Very Vanilla

Thinking of You at Christmas, www.LaurasStampPad.com

I ripped one edge of the cardstock to give the card a little bit of texture and fun! The greetings were both from the Itty Bitty Christmas Stamp Set. This set is perfect for a large array of greetings that fit just about anywhere! I love it. To finish off the card, I added a few metallic pearls.

To make some of these quick and simple cards, check out the supplies below. Just whip it up! Also, Stampin’ Up has FREE SHIPPING today on all orders of $50 or more! Woot Woot!!!!

Happy Stampin’

~Laura

Product List

Christmas Cheer!!!

Posted on

Happy Monday!!! It seems a bit odd to have a post on Christmas Cheer when it’s actually Thanksgiving Week but….. I still love your Thanksgiving but I have to work on my Christmas cards too!!!

Christmas Cheer, www.LaurasStampPad.com

This is one of those quick and simple cards that you can whip up in no time at all. It uses up every inch of your designer series paper too! You can even call it a One Sheet Wonder if you would like!

I started with a card base of Very Vanilla measuring 4-1/4″ x 11″. I like to use this size when wrapping ribbon around my card because it uses less. Going around the card at 4-1/4″ is better than going around it at 5-1/2″. Although I went around it twice so who is really saving ribbon here?!?!?! Next, I cut the Toile Tidings Designer Series Paper into 4″ x 4″ squares. This makes 9 squares from one 12″ x 12″ piece of designer paper! Great for making multiples!

Toile Tidings, www.LaurasStampPad.com

Using the Itty Bitty Christmas Stamp Set, I added the greeting in the lower right corner. There are so many greetings in various sizes so it’s perfect to mix and match and have fun! Then I added some ribbon. The card up top uses the Real Red Curly Ribbon and this one here uses the Garden Green Double Stitched Ribbon. Another option is to use the other side of the designer paper which is Garden Green. There are lots of great ways to mix up this card to make it a little different but still use the same products!

Which is your favorite? Let me know in the comments below! Click the supply list below to get started on your Christmas Cheer cards today!

Happy Stampin’

~Laura

Product List

Golden Goddess!!!

Posted on

Happy Monday, everyone! I hope you had a wonderful weekend! I sure did! My Mom came yesterday and we stamped her Christmas Cards!!! It was so much fun and a good time to catch up! Today, I’m sharing another samples using the Christmastime is Here Suite. Check out this Golden Goddess!!!

Golden Goddess, www.LaurasStampPad.com

This card is just so elegant and beautiful! It would be perfect for a wedding card too!!! All white and gold and so amazing!

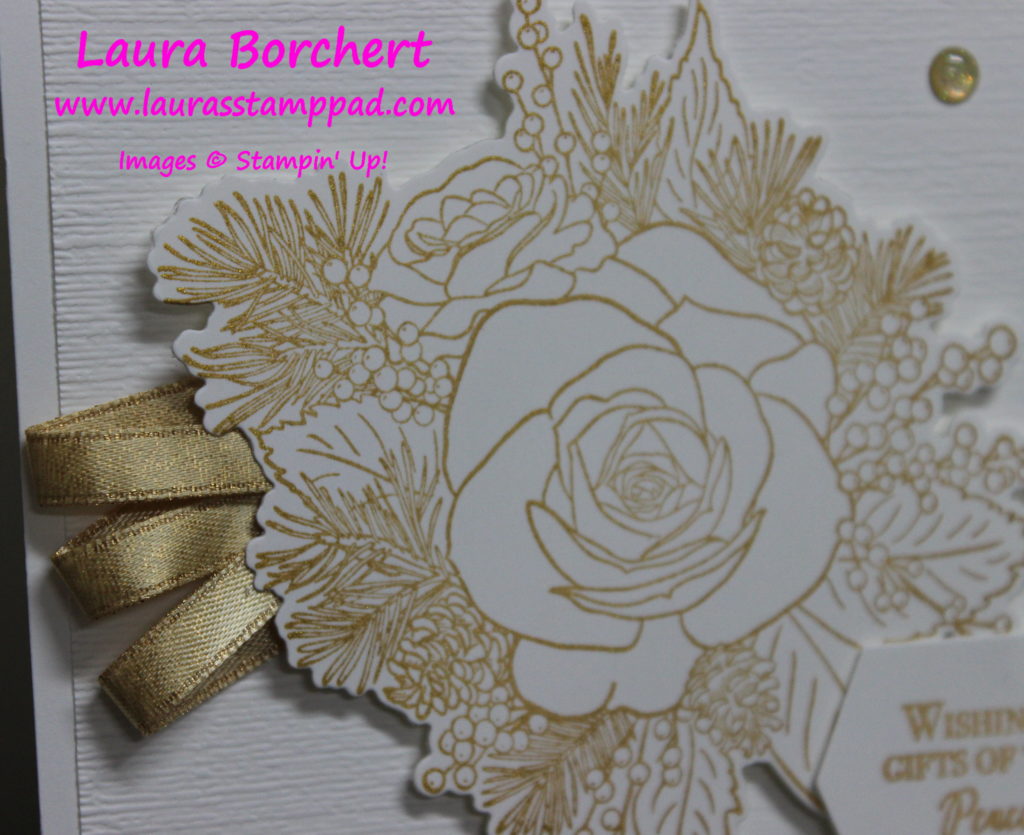
I started with a Whisper White card base. Next, I embossed another piece of Whisper White with the Subtle Embossing Folder and added it to the front. Then with yet another piece of Whisper White, I stamped the Christmas Rose in Gold Delicata Ink. Be sure to set it aside a bit to dry completely. I have found sometimes it smears if it isn’t fully dry. Once it is dry, I used the coordinating Roses Dies to die cut the rose and the greeting label. The greeting was also stamped in Gold Delicata!

Golden Rose, www.LaurasStampPad.com

To assemble, I flipped the rose over and added three little loops of the Gold Shimmer Ribbon. This stuff is just stunning! Using the Stampin’ Dimensionals to secure the ribbon and then all over the rest of the rose, I then added it to the card front! The greeting was also added with Stampin’ Dimensionals. You know me and my love for those things. To finish it off, I added a few Gold Glittered Enamel Dots! LOVE!!!!

Don’t forget that these items are while supplies last so click the supplies below to get your today and recreate this beautiful golden goddess card!

Happy Stampin’

~Laura

Product List
Christmastime Is Here Suite Bundle (English)
$112.50
Christmastime Is Here Specialty Designer Series Paper
$14.50
Gold 1/4" (6.4 Mm) Shimmer Ribbon
$7.00
Christmas Rose Bundle (English)
$61.00
Golden Glitz Delicata Metallic Ink Pad
$11.00
Subtle Dynamic Textured Impressions Embossing Folder
$10.00