Memories In The Making!!!

Posted on

Awesome Emboss Resist, www.LaurasStampPad.com

The Memories In The Making Project Life Card Collection is one of the items that you can earn for FREE through Sale-A-Bration!!! I thought the cards were super fabulous because many of them are window sheets with frames and borders and amazing designs. There are a few that are gold on one side and silver on the other. WOOT WOOT! I love how there is something for everyone there. The other pieces have embossed prints on them so you can have fun and add color for an emboss resist technique. Love it!!!

The card above uses one of the embossed patterns and I brushed over it with an Elegant Eggplant Sponge Dauber to give it some color. Since the card is 4″ x 6″, I had to cut it down a bit (4″ x 5-1/4″). I added some Whisper White Cotton Ribbon. For the greeting, I used the Big News Stamp Set. I layered it onto Elegant Eggplant and added it to my card with Stampin’ Dimensionals. I thought it needed a little bling so I added some Dazzling Details to all of the little dots in the scroll. 🙂

Project Life Card Collection, www.LaurasStampPad.com

I didn’t want to waste that little strip that I cut off so I created this card. I took another Memories In The Making Card, stamped the greeting from the Tin Of Cards Stamp Set in Stazon Ink and added it to my card front once it dried. Be very careful when stamping on Window Sheet as it can be slick and want to slide all over. Straight up and down! This is one of those cards that the dotted wreath is gold on the back side. I’m a silver girl though! 🙂 Since you can see adhesive on Window Sheet, I just added it to the left hand side where the patterned paper is. It is held securely with Tear & Tape so I don’t have to worry about it coming off!

Awesome Ombre, www.LaurasStampPad.com

I wanted to do another one so I took another Card from the Collection that was embossed stripes. I used my Sponge Daubers to add color in this amazing ombre pattern. I used Bermuda Bay, Island Indigo, and Night of Navy. I loved how it turned out. I wrapped some Silver Metallic Thread around a few (hundred) times on the left hand side and tied a knot. I added it to a Bermuda Bay card base and did the awesome greeting again from the Big News Stamp Set. Perfect Man Card!!!

Memories In The Making, www.LaurasStampPad.com

Then with the little strip that I had to cut off, I created this card. Again I took one of the Window Sheet Cards and stamped in Craft White Ink with the Tin of Cards Stamp Set. I adhered it on with Tear & Tape under the strip of ombre! I love how these turned out!

You can use Project Life Card Collections for greeting cards and memory keeping. They are so much fun and so versatile. You can check out a few of my Project Life Album Pages here!

To see all of the cards from the Memories in the Making Card Collection, check out the Video Tutorial below or click here! Don’t forget to give it a thumbs up if you liked it.

Have you ever tried the Project Life Card Collection for memory keeping or card making? Let me know in the comments below!

Happy Stampin’

~Laura


Quick and Simple Birthday Cards!!!

Posted on

Cherry on top, www.LaurasStampPad.com

It’s the end of the year and I am working on cleaning up my stamp room (check that out here) and preparing for the new year ahead! Here are a few cards that I created with some leftover Designer Series Paper pieces, ribbon scraps and pre-cut cardstock! I know I will need lots of Birthday Cards in 2016 because after all everyone has a birthday!

The cards above all have a Pool Party card base and piece of Cherry On Top Designer Series Paper measuring 4″ x 5-1/4″. The ribbon is Whisper White Satin Stitched Ribbon and Bermuda Bay Baker’s Twine! For the greeting, I stamped It’s Your Birthday! from the Big News Stamp Set in Bermuda Bay and brushed the edges with a Cucumber Crush Sponge Dauber! Quick and simple and yet fabulous!!!

Bermuda Birthday, www.LaurasStampPad.com

I love Bermuda Bay and since I had these cut card bases, I thought I would create some cards! I layered on a piece of Basic Black. The one card has some Whisper White Satin Stitched Ribbon and uses the same greeting as above from the Big News Stamp Set! I brushed the edges with some Bermuda Bay and a Sponge Dauber! The other card uses the Happy Birthday Everyone Stamp Set and I die cut the greeting with the Deco Label Framelits!

Sometimes it seems the simple cards have the biggest wow factor!

Happy Stampin’

~Laura


Fabulous Friday!!!

Posted on

Can you believe it’s September?? It’s Friday? It’s a Holiday Weekend??? Woot Woot for the last two!!! I wish it was more like May all over again! I’m sorry, I just prefer Spring and Summer. I do like Pumpkin flavored items though……and you all love me again! 🙂

First things first…..my adorable Birthday Card from my Husband!!!

Domo in a Present, www.LaurasStampPad.com

Isn’t the little Domo adorable??? He has been making me a card with a Domo on it for years now! He did a really good job and even got the colors matching – Rich Razzleberry Cotton Ribbon and ink!!! He said he used punches for the gift box! The greeting is from the Big News Stamp Set! I told him he should have watched my Fork Bow Tutorial to create a mini bow for the top of the box! I love it no matter what because my husband made it for me with lots of love!!! 🙂

Holiday Mini, www.LaurasStampPad.com

The Holiday Mini Catalog is HERE!!!! It’s never too early to start working on treat bags, home decor, and cards for the upcoming holidays because time seems to fly even faster and craziness happens so start early and be prepared!!! I will be sharing lots of samples and product in the coming weeks!!! Be sure to check out my YouTube Channel as well. I did a Holiday Mini Catalog Haul Video and Unboxing and Reveal of the Season to Season Wreath which I love!!!

Weekly Deals 9.1

Brights Candy Dots and RHINESTONES on sale!!!! Count me in!!!! Love the Washi Tape and Whisper White Seam Binding as well! Did you know you can color the ribbon with markers, spritzers, or just Ink Refills?? Love it!!! I will be placing an order this weekend so send me your order or you can order online here! Online orders earn Laura’s Loyal Stampers Points!!!

Happy Stampin’

~Laura


Sheer Perfection!!!

Posted on

Sheer Perfection Vellum, www.LaurasStampPad.com

The NEW Sale-A-Bration item – Sheer Perfection Vellum is lots of fun! It is 6″ x 6″ and there are 2 sheets each of 12 different designs. That is a lot of FUN in one pack!!! Here are some creations I made with this stuff! The sample above has a base of Calypso Coral and then a layer of Whisper White (4″ x5-1/4″). I took a piece of the flower vellum and colored it with my markers and since vellum shows the adhesive I only added it along the top under the Paper Doily! For the greeting I used the 2-3/8 Scallop Circle Punch and 2″ Circle Punch. The greeting is from the Lovely Amazing You Stamp Set! I love that set for the perfect greetings!!!

Sheer Perfection Vellum, www.LaurasStampPad.com

The perfect Man Card is what I made here, don’t you think? I used Basic Gray and Tempting Turquoise!!! I used some of the dotted line vellum for the banners and attached them to the card with staples! I’m not a huge fan of staples but use them every once in awhile. If you don’t like that look, you can always add adhesive to the banner half that is overlapped. The greeting is from the Big News Stamp Set!!!

Sheer Perfection Vellum, www.LaurasStampPad.com

This one is my favorite! I love butterflies!!!! I used my markers (Pear Pizzazz, Lost Lagoon, and Pool Party) to color the Butterflies and then I adhered it to a piece of Whisper White. For the greeting, I used the Lovely Amazing You Stamp Set and the stamped butterfly comes from another fabulous Sale-A-Bration Stamp Set – Nature’s Perfection! You can earn this for FREE with a $50 (US) purchase! Sale-A-Bration ends tomorrow, March 31st so be sure to stock up on everything now so you can earn Sale-A-Bration items! Also, don’t forget that when you order online here, you will earn Laura’s Loyal Stampers Points! WOOT WOOT!!!!

Happy Shoppin’

~Laura


Irresistible Polka Dots!!!

Posted on

Decorative Mask Emboss Resist, www.LaurasStampPad.com

How adorable is this card and it has polka dots!?!?!?!?! Loving it!!! I created this card with the fabulous Irresistibly Yours Designer Series Paper in the Sale-A-Bration Brochure which means you can get it for FREE with a $50 (US) purchase! Last week I showed you how to use this paper with your Sponge Daubers here and your Spritzers here! Today I’m going to show you how to create this card with your Sponge Daubers and Decorative Masks!

I started off with a Hello Honey card base and then cut my star piece from the Irresistibly Yours DSP (4″ x 5-1/4″). Using my Sponge Daubers and Stripes and Dots Decorative Mask (or Simply Created Build A Banner Template), you will add ink (Bermuda Bay) in the dots over your paper! It is so fun because it reveals these adorable little stars! I love it. NOTE: You will want to take a paper towel and wipe each little dot to get the excess ink off the embossed stars before removing the template. If you remove the template and start rubbing all over to get the excess off, you will get streaks in between your dots!!! That’s what I’m here for….to make the mistakes for you and let you know the tips and trick! hehe! Once that is complete, you can adhere that to your card and start on your greeting. I stamped the greeting from the Big News Stamp Set in Memento Ink so I could color in the words with my darkest marker in the Coastal Cabana Blendibilities Set! Precious! I added a little knot of Hello Honey Satin Stitched Ribbon on the left to finish it off! Of course the greeting is popped up on Stampin’ Dimensionals as well! What is a card without those?

Of course you can check out the Video Tutorial on this as well and don’t forget to give it a thumbs up if you liked it!!!

What is your favorite way to add color to the Irresistibly Yours Designer Series Paper – Mask, Sponge Daubers, Spritzing, Stamping, or something else? Leave me a comment down below!

Happy Stampin’

~Laura


Santa Hershey Bars!!!

Posted on

Tis the Season for gifting and why not make the packaging just as special as the person you are giving it to!? You can check out some of my other posts and videos in this Gift Packaging Series by clicking here, here, and here! Today I’m going to show you how to decorate a Hershey Chocolate Bar (or any other large candy bar)!

Santa Hershey Bars, www.LaurasStampPad.com

How cute are these? They would make a cute, yet affordable gift for teachers, neighbors, co-workers, friends and family! Also, great stocking stuffers! I started out with a piece of Real Red cardstock measuring 5-1/2″ x 6-1/2″. You will place Sticky Strip along the 6-1/2″ side and wrap it around the Hershey Bar. WAIT….before wrapping it around, run it over your Bone Folder or over the edge of a table to break down the fibers of the paper a little and allow it to curve better. Then you will take a piece of Whisper White cardstock measuring 1-3/4″ x 5-1/2″ and using your Scallop Border Punch, punch both sides! Adhere this piece to the front of your Hershey Bar with Snail Adhesive. Using your 1/2″ Circle Punch, you will punch out 4 in Basic Black and adhere to your Whisper White piece (3 on top, 1 on the bottom) and you will leave space between the 3rd and 4th one for your Santa Belt. For the Belt, you will need a piece of Basic Black measuring 3/4″ x 6-1/2″. Again you will want to run it over your Bone Folder to break down the fibers and attach it to the Bar with Sticky Strip. I overlap the ends in the front so I can hide it behind the buckle, but you can put it in the back as well. Now for the buckle, I prefer the one of the right which was a piece of Silver Glimmer Paper punched out with the Curly Label Punch. Then I took the Petite Curly Label Punch and punched a black one to layer on top! The bar on the left was done with a square piece of Crushed Curry that has the Petite Curly Label Punch punched out of the middle. I did a few like that and then was browsing Pinterest and saw the other option on a project and fell in love. You know me and my bling! 🙂 You are all set now!!! To see this in action, check out the Video Tutorial below! Don’t forget to give it a thumbs up if you liked it!

Thank You Hershey Bars,  www.LaurasStampPad.com

Here are a few others that I created for Fall/Thanksgiving! I used the Color Me Autumn Designer Series Paper and added some Mossy Meadow Satin Stitched Ribbon. For the greeting, I used the Lots of Thanks Stamp Set and Curly Label Punch!

Birthday Hershey Bars, www.LaurasStampPad.com

Here are a few Hershey Bars that I created with some of the Sweet Taffy Designer Series Paper and Big News Stamp Set. The bottom right one was done with the Back to Black Designer Series Paper and Pool Party Cotton Ribbon! I love these because of the bright colors and MELON MAMBO!!!!

Baby Hershey Bars, www.LaurasStampPad.com

 Everyone loves Chocolate especially someone who just had a baby! What a great little treat to bring to the new parents or grandparents! These were done with the Lullaby Designer Series Paper and Label Love Stamp Set (Artisan Label Punch)!

I hope you enjoyed these cute little chocolates and use them for your next occasion! Let me know in the comments below which one is your favorite!

Happy Stampin’

~Laura


Beautiful Wedding Card!!!

Posted on

Big News Wedding Card, www.LaurasStampPad.com

This card just screams elegance and beauty (although if it was elegant it wouldn’t be screaming, right?)!!! I used the fabulous Big News Stamp Set for the greeting!!! For the background, I used a piece of the Park Lane Designer Series Paper which has flowers all over it! I then punched 2 flowers with my Pansy Punch and off set them for a fuller flower look. I finished it off with Gold Sequins all over the greeting, the center of the flower and hanging out from the behind the flower as well! I use Mini Glue Dots to attach my sequins to my project! Remember, place the sequin or cardstock on the glue dot and then lift them both off the paper. If you try to pull the glue dot off with your hands, it will lose it’s shape and might not want to come off your finger. 😉

I hope you enjoyed this and you can check out more fabulous cards with the Big News Stamp Set here, here and here!

Happy Stampin’

~Laura


Happily Ever After!

Posted on

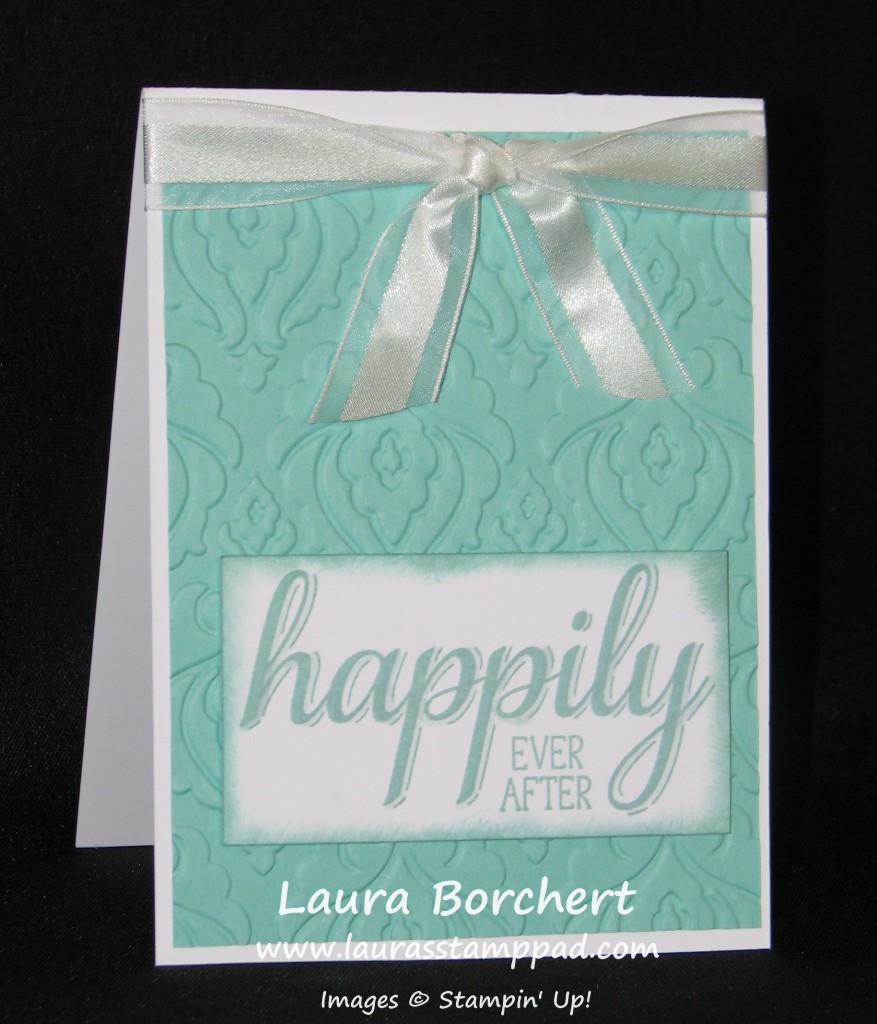
Happily Ever After, Big News, www.LaurasStampPad.com

 This is just a fabulous card to top off any wedding gift or even for an Anniversary! I just love the greeting and I love the amazing elegant look – very Tiffany’s look! Oh how I am loving that look lately with Pool Party, Coastal Cabana and even the brighter Bermuda Bay. This amazing greeting is in the Big News Stamp Set which I LOVE! You can see more samples here, here and here! It just the perfect greetings and images! I stamped that in Pool Party and then brushed the edges with my Sponge Daubers and attached that to my card with Stampin’ Dimensionals (love)! I used my Beautifully Baroque Embossing Folder to get that gorgeous background and added some Whisper White Organza Ribbon to top it off! The one ribbon end fell just so perfectly so I “made” the other end do the same with a little adhesive help! 🙂 Can’t wait to use this card for a newlywed couple or a couple who has been married for many many years!

Leave me a comment down below of ways you have used your Big News Stamp Set!

Happy Stampin’

~Laura

You are AWESOME!!!!

Posted on

Big News Awesome Card, www.LaurasStampPad.com

 This greeting is just fabulous! You could send this card to anyone who is AWESOME, someone who got promoted, someone who achieved a goal or your niece who is starting school TODAY! I’m doing that last one if you hadn’t guessed! Auntie of the Year right here! 🙂 I know you are probably getting tired of seeing Coastal Cabana but I can’t help myself and just I gravitate towards that color. I added a POP of black and white with the Back to Black Designer Series Paper. Then I stamped the greeting from the Big News Stamp Set and used my Big Shot and Deco Label Framelits to cut it out! Don’t ask me where this came from but I brushed the edges using my Sponge Daubers with…..Smoky Slate. Mixing it up folks!!!! Love it!!!!

Big News Awesome Card, www.LaurasStampPad.com

Here is another one. The Blackberry Bliss card base is kind of hard to see with my black background, sorry about that. Again I used some Back to Black Designer Series Paper and this time I used my Labels Collection Framelits! This is a bit larger than the one above and fits the greeting a little more! I stamped the greeting in Encore Gold Ink which gives it a little shine and bling as well as the Gold Sequins!!!! I attached the Gold Sequins with Mini Glue Dots! For more samples using the Big News Stamp Set, click here and here!

Who would you send a card like this too? Who do you think is AWESOME? Leave the name in the comments below!

Happy Stampin’! Be Awesome!

~Laura


Love Is In The Air!!!!

Posted on

Summer time is definitely wedding season! We had one in June, another in July and we have one in August!!!! I love love love weddings though so I’m okay with that. AND then I get to use the fabulous Big New Stamp Set for my wedding cards!!!! I am really loving this set because of the giant greetings and I love the sayings!!!

Big New Wedding Card, www.LaurasStampPad.com

How cute is this? I used Pacific Point and Soft Sky for the colors! These colors matched my wrapping paper ;)! You could always match it to the wedding or just use whatever paper is your favorite color that day!

Wedding Card, www.LaurasStampPad.com

I embossed the background with my Beautifully Baroque Embossing Folder which I love because it has this elegant pattern to it! Then I stamped my greeting and added a little heart from the Itty Bitty Punch Pack on the front and inside!!! This is a MUST for your next order if you don’t have it! A little heart, star, and flower…..they are just perfect for a little something added to your project! Perfect size and perfect images! Love them!!!! I will be making lots of these for all of my upcoming weddings! Stay tuned!

Happy Stampin’

~Laura