Which do you prefer – Sunrise or Sunset?!?!? Honestly I am a bit torn but if I had to pick just 1, it would be sunrise. I love that early morning crispness, the birds chirping, and that feeling of newness. It’s a brand new day to be amazing! I love that! Although I will say right now, I’m not happy to see sunrises because that means the kids woke me super early. LOL
This beautiful card uses the Circle Sayings Stamp Set and coordinating Circle Punch! I am loving this bundle WAY more than I ever thought I would! It’s just super versatile and I love that birthday greeting! It is small and scrolly and fabulous!
I used Azure Afternoon for the card base as well as that color from the Brights Designer Series Paper Pack! Next, I layered this with a piece of Night of Navy cardstock! I thought about coloring all of the waves and everything but then I stopped at just the sun and I love it! What do you think?!?! For this card, I used Daffodil Delight Light Stampin’ Blends. If you want a bit brighter or more yellow/orange, go for the Daffodil Delight Dark Stampin’ Blends! Another option is to use both and really highlight the sun! 🙂
Check out the supply list below if you wish to recreate this card! It can be a sunrise or sunset….it’s all up to you!
It’s always sad to see stamp sets retire and this little piggy set is one of them! It’s also on SUPER sale too!!! This Birthday Piggy Stamp Set is under $10 and the coordinating dies are under $15. WOOT WOOT for an amazing bundle! Click here to shop them!
I used a lot of retiring products in this card actually so snatch them up before they are gone at the end of the month! The black and white polka dot paper is from the Perfectly Penciled Designer Series Paper Pack (sold out already). The Balmy Blue Textured Shimmer Paper (not retiring) is super fun to add to a card or any project. It has just a hint of shimmer to it so nothing majorly bling-y. It’s the texture that is super fun though. I love it!
For the focal point, I used the Scallop Contour Dies and stamped the piggy in Basic Gray Ink! I went for gray because it’s a bit softer than Memento Black. I really struggled with color options for my piggy. After coloring it I thought oh no, that’s awful but after it sat for a bit and the colors blended, I loved the look! For the piggy above, I used Petal Pink and Flirty Flamingo for the accents! For the piggy below, I used just Flirty Flamingo and while he’s PINK its super cute! So my advice for you is to just color and have fun and give it a bit to really blend and dry and then decide whether you like it or not.
Here I created the same card but in landscape to fit this adorable piggy on a scooter! These adorable cards would be fun for any age really! I know I would giggle if I got this little piggy birthday card! What about you?!?
I am still a bit surprised it is September already. Harvest hasn’t officially started yet at least with my family farm so I think that is why! It seems that begins later and later each year. When I was kid, it always started at my birthday which is the end of August! Either way Fall is here as the temps are dropping and the leaves are changing so I have started playing with the Rustic Harvest Suite!
This is one of the cards that we will be creating for the September Online Card Class. There is a total of 5 cards all using the Rustic Harvest Suite from the July – December Mini Catalog! The detail in the pumpkins and that fun floral piece are what makes me love this Suite! I used lots of Linen Thread on this class too! It’s just the perfect thing for a rustic Fall look, don’t you think?!?! Be sure to get signed up for this class here!
September Online Card Class!
One of my other favorite things about the Hello Harvest Stamp Set is the fun little images like the line and dots image above. How cute and fun is that to decorate the inside of the card, the envelope, or even the border on the front of the card!?!? It’s so simple and easy but adds so much to the project. Also, if you are thinking…ohhhh how do I get it straight or I would mess that up…..STOP right there. I thought those same things but just went for it and yes it is off but it also doesn’t matter. It looks fabulous and it’s not noticable. BONUS! I love images like that!
Remember that you can watch the Online Card Class for FREE on YouTube or Facebook LIVE on Friday, September 23rd at 7:30 p.m. CT. If you would like to stamp along you can always purchase the PDF Tutorial and/or the pre-cut card packet! Click here for all of the detail and how to get signed up! See you there for the Rustic Harvest Online Stamp Class!
I know that Sale-A-Bration is over but I just have to share this fun card with you! This lovely layered look works with lots of different stamped images. If you don’t have the Sale-A-Bration Friendly Hello, that’s okay! If you do, then I hope this card inspires you to create with it!
This look is super cool and it’s super easy to do! That’s my kind of WOW card! For this one, I would say all of the coloring is the hardest part, LOL! You all know I am not a huge fan of lots of coloring!
I started off with a piece of Basic Black cardstock as the card base. Then I cut 2 piece of Basic White measuring 5-1/4″ x 4″. One is for the card front and the other one is for the inside of the card. Using Memento Black Ink, I stamped the greeting in the center and then added flowers all around it and to the edge of the cardstock. Then, it’s time to color. I actually colored after I cut the circle but I think it would probably be easier to color first.
Once you are done coloring, simply cut out the greeting with the Layering Circles Dies. Adhere the rectangle to the card front, be sure it is right side up so that the greeting circle lines up with the flowers and the greeting isn’t upside down. Then die cut out the scallop circle in Basic Black cardstock and layer the greeting on top. Then just like a puzzle piece, place this layer over the center of the card! How amazing is that?!?! Simple and fabulous!
Something I would say we all probably could do more of….Relaxing! I know I sure can but it’s so hard for me to relax as I always feel like there is something that needs to be done. Of course there are 2 little ones who take up the rest of my time too! So relax with me for another 5 minutes and check out this fun card!
The In The Moment Stamp Set has beautiful images for a card like this! The greetings are great for everyday type cards! #HappyMail The line art images are great for coloring as well so shout out to all of my coloring lovers!!!
For this card, I stamped the image in Memento Black Ink and colored it in! I always like to take a photo of the markers I use so I remember for next time….and to share with all of you! Then I used the Layering Circle Dies to die cut out the image! This was then layered onto a piece of the In Good Taste Designer Series Paper!
The neutral colors of the card base and designer paper make it super easy to use any colors you would like for the image which is fun to mix it up! You could create multiples of this card and even add different greetings to each one! What occasion would you use this card for?!? Let me know in the comments below!
If you would like to create this Relax With Me card, check out the supplies listed below! Click ADD ALL TO CART for a quick shopping! Don’t forget that it is still Sale-A-Bration time!!!
You all know I LOVE flowers when it comes to stamping. What about animals?!? Are you a big fan or not? I do thing the Awesome Otter Sale-A-Bration Stamp Set is pretty cute and it’s FREE with a $50 order!
Come on, you can’t tell me that that face isn’t adorable!!!! And the Party Hat!!! I love it! I also will say that I don’t think this card is specific to really little kids either! What do you think?! Let me know in the comments below! I was inspired to create this card because of a swap card I received from Laura Mulligan so shout out to her! Thank you!
For this card, I started with a Thick Basic White card base and stamped the party hat all over on the top in Pool Party Ink. Next, I added a strip of the Sunshine & Rainbows Sale-A-Bration Designer Series Paper. Then I stamped the greeting on the corner of a strip of Basic White, added more Designer Paper and added it to the card front with Stampin’ Dimensionals.
For the focal point, I die cut some of the Sunshine & Rainbows Designer Paper. You can use whichever size circle you would like. Then I stamped the adorable otter onto a piece of Basic White in Memento Black Ink. After coloring him with Stampin’ Blends, I used that same circle die and cut him out. This gives that same rounded look on the bottom. For the top half, I fussy cut out the otter and layered it onto the designer paper circle! For the party hat, I simply stamped it onto some of the designer paper in Memento Ink and then fussy cut it out! This circle was then added to the card front with Stampin’ Dimensionals!
If you need just a general #happymail card, you can always change up the greeting to this one! OH and don’t forget the final touch of Iridescent Rhinestones for some bling!
If you would like to recreate these cute cards using the Awesome Otter Stamp Set, click on the supplies listed below! Don’t forget it is Sale-A-Bration time till the end of February so you can earn FREE stuff for every $50 you spend! Woot Woot!
I make a LOT of birthday cards for those of all ages and while I love flowers and nature, I thought I would mix it up a little. The Senior Years Stamp Set is super cute and has great greetings for birthday and even retirement greetings!
You might remember that this look is similar to those I posted on Tuesday! That is because it is the exact same layout and dimensions just with a different stamp set. I used the Senior Years Stamp Set and colored in with Stampin’ Blends!
MAJOR QUESTION: When making these cards, I couldn’t help but feel like I needed to color the person as if they were the recipient getting the card. Now that is in no way correct because not everyone has this hair cut or would wear a purple dress. Then I feel like will the person getting this card think, does she think that looks like me?!?!? Or will they just think this is a cute card?!?!? Let me know in the comment below!
This greeting for the inside of the card is AMAZING! I love it. Honestly as I have gotten older, I have started using the number of candles for both numbers. So rather than adding 31 candles to a cake, I would add 3 in a row and then 1 spaced over from that to represent 31. After all 31 candles could create a cake going up in flames and that would be a tragedy. LOL
Here is the guy version of this card! I just had so much fun with this card style and getting masculine birthday card, feminine birthday cards and then all those beautiful butterfly cards out of it! If you would like to recreate these Senior Years cards, check out the supplies listed below and don’t forget that every $50 earns you a Sale-A-Bration item! Woot Woot!
Have you tried out the Stained Glass technique recently?!?! It is super fun and fairly easy. Although it is one of those techniques that no 2 will come out the same….that’s always hard for me!
To do the stained glass technique, you will need vellum, Stampin’ Blends, and Rubbing Alcohol (the higher the number the better). I found that the darker colors of Stampin’ Blends worked better. When I used light Pool Party, it was barely visible. Color random splotches all over the vellum. This can be messy and all over but be sure to cover the entire piece of vellum. I used Night of Navy, Misty Moonlight, and Balmy Blue Stampin’ Blends! Now for adding the alcohol there can be various ways to do so! Using a Water Painter, Paint Brush, Wink of Stella or simply just dripping it.
For mine, I started by lightly dabbing around the edge of each color with the Water Painter (filled with 91% alcohol). Starting with the darkest color and finishing that one before moving to the next lighter color. Once I finished that, I dripped a few times with the alcohol as well as Wink of Stella! I love the random glitter spots! It’s just perfect! Also, remember that part of the look will be covered up with the Angel so it’s okay if there is a weird spot or it just doesn’t look right. It’s all good!!
For the focal point, I used the Angels of Peace Stamp Set and Night of Navy Ink! The cardstock colors used were Night of Navy and Balmy Blue! The greeting is popped up with the Timeless Label Punch!
I hope you try out this Stained Glass Technique because it is super fun! Check out this video if you want more of a visual on how it works! It would be great for a water theme with fishes or mermaids or even a snowy look! Fall colors and using it with leaves and trees would be fabulous too! So many possibilities! Check out the supplies listed below for what I used!
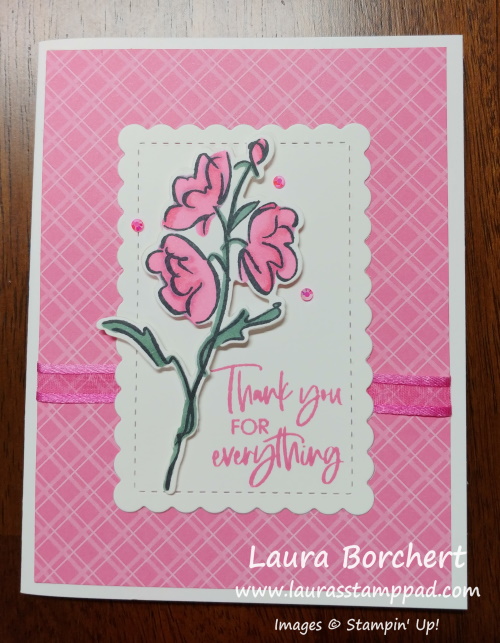
Pink is my favorite color and I just love flowers so this card makes me super happy! The Color & Contour Stamp Set has been on my desk a lot lately. This card could be made in every In Color with the supplies I used!!! Check out the list of items below so you can make some too!
I started with a Basic White thick cardstock base! When I create a card with the base of white or vanilla, I like to use the Thick Cardstock! Next, I took a piece of the In Color Designer Series Paper (4″ x 5-1/4″) and wrapped some Polished Pink Open Weave Ribbon around it. This ribbon comes in all 5 of the in colors! Adding just a small piece across the card front adds a little texture and fun to the card but no need for a bow and only uses a small amount!
For the focal point, I die cut one of the scallop rectangles from the coordinating Scalloped Contour Dies. LOVE THESE!!! The greeting was stamped in Polished Pink and then I added it to the card front!! The flower image was stamped in Memento Black Ink and colored with Stampin’ Blends! Then I die cut it out with the same Scalloped Contour Dies and added it to the label with Mini Stampin’ Dimensionals!
For the inside of the card, I added a little leftover strip of the designer paper to the left hand side. Then using the little dots of the Color & Contour Stamp Stamp Set, I stamped them in the right hand corner. To get a little variation of color, I inked it up and stamped 3 times, moving the stamp around a bit.
I love this Color & Contour Bundle so much because it’s super versatile. This card could be created in any color you like too! Check out the supplies listed below to see what I used! If you want them all, click ADD ALL TO CART for quick and simple shopping!
I am always in need of Thank You cards because I am a firm believer in sending them out for every gift we receive. Lately with Alex being born, his baptism and Claire’s birthday, I’ve been sending out a ton. I also send them out each month to everyone who orders from me that month! This strawberry card is perfect and I love the coordinating inside greeting – So Sweet Of You!!!
This card I created uses Poppy Parade and Whisper White cardstock. The Poppy Parade card base measures 5-1/2″ x 8-1/2″ and the 2 pieces of Whisper White are 4″ x 5-1/4″. One of the pieces of white is for the front and one for the inside of the card!
Using the Sweet Strawberry Stamp Set, I stamped 2 of the leaves and flowers in Memento Black Ink and colored them with Stampin’ Blends. I used Daffodil Delight for the flower centers and Granny Apple Green for the leaves. You can stamp these images as close together or far apart as you wish. It all depends on your greeting panel in the center or preference on how much of the white you want covered!
Next, I stamped some strawberries onto Whisper White in Poppy Parade Ink. The outline image was stamped full strength ink and the solid background stamp was stamped off once (or twice if you want an even lighter look or a variation in color)! Using the coordinating punch, I punched them out! Then I took Granny Apple Green cardstock and stamped some leaves in Granny Apple Green. I used 2 leaves on the front and 2 leaves on the inside of the card!
For the greeting, I just used some scraps of Whisper White and Basic Black cardstock to stamp the greeting. The Thank You greeting is thinner but the Happy Birthday greeting is wider. I love how you can easily adjust this piece of cardstock to create either card. When I went to assemble, I added the strawberries first and held the greeting over the top to help with placement. The strawberries and greeting all have Stampin’ Dimensionals!
On the inside I used the greeting That Was So Sweet Of You and I love it! I also stamped the strawberries onto the cardstock but added punched out leaves. This was a bit of an accident to have my strawberries “standing up” or upside down or however you want to see that. Apparently I kept thinking of a pear. I did actually stamp another card with them the other way and it really looks just the same so I think I like this mistake one better! See no mistake in stamping is bad, just an alternative! 🙂
If you would like to recreate this strawberry card, check out the supplies listed below! Purchase just the ones you need or click Add All To Cart!!! Either way, have fun and enjoy!

")


 Designer Series Paper")


")

 Shimmer Paper")
 Crinkled Seam Binding Ribbon")


")


")
 Designer Series Paper")


")
 Designer Series Paper")


")


")

 Designer Series Paper")


 Open Weave Ribbon")


