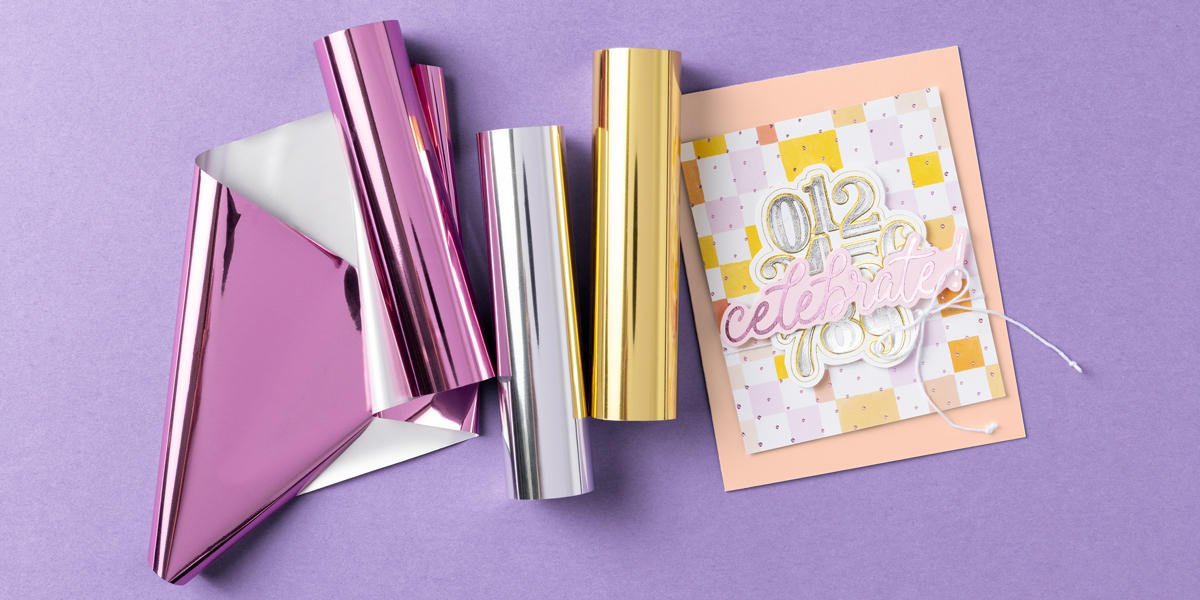
The Stampin’ Up! Hot Foil System has been out for a few months now and I’m still in love! Each time I peel back that foil and see it…..WOW!!!! Check out this foil & shine card for fun inspiration or to push you over the fence to go ahead and order it for yourself!
Paper
Barely Blush Cardstock (5-1/2″ x 5-1/2″)
Bubble Bath 12″ x 12″ Two-Tone Cardstock for the celebrate
Painted Patch Designer Series Paper (4′ x 3″)
Specialty Finishes
Gold Stampin’ Hot Foil Rolls
Light Pink Stampin’ Hot Foil Rolls
Silver Stampin’ Hot Foil Rolls
Ribbon & Trim
Baker’s Twine Essentials Pack
Adhesives
Mini Stampin’ Dimensionals
Tools
Stampin’ Cut & Emboss Machine
Stampin’ Hot Foil System
Classic Greetings Hot Foil Dies
Luxe Alphabet & Numbers Hot Foil Dies
Swiss Dots Hot Foil Die
There is sooooo much fun foil on this card to create a shine like no other! The Designer Paper is foiled with the Swiss Dots and then the numbers and greeting are also foiled! WOWZA! Some may say it’s a bit too much or would take too long! I might agree to that and would maybe nix the Swiss Dots but foil the rest or mix it up and foil just the greeting! It’s so much fun to take a card and make it your own!
Check out the supplies listed below!!! Don’t forget that all order placed starting at $40 earn special rewards from ME!
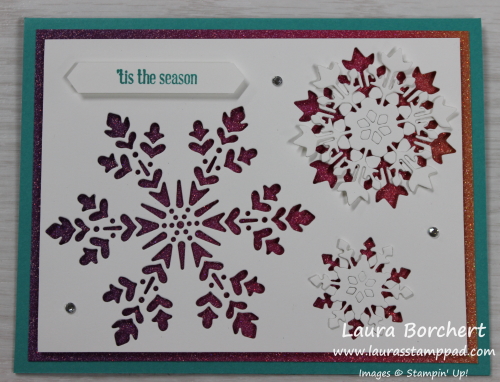
Disclaimer: Still not a fan of winter! LOL I sure have been stamping a lot lately with snowflakes and wintery themes as I’m working on my Christmas Cards. One of them is this gorgeous Rainbow Snowflakes Card!!! What do you think?
I just love the bright colors….surprise, surprise. 🙂 Also, this card is fairly simple to create with few layers and minimal stamping! The die cutting and poking out can make a person go crazy though! LOL
I started with a Bermuda Bay card base and then layered on a piece of that AMAZING Rainbow Glimmer Paper. This stuff is so beautiful and brings happiness to my life for sure! Each sheet is ombre of purple, blue, green, pink, orange, and yellow. Since this piece is only 4″ x 5-1/4″, you can pick which colors you use for your card! You can see 2 different color combinations with the samples here!
Next, I took a piece of Whisper White cardstock (3-3/4″ x 5″) and die cut 3 snowflakes using the So Many Snowflakes Dies. Try to leave a small little spot to put a greeting. I went super small since I used a greeting from the Itty Bitty Christmas Greetings Stamp Set! After die cutting the snowflakes, I delicately popped out the two smaller ones.
Check out the photo above and below these words. In the sample above, all of the pieces popped out from the snowflake center so I added Fine Tip Glue Pen to the edges and glues them off set to the coordinating one. The center is just hanging there. In the sample below, the snowflake centers stayed in and I added a Stampin’ Dimensional to the center to hold them in place and popped the snowflake in the middle. There was no intention on these 2 options, it just happened and I went with it!
I added the Whisper White cardstock to the card front with Stampin’ Dimensionals. This gives that 3D look and makes it pop more! The greeting was stamped in Bermuda Bay from the Itty Bitty Christmas Stamp Set. I did it on a piece of scrap Whisper White as to not mess us my super cute snowflake piece after all of that work. You can always use your favorite punch or just snip the ends diagonal. Then I finished off the card with some Rhinestones for additional bling!
This card would be perfect for any occasion throughout the Winter season so leave off the greeting till you need a card and then add it on!
For the inside of the card, I simply stamped some snowflakes and a greeting from the Snowflake Wishes Stamp Set in Bermuda Bay! Click here for one click shopping for the items used in this Rainbow Snowflakes cards!!!
REMINDER: Christmas is right around the corner. Let your friends and family know what you want with a Stampin’ Up List! Fill this out and pass it out to anyone who asks! All of my contact information is on there for them to reach out and place an order for you or order online! I have already had fun being an elf this year and helping some with early shopping!
Good Morning, everyone! It has been awhile and don’t worry, I’m not gone forever. With all of the chaos of “stay at home” and a toddler, time has not been in abundance! Also, I chat with all of you on my Daily Dose of Stampin’ Therapy on Facebook each week day so you can still catch me there! Here is another project I have been busy with! Elmo says Claire is turning 2!!!!
Isn’t he the cutest ever?!?!?! This card was simple and turned out perfectly! I always love a little punch art. You can always check out some other fun ones here!
I started with a Real Red card base. Next, I cut a piece of Whisper White measuring 4″ x 5-1/4″ for the front. Using the retiring For the Love of Felt Stamp Set, I stamped the greeting in the lower left corner. I thought that the greeting worked well for an invitation for a party!! Then I tied some Silver Metallic Edge Ribbon around the card and placed it right above the greeting! Now it is all set to adhere to the card front!
Now for the fabulous Elmo Punch Art piece, I used the Layering Circles Dies and Circle Punches. The scallop circle is the largest scallop in the Layering Circles Dies. For the eyes, I used 1″ Circles of Whisper White and 1/2″ Circles of Basic Black. The nose is also a 1″ Circle in Pumpkin Pie. For the mouth, I used Basic Black and only slid the cardstock in a bit so it wouldn’t punch the whole circle. It is a 2″ Circle. I would say it was a smidge less than a half of a circle.
The inside of the card was printed on my computer! Of course, I had to decorate the envelope as well to make it super fun! I used the retiring Around the Corner Stamp Set. It was perfect to have Sesame Street stamps too! Elmo says, “It’s fabulous!!!”
Check out the supplies below and don’t forget that the retiring item will be officially gone on June 2nd so don’t delay!!
This is the adorable card I gave my mom for her retirement. I mean actually I sent her a lot of cards but this one I made specifically for her because I thought it was cute and she would enjoy it! Relax & chinchilla out…it’s the perfect greeting, right?
Isn’t it adorable??? I even stamped a coordinating envelope!
For this card, I started with a Pretty Peacock card base. Next, I layered on some Mango Melody and then some Tropical Oasis Designer Series Paper!! Then for the focal point, I die cut out 2 sizes of the Stitched So Sweetly labels! These are so cute and perfect for adding a greeting on your card!
Using the Witty-cisms Stamp Set, I stamped the greeting/image in Memento Black Ink. Then I colored the little chinchilla in with the Light Smoky Slate Stampin’ Blends Marker. To add a little bling, I colored over him with the Wink of Stella Pen! Then I layered these together and added it to the card front with Stampin’ Dimensionals!
For the inside of the card, I stamped another greeting from the Witty-cisms Stamp Set. I also added a little strip of the Tropical Oasis Designer Series Paper to the left hand side to bring it all together! I love how it turned out and my Mom loved it too!!!
Check out the supplies listed below if you need to make a fun “relax & chinchilla out” retirement card! Don’t forget that the FREE Stamp Set of the Month this month is the Under My Umbrella Stamp Set for order of $75 or more!
I have another fabulous one of Laura’s Quick Tips to share with you today! I have received this question a few times lately so I thought I would share it on here too! If one person has it as a question, I’m sure many others do too! Today, I have tips for die cutting rectangles!!!
Many times when die cutting rectangles, squares, or any image with a long straight line and the image doesn’t cut very well. There are also many times it cuts perfectly fine which is a win! 🙂 If you have this happen to you, my tip is to run it through at a diagonal. This allows the die cutting machine to apply pressure on a smaller section with each crank through, rather than hitting a long line at the same time. Also, it is really hard to crank it through when a solid line is going through at once. When you place it in at a diagonal, it goes through smoother and easier which is fabulous!!
To see this all in action, check out the video below or click here. Be sure to give the video a thumbs up if you liked it and don’t forget to subscribe if you are new. If you would like a notification when I post a new video, be sure to click the bell right next to the subscribe!!!
This card just looks like a beautiful spring day! I showed this same card in a different color and I just had to share this one too! I am loving it so much! What about you?? Let me know in the comments below!
This card is very simple to make and you can always change up the greeting for any occasion! A little bit of embossing with the Parisian Embossing Folder. Some added fun with the Stitched Rectangle Framelits. Coloring with Stampin’ Blends!
For this card, I used Pool Party for her dress for a soft subtle blue look! Highland Heather and Old Olive were used to color the flowers! Of course any color would work for those flowers too!!
I hope you are all enjoying the beauty of nature right now. The sunshine and flowers all in bloom are just wonderful and they sure add joy to my life right now in this chaos. Sure they also add pollen to my nose but let’s not talk about that. Find joy in the little things each day! Being stuck at home with a 2 year old and 2 working parents isn’t easy. The extra snuggles, the hand picked dandelions, and the squeals heard when bubbles are made sure make it all amazing! Wishing you all a wonderful day!
Love, hugs, and prayers to all of you during this crazy time! Stay safe and healthy! Happy Stampin’
You all know how much I love flowers so the more the better, right?!? Check out this fun double stamping technique to have more flowers on your card!!!
I started with a Pretty Peacock card base and layered on another piece that was embossed with the Basket Weave Embossing Folder. This adds subtle texture to the card. Next, I took a piece of Whisper White measuring 3″ x 3-1/2″. This is the piece I am going to double stamp on with the Tags In Bloom Stamp Set! Be sure to stamp with the label centered and the flowers in the upper left corner. Then flip the piece around and line up the label to stamp again for flowers on the other side. Photopolymer stamps makes this super easy!
I colored in the flowers with Daffodil Delight and Old Olive Stampin’ Blends! Then for the greeting, I used the stamps from the Tags In Bloom Set and punched it out with the coordinating Label Me Lovely Punch. I added it to the label with Stampin’ Dimensionals for a fabulous layered look! Next, I layered it onto some Daffodil Delight and added it to the card front. I went for an off set look just to go with someone different!
For the inside of the card, I added some flowers and another greeting from the Tags In Bloom Sale-A-Bration Stamp Set. Don’t forget that Sale-A-Bration ends on March 31st! This set is super fun and fabulous so I highly recommend it!!! 🙂
To see this double stamping in action check out the video tutorial below or click here. Be sure to give the video a thumbs up if you liked it and don’t forget to subscribe if you are new. If you would like a notification when I post a new video, be sure to click the bell right next to the subscribe!!!
This card style is perfect for any occasion! The basic colors make it easy to swap a color in or out for your liking. It’s just so berry sweet and simple!!!
I am just loving this layout and how interchangeable it is!! I used the Witty-cisms Stamp Set which has lots of greeting/image variety!
For the card base, I used Smoky Slate cardstock. Next, I took 3 strips of scrap paper in Basic Black (1″), Whisper White (1″), and Silver Glimmer Paper (3/4″) and punched them with the Banner Triple Punch. This is a great way to use up scraps. Also, you can snip off the length you need, punch it again and keep going to make lots of this card style.
For the focal point, I used the Stitched So Sweetly Dies for those adorable scallop stitched rectangles. You can use whichever size fits your image. I went with Real Red and Whisper White for this one to match the berry. I stamped the image from Witty-cisms in Memento Black Ink and then colors it with Stampin’ Blends. Then I layered these together and then added them to the card front over the ends of the banner strips with Stampin’ Dimensionals! This gives a smooth look but also some texture to the card!
For the inside of the card, I used the Stampin’ Write Markers to color just the strawberry image. Then I stamped it in the corner of a piece of Whisper White (4″ x 5-1/4″) for the inside of the card!
To this this berry sweet and simple card in action as well as a graduation card using the same style, check out the video tutorial below or click here. Be sure to give the video a thumbs up if you liked it and don’t forget to subscribe if you are new. If you would like a notification when I post a new video, be sure to click the bell right next to the subscribe!!!
This title – It’s a Poppy Moment – makes me think of the movie Trolls. I do love that movie because it’s so cute and I played with trolls as a kid! 🙂 What about you? Did you play with trolls? Let me know in the comments below!
Okay back to the card at hand and not the movie Trolls! 🙂 Isn’t this one beautiful with a simple greeting stamped in black and die cut flowers! If you made a bunch of these, I would suggest die cutting a whole bunch while watching your favorite show/movie. Then assemble them with the Fine Tip Glue Pen or this fun trick! Then head to your craft table and assemble the card!
I used Poppy Parade for the card base. Next, I layered Basic Black and Whisper White. Be sure to stamp your greeting before assembling the flowers. This way you don’t have to worry about leaving enough space and if you mess up the stamped greeting, it doesn’t ruin the entire card front. Just flip it over! 🙂
To this this Poppy Moments card all in action, check out the video tutorial here or below. Be sure to give the video a thumbs up if you liked it and don’t forget to subscribe if you are new. If you would like a notification when I post a new video, be sure to click the bell right next to the subscribe!!!
Check out more samples using the poppy items from the Mini Catalog by clicking here, and here!!! If you would like to recreate this card, click the supplies below!
Want to get the beautiful poppy look without buying the stamp set?? Check out these Peaceful Poppy Elements and the beautiful Peaceful Poppy Designer Series Paper!!!
All I did was stamp a greeting and layer it all together. Isn’t it beautiful?!?!? It was super simple too! 🙂
I started with a Poppy Parade card base. Next, I layered a piece of Peaceful Poppy Designer Series Paper (3-3/4″ x 5″) onto Whisper White (4″ x 5-1/4″). Next, I tied some Whisper White Crinkled Seam Binding around it and into a double knot. Then I tied the bow. This makes the ribbon nice and tight and you can take your time with creating the bow. Then I added these layers to the card base!
For the greeting, I die cut out these fabulous scallop dotted rectangle from the Stitched So Sweetly Dies. The greeting is from the coordinating So Sentimental Stamp Set. Bundle & Save 10% when you purchase these together! Then I added the little Peaceful Poppy Elements to the left hand side. The greeting was added to the card front with Stampin’ Dimensionals for a little bit of texture. To finish it off, I added a few Peaceful Poppy Sequins with the Fine Tip Glue Pen! Of course a little designer paper for the inside really brings it all together!
Check out all of the different looks with the Painted Poppy Elements in the video below or click here! Be sure to give the video a thumbs up if you liked it and don’t forget to subscribe if you are new. If you would like a notification when I post a new video, be sure to click the bell right next to the subscribe!!!
![Barely Blush 8 1/2" X 11" Cardstock [ 167689 ]](https://assets1.tamsnetwork.com/images/EC042017NF/167689s.jpg "Barely Blush 8 1/2\" X 11\" Cardstock [ 167689 ]")
![Bubble Bath 12" X 12" (30.5 X 30.5 Cm) Two Tone Cardstock [ 166676 ]](https://assets1.tamsnetwork.com/images/EC042017NF/166676s.jpg "Bubble Bath 12\" X 12\" (30.5 X 30.5 Cm) Two Tone Cardstock [ 166676 ]")
![Painted Patch 12" X 12" (30.5 X 30.5 Cm) Designer Series Paper [ 168430 ]](https://assets1.tamsnetwork.com/images/EC042017NF/168430s.jpg "Painted Patch 12\" X 12\" (30.5 X 30.5 Cm) Designer Series Paper [ 168430 ]")
![Gold Stampin' Hot Foil Rolls [ 170066 ]](https://assets1.tamsnetwork.com/images/EC042017NF/170066s.jpg "Gold Stampin' Hot Foil Rolls [ 170066 ]")
![Light Pink Stampin' Hot Foil Rolls [ 170068 ]](https://assets1.tamsnetwork.com/images/EC042017NF/170068s.jpg "Light Pink Stampin' Hot Foil Rolls [ 170068 ]")
![Silver Opal Stampin' Hot Foil Rolls [ 170554 ]](https://assets1.tamsnetwork.com/images/EC042017NF/170554s.jpg "Silver Opal Stampin' Hot Foil Rolls [ 170554 ]")
![Baker's Twine Essentials Pack [ 155475 ]](https://assets1.tamsnetwork.com/images/EC042017NF/155475s.jpg "Baker's Twine Essentials Pack [ 155475 ]")
![Mini Stampin' Dimensionals [ 144108 ]](https://assets1.tamsnetwork.com/images/EC042017NF/144108s.jpg "Mini Stampin' Dimensionals [ 144108 ]")
![Stampin' Cut & Emboss Machine [ 149653 ]](https://assets1.tamsnetwork.com/images/EC042017NF/149653s.jpg "Stampin' Cut & Emboss Machine [ 149653 ]")
![Stampin' Hot Foil System Na & Craft Class [ 170009 ]](https://assets1.tamsnetwork.com/images/EC042017NF/170009s.jpg "Stampin' Hot Foil System Na & Craft Class [ 170009 ]")
![Classic Greetings Hot Foil Dies [ 170042 ]](https://assets1.tamsnetwork.com/images/EC042017NF/170042s.jpg "Classic Greetings Hot Foil Dies [ 170042 ]")
![Luxe Alphabet & Numbers Hot Foil Dies [ 170044 ]](https://assets1.tamsnetwork.com/images/EC042017NF/170044s.jpg "Luxe Alphabet & Numbers Hot Foil Dies [ 170044 ]")
![Swiss Dots Hot Foil Die [ 170075 ]](https://assets1.tamsnetwork.com/images/EC042017NF/170075s.jpg "Swiss Dots Hot Foil Die [ 170075 ]")