White Washing!!!

Posted on

Happy Wednesday…..but sort of like a Tuesday! Since the launch of the Year End Closeout was yesterday, I posted about all of that so you didn’t miss out! So that means today I’m sharing the fun Technique “Tuesday”. It is all about White Washing!!!

White Washing, www.LaurasStampPad.com

How fabulous is this magnolia from the Good Morning Magnolia Stamp Set?!?!?! Beautiful! I am loving it so much! I had fun with different color combinations and variations of the White Washing Technique. Simply White Washing like the one above….or adding color like this one!!

Adding Color to White Washing, www.LaurasStampPad.com

Simply adding a little color with a Sponge Dauber takes this technique to a whole new level! I love it so much! Then I thought I would try it on green so that the leaves are already green and I would just do the flower! Here’s that look!

Good Morning Magnolia, www.LaurasStampPad.com

Which one is your favorite?? Let me know in the comments below! Also, if you would like to recreate these fun cards, check out the supply list below!

Check out the full tutorial of this White Washing Technique in the video below or click here! Be sure to give the video a thumbs up if you liked it and don’t forget to subscribe if you are new. If you would like a notification when I post a new video, be sure to click the bell right next to the subscribe!!!

Happy Stampin’

~Laura

Product List

Technique Tuesday – Black Ice Technique!!!

Posted on

Happy Tuesday!!! That means I have a fabulous technique to share with you!!! Today, it is the Black Ice Technique which I learned from the fabulous stamper, Karla Endris!!! Thanks Karla for this fun technique!!!

Black Ice Technique, www.LaurasStampPad.com

This picture sure doesn’t do this card any justice because you need to rotate it to see the fun shine!!!

I started with a piece of Coastal Cabana cardstock and stamped the tin tile image on each corner. This is from the Country Home Stamp Set and I used Coastal Cabana Ink for that subtle look. Next, I took a piece of the Galvanized Metallic Paper and lightly brushed Stazon Ink up and down the cardstock. Don’t be too heavy handed as you want it to look streaky and not solid. Then I stamped the flowers and pitcher from the Country Home Stamp Set in Stazon Ink and set it with the Heat Tool so it wouldn’t smear.

Flowers in a Kettle, www.LaurasStampPad.com

Now it is time for the ice part of the Black Ice Technique. Simply press the VersaMark Ink all over the top of your image to coat the entire piece. Then add Clear Embossing Powder for all of it and set it with the heat tool. Now you have that glassy shine of your image! I finished it off by coloring with the Stampin’ Blends Markers and layering it onto Basic Black cardstock. Using Stampin’ Dimensionals for some texture, I added it to the card front!

Teal Milk Pail, www.LaurasStampPad.com

Here is another sample that I created using that same Country Home Stamp Set!

Brown Milk Pail, www.LaurasStampPad.com

If you would like to see this all in action, check out the video below or click here! Be sure to give the video a thumbs up if you liked it and don’t forget to subscribe if you are new. If you would like a notification when I post a new video, be sure to click the bell right next to the subscribe!!!

Happy Stampin’

~Laura

Product List


Here’s To An Epic Celebration!!!

Posted on

This card and greeting “Here’s To An Epic Celebration” just makes me think rock star! Then I want to say, “Party on Wayne, Party on Garth!” Name that movie in the comments below! 🙂


Epic Celebration, www.LaurasStampPad.com

Okay enough craziness! This card is super cool and great for the younger kids as well as the older ones! I have an uncle that plays the guitar and this would be perfect for him too!

I started with a Whisper White card base. Next, I took a piece of Lemon Lime Twist cardstock and splattered water all over it with an Aqua Painter. Then I poured Silver Embossing Powders over the top, tapped off the excess, and set it with the Heat Tool. Check out this post for a full tutorial and video! Since the water makes the paper a little warped, I like to add this layer on with some Tear And Tape for a nice strong hold.

Silver Splatter, www.LaurasStampPad.com

Now for the focal point, I took a piece of Whisper White and stamped the guitar and greeting in Memento Black Ink from the Epic Celebration Sale-A-Bration Stamp Set! Using the Pumpkin Pie Stampin’ Blends Marker, I colored in the guitar. Next, I layered this onto a Basic Black square. I wrapped some Silver Metallic Thread around my hand to make loops, slide them off my hand and twisted into a figure 8 and laid them on the back of the focal point. Then I added Stampin’ Dimensionals to secure the ends and fan out the loops on the back. Once all was secure, I added this to the card front. I really struggled with where to place it because a lot of my splatter was in the center of the card and I had to cover some of it. TIP: Splatter more on the edges next time. 🙂

Don’t forget that there is only a week and half left of Sale-A-Bration. There are the original items, 2nd Release Items, and even Catalog Items for you to pick from! My favorite catalog item is the Myths & Magic Glimmer Paper! Bring on the bling!!!! Now is a great time to stock up on cardstock, etc or get a few items off your wish because you are rewarded with freebies! Click here to start shopping! Please so reach out if you have questions on anything! Always happy to help with product questions, inspiration, and more!

Happy Stampin’

~Laura

Product List


Technique Tuesday – Heat Embossing with Water!!!

Posted on

Happy Tuesday!!! You all know what that means! I have a fabulous technique to share with you and today we are heat embossing with water!!! Just splatter water all over and pour the powder on top!!!

Heat Embossing with Water, www.LaurasStampPad.com

I just love this stunning gold and purple card! It’s so wonderful…..just like the greeting says!

I started with a Whisper White card base. Then I took a piece of Elegant Eggplant measuring 4″ x 5-1/4″ and dripped/splattered water all over with an Aqua Painter! A good splatter can be done by tapping/hitting the Aqua Painter on your finger for that bump that makes the water fly. See the video tutorial below for that in action….I’m not sure how else to explain that. 🙂

Once the desired amount of water is on the cardstock, I poured Gold Embossing Powder over the top and the powder sticks to all the water spots. Using the Heat Tool, I melted the powder. The larger drops are full of water and you will notice the water wiggle below the powder when the heat tool blows it around. In order to not make the splatter drip or blow, I would apply the heat a little and then move to another spot and then come back again, repeating this a few times till everything was melted. I love watching the bubbles wiggle though. It’s so magical!

Golden Splatter, www.LaurasStampPad.com

After I set the powder with the Heat Tool, I added this piece to the card front and then added decoration. I used the Cake Soirée Stamp Set and coordinating Sweet Cake Framelits Dies (Bundle & Save 10%). The cake was stamped in Elegant Eggplant Ink onto Wisteria Wonder cardstock. I used Gold Foil Paper for the cake stand and bow! When adding it to the card front, I did the cake stand flat and the cake with Stampin’ Dimensionals. Using the Fine Tip Glue Pen, I added the bow to the top.

For the greeting, I stamped it from the Cake Soirée Stamp Set in Elegant Eggplant Ink and punched either side with the Pretty Label Punch for that cut little rounded edges. Using a Sponge Dauber, I brushed a little color on all of the edges and added this to the card front with Stampin’ Dimensionals. I finished it off with some Gold Metallic Enamel Shapes on either end!!!

If you would like to see this all in action, check out the Video Tutorial below or click here! Be sure to give the video a thumbs up if you liked it and don’t forget to subscribe if you are new. If you would like a notification when I post a new video, be sure to click the bell right next to the subscribe!!!

Happy Stampin’

~Laura

Product List


Technique Tuesday – Brusho Color Palette!!!

Posted on

Happy Tuesday!!! You all know what that means…..I have a fabulous technique to share with you today!!! I’m showing your how to create a Brusho Color Palette!!! I prefer to have more control and precision with my crafting so I love coloring with Brusho like this!!!

Brusho Color Palette, www.LaurasStampPad.com

I love the rustic look of this card with that metal shine from the silver embossing and bold color from the Brusho Crystal Colour. Let’s get started!!

I started with a Island Indigo card base. Next, I layered on a piece of the Wood Textures Designer Series Paper. For the greeting, I took a strip of Pear Pizzaz cardstock and stamped the greeting from the Beautiful Day Stamp Set in the Occasions Mini Catalog. The greeting was stamped in Island Indigo Ink. Then I took some Linen Thread and wrapped it around my fingers to create the loops. I slid the loops off my fingers and placed them on the back of the greeting. Using Stampin’ Dimensionals, I secured the loops all over the back and made sure the ends were held tight. The greeting was placed on the far right side of the card!

Rustic Flower, www.LaurasStampPad.com

Now for that stunning flower and amazing technique using the Brusho Crystal Colour. I stamped the flower from the Beautiful Day Stamp Set in Versamark Ink onto Watercolor Paper. Then I added Silver Embossing Powder and set it with the Heat Tool. Be sure to firmly stamp the flower since the watercolor paper is textured but of course don’t press so hard that you rock or end up with Versamark Ink all over. 🙂 It’s a delicate balance.

For the color palettes, I took a clear block, tapped a little Brusho Crystal Color onto it and added some drops of water from an Aqua Painter. Then I used the Aqua Painter to color the flower. I used the Brilliant Blue, Moss Green, and Yellow! To be honest, I prefer to use the green in this way because of the color combination used to create the green. I find that when I tap it on the purples and yellows pop too much and I prefer a more green look. After coloring the flower and allowing it to dry, I added some Stampin’ Dimensionals and placed it on the left hand side of the card!

If you would like to see this all in action, check out the Video Tutorial below or click here! Be sure to give the video a thumbs up if you liked it and don’t forget to subscribe if you are new. If you would like a notification when I post a new video, be sure to click the bell right next to the subscribe!!!

Happy Stampin’
~Laura
Product List


Black & White With A Pop of Red!!!

Posted on

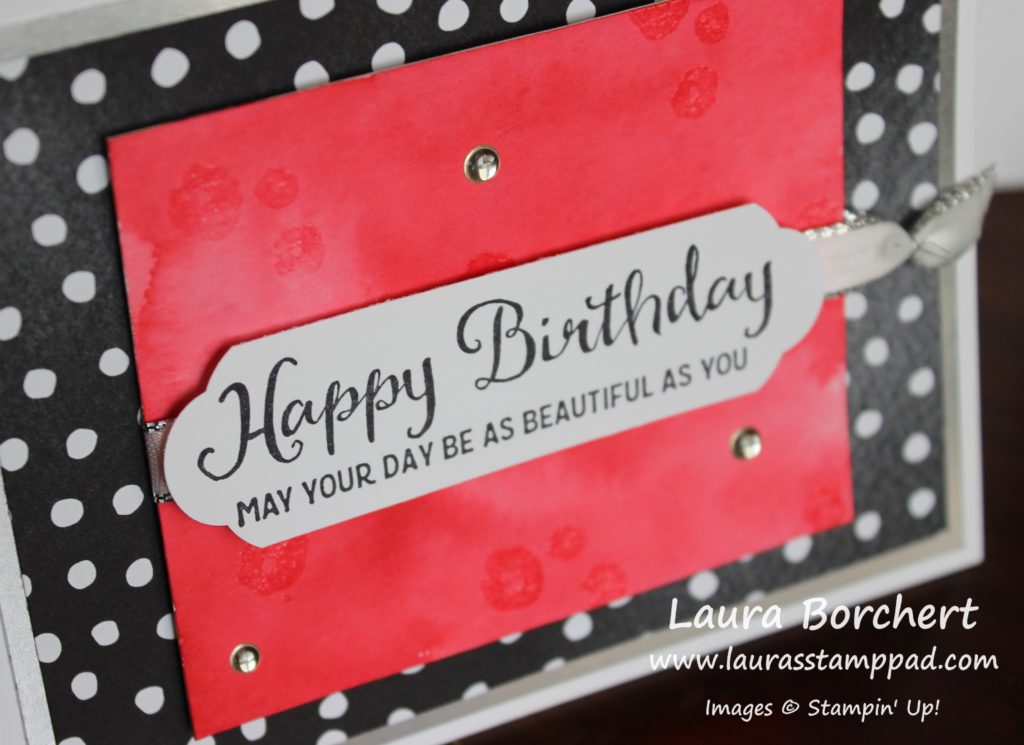
Last week, I showed off the NEW Brusho Crystal Colour and ways to color with it!!! This fabulous black & white with a pop of red was created using the Brusho Crystal Colour as well! That vibrant background

Black & White With A Pop of Red, www.LaurasStampPad.com

I started with a Whisper White card base. Next, I layered on a piece of Silver Foil  Paper measuring 4″ x 5-1/4″ and Petal Passion Designer Series Paper (3-3/4″ x 5″). This can all be done while waiting for the focal point to dry! 🙂

 Red Brusho Crystal Colour, www.LaurasStampPad.com

Using a piece of Watercolor Paper measuring 3-3/4″ x 3″, I wet the entire thing with an Aqua Painter. Then I tapped the Red Brusho Crystal Colour over the top. A little bit goes a long way…..trust me. I love bold vibrant colors and like 8 drops of the powder is perfect! At this point, I used the Aqua Painter to color in the entire piece of paper. If you wish to have a more swish swish look or just the dotted looked, leave it as is. It really is fun how many different ways it can be used! After allowing it to dry, I stamped the dots from the Beautiful Day Stamp Set in Versamark all over. Then I poured Clear Embossing Powder over the top and set it with the Heat Tool. This is how I got those shiny dots!

Spot the Dot, www.LaurasStampPad.com

Next, I added some Silver Metallic Edge Ribbon around the card and tied the two ends on the right hand side with a little bit of Silver Metallic Thread. For the greeting, I stamped it from the Beautiful Day Stamp Set in Basic Black  Ink. I used the Pretty Label Punch to get those nice rounded ends. After stamping the greeting, just turn the punch upside down and slide the greeting in from the top so only one side is in the punch. Punch and then rotate to do the other side. I added the greeting with Stampin’ Dimensionals and used them to add the watercolor paper to the card front!

Check out the Post & Video I posted last week to see more on Brusho Crystal Colour and tips and tricks!

Happy Stampin’

~Laura

Product List


Technique Tuesday – Brusho Crystal Colour!!!

Posted on

Happy Tuesday!!! That means I have a fabulous technique to share with you today! I’m showing you the NEW Brusho Crystal Colour from the Occasions Mini Catalog!

Brusho Crystal Colour, www.LaurasStampPad.com

I love the bright vibrant color that this stuff creates! Look at that stunning butterfly!!! Gorgeous!

I have found that Watercolor Paper works best with the Brusho Crystal Colour since it requires a decent amount of water to dissolve it! First, I stamped the butterfly from the Beautiful Day Stamp Set in Versamark Ink and added Gold Embossing Powder! I set it with the heat tool! Now for the coloring fun, I used the Aqua Painter to wet the area of the butterfly. Using the Red (Brilliant Red), Orange (Gamboge), and Yellow colors, I tapped some onto the butterfly. With yellow on the outside, then orange, and red in the middle. The thing about tapping it on is that you don’t really know where it is going to fall or how much. This is one of those techniques that no two are going to come out the same!

Beautiful Butterfly, www.LaurasStampPad.com

After tapping the powder on, I used the Aqua Painter to blend it all together. I did wipe off the brush tip after each color to try to keep a nice fade and not just blend them all together! Be sure to allow it to dry before assembling the card. When I don’t have a lot of patience, I used the Heat Tool!

Golden Butterfly, www.LaurasStampPad.com

Next, I layered the butterfly onto Pumpkin Pie (4″ x 3-1/4″) and then Real Red (4-1/4″ x 3-3/4″) cardstock! The Real Red was cut with more on the bottom so I could add the Double Stitched Daffodil Delight Ribbon! Before adding this to the Whisper White card base, I stamped the dots from the Beautiful Day Stamp Set all around in Daffodil Delight Ink! Of course, I added the butterfly layers to the card front with Stampin’ Dimensionals for a little bit of texture!

If you would like to see this all in action, check out the Video Tutorial below or click here! Be sure to give the video a thumbs up if you liked it and don’t forget to subscribe if you are new. If you would like a notification when I post a new video, be sure to click the bell right next to the subscribe!!!

Happy Stampin’

~Laura

Product List


Technique Tuesday – Copper Leaves Without Using VersaMark!!!

Posted on

Happy Tuesday!!! You all know what that means!! I have a fabulous technique to share with you today and I came upon it by accident and loved it!!! These copper leaves were created without using VersaMark! I simply poured the powder over the top after stamping and it stuck in random spots where their was still moisture from the stamped leaf.

Copper Leaves Without Using VersaMark, www.LaurasStampPad.com

You will have to watch the video on this one to really see all of the beauty on this card with that copper shine. Link to that is below!

I started with a Crumb Cake card base. Next, I layered on a piece of Cajun Craze measuring 4″ x 5-1/4″! Now for those amazing leaves using the Colorful Seasons Stamp Set! Don’t forget today is the last day to get this set at 15% off in celebration of World Card Making Day! I stamped the large solid leaf in Cherry Cobbler Ink and then the small solid leaf in Cajun Craze Ink. Then, I stamped the outline leaf in Cherry Cobbler Ink (you can pick whichever color) and right away after I finished I poured Copper Embossing Powder over the top. The powder will still to the moisture in the ink from stamping the leaves. Then, I set it with the Heat Tool.

This will come out differently each time you do it. There are lots of different factors. How quickly you stamp and pour the powder is one of the big ones. Another thing you can do is allow the solid images to dry for a minute or more (or set it with the Heat Tool). Then when you stamp the outline, the powder will only stick to the outline images. I just love how the powder is random and the leaves are still that fabulous dark color. Also, I love how I don’t have to get out my VersaMark Pad as well as the colors! 🙂

Copper Leaves, www.LaurasStampPad.com

Look at the shine? I love it!!! Once I was finished with this piece, I added it to the card front. For the greeting, I die cut a Stitched Shape Oval and stamped the greeting from the Colorful Seasons Stamp Set. I added loops of Copper Metallic Thread to the back and added it to the card front with Stampin’ Dimensionals.

Copper Spotted Leaves, www.LaurasStampPad.com

This card is perfect for any occasion in the Fall. Just change up the greeting!!! What greeting would you put on this card? Let me know in the comments below!

If you would like to see this in action, check out the Video Tutorial below or click here! Be sure to give the video a thumbs up if you liked it and don’t forget to subscribe if you are new. If you would like a notification when I post a new video, be sure to click the bell right next to the subscribe!!!

Happy Stampin’

~Laura

Product List


Crazy for Copper Roses!!!

Posted on

This card is just stunning with the copper roses! I love the bling from the embossing but all the simplicity of the single image and designer paper!

Copper Roses, www.LaurasStampPad.com

You all know I love flowers oh so very much so this card is already fabulous in my book! I hope you all love it too!

I started with an Old Olive card base. Next, I layered on a piece of Petal Garden Designer Series Paper measuring 4″ x 5-1/4″. Now for that amazing rose. I took a piece of Whisper White cardstock (3″ x 4-1/2″) and tapped the Embossing Buddy all over it. This reduces the static on the paper so the embossing powder doesn’t stick in places it shouldn’t. Using the rose from the Graceful Garden Stamp Set, I stamped it in VersaMark Ink. This is the tacky ink for holding the embossing powder. Next, I poured Copper Embossing Powder over the top and tapped off the excess. To set the powder, I used the Heat Tool on setting 2.

Once it cooled, I stamped the greeting from the Beautiful Bouquet Stamp Set. When I did this card in class sometimes we had a hard time fitting the greeting in. You could stamp the greeting first but allow it to dry for a bit and be sure to use the embossing buddy over the greeting. If you don’t the little bit of moisture from stamping the greeting will hold onto the embossing powder. To finish it off, I tied some Calypso Coral Ombre Ribbon around the rose. Next, I added this piece to the card front with Stampin’ Dimensionals. I placed it on diagonally which is always a bit of a struggle for me. The look is super cool but then I think it just looked crooked. I say just place it down and go with it!!! Made with love and not perfection! 🙂

Product List

Don’t forget there are still a few more days to earn the Smitten Mittens Stamp Set for FREE!! Click here for all of the details!

Happy Stampin’

~Laura


Baby Bunny is just Adorable!!!

Posted on

This baby bunny is just precious and I used Basket Bunch Stamp Set which is Easter themed! I love using a stamp set in out of the box way! To see a few other samples with this set, click here and here!

Baby Bunny, www.LaurasStampPad.com

You could always create this little baby bunny card in pink, blue, or even yellow. Go with the color that you enjoy the best!

I started with a Whisper White card base! Next I die-cut a scallop oval and smooth oval using the Layering Ovals Framelits. With the smooth oval and the card base, I pounced the Embossing Buddy over the top to reduce any static on the paper before heat embossing. Next, I stamped the greeting from the Tin of Cards Stamp Set and bunny from the Basket Bunch Stamp Set in Versamark Ink. I poured Gold Embossing Powder over the top and heated it with the Heat Tool. Oh how I love watching the powder melt! It’s so magical every time! Check out this Video for the basic on Heat Embossing!

Now that the heat embossing is all complete, it’s time to add color! I stamped the dotted splatter on the background twice in Melon Mambo Ink using the Happy Celebrations Stamp Set. To color in the bunny, I used some Melon Mambo Ink and an Aqua Painter. I love how the embossed image acts like a little barrier to keep the ink/water in! To assemble the card, I layered the bunny oval onto the scallop oval. Then I took some Gold Thread and wrapped it around my fingers a few times (10-12), slid the loops off my fingers and twisted in the middle. Next, I placed this on  the back of the scallop oval and secured it with some Stampin’ Dimensionals. I always like to add more dimensionals to really make my gold thread fan out just so. Peel the backs off of the Stampin’ Dimensionals and adhere to the card! It’s just so precious!!!

I know today is Thursday and I normally do a Video on Thursday but I did a special one yesterday for my Stampin’ Anniversary. You can check that out here!

Don’t forget that the Stampin’ Up! Retired List is out and items are selling out fast! You can check out the complete list here:

2017 Retiring List – Excel
2017 Retiring List – PDF

Some of these items are sold out already so you can just start shopping here! Not only do you get to enjoy getting some great products before they are gone (and at a discount for some), you will also be able to earn Laura’s Loyal Stampers Stickers!!!

Happy Stampin’

~Laura