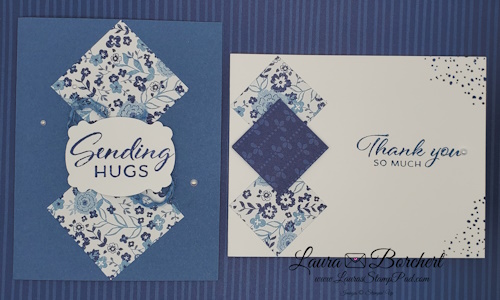
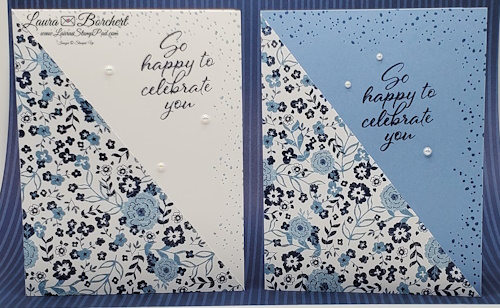
Countryside Inn!!!

Posted on

Give me all the shades of blue with the Countryside Inn Designer Series Paper!!! Balmy Blue, Night of Navy, Boho Blue and Misty Moonlight are all the colors in this paper pack! You can really have fun with this for quick and simple cards!!!

Countryside Inn Designer Paper, www.LaurasStampPad.com

To create these 2 cards, I used a 4-1/4″ x 5-1/2″ piece of the Designer Paper! If you wish to create lots of these cards, you can get 4 of these rectangles from a 12″ x 12″ sheet of Designer Paper with leftovers. The leftover pieces can be used on the inside of the cards or for additional cards!

SUPPLIES & MEASUREMENTS:

  • Thick Basic White Cardstock – 8 ½” x 5 ½”
  • Boho Blue Cardstock – 8 ½” x 5 ½”
  • Countryside Inn Designer Series Paper – 4 ¼” x 5 ½” cut diagonally in half

CARD INSTRUCTIONS:

Stamp greeting and decoration as you wish in the upper right-hand corner. I used Night of Navy Ink for all. For the card on the left side, I stamped off once for a lighter look for the dots. Adhere triangle of designer paper in the lower left corner. Depending on the pattern on your designer paper, this could be flipped or rotated around to create a landscape card or even your stamped greeting in a different corner. Embellish as desired. 

You can also check out more details about this card and others using the Countryside Inn Designer Paper in this video tutorial!

Want to recreate this card? Check out the supplies listed below! Click Add All To Cart for easy shopping too!

Happy Stampin’

~Laura

Product List

Gold Foil One Sheet Wonder!

Posted on

There is something about Gold and Navy that just looks stunning!!! Check out this fun Gold Foil One Sheet Wonder card that I created! It uses the NEW Naturally Gilded Specialty Designer Paper that came out this month!!!

Gold Foil One Sheet Wonder, www.LaurasStampPad.com

The Naturally Gilded Paper has sheets of Gold, Copper, and Silver! These prints are basic nature images which is perfect for any occasion! I paired it with the Something Fancy Stamp Set and Dies for a quick and simple card!

One Sheet Wonder

Now for the amazing One Sheet Wonder part where you can create 6 cards! Let me share the measurements so you can use every inch of the 12″ x 12″ Designer Paper. After all this paper is gorgeous and you don’t want to waste any. First, cut at 5-1/4″ creating a 5-1/4″ x 12″ strip. Then cut another strip at 5-1/4″. Now you should have 2 strips measuring 5-1/4″ x 12″ and 1 strip measuring 1-1/2″ x 12″. With both 5-1/4″ x 12″ strips, cut across every 4″ creating 6 pieces measuring 5-1/4″ x 4″. These will be used on the card fronts of 6 cards! Now with the 1-1/2″ x 12″, simply cut that in half at 3/4″ creating 2 strips of 3/4″ x 12″. Then cut across every 4″ creating 6 pieces measuring 3/4″ x 4″ which will be used inside the card!

One Sheet Wonder Something Fancy, www.LaurasStampPad.com

For the inside of this card, I brushed some Night of Navy Ink on the bottom of the Very Vanilla just to make the Designer Paper POP some more! I really love how it turned out!!! Of course, then I stamped the greeting crooked but it’s all good! 🙂 Check out all of the supplies below so you can recreate these gold foil one sheet wonder cards!

Happy Stampin’

~Laura

Product List

Halloween One Sheet Wonder!

Posted on

I’m not a huge Halloween fan but I do like to make a few cards to send to family. This Halloween One Sheet Wonder is perfect for creating just enough cards and using every inch of the Designer Paper!

Halloween One Sheet Wonder, www.LaurasStampPad.com

I added Glimmer Washi Tape in every other strip of the Perfectly Penciled Designer Series Paper for a fabulus background! Add the Washi Tape to the full sheet of 12″ x 12″ and then cut it into 4″ x 12″ strips. Then take each strip and cut it into 2 pieces measuring 4″ x 5-1/4″. Then cut the leftover piece in half to use as a decoration on the inside of the card! BAM Used every inch of the paper – One Sheet Wonder!

Halloween Spiders Paper Pumpkin Kit, www.LaurasStampPad.com

The greeting and spider stamp are from the September Paper Pumpkin Kit! Since I’m not a huge fan of Halloween I like to use the Paper Pumpkin stamps rather than purchasing another Halloween Set! I hope you try out this Halloween One Sheet Wonder so you can whip up some cute cards to send out this month!

Happy Stampin’

~Laura

Product List

Floral One Sheet Wonder!!

Posted on

One Sheet Wonders are so much fun because they use ALL of one sheet of 12″ x 12″ Designer Series Paper (or 6″ x 6″). I like to stick to minimal products as well to really just enjoy the card making part and not the big mess part! 🙂 This Floral One Sheet Wonder is my current favorite!!!

Floral One Sheet Wonder, www.LaurasStampPad.com

I used the Fine Art Floral Designer Series Paper which is just stunning! The back side of the floral paper is that fun mosaic yellow print which I used on 2 cards. It was just so hard to not use the floral side. Then I looked at the paper pack at the coordinating colors and picked my favorite – Night of Navy, Petal Pink, and Merry Merlot. I went with Basic White even though there is also some Very Vanilla in the pattern too.

First, I started off by cutting my card bases in each of the 3 colors (4 bases). This makes 12 cards! Then I cut my designer series paper and just started layering and mixing and matching! For the greetings, I stamped the Many Messages greeting in Merry Merlot and Night of Navy and die cut them with the coordinating die. BOOM! 19 greetings in each color! It was so quick and simple. AMAZING! Then as I was creating the cards, I just grabbed a greeting and popped it on. Another option would be to package the cards and greetings together and attach as you need the cards.

This Floral One Sheet Wonder set made quick and simple cards for all of my upcoming occasions! This is also a great gift to wrap all of these cards up together and offer! Have you ever tried out a One Sheet Wonder?? Let me know in the comments below! Also, don’t forget you can get a One Sheet Wonder Template Offer as well as a Card Making Cheat Sheet when you join my mailing list! Join with the form below now!

Happy Stampin’

~Laura

Product List

Golden Honey One Sheet Wonder!!!

Posted on

Happy Tuesday!!! Today’s Technique Tuesday is the Golden Honey One Sheet Wonder!!! I know how much you all love One Sheet Wonders so I hope you enjoy this one too!!!

All 9 of these cards were created with 1 sheet of 12″ x 12″ Golden Honey Designer Series Paper!!! I used both sides of the paper so no struggle for which side to use!

The first cut was at 4″ creating a 4″ x 12″ strip which I then cut into 4″ x 4″ squares! This is the first 3 cards! I used the Peaceful Moments Stamp Set for all of the greetings!

Next, I cut a 2″ strip off. This creates a 2″ x 12″ piece that I then cut into 2″ x 4″ pieces. That first card was created by cutting the 2″ x 4″ into 2″ squares. I used Stampin’ Blends to color in the designer paper for even more variability. Coastal Cabana, Highland Heather, Whisper White, and Daffodil Delight were the colors I used on all of these cards!

Then, I cut a 5-1/4″ piece off which created a 5-1/4″ x 12″ piece. I cut this one into 4″ x 5-1/4″ and used it as backgrounds for my cards. Again, I colored in the flowers with Stampin’ Blends for some added flare!

The leftover strip is 3/4″ x 12″ and I cut it into 2 pieces to decorate the inside of the 2 cards! One strip is 4″ x 3/4″ and the other is 5-1/4″ x 3/4″. Perfect way to use up every bit of the paper!

Check out the full Golden Honey One Sheet Wonder tutorial in the video below or click here! Be sure to give the video a thumbs up if you liked it and don’t forget to subscribe if you are new. If you would like a notification when I post a new video, be sure to click the bell right next to the subscribe!!!

Happy Stampin’

~Laura

Product List

Christmas Cheer!!!

Posted on

Happy Monday!!! It seems a bit odd to have a post on Christmas Cheer when it’s actually Thanksgiving Week but….. I still love your Thanksgiving but I have to work on my Christmas cards too!!!

Christmas Cheer, www.LaurasStampPad.com

This is one of those quick and simple cards that you can whip up in no time at all. It uses up every inch of your designer series paper too! You can even call it a One Sheet Wonder if you would like!

I started with a card base of Very Vanilla measuring 4-1/4″ x 11″. I like to use this size when wrapping ribbon around my card because it uses less. Going around the card at 4-1/4″ is better than going around it at 5-1/2″. Although I went around it twice so who is really saving ribbon here?!?!?! Next, I cut the Toile Tidings Designer Series Paper into 4″ x 4″ squares. This makes 9 squares from one 12″ x 12″ piece of designer paper! Great for making multiples!

Toile Tidings, www.LaurasStampPad.com

Using the Itty Bitty Christmas Stamp Set, I added the greeting in the lower right corner. There are so many greetings in various sizes so it’s perfect to mix and match and have fun! Then I added some ribbon. The card up top uses the Real Red Curly Ribbon and this one here uses the Garden Green Double Stitched Ribbon. Another option is to use the other side of the designer paper which is Garden Green. There are lots of great ways to mix up this card to make it a little different but still use the same products!

Which is your favorite? Let me know in the comments below! Click the supply list below to get started on your Christmas Cheer cards today!

Happy Stampin’

~Laura

Product List

More Gingham Fun!!!

Posted on

Last week I shared some fabulous cards using the Gingham Gala Designer Series Paper. Check that out here! Today, I’m sharing more gingham fun! Let me know in the comments which set your favorite is!

More gingham fun, www.LaurasStampPad.com

These cards were created using Grapefruit Grove card bases. Next, I too Whisper White (4″ x 5-1/4″) and added a piece of the gingham to the left side measuring 2″ x 4″. The other card uses a piece measuring 5-1/2″ x 2″. The inside uses the leftover pieces. For the triangles, I was left with a 2″ square which I just cut corner to corner. The greetings were stamped from the Well Said Stamp Set! I used the same greetings for both but flip flopped them from one card to the next with which one is on the outside.

Blue & Yellow Gingham, www.LaurasStampPad.com

For 1 of the blue cards and 1 of the yellow cards, I decided to switch it up! I just love blue and yellow together! I used 1″ x 4″ strips and stamped the greeting in between. Using the Butterfly Gala Punch, I punched out 2 Balmy Blue and 2 Daffodil Delight. I added 2 to the front and used the other 2 for the inside decoration! The baby card used the Rectangle Stitched Shapes for all the pieces. The stitched frame is super cute and then I used the inside rectangle for the inside of the card. Adorable!! This style would work for the other colors of gingham too.

Yellow Gingham, www.LaurasStampPad.com

For the Daffodil Delight cards, I used one set of the blue! Simple squares for a quick and easy card. The ribbon was colored with the Stampin’ Blends Markers! I recommend maybe using the light marker as it seems the dark marker was a bit too dark. That is all personal preference though! For the top card, I used the Banner Triple Punch and Layering Circles Framelits!!! The Gingham Gala Adhesive Backed Sequins made for the perfect finishing touch!

I had so much fun creating all 10 of these cards using the Gingham Gala Designer Series Paper!!! Tons of all occasion cards to have on hand. The Well Said Stamp Set was the perfect set for inside and outside greetings! I love it! Click the supplies below to make some of your own! So much more gingham fun!!!

Happy Stampin’

~Laura

Product List

Bring on the Gingham!!!

Posted on

Gingham is soooo IN right now! I did an entire class on Gingham using the Gingham Gala Designer Series Paper! The class consisted of 2 cards for each of the 5 colors. I am going to share some today and the rest later in the week! Bring on the Gingham!!!

Bring on the Gingham, www.LaurasStampPad.com

These samples were done in Highland Heather!!! I used Gorgeous Grape and Whisper White cardstock as well!!!

Starting with the card on the left, I went with a Highland Heather card base. Next, I took a 2″ x 5-1/2″ piece of the Gingham Gala Designer Series Paper for the left hand side. Before adding it to the card front, I added a small strip of Gorgeous Grape to the left side for a little pop of color! This is also a great way to use you scraps! For the greeting, I stamped it on a scrap piece of Whisper White from the Well Said Stamp Set! It has the perfect inside/outside greetings! I layered the greeting onto a Pearlized Doily which is layered over a 2-1/4″ Circle Punch of Gorgeous Grape! I finished it off with some Gingham Gala Sequins!

For the card on the right side, I used a Highland Heather card base too! Next, I took a piece of Gorgeous Grape (4″ x 5-1/4″) and layered on a 3-3/4″ square of gingham paper! Then I took some Whisper White Woven Thread and tied it around the cardstock where the gingham paper ends. This helps to give a smooth transition from one paper to another. For the greeting, I used the 1-3/8″ Scallop Circle Punch and 1-1/4″ Circle Punch. Again I used the Well Said Stamp Set for the greeting!!

The insides of the cards have the coordinating greetings and some of the leftover gingham pieces used as decoration! No designer paper waste here!!

Lemon Lime Twist Gingham, www.LaurasStampPad.com

For the Lemon Lime Twist Cards, I used all the Tailored Tag Punch!!! For the card on the left, I placed the greeting down first with Stampin’ Dimensionals. This makes it pop more! Then I just added in all around till it was covered. Then I trimmed off the ones that were hanging off the paper!

The card on the right was created using a piece of Lemon Lime Twist gingham measuring 4″ x 5-1/4″. I layered the greeting with 2 of the tags just off set a bit. Using the Silver Baker’s Twine, I added some loops and secured it to the back of the greeting!

Again for the insides of the cards, I used leftover pieces of the designer paper!!!

If you want to create these cards, check out the supplies listed below! Also, stay tuned for the other 3 colors in the pack! I will be posting those later this week! Bring on the Gingham! Also, check out these designer paper tips!

Happy Stampin’

~Laura

Product List

Laura’s Quick Tips: 6″ x 6″ Designer Paper!!!

Posted on

Today, I am sharing another fabulous one of Laura’s Quick Tips and it’s all about 6″ x 6″ Designer Paper!! I don’t like wasting designer paper because it is so pretty and I don’t like to waste. Creating cards using specific measurements makes little to no waste and lots of fabulous card creations!!!

Laura's Quick Tips: 6" x 6" Designer Paper, www.LaurasStampPad.com

I’m sharing samples using the Gingham Gala Designer Paper from the Occasions Mini Catalog. Actually you can use any 6″ x 6″ Designer Series Paper. In fact, you can even cut your 12″ x 12″ pieces down to create these same projects!!!

One way to use up all of the 6″ x 6″ piece is to cut as follows. First, cut at 4″ creating a 6″ x 4″ piece. Then cut that into 2″ x 4″ pieces resulting in 3 pieces of that size. The leftover piece measures 2″ x 6″ so cut another 2″ x 4″ piece. This leaves a 2″ square leftover. This is perfect for punching out a piece to layer behind a greeting or save up 4 of these for a 2″ x 4″ four square grid. Here is a fabulous sample using the 2″ x 4″ pieces!

The other way to use up all of the 6″ x 6″ piece is as follows. First, cut at 4″ creating a 6″ x 4″ piece. Then cut that one at 5-1/4″ creating a 4″ x 5-1/4″ piece which is perfect for laying on the front of a card base. The little 3/4″ x 4″ piece leftover is perfect to place on the inside of the card for some fabulous coordination and decoration. Then there is a leftover 2″ x 6″ piece that can be cut at 2″ x 4″ and a 2″ square like the one above. Another option would be cutting it at 2″ x 5-1/2″ for a side strip down the edge (or middle) of a card front. Here is a fabulous sample using that!

If you would like to see this all in action, check out the video below or click here! Be sure to give the video a thumbs up if you liked it and don’t forget to subscribe if you are new. If you would like a notification when I post a new video, be sure to click the bell right next to the subscribe!!!

Happy Stampin’

~Laura


Polka Dots & Stripes!!!

Posted on

Happy Monday!!! I just love Polka Dots and Stripes and the In Color Designer Series Paper Stack is just that. It’s amazing for any style of card!!! Last week I showed off the One Sheet Wonder with this 6″ x 6″ stack and today I have more samples.

Polka Dots & Stripes, www.LaurasStampPad.com

For this card, the stripes make the card so cheerful. Sending this out to a friend is sure to brighten their day!! The card above uses the 5-1/4″ x 4″ piece of Designer Paper. I added some Whisper White Classic Weave Ribbon and the greeting from the Accented Blooms Stamp Set. The greeting was punched out with the coordinating Tailored Tag Punch.

Decorate the Inside, www.LaurasStampPad.com

So I wasn’t wasting any pieces, I placed the little 4″ x 3/4″ piece on the inside as a little decoration. I feel like it really pulls the card together!

Dots of Thanks, www.LaurasStampPad.com

The other piece was used on this simple card! This piece measures 5-1/2″ x 2″ and I simply stamped the greeting directly to the card base! You could always stamp this on Whisper White and punch it out to give the card a little more texture!

6x6 One Sheet Wonder, www.LaurasStampPad.com

Here is the template for cutting the Designer Paper for these cards!!! I just love One Sheet Wonders!!! Also, if you would like to see this all in action, check out my Video Tutorial.

Let me know what designer series paper you would use for this One Sheet Wonder in the comments below!

Happy Stampin’

~Laura