With Love & Gratitude!!!

Posted on

The September 2023 Paper Pumpkin Kit – With Love & Gratitude was stunning! I loved the color combination and the amazing greetings!

With Love & Gratitude Paper Pumpkin Kit, www.LaurasStampPad.com

How cute is this little card?!? The sentiment is super fabulous for a just because card. I do wish the size of the card was mailable but not all cute cards are! Just means I need to hand deliver some kindness. A friend, neighbor, teacher, mailman, etc. would be the perfect recipient for a card like this!

Grateful For You Treat Bag, www.LaurasStampPad.com

Treat Bags…..not my favorite thing as I never know what to do with them. BUT not this time. I have been wanting to give a little card or treat to the car line workers at the kid’s school and the teachers and helpers. They are very kind and cheery and I’m so thankful for everything they do. I thought a little note of thanks would be perfect! These are just that! I was going to get some candy but honestly I think I’m going to wait for Halloween and use some of the kid’s candy because we all know they get way to much! Perfect!

What are you doing with your With Love & Gratitude Kit?!? Let me know in the comments below!

Be sure to sign up for the October Kit before the 10th of the Month! Click here to try it out! It’s Christmas themed!

Happy Stampin’

~Laura


November 2021 Paper Pumpkin!

Posted on

I know I am way behind on posting this but I did remember to take photos before they left the house to those we love! The November 2021 Paper Pumpkin came in handy for Claire’s teachers and our neighbors!

November 2021 Paper Pumpkin, www.LaurasStampPad.com

I was able to roll a pair of fluffy cozy socks (REALLY TIGHT) and shove it into the little box and then I placed it into a large cellophane bag and dropped some chocolates in. I had to put them in a bag or Claire would have eaten all of the chocolate before they got to her teachers! Super cute and the tags and twine came in handy for added cuteness!

Homemade Holiday Neighbor Gifts, Paper Pumpkin, www.LaurasStampPad.com

The rest of the boxes were stuffed with bags of Ritz Toffee and we took them to the neighbors! This stuff is AMAZING and so quick to make…..and so easy to inhale! 😉 I just love how it packaged up so cute to gift to everyone!

The November 2021 Paper Pumpkin saves the day again and I love it! My December Kit has arrived and I’m working on it now! It’s super cute with the puns! Now is the time to sign up for the January Kit which is themed Hugs & Kisses! The kit is all cards but there is an option to purchase a Treat Box Add-On perfect for Valentine’s Day!!! Paper Pumpkin for the win again and I love that it comes a month early to help me be prepared! Woot Woot! Click here to get signed up!

Happy Stampin’

~Laura


September 2021 Paper Pumpkin!!!

Posted on

I realized I never posted the September 2021 Paper Pumpkin Kit! While I am late I still wanted to share it so that I could look back on this kit! It was super cute and fun and made the perfect treat boxes for Fall!

September 2021 Paper Pumpkin, www.LaurasStampPad.com

The little boxes weren’t really that hard to put together especially since they are scored and have exact adhesive strips provided! TIP: Be careful “curling” or working the top little pieces that curve in. I used my bone folder to get the paper to curl in and I accidently ripped off a few of the little notches….ops! I wish I had good advice for notching each of the things at the top but I feel like I don’t even know! Some of them seemed to just connect so easy and others I struggled with like I lost my groove! LOL

Pumpkin Treat Boxes, www.LaurasStampPad.com

Claire actually helped me on these a little bit and then of course she “helped” make it more chaotic too! We did faces on some and added leaves to others. I did have TONS of faces and leaves left over. I also ended up not using the tags or the curly cues because I didn’t want to overcomplicate things and I felt they didn’t stay on well. Oh well, another project will enjoy them more!

The wheelbarrow box was super fun! I thought you have got to be kidding me when I heard it. So for that reason alone, I thought I have got to try this! My cutting skills are not the neatest and perfect but it actually came together pretty easy and looks okay! This won’t be a decoration piece I’ll keep for years to come though.

Some of the treats have just candy and others have a mini Playdoh in there as well as candy! They were perfect to gift to neighbors, friends and stamp class attendees!

You can sign up for Paper Pumpkin and join in the magic of the surprise and fun! These kits are perfect for beginners but also the avid crafter. So fun and perfectly sets you up for the upcoming holidays! Click here to get the November Paper Pumpkin!

Happy Stampin’

~Laura


Valentine’s Day Treats!!!

Posted on

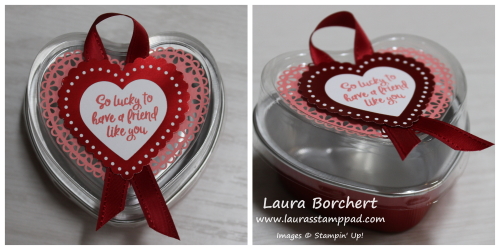
Valentine’s Day is 1 month away so let’s get started on creating hand made goodies for those we love!!! They always say the way to someone’s heart is through their stomach. These Valentine’s Day Treats do just that. These are food and oven safe so a brownie or cookie would work perfectly!

Valentine's Day Treats, www.LaurasStampPad.com

Aren’t these little things adorable?? Little red heart shaped tins to fit just about anything. Chocolates, cookies, brownies, jewelry, conversation hearts, M&Ms and so much more fit in these tins.

Heart Shaped Brownie Tin, www.LaurasStampPad.com

Decorating these is super simple with the amazing products in the From My Heart Suite in the new mini catalog! There are heart shaped doilies that fit in the lid but also in the bottom of the tin for a super fabulous look! The doilies come in both red and pink! I also punched out a heart from the From My Heart Designer Series Paper and stamped a greeting in the center! The greeting is from the Heartfelt Stamp Set!

Heartfelt Stamp Set, www.LaurasStampPad.com

You all know that ribbon is my favorite embellishment so I just played with it in different ways to add texture to these adorable Valentine’s Day Treats. Just secure the ribbon with Stampin’ Dimensionals on the back of the punched out heart!

Don’t forget that Valentine’s Day is a month away so click on the supplies listed below to get all the goodies you need to make these adorable tins. Also, it’s Sale-A-Bration so you can enjoy a FREE item for every $50 you spend too!

Check out the full tutorial for these Valentine’s Day Treats in the video below or click here! Be sure to give the video a thumbs up if you liked it and don’t forget to subscribe if you are new. If you would like a notification when I post a new video, be sure to click the bell right next to the subscribe!!!

Happy Stampin’

~Laura

Product List

Technique Tuesday: Simple & Snowy!!!

Posted on

Happy Tuesday!!! You know that means I have a fabulous technique to share with you!!! These gift card holders are simple and snowy and just perfect to spruce up any gift card!!! They are so simple to create that you will want to give gift cards to everyone this year. PS: You can give a Stampin’ Up Gift Card too! Ask me how!

simple & snowy, www.LaurasStampPad.com

Aren’t these adorable?? I got the idea for these from the amazing Terri Gaines!!! I love swapping ideas with fellow stampers. This little gift card idea was shared at the event I attended over the summer!

Snowman Gift Card Holder, www.LaurasStampPad.com

Decorate the front all simple & snowy as well as the side card for the perfect look! You could always write on the inside too since it is all hidden down in the sleeve!

Cup of Cheer, www.LaurasStampPad.com

All of the details for making these is in the Video Tutorial below but I will share the dimensions here as well.
The Designer Series Paper (or Navy piece) measures 2″ x 8-1/2″ and is scored at 4-1/4″.
Then the belly band measures 2-3/4″ x 5-3/8″ and is scored at 1-1/2″ from both ends.
The card insert measures 2-1/8″ x 3-1/8″.

The ribbon is 12″ long!

Check out the full tutorial of this simple & snowy gift card holders in the video below or click here! Be sure to give the video a thumbs up if you liked it and don’t forget to subscribe if you are new. If you would like a notification when I post a new video, be sure to click the bell right next to the subscribe!!!

Happy Stampin’

~Laura

Product List

September 2019 Paper Pumpkin!!!

Posted on

Happy Monday!!! The September 2019 Paper Pumpkin saves the day! I was able to put these together so quickly for Halloween treats. Still shooting for Auntie of the year with treats for my nieces and nephews! 🙂

September 2019 Paper Pumpkin, www.LaurasStampPad.com

I love that these boxes are big enough to hold regular candy but small enough not to break the bank! Candy is so expensive it seems. After assembling the boxes, I added the little tags. I didn’t stamp on the background like the instructions said because I thought that wasn’t necessary! They are still super cute!

Skeleton Treat Boxes, www.LaurasStampPad.com

I did go super simple for the kid’s treat boxes because after all we know they just want the treats! Using the die cut skeletons from the kit, I added one so the side of the box.

There are so many extras in the September 2019 Paper Pumpkin Kit to create the treat boxes, cards, and so much more! I love that Paper Pumpkin makes holidays simple and I have plenty of goodies for other projects too!

If you would like to try out Paper Pumpkin and have it save you for your next holiday or project, click here to sign up now! If you want to see past kits, click here!

Happy Stampin’

~Laura


August 2019 Paper Pumpkin!!!

Posted on

I actually got my August 2019 Paper Pumpkin Kit complete and almost all used up! The day after it arrived I completed 3 gift bags to use right away!!! Paper Pumpkin to the rescue!

August 2019 Paper Pumpkin, www.LaurasStampPad.com

Aren’t these amazing?!?!?! I’m loving them so much! They are big enough to hold a small treat but not so big that you have to buy 3 bags of candy just to fill them. I put 6 Lindt Truffles in there and it was perfect! PS: Lindt truffles are sooooo amazing. I tried out Butter Pecan, Sea Salt, and Fudge Swirl and they are all heavenly!

The tags were super easy to put together and I love the greetings. I actually forgot the gold sequins on the first 3 bags so I have LOTS leftover. In fact, I have tons of goodie left over to make more tags for bags or to add to a card front. Look at all of this leftover goodie!

Paper Pumpkin leftovers, www.LaurasStampPad.com

The first gift bag went to a friend of mine who let me crash on her couch one night while I was attending a Stamp Event! Then I took in 2 bags for Claire’s teachers at the program she is attending 2 days a week. They loved it so much and the one teacher almost cried when I handed them over. That melted my heart and is exactly why I do what I do. Not that I want people to cry but I want to bring joy to others with my cards, gift bags, and homemade goodies. I have 3 left and lots of events coming up that I need a little thank you gift for!

Thankful for Family Like You, www.LaurasStampPad.com

I am not sure whether I need this for a friend or family member but I made a few tags for each. When it comes time to use it, all I have to do is pop off the Stampin’ Dimensional backs and stick it on. It’s perfect! I am just loving the August 2019 Paper Pumpkin Kit!

If you love Halloween, you NEED to sign up for the September Paper Pumpkin Kit! It’s a spooky one! Click here to get signed up before the 10th of the month!!! If you would like to check out the September Kit from last year, click here!

Happy Stampin’

~Laura


Technique Tuesday – Boxes & Boughs!!!

Posted on

Happy Tuesday!!! That means I have a fabulous technique to share with you today! With Christmas less than a week away, it’s all about gift packaging and last minute gifts! These boxes and boughs are sure to make things merry and bright!

Boxes & Boughs, www.LaurasStampPad.com

These acetate boxes are super fun to decorate and I have put lots of different items in there as gifts – cards, Stampin’ Dimensionals, and gift certificates!

I started by popping up the Acetate Box. It’s already scored and all so just fold on the score lines and pop it up! Next, I took some Real Red cardstock and created a belly band. I have found that scoring the cardstock doesn’t work very well because the lines sometimes aren’t exact so it fits weird. What I do is just wrap it around, slide it off and press on the fold lines. This just seems to work best for me. Then I layered on a piece of Merry Little Christmas Designer Series Paper (retiring). The paper is black and white but I sponged on some green very lightly for a little more color! I used Tear And Tape to secure the ends of the belly band together.

Gift Packaging, www.LaurasStampPad.com

Now for the decoration, I used a hot glue gun! First, I added the little Green Sprig and pressed it into the glue. Next, I created 2 loops with the Striped Ribbon and tied the center tight using the Black Baker’s Twine. This is much easier that tying it into a knot and it allows for the stripes to show. If you do a knot, it will make the one side backwards. This ribbon does have wire in it so you can mold it as needed! The Mini Ornament is secured to the bow with the Black Baker’s Twine as well. I hot glued this to the front as well. Be sure it is all on the belly band so it can still slide off. The tag was created with the Merry Little Labels Stamp Set (retiring) and coordinating Everyday Label Punch! Cute and simple gift packaging!

What would you put in this box to give to a friend or family member? Let me know in the comments below!

Today, I’m sharing a sneak peak to the 2018 Occasions Mini Catalog. Check out the Video Tutorial below or click here! Be sure to give the video a thumbs up if you liked it and don’t forget to subscribe if you are new. If you would like a notification when I post a new video, be sure to click the bell right next to the subscribe!!! Let me know if you have any tip and tricks to share in the comments below!

Happy Stampin’

~Laura

Product List


Decorated Tiny Treat Boxes!!!

Posted on

Happy Friday!!! Today I’m sharing a cute gift packaging with the Tiny Treat Boxes!!! You can add some chocolates or other candy in there and so much more! Cute little gift for a hostess or at each spot at a party!

Tiny Treat Boxes, www.LaurasStampPad.com

Isn’t it adorable??? It’s super simple to create as well. Mix up the designer paper for any occasion too!

I started by popping up the Clear Tiny Treat Boxes. Next, I took a piece of the Be Merry Designer Series Paper (1-3/4″ x 10″) and wrapped it around the box. I started with the end in the middle of the bottom of the box. This makes the overlap on the bottom to seal it together. After wrapping it around, I slide it off and used my Bone Folder to create a strong crease on each edge. I prefer doing this over scoring it because I find it fits around the box better. When I score, sometimes it’s a little too big or a little too small. Be sure not to adhere the paper to the box or you won’t be able to open the box. If you adhere it around like a belly band, it just slides right off!

Be Merry Treat Box, www.LaurasStampPad.com

For the decoration, I used the 1-1/2″ Circle Punch to punch out Whisper White and stamp the To/From. I layered this one onto a Silver Foil Circle punched out with the 1-3/4″ Circle Punch! Using the Handheld Punch, I added a hole and tied on the box with some Silver Tinsel Ribbon. I finished it off with a little Season of Glitz Mini Gift Bow! These bows come in green, red, and white so there are lots of options to mix and match with other papers!

Product List

Don’t forget that the Basket of Wishes Stamp Set is the November Free Stamp Set from me for orders of $75 or more this month! Of course, all orders over $40, earn Laura’s Loyal Stampers Stickers!

Yesterday, Stampin’ Up opened up the reservations for the New Stamparatus and they were sold out in less than 20 minutes! I knew this item was HOT but I didn’t know it was going to go that fast. The next reservation date is December 5th!!! If you would like one, stay tuned and be ready on December 5th!

I hope you all have a fabulous weekend. See you back here on Monday! Happy Monday!

~Laura


Halloween Goodies for Everyone!!!

Posted on

Happy Friday!!! I can’t believe it’s almost Halloween….after all wasn’t it my birthday at the end of August just yesterday? After all, it’s coming whether we are ready or not. Here are the Halloween goodies I made!

Halloween Goodies for Everyone, www.LaurasStampPad.com


I went really simple this year. In a weak moment, I decided to buy my favorite candy – Reese’s Peanut Butter Cups. What was I thinking? Anyway, I had to quickly package them up before I ate them all! I slipped one into a Gusseted Cellophane Bag with a piece of Spooky Night Designer Series Paper in the back. The Designer Paper measures 3″ x 2-3/4″. Using some Black Baker’s Twine, I tied it closed and into a bow! For the decoration on the front, I used the 2″ Circle Punch and the Cat Punch. The cat was punched out from some of the Spooky Night Designer Paper. I added the cat to the circle with Stampin’ Dimensionals and added the circle to the bag with Snail Adhesive. These were really simple, cute, and quick to whip up!

Anna & Ruth, www.LaurasStampPad.com

These cuties are my nieces who came to stamp class this past weekend so they got their treats in person!!!

Now, I know I mentioned Halloween Goodies for everyone so here you go!!! I am offering DOUBLE Laura’s Loyal Stampers Stickers to all of you!! All orders placed this weekend (Friday – Sunday) will earn Double Laura’s Loyal Stampers Stickers! Don’t forget about the Buy 3, Get 1 Free Designer Series Paper Special and of course all orders of $75 or more will earn my Free Stamp Set of the Month! It is your choice between Graceful Garden or Daisy Delight!!! Click here to start shopping!

Have a wonderful weekend and I’ll see you back here on Monday! Happy Stampin’

~Laura

Product List