March 2023 Paper Pumpkin!!!

Posted on

The March 2023 Paper Pumpkin Kit was so fresh and fun! I love the pops of gold foil, the simple plants and uplifting greetings!!! This kit also came with 2 stamp sets which was extra fun! Paper Pumpkin is 10 years old! Woot Woot!

March 2023 Paper Pumpkin, www.LaurasStampPad.com

I think this one is my favorite mostly because of the greeting! This would make a great Mother’s Day Card but also any time. I feel like I could give this to a fellow Mom friend to brighten her day. It could be a birthday card for any of the women in my life. There are lots of ways to use this card!

Gold Polka Dots March Paper Pumpkin, www.LaurasStampPad.com

This card is my second favorite because I love polka dots! TIP: When I added the flower pot, I actually put a Mini Stampin’ Dimensional at the bottom of the pot so it would stay level with the popped up label. Then I added the glue dots at the top of the pot to adhere to the popped up label!

Plants on a Bookshelf, www.LaurasStampPad.com

Okay, I have to say, this is not my least favorite card. I love this one too but it just happens to be the final card in the kit. I love the whole bookshelf concept and all the pinks and purples with that hint of gold foil.

Which card is your favorite from the March 2023 Paper Pumpkin?!? Let me know in the comments below! Also, don’t forget to sign up for the April Kit before the 10th! Click here to get started!

Happy Stampin’

~Laura

Gold Foil One Sheet Wonder!

Posted on

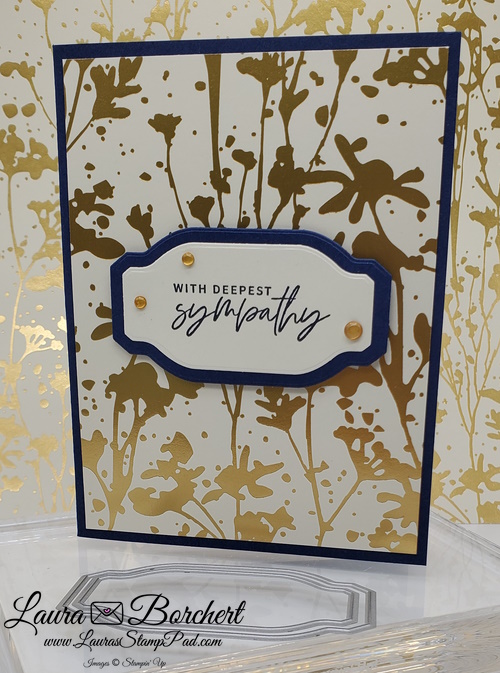
There is something about Gold and Navy that just looks stunning!!! Check out this fun Gold Foil One Sheet Wonder card that I created! It uses the NEW Naturally Gilded Specialty Designer Paper that came out this month!!!

Gold Foil One Sheet Wonder, www.LaurasStampPad.com

The Naturally Gilded Paper has sheets of Gold, Copper, and Silver! These prints are basic nature images which is perfect for any occasion! I paired it with the Something Fancy Stamp Set and Dies for a quick and simple card!

One Sheet Wonder

Now for the amazing One Sheet Wonder part where you can create 6 cards! Let me share the measurements so you can use every inch of the 12″ x 12″ Designer Paper. After all this paper is gorgeous and you don’t want to waste any. First, cut at 5-1/4″ creating a 5-1/4″ x 12″ strip. Then cut another strip at 5-1/4″. Now you should have 2 strips measuring 5-1/4″ x 12″ and 1 strip measuring 1-1/2″ x 12″. With both 5-1/4″ x 12″ strips, cut across every 4″ creating 6 pieces measuring 5-1/4″ x 4″. These will be used on the card fronts of 6 cards! Now with the 1-1/2″ x 12″, simply cut that in half at 3/4″ creating 2 strips of 3/4″ x 12″. Then cut across every 4″ creating 6 pieces measuring 3/4″ x 4″ which will be used inside the card!

One Sheet Wonder Something Fancy, www.LaurasStampPad.com

For the inside of this card, I brushed some Night of Navy Ink on the bottom of the Very Vanilla just to make the Designer Paper POP some more! I really love how it turned out!!! Of course, then I stamped the greeting crooked but it’s all good! 🙂 Check out all of the supplies below so you can recreate these gold foil one sheet wonder cards!

Happy Stampin’

~Laura

Product List

Christmas in July!

Posted on

WHAT?!?!?!?! I am so not ready for Christmas but that is why this is called Christmas IN JULY! It’s never to early to get started on your holiday cards after all! The July-December Mini Catalog launched this month and my Online Stamp Class is Christmas in July – Lights Aglow!

Christmas in July, Lights Aglow, www.LaurasStampPad.com

This stunning cards uses products from the Lights Aglow Suite! It is one of the 5 cards that I will be making in the July Online Card Class! This class takes place on Friday, July 22nd at 7:30 p.m. CT on Facebook and YouTube Live! Anyone can watch for FREE! In fact, you can check out past Online Card Classes here! Share with all of your friends because I love chatting and stamping with everyone as if we were all in the same room together!

If you would like to stamp along with me there are 2 options for you to pick from! You can purchase the PDF Tutorial for instant download and cut the cardstock and supplies yourself OR you can purchase a card kit and I will mail it all out to you! No die cut/punched images or stamped images will be provided. You will need the Lights Aglow Bundle or stamp set of your choice! Click here for all of the details and to get registered!

The In Person Class for this one has filled up fast so I’m super excited to do it online with all of you as well! Save the Date for the Christmas in July – Lights Aglow Online Stamp Class on June 22nd at 7:30 p.m. CT!

Happy Stampin’

~Laura


May 2022 Paper Pumpkin!!!

Posted on

The May 2022 Paper Pumpkin Kit featured all 5 of the new In Colors and I love it! The pop of color and then gold foil accents are just stunning!! Let me know which set is your favorite in the comments below!

May 2022 Paper Pumpkin Kit, www.LaurasStampPad.com

It is so hard for me to pick a favorite because I really do love these cards. I’m going with Tahitian Tide as my first pick because I love the splatters in the background and the greeting is super fabulous!!! The monochromatic dots are my favorite here as well!

Sweet Sorbet Paper Pumpkin Kit Cards, www.LaurasStampPad.com

This card is perfect for #Happymail and will be great to send to my niece who is in college. Anyone getting a new job, moving, starting a sport, etc would love this uplifting card for sure! For some reason, on this card I actually like the multicolored dots better than monochromatic!

2022-2024 Stampin’ Up In Colors

Orchid Oasis Stampin' Up In Color, www.LaurasStampPad.com

This card is great because the greeting is very generic. I also love the color variations for some reason! Monochromatic all the way with this card. How crazy is it that I love monochromatic on some and others I prefer multi-colored?!?! Ehhh I’m crazy so I shouldn’t be surprised!

Parakeet Party 2022-2024 In Color Stampin Up, www.LaurasStampPad.com

For this card, I love the bright green – Parakeet Party! It’s so bright and cheery. The greeting is kinda meh. I would prefer just a Happy Birthday or something. Although there are plenty of people I could send this card too so looks like I just need to branch out and embrace it. That is one thing I love about Paper Pumpkin…..it pushes me! It makes me try color combinations I wouldn’t have thought of. I used greetings, images, and techniques that maybe aren’t my favorite. This is a good thing and I need the push!

Starry Sky Stampin' Up In Color Paper Pumpkin, www.LaurasStampPad.com

This is another greeting that I struggle with a lot. Best Wishes is a hard greeting for me to use. I mean sure I could use it for wedding, anniversary, new job, a move, etc but I also look at the greeting and think “IDK.” Do you use Best Wishes a lot?!?! What occasion?!?

Be sure to sign up for the June Paper Pumpkin before Friday so you can enjoy the fun of card making and ease of it all prepped for you! Also, it’s okay if it pushes you out of your comfort zone! It’s a good thing! 🙂

Happy Stampin’

~Laura


Anniversary April!!!

Posted on

Let’s just go ahead and call this month – Anniversary April!!! My Stampin’ Up! Anniversary is the month as well as our Wedding Anniversary! Pop the champagne and let’s celebrate!!!

Anniversary April Fun Fold Card, www.LaurasStampPad.com

I created this fun fold card for a recent class and thought it was perfect for Brad for our anniversary! Thank you to Connie Stewart for the inspiration! There is something about the elegant paper and jade color that just felt so right!

How To Cut & Use All of the Paper:

I started with a 1/4 sheet of Just Jade cardstock (4-1/4″ x 5-1/2″) as the card base. Next, I took a piece of Basic White (8″ x 5-1/4″) and folded it in half. This is the actual card. For the card front, I added a piece of Simply Elegant Designer Series Paper. BONUS: You can create 6 of these cards with 1 sheet of 12″ x 12″ with no waste! Cut at 4″ creating 3 strips of 4″ x 12″. Then cut at 5-1/4″ creating two 5-1/4″ x 4″ pieces from each strip (6 total). This leaves 3 small pieces measuring 4″ x 1-1/2″ which I cut into 4″ x 3/4″ and used on the inside of the card!

Simple Fun Fold Card, www.LaurasStampPad.com

Now add the designer series paper to the card front covering it completely. Before adding this to the Just Jade base, I added a little flap for the greeting.

You can make this piece as big or small as you wish! I simply took my greeting of choice and measured it with a little extra on all sides. This was 1″ x 2-1/2″ which I stamped in Just Jade Ink onto Basic White. For the tab, simply add 1/4″ up and down and an 1″ side to side. So the Basic White is 1″ x 2-1/2″ and the Just Jade is 1-1/4″ x 3-1/2″. Score the Just Jade at 3/4″ to create a little tab. Adhere that tab to the Just Jade card base flush with the edge on the right side. I placed mine about 3/4 of the way down from the card top. Next, I added the Basic White card to the front. Stamped the greeting and added it to the tab with a little ribbon knot for decoration! Simple and fabulous!

Happy Easter Fun Fold Card, www.LaurasStampPad.com

Here is another one I made but went with Happy Easter and a different pattern of paper from the Simply Elegant Designer Series Paper Pack! See this all in action by clicking here!

Now I am all set for Anniversary April! Let’s celebrate! Remember that many of these items are retiring so you want to check out the Last Chance List and get them before they are gone!

Happy Stampin’

~Laura

Product List

A Grateful Heart!!

Posted on

Thanksgiving is a day to be thankful but I have a grateful heart every day! There are so many blessings in my life that I can’t even count them all. I find that on hard days it is best to think of as many as I can! One of them is Stampin’ Up and all of YOU!!! You mean so much to me and have allowed me to enjoy my job so much and stay home with my 2 little blessings too!

Grateful Heart Card, www.LaurasStampPad.com

On this crazy busy holiday week, I thought I would share a quick and simple card that you could whip up in 3 minutes or less!!! Time it!

I used a Blackberry Bliss card base. Next, I cut a piece of the Blackberry Beauty Designer Series Paper into a 4″ x 5-1/4″ piece and added it to the card front. Then for the greeting, I used the Double Oval Punch! I love that it’s a 2 in 1 punch for the perfect layered greeting! The scallop was punched in Gold Foil Paper. The smooth oval is Gray Granite! I stamped the greeting in Blackberry Bliss Ink. The greeting as well as the image on the inside of the card is from the Banner Year Stamp Set! The greeting was added to the card front with Stampin’ Dimensionals…of course!! 🙂

Banner Year Stampin' Up Stamp Set, www.LaurasStampPad.com

Then for the inside of the card, I used Gray Granite cardstock (4″ x 5-1/4″) and stamped the corners! Just a little decoration to pull it all together! DONE!

How long did that take?!? You could even make it simpler by stamping the greeting on the front directly to the designer paper! Quick, simple, and made with love is perfect for this time of year! After all, it is the message and the thought that means the most!

Wishing you all a wonderful week! If you are feeling overwhelmed with the holidays and to-do lists, stop and think of your many blessings for just a minute with a grateful heart! Smile and power through! You got this! Remember that you mean so much to me and I appreciate you! HUGS!

Happy Stampin’

~Laura


Beautiful Angels!

Posted on

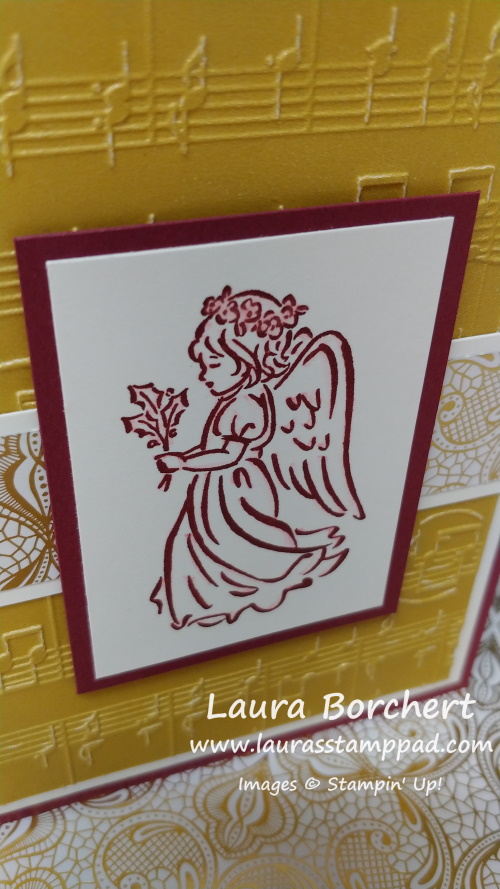
The Beautiful Angels in the Angels of Peace Stamp Set are stunning! I love the elegant, classic look for Christmas time! Add in the Gold Glimmer Paper and I’m in love!

Beautiful Angels Christmas Card, www.LaurasStampPad.com

For these cards, I used Merry Merlot for the card base. Next, I layered on a piece of Basic White (4″ x 5-1/4″). Then I took a piece of the Gold Glimmer Paper and layered it on with Stampin’ Seal+. This adhesive doesn’t show through the vellum which is amazing! After creating the first card with the smooth Glimmer Paper, I decided to emboss it for a different look. I’m in LOVE!!!! It just takes this card to a whole new level! Which is your favorite?

Embossed Gold Glimmer Paper, www.LaurasStampPad.com

For the center band, I wanted to break things up and add a little more depth. I went with the Simply Elegant Designer Series Paper layered on Basic White. Without the white, it just didn’t pop and I wanted it to POP!

Now for the beautiful angels! I simply stamped her in Merry Merlot onto Basic White cardstock and then layered it onto Merry Merlot. This piece was then added to the card front with Stampin’ Dimensionals! BUT WAIT…..before you go thinking this card is done, I added some Wink of Stella! Wink of Stella adds that hint of glimmer to the angel and it bleeds the ink out a bit. I did the flowers on her head as well as the holly in her hand. On another card, I went over each link of ink in the image to really make it pop and add more color. STUNNING!

Wink of Stella Technique Card Making, www.LaurasStampPad.com

If you would like to see this all in action, check out the video here! If you would like to recreate this card, click on the supplies listed below!!!

Happy Stampin’

~Laura

Product List

Blackberry & Gold!!!

Posted on

When you think of Fall, what colors come to mind?? For me it’s typically orange, yellow, and brown/tans. I am loving this new look of Blackberry & Gold for Fall! Thank you Stampin’ Up for making me branch out because I’m in LOVE!!! With this, I might start to like Fall more! I still hate winter and I’m not sure that will ever change. LOL

Blackberry & Gold, www.LaurasStampPad.com

This card has me swooning! I started with a Rich Razzleberry card base. Next, I layered strips of the Blackberry Beauty Designer Series Paper onto Cinnamon Cider cardstock! This paper is gorgeous with the rich colors and gold foil shine! Then I added this to the left hand side of the card and wrapped some Gold Shimmer Ribbon around the card and tied it into a knot.

Now for the focal point, I stamped the greeting from the Pretty Pumpkins Stamp Set in Blackberry Bliss ink onto Very Vanilla cardstock. Then I layered it onto Early Espresso cardstock and added it to the card front with Stampin’ Dimensionals. Using the Pretty Pumpkins Stamp Set and coordinating dies, I stamped and die cut the 2 pumpkins. I love the Gold Foil touch on that detailed pumpkin! There is a Mini Stampin’ Dimensional on the top of the stamped pumpkin that is falling off the greeting piece. This is to keep the image level and popped up even though it is falling off the greeting piece a bit.

Pretty Pumpkins Stampin' Up Bundle, www.LaurasStampPad.com

On the inside of the card, I added a piece of Very Vanilla cardstock (4″ x 5-1/4″ and stamped a coordinating greeting and some of the leaves from the Pretty Pumpkin Stamp Set. There are so many beautiful images in that set!

This card would be perfect for Thanksgiving but also works for a thank you card all season long! What would you use this card for?!?! Let me know in the comments below! If you wish to make this stunning Blackberry & Gold card, check out the supplies listed below. Click Add All To Cart for a quick shopping experience!

Happy Stampin’

~Laura

Product List

February 2021 Paper Pumpkin!

Posted on

The February 2021 Paper Pumpkin Kit was super simple and fabulous! I totally messed up on a few of mine but I still love the way they turned out! Which one is your favorite??

February 2021 Paper Pumpkin, www.LaurasStampPad.com

My favorite one is the bouquet card. The colors, the flowers, and that sweet greeting are just amazing! This is a greeting I can see me using on future cards as well! I will say I’m not so sure black sequins was the correct look for these cards but……I can use them on another project since I have a lot leftover!

Monthly Card Kit, www.LaurasStampPad.com

The Thinking of You card is my second favorite! I love that gold vellum. For the first card, I added adhesive all around the edge under the gold foil but I could still see it through. On the other 2 cards, I added adhesive on opposite corners (under the flowers) and a small day on the other 2 corners. This was more subtle and looked much better!

Thinking of You Stampin' Up Greeting Card, www.LaurasStampPad.com

This card is my least favorite and I realized I totally forgot the twine which makes it super simple and a little plain. The gold foil is stunning so really it does so much for this card and I still like it but it is plain! I don’t know what I was thinking to not add the twine. The black sequins seemed a little “dark” for the card.

Homemade Sympathy Card, www.LaurasStampPad.com

I just love Paper Pumpkin kits because they are always keeping my card stash full with cards for every occasion! The color combinations inspire me and give me ideas! I also enjoy just creating for fun without coming up with the idea and having to cut everything for it! It’s perfect!!! If you liked this February 2021 Paper Pumpkin and would like to try out it out for a month or more, click here to sign up for the March Kit before the 10th!

Happy Stampin’

~Laura


Embossed Trees!!!

Posted on

The moment I saw the Evergreen Embossing Folder, I saw Christmas beauty. Simple, elegant and fabulous! These embossed trees have so much texture that just makes you stare at it forever! I did this card in Real Red with Gold Foil but I think Shaded Spruce, Night of Navy and Merry Merlot would be amazing as well as other foils! Let me know your pick in the comments below!

Embossed Trees, www.LaurasStampPad.com

This card is beyond simple and oh so fabulous! You could crank out multiples in no time at all. I also used a 4″ x 4″ piece of Gold Foil Paper so not an inch goes to waste!

I started with the following supplies: Real Red Card Base (5-1/2″ x 8-1/2″), 2 pieces of Whisper White (4″ x 5-1/4″), Gold Foil Paper (4″ x 4″) and Real Red Satin Ribbon (approx. 12 inches). That’s it!!!!

First, I embossed the Gold Foil Paper with the Evergreen Embossing Folder and then added it to the Whisper White cardstock. Next, I stamped a greeting on the bottom from the Itty Bitty Christmas Stamp Set. I did a few others with the For Unto Us Stamp Set and there are many more options you could go with! Then I wrapped the Real Red Satin Ribbon around the cardstock and tied it. This helps the transition from gold foil to the white look more seamless! Then add it to the card front!

Evergreen Embossing Folder, www.LaurasStampPad.com

For the inside of the card, I decorated with another greeting and some fun corner images from the Banner Year Stamp Set. I only used the 1 ink pad for this entire card – Real Red! See, I told you this was fabulous and simple! Embossed Trees are just so elegant for Christmas time but also all year long. I think this card would be perfect for a masculine card as well!

Inside Christmas Card Greetings, www.LaurasStampPad.com

REMINDER: Christmas is right around the corner. Let your friends and family know what you want with a Stampin’ Up List! Fill this out and pass it out to anyone who asks! All of my contact information is on there for them to reach out and place an order for you or order online! I have already had fun being an elf this year and helping some with early shopping!

Happy Stampin’

~Laura

Product List