The June 2026 Paper Pumpkin Kit was called Bikes & Blooms! Wondering what Paper Pumpkin is? It is a monthly subscription kit with a craft project and everything needed to create it all in a fabulous box. These kits are typically cards but sometimes include treat boxes, home decor, etc.
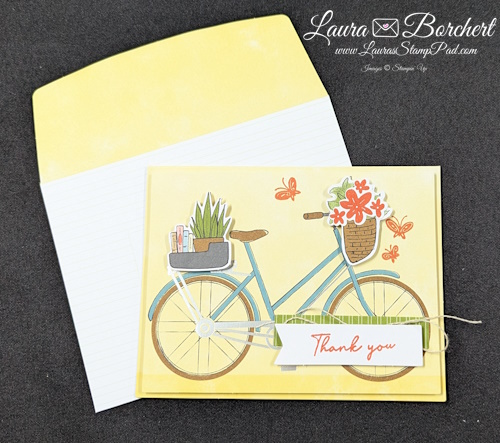
Honestly, I loved all of these so I don’t think I can rank them! LOL The instructions have you add the yellow bike panel with Stampin’ Dimensionals. But wait there is more…..dimensionals on the back basket, the front basket, the flowers, and the greeting! WHAT?!?! I just suggest you use them as you wish! LOL I loved the little butterflies on this card too!!!
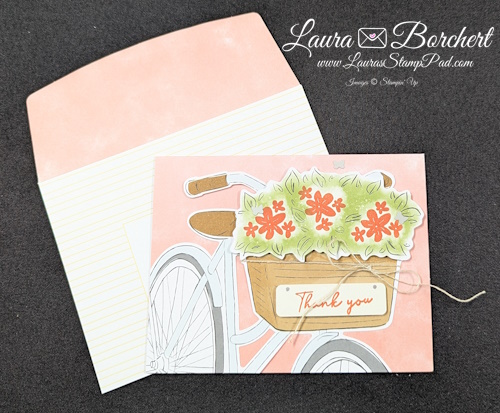
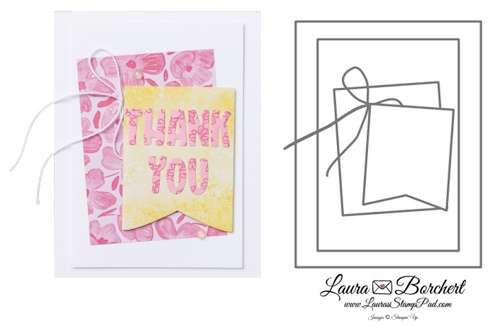
Now for this card, I actually put the bike on flat rather than with Stampin’ Dimensionals. Gasp! I know I know. You all know how much I love my Stampin’ Dimensionals. I added them to the flowers on the basket and the greeting! There was a Best Wishes greeting but Claire and I decided to do Thank you instead! Also, don’t forget to tie the twine around the bike basket before adding that to the card front! No worries, if you forget, you can always tie a bow and stick it on with a Mini Glue Dot!
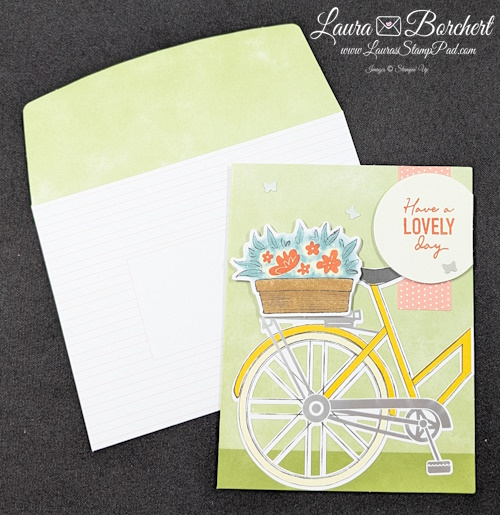
This is another one that I mixed it up from the instructions! I put my bike on flat and the polka dotted strip on flat! The basket of flowers and the greeting circle are popped up! I will say I wish the butterflies were different. They are a very muted silver blah…..in my opinion. I wish they were shiny or even a color rather than silver. Let me know in the comments what you thought of the butterflies!
Which card was your favorite card from the June 2026 Bikes & Blooms Kit?!?
If you want to join the Paper Pumpkin fun, click here to get signed up!
Happy Stampin’
~Laura
![Paradise Garden Bundle (English) [ 167121 ]](https://assets1.tamsnetwork.com/images/EC042017NF/167121s.jpg "Paradise Garden Bundle (English) [ 167121 ]")
![Basic White 8 1/2" X 11" Cardstock [ 166780 ]](https://assets1.tamsnetwork.com/images/EC042017NF/166780s.jpg "Basic White 8 1/2\" X 11\" Cardstock [ 166780 ]")
![Misty Moonlight 8-1/2" X 11" Cardstock [ 153081 ]](https://assets1.tamsnetwork.com/images/EC042017NF/153081s.jpg "Misty Moonlight 8-1/2\" X 11\" Cardstock [ 153081 ]")
![Crushed Curry Classic Stampin' Pad [ 147087 ]](https://assets1.tamsnetwork.com/images/EC042017NF/147087s.jpg "Crushed Curry Classic Stampin' Pad [ 147087 ]")
![Fresh Freesia Classic Stampin' Pad [ 155611 ]](https://assets1.tamsnetwork.com/images/EC042017NF/155611s.jpg "Fresh Freesia Classic Stampin' Pad [ 155611 ]")
![Granny Apple Green Stampin' Pad [ 147095 ]](https://assets1.tamsnetwork.com/images/EC042017NF/147095s.jpg "Granny Apple Green Stampin' Pad [ 147095 ]")
![Misty Moonlight Classic Stampin' Pad [ 153118 ]](https://assets1.tamsnetwork.com/images/EC042017NF/153118s.jpg "Misty Moonlight Classic Stampin' Pad [ 153118 ]")
![Petal Pink Classic Stampin' Pad [ 147108 ]](https://assets1.tamsnetwork.com/images/EC042017NF/147108s.jpg "Petal Pink Classic Stampin' Pad [ 147108 ]")
![Watercolor Pencils Assortment 2 [ 149014 ]](https://assets1.tamsnetwork.com/images/EC042017NF/149014s.jpg "Watercolor Pencils Assortment 2 [ 149014 ]")
![Pearlized Faceted Circles [ 166978 ]](https://assets1.tamsnetwork.com/images/EC042017NF/166978s.jpg "Pearlized Faceted Circles [ 166978 ]")
![Stampin' Dimensionals [ 104430 ]](https://assets1.tamsnetwork.com/images/EC042017NF/104430s.jpg "Stampin' Dimensionals [ 104430 ]")
![A Round Of Hellos Photopolymer Stamp Set (English) [ 167227 ]](https://assets1.tamsnetwork.com/images/EC042017NF/167227s.jpg "A Round Of Hellos Photopolymer Stamp Set (English) [ 167227 ]")
![Garden Green Classic Stampin' Pad [ 147089 ]](https://assets1.tamsnetwork.com/images/EC042017NF/147089s.jpg "Garden Green Classic Stampin' Pad [ 147089 ]")
![Pretty In Pink Classic Stampin Pad [ 163807 ]](https://assets1.tamsnetwork.com/images/EC042017NF/163807s.jpg "Pretty In Pink Classic Stampin Pad [ 163807 ]")
![Daffodil Delight Classic Stampin' Ink Refill [ 119672 ]](https://assets1.tamsnetwork.com/images/EC042017NF/119672s.jpg "Daffodil Delight Classic Stampin' Ink Refill [ 119672 ]")
![Pretty In Pink Classic Stampin’ Ink Refill [ 163816 ]](https://assets1.tamsnetwork.com/images/EC042017NF/163816s.jpg "Pretty In Pink Classic Stampin’ Ink Refill [ 163816 ]")
![Uninked Stampin' Spots [ 141822 ]](https://assets1.tamsnetwork.com/images/EC042017NF/141822s.jpg "Uninked Stampin' Spots [ 141822 ]")
![2" (5.1 Cm) Circle Punch [ 133782 ]](https://assets1.tamsnetwork.com/images/EC042017NF/133782s.jpg "2\" (5.1 Cm) Circle Punch [ 133782 ]")
![2024 2026 In Color™ Flat Pearls [ 165266 ]](https://assets1.tamsnetwork.com/images/EC042017NF/165266s.jpg "2024 2026 In Color™ Flat Pearls [ 165266 ]")
![Sweet Blooms Photopolymer Stamp Set (English) [ 165181 ]](https://assets1.tamsnetwork.com/images/EC042017NF/165181s.jpg "Sweet Blooms Photopolymer Stamp Set (English) [ 165181 ]")
![Pretty Florals Bundle [ 165179 ]](https://assets1.tamsnetwork.com/images/EC042017NF/165179s.jpg "Pretty Florals Bundle [ 165179 ]")
![Hole Punch Assortment [ 165409 ]](https://assets1.tamsnetwork.com/images/EC042017NF/165409s.jpg "Hole Punch Assortment [ 165409 ]")
![1-3/4" (4.4 Cm) Circle Punch [ 119850 ]](https://assets1.tamsnetwork.com/images/EC042017NF/119850s.jpg "1-3/4\" (4.4 Cm) Circle Punch [ 119850 ]")
![Petunia Pop Classic Stampin Pad [ 163811 ]](https://assets1.tamsnetwork.com/images/EC042017NF/163811s.jpg "Petunia Pop Classic Stampin Pad [ 163811 ]")
![Secret Sea Classic Stampin' Pad [ 165285 ]](https://assets1.tamsnetwork.com/images/EC042017NF/165285s.jpg "Secret Sea Classic Stampin' Pad [ 165285 ]")
![Cloud Cover 12" X 12" (30.5 X 30.5 Cm) Two Tone Cardstock [ 166708 ]](https://assets1.tamsnetwork.com/images/EC042017NF/166708s.jpg "Cloud Cover 12\" X 12\" (30.5 X 30.5 Cm) Two Tone Cardstock [ 166708 ]")
![Petunia Pop 12" X 12" (30.5 X 30.5 Cm) Two Tone Cardstock [ 166690 ]](https://assets1.tamsnetwork.com/images/EC042017NF/166690s.jpg "Petunia Pop 12\" X 12\" (30.5 X 30.5 Cm) Two Tone Cardstock [ 166690 ]")
![Pretty In Pink 12" X 12" (30.5 X 30.5 Cm) Two Tone Cardstock [ 166693 ]](https://assets1.tamsnetwork.com/images/EC042017NF/166693s.jpg "Pretty In Pink 12\" X 12\" (30.5 X 30.5 Cm) Two Tone Cardstock [ 166693 ]")
![Misty Moonlight & White 1/4" (6.4 Mm) Starter Ribbon Pack [ 165276 ]](https://assets1.tamsnetwork.com/images/EC042017NF/165276s.jpg "Misty Moonlight & White 1/4\" (6.4 Mm) Starter Ribbon Pack [ 165276 ]")
![Linen Thread [ 104199 ]](https://assets1.tamsnetwork.com/images/EC042017NF/104199s.jpg "Linen Thread [ 104199 ]")
![2025–2027 In Color™ Flat Pearls [ 165192 ]](https://assets1.tamsnetwork.com/images/EC042017NF/165192s.jpg "2025–2027 In Color™ Flat Pearls [ 165192 ]")


![Adopt A Pet Kit [ 167256 ]](https://assets1.tamsnetwork.com/images/EC042017NF/167256s.jpg "Adopt A Pet Kit [ 167256 ]")
![Lots To Love Kit [ 167263 ]](https://assets1.tamsnetwork.com/images/EC042017NF/167263s.jpg "Lots To Love Kit [ 167263 ]")
![Butterfly Garden Kit (English) [ 167266 ]](https://assets1.tamsnetwork.com/images/EC042017NF/167266s.jpg "Butterfly Garden Kit (English) [ 167266 ]")


![Pop Up Petals Bundle (English) [ 168010 ]](https://assets1.tamsnetwork.com/images/EC042017NF/168010s.jpg "Pop Up Petals Bundle (English) [ 168010 ]")
![Stylish Shapes Dies [ 159183 ]](https://assets1.tamsnetwork.com/images/EC042017NF/159183s.jpg "Stylish Shapes Dies [ 159183 ]")
![Florals In Bloom 12" X 12" (30.5 X 30.5 Cm) Designer Series Paper [ 165175 ]](https://assets1.tamsnetwork.com/images/EC042017NF/165175s.jpg "Florals In Bloom 12\" X 12\" (30.5 X 30.5 Cm) Designer Series Paper [ 165175 ]")
![Tuxedo Black Memento Ink Pad [ 132708 ]](https://assets1.tamsnetwork.com/images/EC042017NF/132708s.jpg "Tuxedo Black Memento Ink Pad [ 132708 ]")
![Daffodil Delight Stampin' Blends Combo Pack [ 154883 ]](https://assets1.tamsnetwork.com/images/EC042017NF/154883s.jpg "Daffodil Delight Stampin' Blends Combo Pack [ 154883 ]")
![Old Olive Stampin' Blends Combo Pack [ 154892 ]](https://assets1.tamsnetwork.com/images/EC042017NF/154892s.jpg "Old Olive Stampin' Blends Combo Pack [ 154892 ]")
![Pecan Pie Stampin’ Blends Combo Pack [ 161674 ]](https://assets1.tamsnetwork.com/images/EC042017NF/161674s.jpg "Pecan Pie Stampin’ Blends Combo Pack [ 161674 ]")
![Foam Adhesive Strips [ 141825 ]](https://assets1.tamsnetwork.com/images/EC042017NF/141825s.jpg "Foam Adhesive Strips [ 141825 ]")
![Mini Stampin' Dimensionals [ 144108 ]](https://assets1.tamsnetwork.com/images/EC042017NF/144108s.jpg "Mini Stampin' Dimensionals [ 144108 ]")
![Take Your Pick [ 144107 ]](https://assets1.tamsnetwork.com/images/EC042017NF/144107s.jpg "Take Your Pick [ 144107 ]")
![Layers Of Beauty Photopolymer Stamp Set (English) [ 163514 ]](https://assets1.tamsnetwork.com/images/EC042017NF/163514s.jpg "Layers Of Beauty Photopolymer Stamp Set (English) [ 163514 ]")
![Basic White 8 1/2" X 11" Thick Cardstock [ 159229 ]](https://assets1.tamsnetwork.com/images/EC042017NF/159229s.jpg "Basic White 8 1/2\" X 11\" Thick Cardstock [ 159229 ]")
![Strawberry Slush Classic Stampin' Pad [ 165286 ]](https://assets1.tamsnetwork.com/images/EC042017NF/165286s.jpg "Strawberry Slush Classic Stampin' Pad [ 165286 ]")
![Blending Brushes [ 153611 ]](https://assets1.tamsnetwork.com/images/EC042017NF/153611s.jpg "Blending Brushes [ 153611 ]")
![Opal Rounds Assortment [ 163298 ]](https://assets1.tamsnetwork.com/images/EC042017NF/163298s.jpg "Opal Rounds Assortment [ 163298 ]")
![Mini Alphabet Dies [ 162934 ]](https://assets1.tamsnetwork.com/images/EC042017NF/162934s.jpg "Mini Alphabet Dies [ 162934 ]")

![Extraordinary Flora Bundle (English) [ 165245 ]](https://assets1.tamsnetwork.com/images/EC042017NF/165245s.jpg "Extraordinary Flora Bundle (English) [ 165245 ]")
![Lost Lagoon Classic Stampin' Pad [ 161678 ]](https://assets1.tamsnetwork.com/images/EC042017NF/161678s.jpg "Lost Lagoon Classic Stampin' Pad [ 161678 ]")
![Pecan Pie Classic Stampin' Pad [ 161665 ]](https://assets1.tamsnetwork.com/images/EC042017NF/161665s.jpg "Pecan Pie Classic Stampin' Pad [ 161665 ]")
![Daffodil Delight Classic Stampin' Pad [ 147094 ]](https://assets1.tamsnetwork.com/images/EC042017NF/147094s.jpg "Daffodil Delight Classic Stampin' Pad [ 147094 ]")
![Old Olive Classic Stampin' Pad [ 147090 ]](https://assets1.tamsnetwork.com/images/EC042017NF/147090s.jpg "Old Olive Classic Stampin' Pad [ 147090 ]")
![Very Vanilla 8 1/2" X 11" Cardstock [ 166784 ]](https://assets1.tamsnetwork.com/images/EC042017NF/166784s.jpg "Very Vanilla 8 1/2\" X 11\" Cardstock [ 166784 ]")
![Basic Beige 8 1/2" X 11" Cardstock [ 164511 ]](https://assets1.tamsnetwork.com/images/EC042017NF/164511s.jpg "Basic Beige 8 1/2\" X 11\" Cardstock [ 164511 ]")
![Lost Lagoon 12" X 12" (30.5 X 30.5 Cm) Two Tone Cardstock [ 166658 ]](https://assets1.tamsnetwork.com/images/EC042017NF/166658s.jpg "Lost Lagoon 12\" X 12\" (30.5 X 30.5 Cm) Two Tone Cardstock [ 166658 ]")
![Lemon Lolly 12" X 12" (30.5 X 30.5 Cm) Two Tone Cardstock [ 166659 ]](https://assets1.tamsnetwork.com/images/EC042017NF/166659s.jpg "Lemon Lolly 12\" X 12\" (30.5 X 30.5 Cm) Two Tone Cardstock [ 166659 ]")
![Blender Pens [ 102845 ]](https://assets1.tamsnetwork.com/images/EC042017NF/102845s.jpg "Blender Pens [ 102845 ]")
![Antique Pearls [ 164679 ]](https://assets1.tamsnetwork.com/images/EC042017NF/164679s.jpg "Antique Pearls [ 164679 ]")
![Extraordinary Flora Washi Tape [ 165269 ]](https://assets1.tamsnetwork.com/images/EC042017NF/165269s.jpg "Extraordinary Flora Washi Tape [ 165269 ]")