Technique Tuesday – Stamping-In-The-Round!!!

Posted on

Happy Tuesday!!!! Today, I have a fabulous technique to share with you!!! I am showing off the Stamping-In-The-Round Technique with the Stamparatus!!! Some techniques like watercoloring come out different each time but this is one that comes out the same each time and  it’s fabulous!!! I got this technique from fellow stamper Joanne Cantrell.

Stampin-In-The-Round, www.LaurasStampPad.com

This card is just so fabulous and rather easy to create. I love the added bling with the Glimmer Paper. 🙂

I started with a Smoky Slate card base and added a piece of the Merry Merlot Glimmer Paper from the Joyous Noel Pack. The Glimmer Paper measures 2″ x 5-1/2″. Next, I took a Mossy Meadow 3-1/2″ square and added it to the card front with Stampin’ Dimensionals. After placing that down, I knew where I could stamp the greeting. I used Merry Merlot Ink and the Peaceful Noel Stamp Set.

Peaceful Noel Wreath, www.LaurasStampPad.com

Now for that fabulous wreath that I created using the Stamparatus. First I created a template with squares and diamonds in a 3″ square. I placed the Whisper White 3″ square on the template and then placed the greenery piece from the Peaceful Noel Stamp Set on the edge. This is the start of the wreath. Using Mossy Meadow Ink, I stamped the first greenery piece. Then I rotated the square to the diamond template and stamped again. Continue rotating around and around until your wreath is complete. Next, I added a few holly berries in Merry Merlot. I found that it looked best to stamp them off to the side (on the white) so they would show up better. I added this to the card front and then tied a bow using the Copper & Merry Merlot Ribbon. Using Mini Glue Dots, I adhered the bow to the card front!

This technique is super handy for lots of different stamped images on corners or in a circle.

If you would like to see this all in action and what the template looks like, check out the video below or click here! Be sure to give the video a thumbs up if you liked it and don’t forget to subscribe if you are new. If you would like a notification when I post a new video, be sure to click the bell right next to the subscribe!!!

Happy Stampin’

~Laura

Product List


Mermaids Under The Sea!!!

Posted on

Whether you like the Little Mermaid Disney Movie or not, these mermaids under the sea on this card are just adorable!!! I love the layers, texture, and fun in this card so much!!!

Mermaids Under The Sea, www.LaurasStampPad.com

There is just so much fabulous-ness going on with this card. I’ll let you continue to stare at it or you can keep reading for all the details to make your own!

I started with a Pool Party card base. Next, I took another piece of Pool Party (4″ x 5-1/4″) and ran it through the Big Shot in the Seaside Embossing Folder. I added this layer to the card front. Then, I took a piece of the Myths & Magic Designer Series Paper (blue bubbles) measuring 2″ x 4-1/2″ and punched the banner tips with the Banner Triple Punch. This piece was added to the card front as well.

Swimming Mermaids, www.LaurasStampPad.com

I took the sheet of mermaids from the Myths & Magic Designer Series Paper and cut out by hand 2 different mermaids. I wanted them going in different directions so that they fit on the square better. Since I’m not a huge fan of fussy cutting, I just did a basic around the body and didn’t get into all the details. Next, I stamped the bubbles from the Magical Day Stamp Set in Bermuda Bay all over a Stitched Shape die cut square. Then I added the mermaids to the front and added this to a layer of Bermuda Bay Glimmer Paper. I liked to use Tear And Tape to add layers to glitter to make sure it has a nice strong hold.

Using the coordinating Magical Mates Framelits (Bundle & Save 10%), I die cut out some seaweed in Lemon Lime Twist and Tranquil Tide. Then I added these along the side of the glimmer square, securing them on the back side with Stampin’ Dimensionals. I finished off with a few more dimensionals and then added it to the card front! For the greeting at the bottom, I stamped it from the Picture Perfect Birthday Stamp Set onto Lemon Lime Twist cardstock. Then I punched it out with the Classic Label Punch and added it to the card front with Stampin’ Dimensionals. On either end of the greeting, I added an Epoxy Dot for even more shine and texture!

I told you there were lots of layers and fun in this card but isn’t it just so magical?!?!?! I love it even if I only make 1…or maybe 2. 🙂 The Myths & Magical Suite is retiring at the end of the May which makes me sad. Be sure to stock up on these amazing products before they are gone. To see more samples using these products, click here, here, and here! Shop all of the products by clicking the items below!

Happy Stampin’

~Laura

Product List


A Wizard with a Crystal Ball!!!

Posted on

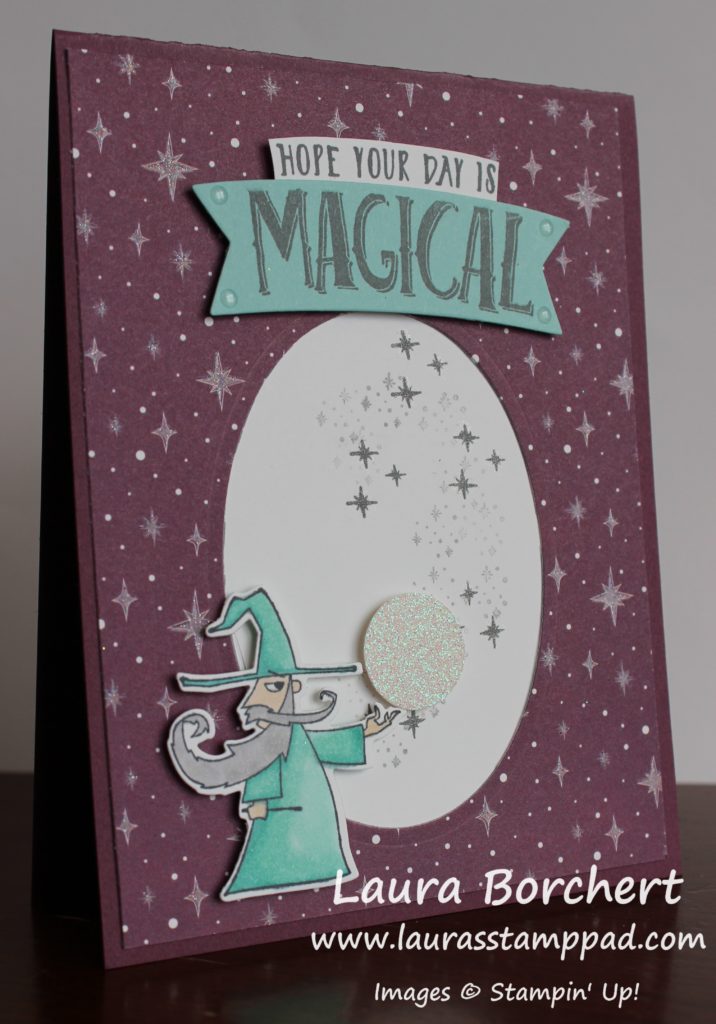
I have been having so much fun with the Myths & Magic Suite. You can see other samples here, here, and here! Now, today, I’m sharing a wizard with a crystal ball card!!!

Wizard with a Crystal Ball, www.LaurasStampPad.com

I love the color combination of Fresh Fig and Pool Party. Also, all of that bling and shine is just amazing and makes this card even more magical!

I started with a Fresh Fig card base measuring 11″ x 4-1/4″. Next, I took a piece of the Myths & Magic Designer Series Paper (4″ x 5-1/4″) and die cut an oval in the middle (side to side) and towards the bottom (to allow for the greeting up top). I used the Layering Ovals Framelits! Then, I took a piece of Whisper White big enough to cover the hole and stamped the 2 star images from the Magical Day Stamp Set in Basic Gray Ink. I stamped the larger star in full strength and the smaller cluster of stars was stamped off once for a lighter look! Then I added this piece to the card front!

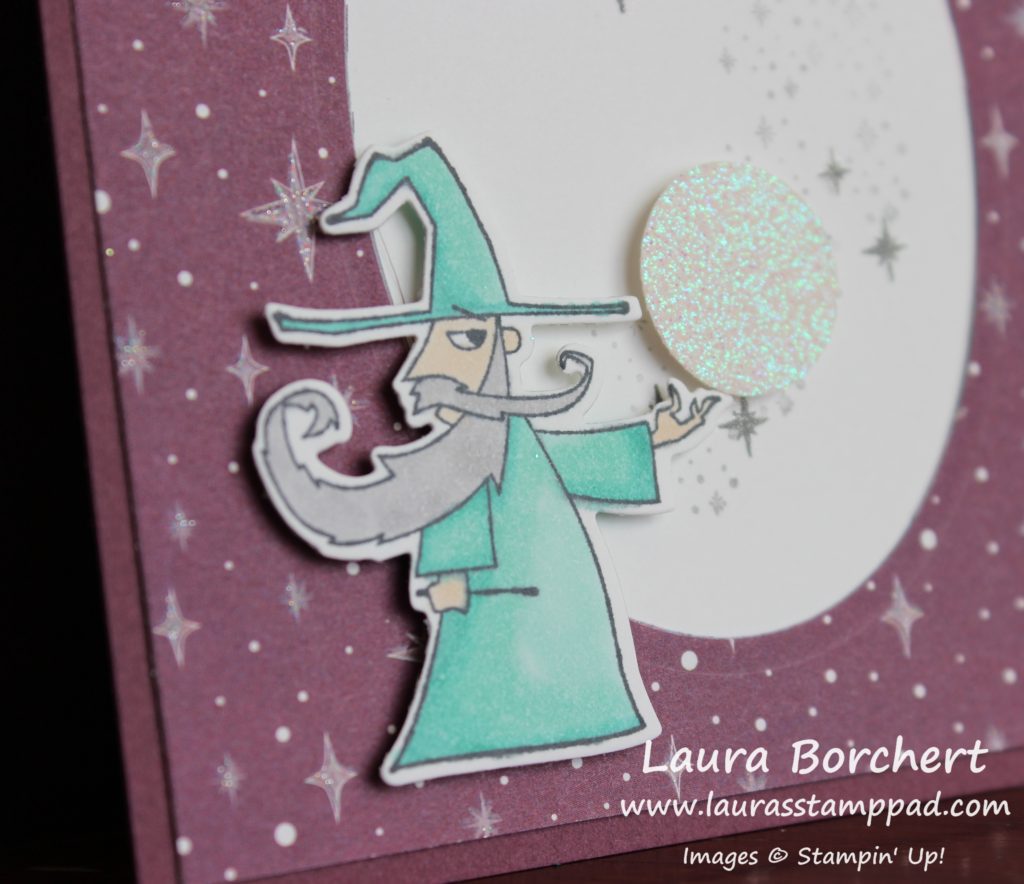
Crystal Ball, www.LaurasStampPad.com

Now for the amazing wizard and his crystal ball!! I stamped him onto Whisper White in Memento Black Ink and colored him with Stampin’ Blends. I actually used the Light Bermuda Bay and Dark Pool Party.  These colors just seemed to be the right darkness/brightness I was looking for. Smoky Slate was used for the hair and Ivory for his face and hands! Using the coordinating Magical Mates Framelits (Bundle & Save 10%), I die cut him out and added him to the card front with Stampin’ Dimensionals. His crystal ball was punched out with a circle punch and the Myths & Magic Glimmer Paper. This can be redeemed as a Free Item for Sale-A-Bration so you can get all of these goodies!! I added the crystal ball with Stampin’ Dimensionals as well!

For the greeting, I stamped it from the Magical Day Stamp Set in Basic Gray near the edge of a piece of Pool Party cardstock. Then using the banner in the Magical Mates Framelits, I die cut it out. If you are worried about it moving as you put it through the Big Shot, just add a little post it note to hold it in place. Then I stamped the greeting again on a piece of scrap Whisper White (mostly just the top part of the greeting). Next, I cut it out on the sides and top freehand and left the extra on the bottom portion so that I could use that to help me line up the greeting with the Pool Party one. I placed them together and used Stampin’ Dimensional to secure them together and add it to the card front! I love the dual color for the greeting! It really makes it pop! To finish it off, I added some Epoxy Shapes to the corners of the greeting!

Get the Magical Day Bundle and these fun products and enjoy a FREE Sale-A-Bration item before it all ends on Saturday! Click the product list below to start shopping!

If you would like to see this all in action, check out the Video Tutorial below or click here! Be sure to give the video a thumbs up if you liked it and don’t forget to subscribe if you are new. If you would like a notification when I post a new video, be sure to click the bell right next to the subscribe!!!

Happy Stampin’

~Laura


Product List


Fresh Florals, Color Theory, Stamps, & Bling!!!

Posted on

Fresh Florals, Color Theory, Stamps, & Bling are just a few of the amazing things I got in my Pre-Order for the New Catalog!!! Here is a few sneak peaks!!!

Fresh Florals, Color Theory, Stamps, & Bling, www.LaurasStampPad.com

Oh my goodness this is just a pile of heaven!!!! Here are a few of my favorites that I quickly picked out!

In-Colors Collection, www.LaurasStampPad.com

This designer series paper is just stunning! It has the same patterns as the current Floral Boutique and I LOVE IT! Note: there are distressed looks to the paper where some spots are lighter or splotchy and this is suppose to be like that! The Ribbons are perfect because they aren’t too wide and they are soft and flexible for tying knots and using on projects! Love love love!!!

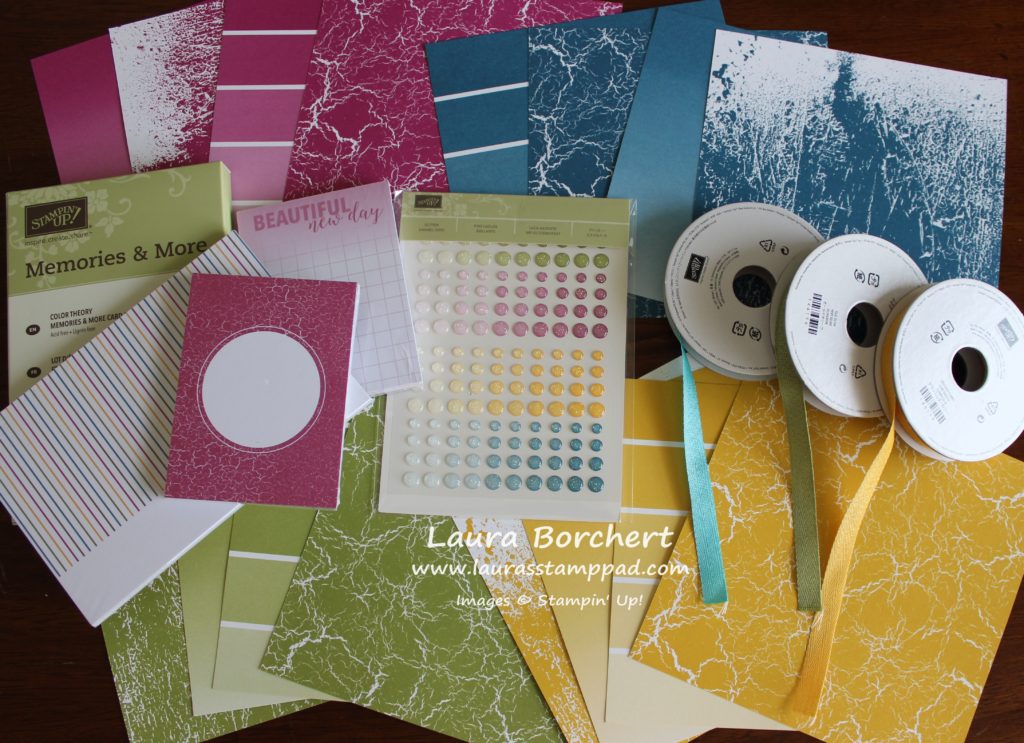
Color Theory, www.LaurasStampPad.com

This  is another favorite of mine – The Color Theory Suite! I love these colors – Berry Burst, Dapper Denim, Crushed Curry, and Old Olive. The cool designer paper, fabulous ribbon (which I realized is Bermuda  Bay and doesn’t coordinate like the others) and those glimmer enamel shapes. YUM! Glimmer Enamel Shapes…..like WOW!!!!

Stamps, www.LaurasStampPad.com

These are some of the stamp sets. Many of these come as a Bundle with coordinating Framelits or Punches! Now I need to find time to PLAY!!!

Bling & Baby Bows, www.LaurasStampPad.com

And then there are amazing accessories. Bling, Bows, and Punches are some of my absolute favorites! I’m super excited about that label punch since my favorite Decorative Label Punch is retiring. Now you have bows made already for you! How amazing is that?!?!?! I flipped over the second one so you could see that they already have adhesive on the back, just peel off the sticky. Love it!!!!

Can’t wait till June 1st? You can always join Stampin’ Up and get these products in your Starter Kit! You get to pick out $125 in any product you would like (retiring, current items, and sneak peak items) for just $99 and FREE SHIPPING! Click here for more information or reach out if you have any questions at all.

If you want to see the complete unboxing and reveal of my New Catalog Pre-Order Haul, check it out below or click here to watch and enter the drawing! Don’t forget to give it a thumbs up if you liked it and be sure to subscribe if you are new. You don’t want to miss out on the fabulous project I create with all of this!

Let me know in the comments below what your favorite item is!!!

Happy Stampin’

~Laura


Technique Tuesday – Baby Bear Peek-A-Boo Glimmer!

Posted on

Happy Tuesday!!! Today, I have a fabulous technique to share with you – Baby Bear Peek-A-Boo Glimmer greeting!!!

Baby Bear Peek-A-Boo Glimmer, www.LaurasStampPad.com

Isn’t he precious….or she?!?!?! That little teddy just looks so real with the 3 step stamping images. You can always do a blue card base and silver glimmer paper or even yellow for gender neutral! I just think this card has such a WOW factor to it!

I started with a Blushing Bride card base. Next I took a piece of Very Vanilla (4″ x 5-1/4″) and die cut the congrats greeting out of the top with the Sunshine Wishes Framelits! Now, before adhering it to the card front, I stamped little Baby Bear on there. Since this is a 3-step stamping technique, I stamped the solid  image in Crumb Cake Ink (stamped off once). I stamped image #2 in Crumb Cake (full strength). Finally, the #3 image was stamped in full strength Tip Top Taupe Ink. A few tips for this 3-step stamping, be sure to ink it up well and press firmly all around the image since it is a larger image. When stamping, I always looked to line up that little rounded bum and the ears. If I had those 2 points lined up, I was golden. Another tip is that if you think you are right on top of the image and need to move down a bit, stay exactly where you are and it will be perfect. It’s when I think I need to go down a bit that I end up off a bit. You got this!

Baby Bear, www.LaurasStampPad.com

Now that Baby Bear is stamped, it is time to add this to the card front! I used a piece of Blushing Bride Glimmer Paper that was big enough to cover the greeting. This could vary depending on your greeting of choice. Next, I added adhesive to the back side of the glimmer and placed it behind the greeting (glimmer side up). Then I placed this piece onto my card front with the vanilla piece centered all around. Press over the greeting/glimmer paper so that the adhesive sticks. Now I know that my glimmer paper is in the correct spot. Then I took the vanilla piece off and added Stampin’ Dimensionals all around and placed it back over the glimmer paper. The dimensionals make it look a little more 3D and gives a little peek-a-boo glimmer look!

To finish off little Baby Bear, I added a Very Vanilla Satin Ribbon bow to his neck securing it with a Mini Glue Dot. Isn’t he precious?!?!?

Of course, if you would like to see this all in action, check out my Video Tutorial below or click here! I did the one in the video as a Baby Boy card! Don’t forget to give it a thumbs up if you liked it and be sure to subscribe if you are new. I post a new video every Tuesday and Thursday!

Happy Stampin’

~Laura

Some of the items used for this card are retiring as well as a lot of others. You can check out the complete list here:

2017 Retiring List – PDF

2017 Retiring List – Excel

These items are all while supplies last and some are sold out already! You can start shopping here!


My Top 10 Retiring Items I’m Sad to See Go!

Posted on

When the retiring list comes out I’m always sad to see certain items go. Here is my Top 10 retiring items I’m sad to see go this year! I always take a deep breath and know that while I’m sad these are leaving, that just means there is more room for fabulous new products to come out. I hope you feel the same way!

Top 10 Retiring Items, www.LaurasStampPad.com

Decorative Label Punch – So my husband was reading off the list and I was marking everything in the catalog. When he mentioned this one, I screamed and just about cried. I love love love this punch and use it so much. I think I will hold on to mine even though I normally get rid of everything that retires. This punch just means so much to me. You can see samples using it here, here, and here. I really could go on and on with samples.

Tin of Cards Stamp Set – I love this set because it has the perfect size greeting especially to fit into the Decorative Label Punch. It also has a greeting for almost every occasion. I loved the Tin of Cards as well! My set is almost black because I used it so much and the stamps are stained. You can see samples here and here!

Mint Macaron  – I have really fallen in love with this color. It’s such a beautiful soft green and even looks a little blue sometimes. I’ll miss you Mint Macaron!

Blushing Bride Glimmer Paper – Okay we all know I love pink and sparkle. Um…hello?!?!?! This is just that and I love it. Good thing we can always create pink glimmer paper with re-inkers and the Dazzling Diamonds Glimmer Paper.

Bitty Butterfly Punch – This punch as well as the Elegant Butterfly Punch are just so beautiful alone and paired with the Papillon Potpourri Stamp Set.

Elegant Butterfly Punch – Again, I am sad to see this one go. I just love butterflies. You can see some samples using this here, here, and here!

Woodgrain Embossing Folder (Sold Out) – Okay, so I feel like I have fallen off the embossing folder train a bit but I still like this one for backgrounds and Man Cards! I tend to use certain products a ton and then not as much. I feel like I have gone from Embossing Folders to Heat Embossing more.

Perpetual Birthday Calendar Stamp Set – This set is perfect for backgrounds and memory keeping. I have done lots of quick and simple cards using this set. I have also created a Birthday Calendar even after the kit was no longer available. See more samples here and here!

Oh So Succulent Stamp Set and Succulent Framelits – I love flowers and this set was so much fun! The little flowers were perfect for cards and home decor pieces. Succulents are so in right now. Check out all these amazing samples here, here, and here!

So Detailed Framelits – I was just starting to really have fun with these. Check out some of my samples here and here! I guess I will need to start playing with the Detailed Floral Framelits!

So there are my Top 10 Retiring Favorites! How many of these are on your list? Tell me in the comments below what you are most sad to see go.

I hope you all have a fabulous weekend and I’ll see you back here on Monday!

Happy Stampin’

~Laura


The Stunning Glimmer Floral Lace!!!

Posted on

This card is just stunning with that glimmer floral lace detail using the So In Love Bundle!!! I think this card is perfect for weddings, anniversaries, birthdays and so much more. It is just amazing!!!

Glimmer Floral Lace, www.LaurasStampPad.com

I started with a Very Vanilla card base! Next, I layered a piece of the Falling In Love Designer Series Paper (4″ x 5-1/4″) onto a piece of Blushing Bride cardstock (4-1/8″ x 5-3/8″). I placed this on the card front! For the amazing glimmer floral lace detail, I used the Blushing Bride Glimmer Paper and the So Detailed Thinlits. It is best to place the thinlit on the backside of  the glimmer paper to run through the Big Shot. When I did this I found that I could use the Big Shot Die Brush to pop all of the pieces out. If I run it through face up and use the brush, it scruffs up the glimmer and sometimes makes it come off! This  is the perfect solution.

Die Cut Pretties, www.LaurasStampPad.com

I just love how all of the pieces popped out and look so amazing! Now it is time to adhere it to the card front. I put it on the left hand side and used the Multi-Purpose Glue to adhere it. Just use a sponge and some of the glue to pounce all over the details for that perfect amount of glue without any messes! I love it!!! Next, I added some Very Vanilla Satin Ribbon around the card and into a knot.

Floral Lace, www.LaurasStampPad.com

For the greeting, I used the Layering Ovals Framelits and the So In Love Stamp Set! I added the greeting to the card with Stampin’ Dimensionals. Oh how I am just in love with this card and this bundle! Don’t forget that you can purchase the So In Love Stamp Set and So Detailed Thinlits as a Bundle and you will save 10%. Stay tuned as I have a lot more samples coming soon!

If you would like to see this all in action, check out my Video Tutorial below or click here! Don’t forget to give it a thumbs up if you liked it and be sure to subscribe if you are new. I post a new video every Tuesday and Thursday!

Today is the last day to get entered into the Ink Pad Giveaway! I will be drawing a name for a Color Family of Ink Pads (10 total) tomorrow!!! Click here for all the details!!!

Ink Pad Collection Giveaway, www.LaurasStampPad.com

Happy Stampin’

~Laura


I Am Loving the Glimmer Paper Assortment!!!

Posted on

The Glimmer Paper Assortment is one of the NEW Sale-A-Bration items and it is by far my favorite of the 3 new ones!!! Since it comes in 6″ x 6″ squares, you really want to savor each piece! I used a simple 3/4″ strip to these cards and it’s perfect!!!
Glimmer Paper Assortment, www.LaurasStampPad.com

These cards are so simple and stunning and use lots of stuff I got for FREE!!!! How amazing is that?!?!?! I just love Sale-A-Bration!!

I took a piece of Whisper White cardstock measuring 5-1/2″ x 8-1/2″. Then I folded it in half like I would to make a regular card base. Next, I unfolded it and placed it in the Stampin’ Trimmer and took off a 1/2″ from the bottom of the card front! This allows for you to see the inside of the card which is where I adhered the strip of Glimmer Paper (3/4″ x 5-1/2″). I love that little peekaboo look! Then I stamped the Thank You greeting from the So Very Much Sale-A-Bration Stamp Set. I stamped it in the coordinating color as the glimmer paper…..except Bermuda Bay. That was a mistake on my part….I got out the ink pad but stamped it in the prior color and pressed it down. Ops! Wrong color but still looks fabulous. The colors are Bermuda Bay, Mint Macaron, and Sweet Sugarplum!

The simplicity of  the color scheme and how quickly you can make lots of these is what I love the most! To finish it off, I added a few Rhinestones for a little texture and more bling!!! I used some Bermuda Bay Enamel Shapes on the “mistake” one!

Bermuda Bay, www.LaurasStampPad.com

I just love these! You can earn the So Very Much Stamp Set and the Glimmer Paper Assortment Pack with every $50 order now through the end of the month! Remember that Sale-A-Bration ends on March 31st and these items are while supplies last! Click here to start shopping!

If you would like to see more samples using the So Very Much Stamp Set, click here and here!

Happy Stampin’

~Laura


Playing with the Birthday Blast Bundle!

Posted on

The Birthday Blast Bundle from the Occasions Mini Catalog is super fun for lots of occasions! Who doesn’t love bursting stars?!?! Check out this beauty!!!

Birthday Blast, www.LaurasStampPad.com

Of course I had to add in some bling! It’s so amazing!!!!

I started with a Bermuda Bay card base. Then I took a piece of Whisper White (4″ x 5-1/4″) and stamped the star swirl image from the Birthday Blast Stamp Set! I used Bermuda Bay Ink. You will want to stamp this image as high up as you can but not falling off the top like I did in the video below (lol). Also make sure it is “centered” as best you can. Don’t stress over this part! It doesn’t have to be perfect! Next, I took a piece of Silver Glimmer Paper (4″ x 2-1/2″) and die cut it with the Star Blast Edgelits. Be sure to save all of the little stars that die cut out so you can use them all over your card! 😉 Also, don’t forget that you can get the Birthday Blast Bundle – Bundle & Save 10%!! I adhered the Glimmer piece onto the card with some Fine Tip Glue Pen. Then I added the leftover stars randomly around! I love that extra bling!

For the greeting, I waited to stamp it after I placed the glimmer piece on so I knew how much space I had left. I used the greeting from the Birthday Blast Stamp Set. To finish off the card, I die cut that adorable little swirl in Silver Glimmer Paper. It was added below the greeting using the Fine Tip Glue Pen. See how simple that was!!!

If you would like to see this all in action, check out the video tutorial below or click here! Don’t forget to give it a thumbs up if you liked it and be sure to subscribe if you are new!

Stay tuned as tomorrow I will be posting the other sample shown in the video!!!

Happy Stampin’

~Laura


All the Pink Balloons!!!

Posted on

Pink Glitter Balloons, www.LaurasStampPad.com

You all know my love for Pink and Bling!!!! I love this card that was created with the Balloon Adventures Bundle!!! You can see more samples using this bundle here, here, here, and here!!!

I started with a Whisper White card base. Then I took a piece of Blushing Bride measuring 3-3/4″ x 5″ and added it to the card front! Now for the main focus of fabulous-ness!!! I took a piece of Melon Mambo cardstock measuring 3-1/2″ x 4-3/4″ and placed the Balloon Pop-Up Thinlits die over the top of it. I ran it through The Big Shot and popped it out with the Big Shot Die Brush! I love how you can use this this die to a pop-up insert in your card or a beautiful front like this one! I stamped the banner and greeting in Basic Black from the Balloon Adventures Stamp Set. For the balloons, I used the dies from the set to cut out Blushing Bride Glimmer Paper. I added the pieces to the balloons with the Fine Tip Glue Pen. I saved the dots from the one balloon and used them to dot the last balloon. You could always use the stripes for the third balloon too! Simple and fabulous!!! I love the layers and texture from this card!

What color scheme would you use for this – pinks? blues? black and gold?? Let me know in the comments below!

Happy Stampin’

~Laura