I have loved Embossing Folders since the moment I saw the magic of them! When I signed up as a demonstrator 20+ years ago, I always wanted to light table and brass dies. It was on my wish list for years! AND THEN……the Big Shot came out and I was swooning. This thing cuts, embosses, and is just pure magic! I had to get it!
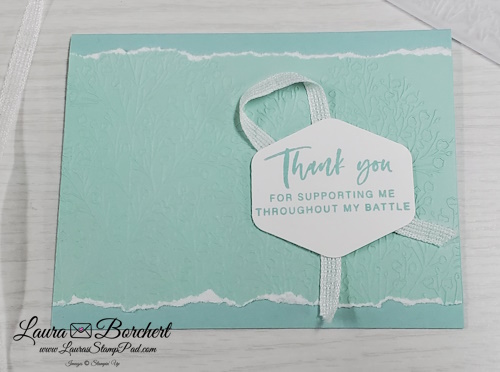
Look at how amazing this card is with just a simple embossed layer and a greeting! So easy and quick to create and so many different looks you can achieve! There are so many fabulous embossing folders that are great for a background or just a bit of texture for your project!
Here I used Pool Party for the card base! Then I took a piece of Pool Party 2 Tone Cardstock measuring 5-1/2″ x 4-1/4″ and embossed it with the Pressed Flower Embossing Folder! Before adhering it to the card front, I ripped the top and bottom for some additional texture and color! Since the 2 Tone Cardstock has a white core, you get that layered look without additional cardstock! For the greeting, I stamped the message in Pool Party Ink from the Love & Courage Stamp Set and punched it out with the Heartfelt Hexagon Punch! I added some ribbon behind the greeting and added it to the card front with Stampin’ Dimensionals!
What is your favorite embossing folder?!?! Give this card style a try and then share yours on my Facebook Page!!! I would love to see it!
Happy Stampin’
~Laura
Product List![Love & Courage Cling Stamp Set (English) [ 165935 ]](https://assets1.tamsnetwork.com/images/EC042017NF/165935s.jpg "Love & Courage Cling Stamp Set (English) [ 165935 ]")
![Stampin' Cut & Emboss Machine [ 149653 ]](https://assets1.tamsnetwork.com/images/EC042017NF/149653s.jpg "Stampin' Cut & Emboss Machine [ 149653 ]")
![Pressed Flowers Embossing Folder [ 165614 ]](https://assets1.tamsnetwork.com/images/EC042017NF/165614s.jpg "Pressed Flowers Embossing Folder [ 165614 ]")
![Pool Party 12" X 12" (30.5 X 30.5 Cm) Two Tone Cardstock [ 166691 ]](https://assets1.tamsnetwork.com/images/EC042017NF/166691s.jpg "Pool Party 12\" X 12\" (30.5 X 30.5 Cm) Two Tone Cardstock [ 166691 ]")
![Pool Party 8-1/2" X 11" Cardstock [ 122924 ]](https://assets1.tamsnetwork.com/images/EC042017NF/122924s.jpg "Pool Party 8-1/2\" X 11\" Cardstock [ 122924 ]")
![Heartfelt Hexagon Punch [ 162888 ]](https://assets1.tamsnetwork.com/images/EC042017NF/162888s.jpg "Heartfelt Hexagon Punch [ 162888 ]")
![Pool Party Classic Stampin' Pad [ 147107 ]](https://assets1.tamsnetwork.com/images/EC042017NF/147107s.jpg "Pool Party Classic Stampin' Pad [ 147107 ]")
![White 1/4" (6.4 Mm) Ribbon [ 165562 ]](https://assets1.tamsnetwork.com/images/EC042017NF/165562s.jpg "White 1/4\" (6.4 Mm) Ribbon [ 165562 ]")

")
 Designer Series Paper")


 Circle Punch")
 Circle Punch")
 Frayed Grosgrain Ribbon")
 Center Stripe Ribbon")


")

 Designer Series Paper")

 Textured Ribbon")


 Textured Ribbon")


")

 Shimmer Paper")
 Crinkled Seam Binding Ribbon")


")
 Designer Series Paper")


")
 Designer Series Paper")


 Woven Metallic Ribbon")


")
 Specialty Designer Series Paper")


 Braided Ribbon")


")
 Designer Series Paper")


 Faux Linen Ribbon")

