All The Layers!

Posted on

You all know I love bright colors and flowers! Here I created a card that is just that and I just want to make a million of them! It’s actually really easy and a fun way to use Designer Paper! Check it out with all the layers!

All the Layers Hues of Happiness, www.LaurasStampPad.com

Isn’t it just stunning?!?! Are you ready for all the measurements to layer together?!?!

Daffodil Delight – 4-1/4″ x 5-1/2″, Melon Mambo – 4″ x 5-1/4″, Daffodil Delight – 10″ x 3-3/4″, scored at 3″ and 8″. All of these pieces are layered onto each other! Then the Hues of Happiness Designer Series Paper measures 1-3/4″ x 3-1/2″ for the top piece and 2-3/4″ x 3-1/2″ for the bottom piece! You could use the same pattern for these 2 pieces or use coordinating pieces.

For the greeting, I used the amazing Something Fancy Stamp Set and coordinating dies. I love how the dies have layering labels! There is nothing better than a good label set and even better when they layer for a fabulous look like this!

Fun Fold Hues of Happiness, www.LaurasStampPad.com

This inside greeting is like the best ever. I love it so much because it’s so perfect to send to someone to brighten there day! This greeting could be stamped inside every card in my opinion!

I hope you enjoyed this card with all the layers! It’s so beautiful and easy to create! Try it out!

Happy Stampin’

~Laura

Gold Foil One Sheet Wonder!

Posted on

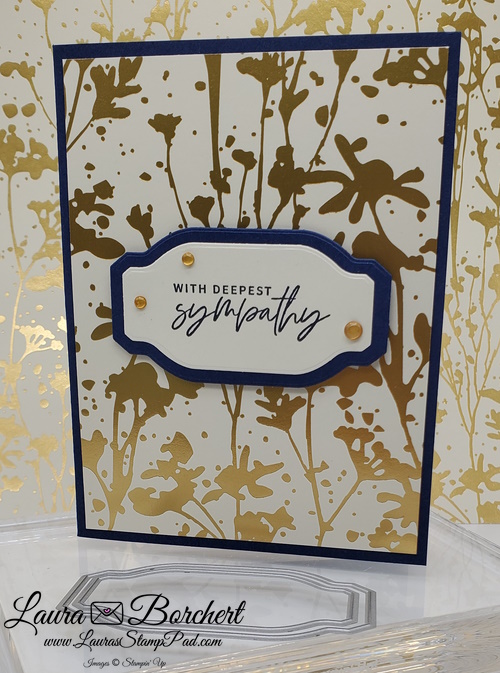
There is something about Gold and Navy that just looks stunning!!! Check out this fun Gold Foil One Sheet Wonder card that I created! It uses the NEW Naturally Gilded Specialty Designer Paper that came out this month!!!

Gold Foil One Sheet Wonder, www.LaurasStampPad.com

The Naturally Gilded Paper has sheets of Gold, Copper, and Silver! These prints are basic nature images which is perfect for any occasion! I paired it with the Something Fancy Stamp Set and Dies for a quick and simple card!

One Sheet Wonder

Now for the amazing One Sheet Wonder part where you can create 6 cards! Let me share the measurements so you can use every inch of the 12″ x 12″ Designer Paper. After all this paper is gorgeous and you don’t want to waste any. First, cut at 5-1/4″ creating a 5-1/4″ x 12″ strip. Then cut another strip at 5-1/4″. Now you should have 2 strips measuring 5-1/4″ x 12″ and 1 strip measuring 1-1/2″ x 12″. With both 5-1/4″ x 12″ strips, cut across every 4″ creating 6 pieces measuring 5-1/4″ x 4″. These will be used on the card fronts of 6 cards! Now with the 1-1/2″ x 12″, simply cut that in half at 3/4″ creating 2 strips of 3/4″ x 12″. Then cut across every 4″ creating 6 pieces measuring 3/4″ x 4″ which will be used inside the card!

One Sheet Wonder Something Fancy, www.LaurasStampPad.com

For the inside of this card, I brushed some Night of Navy Ink on the bottom of the Very Vanilla just to make the Designer Paper POP some more! I really love how it turned out!!! Of course, then I stamped the greeting crooked but it’s all good! ๐Ÿ™‚ Check out all of the supplies below so you can recreate these gold foil one sheet wonder cards!

Happy Stampin’

~Laura

Product List

Christmas in July!

Posted on

WHAT?!?!?!?! I am so not ready for Christmas but that is why this is called Christmas IN JULY! It’s never to early to get started on your holiday cards after all! The July-December Mini Catalog launched this month and my Online Stamp Class is Christmas in July – Lights Aglow!

Christmas in July, Lights Aglow, www.LaurasStampPad.com

This stunning cards uses products from the Lights Aglow Suite! It is one of the 5 cards that I will be making in the July Online Card Class! This class takes place on Friday, July 22nd at 7:30 p.m. CT on Facebook and YouTube Live! Anyone can watch for FREE! In fact, you can check out past Online Card Classes here! Share with all of your friends because I love chatting and stamping with everyone as if we were all in the same room together!

If you would like to stamp along with me there are 2 options for you to pick from! You can purchase the PDF Tutorial for instant download and cut the cardstock and supplies yourself OR you can purchase a card kit and I will mail it all out to you! No die cut/punched images or stamped images will be provided. You will need the Lights Aglow Bundle or stamp set of your choice! Click here for all of the details and to get registered!

The In Person Class for this one has filled up fast so I’m super excited to do it online with all of you as well! Save the Date for the Christmas in July – Lights Aglow Online Stamp Class on June 22nd at 7:30 p.m. CT!

Happy Stampin’

~Laura


Over the Top Card!!!

Posted on

Recently I was asked by my friend, Jean to create a birthday card for her to give to her friend who was turning 90 years young! I was happy to do so but also nervous because this card has to be special and over the top! I know Jean would have thought any card I created was special and over the top. You all know as a crafter though how you feel put on the spot to do your absolute best. Well I created what I thought was an amazing card and Jean loved it too!!!

Over the Top Fun Fold Homemade Greeting Card, www.LaurasStampPad.com

I actually used a few past Paper Pumpkin Stamp Sets which came in handy for my garden themed card! The Pansy Petals Designer Series Paper was just perfect as well!!! It turned out fabulous….so fabulous that I have recreated this design many time since as well!!!

Mother's Day Heart & Home Over the Top Greeting Card, www.LaurasStampPad.com

I made a Mother’s Day Card for my Mom and my Mother In Law as well with this same concept! For this one I used the Heart & Home Designer Series Paper!

Handmade Mother's Day Card, www.LaurasStampPad.com

The next flap that opens up was just decorated with the stamped flowers from the Blessings of Home and then the final flap is decorated but also has some space for writing! If you wish to keep the front of the card and each flap clean of writing, simply add a piece of Basic White to the back of the card and you will have plenty of room!

Pansy Petal Gardening Mother's Day Card, www.LaurasStampPad.com

This other Mother’s Day Card that I created was very similar to the 90th Birthday one! I can’t wait to make even more!!! Eeeeee! Love it!

For all of the details on this card, check out this video tutorial!!!

Happy Stampin’

~Laura


Here For You!!!

Posted on

I love the message on this card and it really comes in handy now and again! I recently made this card for a friend who was having surgery and I hope it warmed her heart. Here for you, I promise! It would make a great card for teenagers or those going off to college too!

Here For You, www.LaurasStampPad.com

I love the color combination with this card. The red is bold but the blue softens it for a warm and heartfelt feeling! Try out Real Red and Balmy Blue and see for yourself!!!

I started with a Balmy Blue card base measuring 5-1/2″ x 8-1/2″ and stamped the “I Promise” and the heart outline all over the card front. Be sure to angle the images in different ways. Typically I start with the larger image and then fill in with the smaller one! I used Balmy Blue Ink for just that subtle background look!

Stampin Up Together Forever Bundle, www.LaurasStampPad.com

Next, I took a 3″ x 3″ piece of You’re A Peach Designer Series Paper and layered it onto Real Red (3-1/4″ x 3-1/4″). Then I tied some Real Red Faux Linen Ribbon around it and added it to the card front with Stampin’ Dimensionals. For the greeting, I used the Here For You Dies and adhesive sheets. Simply add the adhesive sheet to the back of the Real Red cardstock and then run it through the Mini Cut & Emboss Machine (which is on sale for 20% this month)! Now you have a homemade sticker and a quick and easy greeting! I also snuck in the heart next to the greeting to die cut at the same time!

Homemade Here For You Greeting Card, www.LaurasStampPad.com

For the inside of the card, I added the heart and greeting that was stamped all over the background! Just a little fun touch! You could also add some to the envelope!

If you would like to make this Here For You card, check out the supplies listed below! Don’t forget that the Mini Cut & Emboss is on sale for 20% off till the end of March!!! There are also select bundles on sale as well!

Happy Stampin’

~Laura

Product List

Lovely Layered Look!!!

Posted on

I know that Sale-A-Bration is over but I just have to share this fun card with you! This lovely layered look works with lots of different stamped images. If you don’t have the Sale-A-Bration Friendly Hello, that’s okay! If you do, then I hope this card inspires you to create with it!

Lovely Layered Look, www.LaurasStampPad.com

This look is super cool and it’s super easy to do! That’s my kind of WOW card! For this one, I would say all of the coloring is the hardest part, LOL! You all know I am not a huge fan of lots of coloring!

I started off with a piece of Basic Black cardstock as the card base. Then I cut 2 piece of Basic White measuring 5-1/4″ x 4″. One is for the card front and the other one is for the inside of the card. Using Memento Black Ink, I stamped the greeting in the center and then added flowers all around it and to the edge of the cardstock. Then, it’s time to color. I actually colored after I cut the circle but I think it would probably be easier to color first.

Once you are done coloring, simply cut out the greeting with the Layering Circles Dies. Adhere the rectangle to the card front, be sure it is right side up so that the greeting circle lines up with the flowers and the greeting isn’t upside down. Then die cut out the scallop circle in Basic Black cardstock and layer the greeting on top. Then just like a puzzle piece, place this layer over the center of the card! How amazing is that?!?! Simple and fabulous!

If you would like to see this lovely layered look in action, check out this video!

Happy Stampin’

~Laura


Calming Camellia!!!

Posted on

The Calming Camellia Stamp Set is an exclusive stamp set during Sale-A-Bration for orders of $350 or more. This can be a single order or a few orders gathered together!

Calming Camellia Stampin Up Stamp Set, www.LaurasStampPad.com

This card is super simple but does require a lot of die cutting! This card uses the Scallop Contour Dies and I am LOVING those lately! The little detailed scallop for each one makes it super fun to layer. I die cut 4 scallops for this card – 3 for the front and 1 for the inside!

You could mix up the colors or go for a monochromatic look like I did! I used Melon Mambo and Blushing Bride cardstock. The ink is Melon Mambo!

Stampin' Up! Scalloped Contour Dies, www.LaurasStampPad.com

On the inside, I stamped some more fun but I will say that it makes the area for the greeting rather small. When I created this card on video, I actually stamped the curly cues on the Basic White card base rather than the scalloped die cut and I LOVE that look. You can check out the video tutorial here!

You have less than 2 weeks left to get this beautiful Calming Camellia Stamp Set so you can recreate this card! Click the supplies used below to get started! What color would you use?!?!?

Happy Stampin’

~Laura

Product List

Peppermint Kisses!!!

Posted on

At Target the other day and I see Sugar Cookie Kisses…..Yes please! Omg you all they were AMAZING and gone within a few days! Heavenly!!! Accepting all Sugar Cookie Kisses this season! ๐Ÿ™‚ I also have this cute Peppermint Kisses card to share with you today!!!

Peppermint Kisses, www.LaurasStampPad.com

I got this card idea from the amazing, Kim Peck!!! It uses the Gingerbread and Peppermint Suite!!! You can check out more cards using this Suite here.

I started with a Real Red card base! Next, I took 2 pieces of Basic White measuring 3-3/4″ x 5″ – one for the front and one for the inside! I added a piece of the Gingerbread & Peppermint Designer Paper along the left hand side and stamped the greeting from the Frosted Gingerbread Stamp Set up top! NOTE: If you wish to stamp first, just make sure it is a bit off center since it is centered in the area after the designer paper is placed down!

Stampin' Up! Gingerbread & Peppermint Suite, www.LaurasStampPad.com

For the kisses, I stamped 3 of the ornament baubles in Real Red Ink onto Basic White cardstock and then die cut them out! Then I flipped them upside down and placed the 2 on the bottom of the card front with the scallop at the bottom edge of the white cardstock. Using the cardstock as a guide, I trimmed off the tops of the ornaments to create a kiss! Next, I took the third ornament and trimmed less off so it looks bigger and placed it on the card front with Stampin’ Dimensionals! To finish off the look, I added a little piece of White Crinkled Seam Binding to the tops of each one. I used Mini Glue Dots to adhere the ribbon.

Happy Holidays Peppermint Greeting Card, www.LaurasStampPad.com

On the inside I decorated with a few of the peppermint candies from the stamp set and the greeting!!! I love the coordination of the front to the inside!

If you would like to recreate this Peppermint Kisses card, check out the supplies listed below! Don’t forget about the Seasonal Sale going on right now! It ends TONIGHT! Click here to get ink, cardstock, and dies on sale!!!

Happy Stampin’

~Laura

Product List

Baby Wipe Bells!!!

Posted on

The Baby Wipe Technique has been around forever it seems. I have done it various times over the years and love the look! Here I created Baby Wipe Bells for this beautiful holiday card! What do you think?!?!

Baby Wipe Technique on Christmas Bells, www.LaurasStampPad.com

The Baby Wipe Technique is super easy and only requires a Baby Wipe and Ink Refills in any color that you would like! Simply fold the baby wipe to create 4-6 layers. This gives it enough squish to hold ink and press into the stamp. Next, add drips of color from the ink refills randomly all over, filling in all the white spots. For these bells, I used Real Red, Old Olive, and Cinnamon Cider. This is now your ink pad.

The first few images might come out a little odd or fabulous! It just depends. The more you use this “ink pad” the more the colors bleed together and mix for a fun look! I stamped the bells onto Shimmery White Cardstock for a little extra shine and because this cardstock is a hint thicker.

For this card, I used the Frosted Gingerbread Suite!!! You could try out this technique and use other images from the stamp set like the ornament and snowflake too!

Stampin' Up Cinnamon Cider, www.LaurasStampPad.com

For the inside of the card, I actually used Cinnamon Cider rather than the typical Basic White or Very Vanilla. Have you ever tried this?!?! Super cool and I think I’m going to try it more often!

If you would like to see this card in action, click here to watch! If you would like to recreate this card, check out the supplies listed below. Click Add All To Cart for quick and simple shopping!

Happy Stampin’

~Laura

Product List

Blackberry & Gold!!!

Posted on

When you think of Fall, what colors come to mind?? For me it’s typically orange, yellow, and brown/tans. I am loving this new look of Blackberry & Gold for Fall! Thank you Stampin’ Up for making me branch out because I’m in LOVE!!! With this, I might start to like Fall more! I still hate winter and I’m not sure that will ever change. LOL

Blackberry & Gold, www.LaurasStampPad.com

This card has me swooning! I started with a Rich Razzleberry card base. Next, I layered strips of the Blackberry Beauty Designer Series Paper onto Cinnamon Cider cardstock! This paper is gorgeous with the rich colors and gold foil shine! Then I added this to the left hand side of the card and wrapped some Gold Shimmer Ribbon around the card and tied it into a knot.

Now for the focal point, I stamped the greeting from the Pretty Pumpkins Stamp Set in Blackberry Bliss ink onto Very Vanilla cardstock. Then I layered it onto Early Espresso cardstock and added it to the card front with Stampin’ Dimensionals. Using the Pretty Pumpkins Stamp Set and coordinating dies, I stamped and die cut the 2 pumpkins. I love the Gold Foil touch on that detailed pumpkin! There is a Mini Stampin’ Dimensional on the top of the stamped pumpkin that is falling off the greeting piece. This is to keep the image level and popped up even though it is falling off the greeting piece a bit.

Pretty Pumpkins Stampin' Up Bundle, www.LaurasStampPad.com

On the inside of the card, I added a piece of Very Vanilla cardstock (4″ x 5-1/4″ and stamped a coordinating greeting and some of the leaves from the Pretty Pumpkin Stamp Set. There are so many beautiful images in that set!

This card would be perfect for Thanksgiving but also works for a thank you card all season long! What would you use this card for?!?! Let me know in the comments below! If you wish to make this stunning Blackberry & Gold card, check out the supplies listed below. Click Add All To Cart for a quick shopping experience!

Happy Stampin’

~Laura

Product List