Happy Monday everyone! This week is Christmas so I’m sure many of you are scrambling to get those cookies made, presents wrapped, groceries bought, and everything else. I just wanted to say May Your Days Be Merry through it all! Stop and take a deep breath and enjoy the site of your tree lights glistening. Enjoy the sounds of laughter from your children or those at a party! Try to enjoy the little things this week!!!
Today I’m sharing with you a quick and simple card that uses up a few scraps that I had laying around! I used a Whisper White card base measuring 4-1/4″ x 11″. When I am using ribbon, I liked this size/style because it uses less ribbon around than a 5-1/2″ x 8-1/2″ style. I had some strips of Silver Foil Paper left over so I added a strip of that. It can be 2″ wide or a 1/2″ wide, whichever you prefer or whichever you have scraps of! Then I took a piece of the Winter Wonderland Designer Series Paper which was also leftover. If you are cutting your Designer Series Paper into 4″ x 5-1/4″ which is the perfect layering size for a card front then you have a strip leftover that is 1-1/2″ x 4″. That is perfect for a card like this! I tried the Real Red Cotton Ribbon around the card right over the overlap of the two stripes of paper! For the greeting, I stamped it in Real Red on some scrap white with the Berry Merry Stamp Set! I punched it out with the 2″ Circle Punch and brushed the edges with a Sponge Dauber for a pop of color! I added the greeting to the card with Stampin’ Dimensionals and finished it off with a few Rhinestones! Everything needs a little bling! 🙂
I had some leftover pieces for this card but didn’t need any more holiday cards. Switch up the greeting and it makes a fabulous Birthday card! I love that!!!
Happy Tuesday!!! That means I have a fabulous technique to share with you! I am doing 4 more animals using the Owl Builder Punch!!! You can see the Punch Art samples from the past months here, here and here! I hope you are enjoying all of these fabulous creations as much as I am!
Aren’t these adorable?!?!?! The penguin is perfect for Christmas and Winter cards. They are all super cute for kid’s cards, birthday party decor and so much more! You can see the wet glue in my photos so it looks like I will need to be a little bit more precise on glue use next time! It really isn’t that noticeable in person but the camera really made it shine!
For the Chicken, I used the Owl Builder Punch and 1-3/4″ Scallop Circle Punch! You will need Real Red, Pumpkin Pie and Whisper White cardstock. I punched out one owl body and a half of the scallop circle in Whisper White. I punched out a half of owl body with the feet in Pumpkin Pie and one heart. I punched out to Real Red hearts. You will snip off the white feet and the owl ears/horns. Just round out the top of the owl body and adhere the Pumpkin Pie feet to the back. Adhere the owl body on the scallop circle and then place the hearts and googly eyes on. I used the new Fine Tip Glue Pen for adding the hearts! It was super easy since the tip is very precise…..but I think I can use a lot less than I did. 🙂
For the fishy, I used just the Owl Builder Punch and some Pumpkin Pie and Pacific Point cardstock. You will need 1 Owl Body, 2 Breast Pieces, 1 Heart, and 1 Circle (the one above the owl body). Snip off the owl feet and place the heart there for the lips. The breast pieces peak out on the top and bottom as fins. I attached the googly eye to the blue circle and then to the fishy! For this one, I used the Fine Tip Glue Pen and again I used a little bit too much! Once it was dry, it didn’t shine as much as it did in the photos!
For the little mousy, I used the Owl Builder Punch and some Basic Gray, Whisper White, and Pink Pirouette cardstock. You will need an owl body, heart, 2 white circles (the smaller ones above the body), 2 pink small circles, and 2 gray larger circles. Then for the tail you will line up the punch with the already punched owl body and just allow a little sliver to be punched out. Don’t worry I show it in action in the video tutorial below! 🙂 I layered the gray and pink circles together and placed those on the owl body after cutting off the owl ears/horns and rounding it out! I added the white circles for the eyes and with a Basic Black Marker added a little beady eye. After adding the pink heart as a nose, I drew a few whiskers on there as well! You could always use googly eyes as well! I used the Fine Tip Glue Pen for all of the adhering but again less is better!
For the Penguin, I used the Owl Builder Punch and some Basic Black, Whisper White, and Pumpkin Pie cardstock. You will need an owl body, breast piece, partial body with the feet, a heart, and 2 white circles (the smaller ones above the body). I started out by cutting off the owl ears/horns and rounding it out like those above! I snipped off the black feet and adhered the orange feet to the penguin. I placed the breast piece on pretty low on the owl body and then the white circle up higher for the eyes. You can always draw them in with a marker or add googly eyes! I really love googly eyes because they really make him come to life. For the little beak, I just cut it out of the heart. I used the Fine Tip Glue Pen on all of the little pieces which made it super easy but I need to use less next time!
To see all of these in action, check out my Video Tutorial below or by clicking here! Don’t forget to give it a thumbs up if you liked it and be sure to subscribe so you don’t miss out on any more of these and other fabulous videos!
Let me know in the comments below which is your favorite??? I like the Mouse the best! 🙂
Happy Tuesday!!! That means that I have a fabulous technique to share with you today! Tis the Season to be jolly so we are making quick and simple cards using the One Sheet Wonder Technique!!! I got 13 cards from one sheet of 12″ x 12″ Home for Christmas Designer Series Paper!
All adorable, all quickly created, all using the same greeting!!! I honestly whipped these up in an hour or so! I didn’t actually time myself but it was really quick! Let’s get started!
Here is the template. For this set of cards, I cut that top 2″ x 12″ strip into 2 pieces of 2″ x 5-1/2″ to really use up the paper and get more cards out of it! You can also leave in all of those little slivers and create the same style and use up even more of the sheet! I used the same greeting for all of these cards. It is from the Peaceful Pines Stamp Set and punched out with the Decorative Label Punch! I stamped it onto Very Vanilla and layered it with similar colors that coordinate with the paper – Real Red, Mossy Meadow, Mint Macaron, Pool Party, and Very Vanilla!
This is the bottom right hand corner piece. I ripped it diagonally and placed it on the corners of a Real Red and Very Vanilla card base!
These cards use the 3-1/2″ x 4-1/2″ piece and 2-1/4″ x 4-1/2″! I used both sides of the Designer Series Paper for these cards!
I really had a hard time deciding which side to use for all of these cards! Another tip is that you can use your scraps for the layering colors. You don’t need a full piece to layer behind it, instead you can use little strips of paper on either side!
I used the 2″ squares for the middle card and off set them with a 2″ Mossy Meadow square! I really like how it turned out!
Rather than cutting three 1-1/2″ squares, I just left it as a piece of 1-1/2″ x 4-1/4″ in the card laying down! I really went basic for this set because I needed to get these done quickly! That is all 13 cards!!! You can always mix it up and change the pieces as you see fit!
If you would like to see this in action, check out my Video Tutorial here or below!! Don’t forget to give it a thumbs up if you liked it!
You can check out many of my past One Sheet Wonders HERE!
I think my favorite part of this card is the greeting. There is just something so fabulous and touching about it! This simple card was super quick and fun to create! I started with a Pool Party card base. I stamped all over a piece of Whisper White with the snowflakes from the Flurry of Wishes Stamp Set in Pool Party! I added that piece to the card front and then added a little strip (leftovers from another project) of Neutrals Designer Series Paper to the left hand side! This is a great way to use up those scraps or create lots of cards from one 12″ x 12″ sheet! I stamped the greeting from the Flurry of Wishes Stamp Set in Basic Gray onto Whisper White cardstock and punched it out with the Decorative Label Punch! Of course the greeting was added to the card with Stampin’ Dimensionals BUT FIRST I added some loops of Silver Metallic Thread to the back! You can check out a Video Tutorial on that here! Simple and fabulous!
Isn’t this card just fabulous??? That subtle bling is just perfect! It isn’t too much and you don’t have to worry about creating a huge glittery mess when you create this card! I used Dazzling Details, a Sponge Dauber and a Mask! How amazing!?!?!
I started with a Whisper White card base! I took a piece of Real Red measuring 4″ x 5-1/4″ and placed the Dots Decorative Mask over top of it! Then I squeezed some Dazzling Details into a old embellishment container (or any plastic surface) and using a Sponge Dauber, I pounced over the polka dots. You don’t want to add lots of glitter because it will take forever to dry and will bleed under the mask a little. Once you have filled all of the polka dots, pull off the mask and set it aside to dry. You can always use your Heat Tool to speed up the process a little!
Once it was dried, I added it to the card front. For the greeting, I used the Berry Merry Stamp Set and die cut it with the Lots of Labels Framelits! Super cute and fabulous for the Holiday Season!!!
This card I am in LOVE with and it was sort of a mistake. After playing with the glitter, I thought what about adding some Re-Inker to it for some color. I dripped 1 (ONE) drop of Night of Navy in there and HELLO COLOR! I was really surprised at how dark it was. I started playing the stripes on some Whisper White scrap paper. Slowly I was running out of glitter so I added some more Dazzling Details and of course this only lightened the blue more. As I went along I noticed this fabulous ombre affect happening and I was in love. I will say that when you add the re-inker it gets much runnier so it bleed under the mask and wasn’t as crisp. I still love it!!! I layered this onto some Night of Navy Cardstock and then Marina Mist. I put it all onto a Whisper White card base. For the greeting, I used the Tin of Cards Stamp Set and Decorative Label Punch!
I love the subtle glittery look and I love Dazzling Details in all of the colors – Silver, Gold, Red, and Dazzling! You can check out my Video Tutorial below of by clicking here! Don’t forget to give it a thumbs up if you liked it!!!
You can use those Whisper White scraps that you have been saving….surely I’m not the only one! 🙂 I stamped the Penguin, Snowmen, Arms and Top Hat from the Snow Place Stamp Set all in Basic Black! You can stamp with fairly close together but not sure close that the Framelits would cut into the one next to it. I stamped the ear muffs in Melon Mambo and the bow tie in Bermuda Bay. There are lots of other pieces in this set that you can use as well – buttons, hat, scarf, snowcone, and more! Once you have everything stamped, it is time to cut the out with the coordinating Snow Friends Framelits. I used the Magnetic Platform when die cutting these out because the frames stick to this platform and don’t move around. You can cut lots of pieces out at one time, as long as they all fit on the platform! This way you don’t have to run it through the Big Shot millions of times! Once you have your pieces cut out, it is time to assemble!!!
I started with A Bermuda Bay card base and layered on some Basic Black. Then I took a piece of Whisper White cardstock and ran it through the Big Shot in the Softly Falling Embossing Folder! I added this to the Basic Black layer and then built my snowmen on the card. I used Stampin’ Dimensionals of course! For the nose, I used a Pumpkin Pie Marker to color it in!
This is the penguin that I created in the Video Tutorial! You can check that out below or by clicking here! Don’t forget to give it a thumbs up if you liked it!
Which do you prefer the snowmen or the penguin? Let me know in the comments below!
Happy Tuesday!!! You know what that means!!! I have a fabulous technique to share with you today. I will show you how to create over 70 Cards from a Designer Series Paper Stack! I used the Pretty Petals Stack and created cards for every occasion – man, women, sympathy, birthday, anniversary, wedding and more!!! I love it!
Here are the cards that I created with each sheet in the Pretty Petals Designer Series Paper Stack! You can get multiples of each of these cards and then use the leftover scrap pieces to create quilt cards like these samples! I will be posting a few of these today and the rest tomorrow!!! 🙂 Let’s get started!
This card uses a Calypso Coral card base. The Pretty Petals Designer Series Paper measures 4″ x 5-1/4″. You can get 1 of these from one sheet and since there are 4 sheets of this pattern, that is 4 cards like this! The Designer Series Paper is layered onto Old Olive measuring 4-1/8″ x 5-3/8″. I wrapped some Gold Baker’s Twine around the left edge and tied it into a bow! The greeting is from the Tin of Cards Stamp Set. I die cut the greeting out with the Deco Label Framelits and added a layer of Old Olive with the next frame size up! I added a flower that was punched out with the Petite Petals Punch and I placed a Pearl in the center!
This card uses a Very Vanilla card base. The Pretty Petals Designer Series Paper measures 2″ x 5-1/2″. You can get 3 of these from one sheet and since there are 4 sheets of this pattern, that is 12 cards like this! The border on the left and right of the DSP is from the Tin of Cards Stamp Set. I stamped the greeting from the same set and punched it out with the Decorative Label Punch!
This card uses a Pacific Point card base. The Pretty Petals Designer Series Paper measures 5-1/4″ x 4″. You can get 1 of these from one sheet and since there are 4 sheets of this pattern, that is 4 cards like this! I used some of my scraps of cardstock in Real Red, Daffodil Delight, Old Olive and Pacific Point. I used various sizes of circle punches. The greeting is from the Tin of Cards Stamp Set. I thought the circles looked a little plain at first so I added the little stitches around the edges and I think it really makes them pop! Love it!! This would make a fabulous kid’s card!
I will be posting the rest of the cards in the set tomorrow! If you would like to see all of this in action, check out the Video Tutorial below or by clicking here! If you liked the video, be sure to give it a thumbs up! Don’t forget to subscribe to my blog so you don’t miss tomorrow’s post! 🙂
See you tomorrow! Which one of these is your favorite so far? Let me know in the comments below!
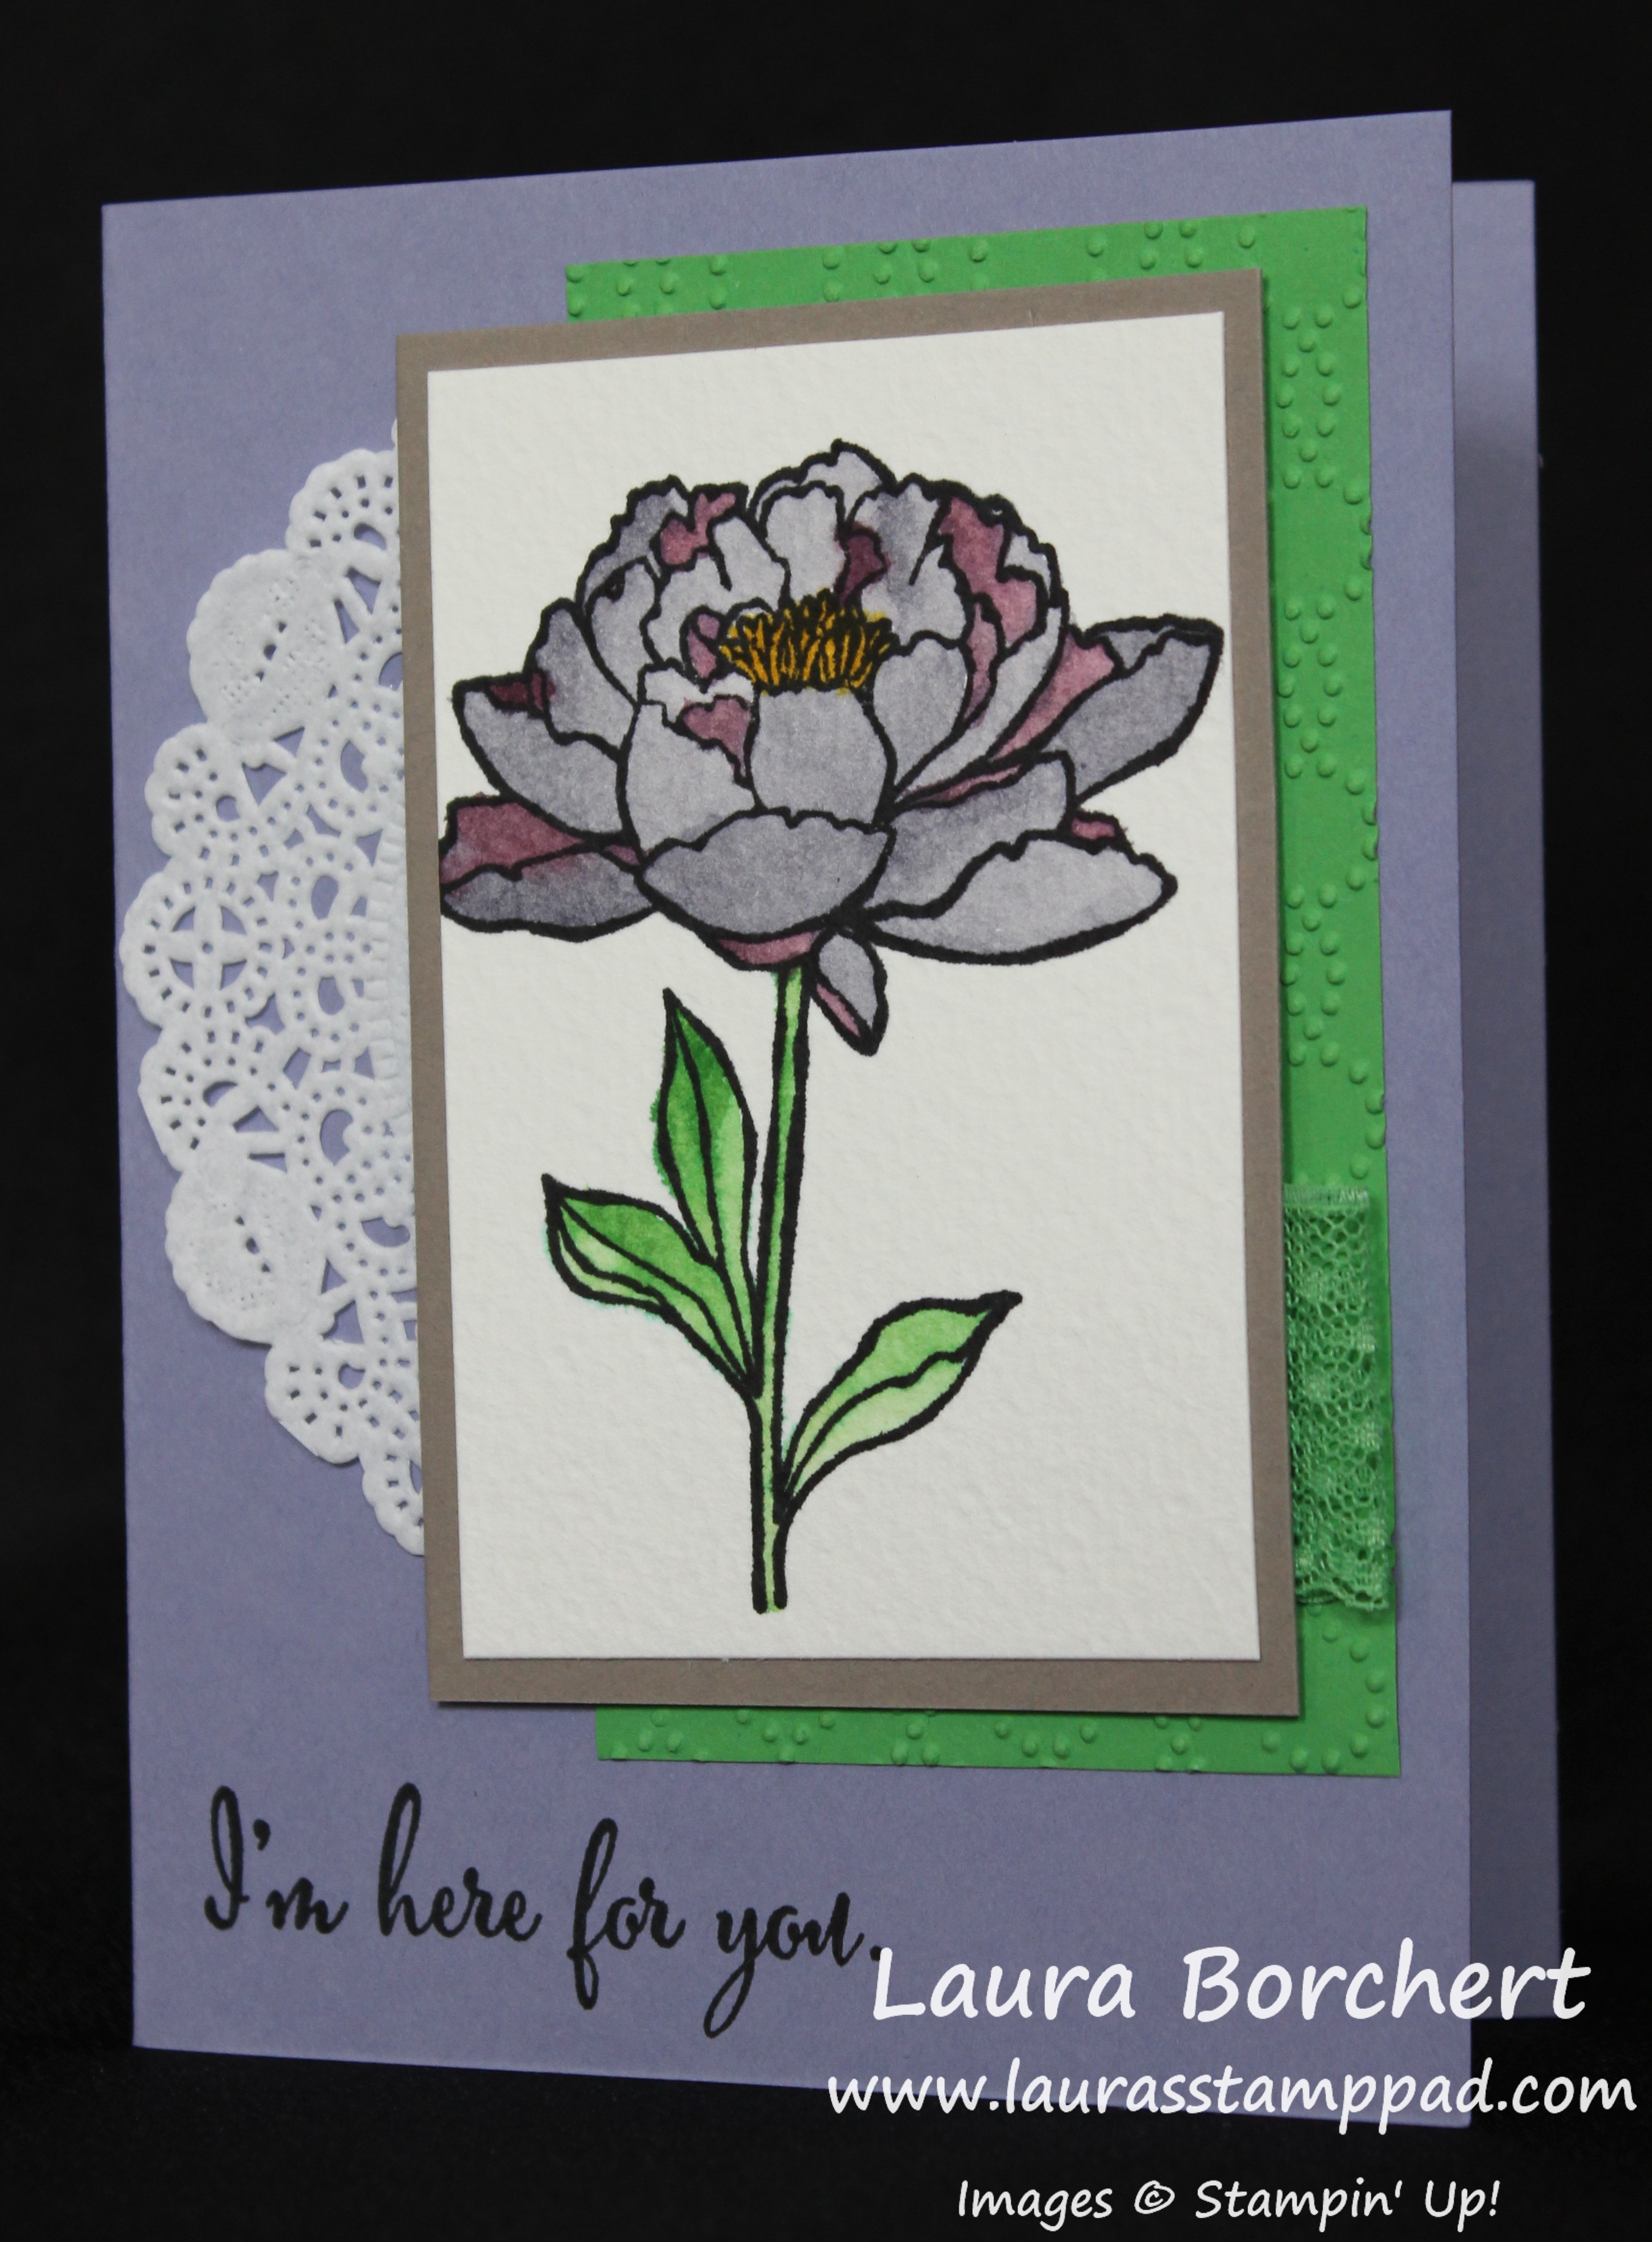
I feel like I mention it a lot but texture on a card can really make it go from nice to FABULOUS! This card is fabulous for sure to me! I love all of the textures with the doily, ribbon loop, and embossed cardstock. Do you think it is too much? Let me know in the comments below if you like texture or not!!!
I started with a Wisteria Wonder card base and stamped the greeting from You’ve Got This in Basic Black on the bottom. Then I took a piece of Cucumber Crush and ran it through the Big Shot in the Elegant Dots Embossing Folder and adhered it to the card on the right side. I added a 1/3 piece of a White Tea Lace Doily to the edge of the Cucumber Crush. You can cut the doily into 3 pieces and really get the most out of each one! 🙂 For the flower, I stamped it from the You’ve Got This Stamp Set in Stazon Black onto Watercolor Paper. I used an Aqua Painter to color in the flower in Wisteria Wonder, Rich Razzleberry, and Cucumber Crush! I love how it turned out with the shading and all. Watercoloring is something that usually something I feel like I either nail it or it’s ehhh! After the flower was completely dry, I layered it onto Tip Top Taupe with Tear and Tape because I like to use a strong adhesive to really hold down the watercolor paper since it isn’t always flat. I added a little loop of Cucumber Crush Lace Trim to the right hand lower side of the flower before adding it to my card front. This is a great way to use those little scraps at the end of a roll or that you trimmed off from another project! Love it!!!
You can check out more samples using this stamp set here, here and here!
Happy Tuesday everyone!!! You know what that means….I have some fabulous techniques to share with you today! Today we are playing with Punch Art! It is so much fun to create lots of different creatures and images from the punches you already have (or need to get after today)! When you can use a punch for more ways that the obvious circle or square, it makes it worth so much more as well! Let’s get started!!!
We will start with the Tulips! I love tulips and they make me think of Spring…..can we just skip Winter this year? These tulips can be created in any color! I used Wisteria Wonder to punch out 3 owl bodies from the Owl Builder Punch. I snipped off the feet of the owl and brushed the edges with Elegant Eggplant and a Sponge Dauber. I like how this gives texture and dimension to the tulip. For the stems and leaves, I used Pear Pizzazz cardstock. I cut long strips for the stems. They don’t have to be rectangle or perfect because flower stems never are so make it a long triangle or a short rectangle or a not perfectly straight stem! It all works! The leaves were punched out with the Bird Builder Punch for the final touch! You can create bouquets or just a few along the bottom of your project or just one elegant tulip! I love these!
This little pear is super easy to create with the Owl Builder Punch! Just punch out an owl body with some Pear Pizzazz cardstock and cut off the feet and ears, slopping to the center to give that rounded off look. Then with a little piece of scrap Pear Pizzazz or brown of your choice, cut a little piece for the stem. I brushed the edges of the pear with a Chocolate Chip Sponge Dauber to give texture and make it look rounded! Simple and fabulous!
This little kitty is just adorable and would look super fabulous looking out the window using the Hearth and Home Thinlet Dies! For the kitty, I punched out an owl body in Basic Black with the Owl Builder Punch. Then I punched just a sliver of the body from the side to create that little curved tail. I adhered the owl body to a piece of Bohemian Designer Series Paper with the tail off to the left and then trimmed the bottom off. I like using the Designer Series Paper as a guide to cut straight! There is your kitty silhouette! I did take a Basic Black Marker to create a few whiskers. You could create a face and have the kitty looking at you if you wished! Mine is looking out the window!
The guitar is perfect for any rockstar!!!! You could use Silver, Gold, Red, or Dazzling Diamonds for your guitar. You can even spritz the Dazzling Diamonds with some re-inker and get any color! ROCK ON!!!! I punched an owl out in the Gold Glimmer Paper and cut off the feet. You will also need the Owl Builder Punch for 1 eye (smaller circle above the body) and 2 hearts. Placing the 2 hearts point to point, place a Mini Glue Dot on the end of some Basic Black measuring 3/4″ wide and however long you wish and stick it on the hearts. This creates your guitar end. The little eye will be added to the center of the glimmer paper with a Mini Glue Dot. This is the whole in the guitar. Now adhere the other end of the long black piece to the guitar body. You are all set! You could always take a Signo White Gel Pen and create strings! Love it!!!
If you would like to see all of these in action, check out the Video Tutorial below or click here! Don’t forget to give the video a Thumbs Up if you liked it! Let me know in the comments below which Punch Art items you would like to see next month! You can see last month’s Punch Art here!
Happy Labor Day!!!! No need to labor today because this fabulous kit does all the hard work for you!!!
From the moment I opened the August Paper Pumpkin Kit (video here), I was in love!!! Pink mixed with Black, Vanilla, and Gold is just amazing! The little gold foil ribbons on the card front. The adorable boxes with the flowers on top. The AMAZING stamp set with a beautiful font and perfect greetings. There is just so much fabulous-ness in one box and it’s awesome!!! For the tags, I stamped ALL OF THEM at one time. I just used the different images from the stamp set and did a little bit of everything. I love the With Sympathy greeting because it is a beautiful font and I was in need of a good Sympathy stamp. Thank you, Stampin’ Up!!! Stampin’ Up! must have known it was my Birthday month and hand-picked this amazing one for me! 🙂 After stamping all of the greetings, I went and had lunch to allow them to dry since it is Craft Ink. I came back and assembled the rest of the kit!!!
Here are the 3 boxes that come in the kit. As always the kits come with plenty of supplies….including ribbon….so I only followed the directions for one box and just wrapped it around. For another box, I wrapped it around and tied a knot. For the third box, I had enough leftover to tie a bow!!! Love it! The flowers were very simple to assemble and look stunning. I didn’t really complete these boxes since I am not sure how I will use them so I just placed the flower on top and the ribbon can be slid off.
Be still my heart. These light pink cards with gold foil ribbons on them are just to die for. I mixed up one of the banners and added a Vanilla banner to one of these and a pink banner to one of the other cards. Just wanted to mix it up a bit.
Simple and yet so elegant! I love it!!! Of course, there is still so much leftover from the kit as well…..besides the ink pad and stamp set. There were 3 tags left which I couldn’t seem to find the 3rd at picture time.
AND look at all of this fabulous pink paper!!!! I plan on keeping this to punch out some flower or something for a little extra flare to one of these cards or for another project!!!
So while I was making this kit, I thought this would be perfect for a Baby Girl Baby Shower!!! Use the cards for Invitations and the boxes as centerpieces/party favors or to hold the mints/nuts/silverware. Purchase refill kits (not available just yet but soon) for even more cards for Thank You Notes or any other piece of the event. I love it!!! You could always cut up the cards to use an a banner strip on a card. That would create more cards from just one kit. There are just so many fabulous ways to create amazing cards!!!
If you aren’t a Paper Pumpkin Subscriber, WHAT ARE YOU WAITING FOR? You missed out on this one but can purchase the refill kit once you are a subscriber. 🙂 BONUS!!! Also, if you sign up now (before September 10th), you can get your first 2 months at half price with the Promo Code: HALFOFF. That is an amazing steal. All of the items above plus a stamp set and ink pad for $9.98 plus tax. That’s a steal!!! try it out for 2 months and if you love it like me, keep going or you can cancel at any time! Click here to sign up!!
Can’t wait to share the excitement of the September Kit with you!!! Stay tuned and be sure to subscribe to my YouTube Channel where I will unbox and reveal it as soon as it arrives!!!