So much texture!!!

Posted on

Flower Texture Layers, www.LaurasStampPad.com

I feel like I mention it a lot but texture on a card can really make it go from nice to FABULOUS! This card is fabulous for sure to me! I love all of the textures with the doily, ribbon loop, and embossed cardstock. Do you think it is too much? Let me know in the comments below if you like texture or not!!!

I started with a Wisteria Wonder card base and stamped the greeting from You’ve Got This in Basic Black on the bottom. Then I took a piece of Cucumber Crush and ran it through the Big Shot in the Elegant Dots Embossing Folder and adhered it to the card on the right side. I added a 1/3 piece of a White Tea Lace Doily to the edge of the Cucumber Crush. You can cut the doily into 3 pieces and really get the most out of each one! 🙂 For the flower, I stamped it from the You’ve Got This Stamp Set in Stazon Black onto Watercolor Paper. I used an Aqua Painter to color in the flower in Wisteria Wonder, Rich Razzleberry, and Cucumber Crush! I love how it turned out with the shading and all. Watercoloring is something that usually something I feel like I either nail it or it’s ehhh! After the flower was completely dry, I layered it onto Tip Top Taupe with Tear and Tape because I like to use a strong adhesive to really hold down the watercolor paper since it isn’t always flat. I added a little loop of Cucumber Crush Lace Trim to the right hand lower side of the flower before adding it to my card front. This is a great way to use those little scraps at the end of a roll or that you trimmed off from another project! Love it!!!

You can check out more samples using this stamp set here, here and here!

Happy Water Colorin’

~Laura


Polka Dot Perfection!!!

Posted on

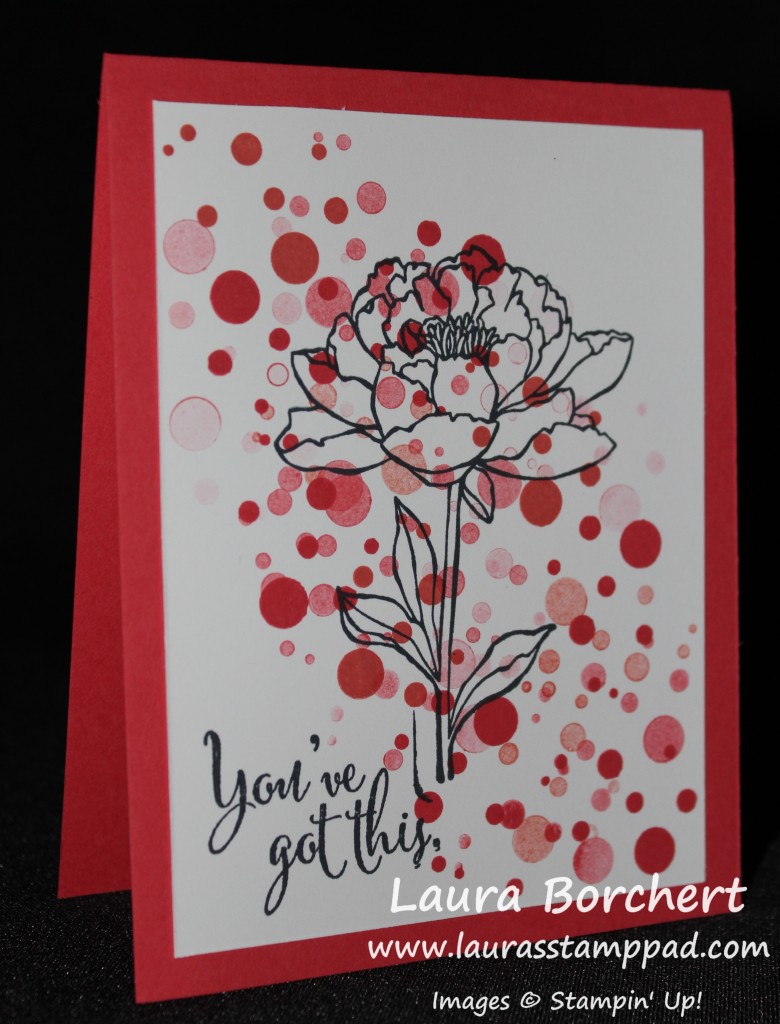
Polka Dot Ombre Background, www.LaurasStampPad.com

I love how this card uses a lot of my favorites – polka dots, ombre, pink, and flowers!!!! Woot Woot! I started with a card base of Watermelon Wonder and then cut a piece of Whisper White measuring 5″ x 3-3/4″. I stamped the dots from the Perpetual Birthday Calendar Stamp Set in Watermelon Wonder and Calypso Coral. I stamped 2-3 times before going back to the ink each time, this is how I got those various shades! I love it!!! Also, when it comes to the random background stamping be sure to fall off of your paper so it looks more like a background and not just in the middle of the paper. I stamped the flower and greeting in Memento Black Ink from the You’ve Got This Stamp Set!!! Love it!!! This would be a fabulous card to make multiples of and you could do it in so many colors!!!

What color would you like to use for your polka dots??? Let me know in the comments below!!!

Happy Stampin’

~Laura


Color Me Irresistible!!!!

Posted on

Color Me Irresistible Paper, www.LaurasStampPad.com

Have you seen the NEW Color Me Irresistible Specialty Designer Series Paper in the NEW Stampin’ Up! Catalog??? It can be tricky to understand exactly what it is but it is very similar to the Designer Series Paper from Sale-A-Bration! This is what it looks like in the catalog!!!
Color Me Irresistible, www.LaurasStampPad.com

Half of the sheets in the pack already have color – the 2015-2017 In-Colors and Basic Black. Then there is a coordinating piece of Whisper White with the same pattern! This paper is clear embossed with fun images which will resist ink when you add color. You can add color with a Sponge Dauber, Spritzer, Brayer, Marker, and even a stamped image!

The card above uses the Watermelon Wonder dotted paper which makes a fun, quick, and simple card! I added the greeting from the You’ve Got This Stamp Set and some Whisper White Satin Stitched Ribbon!

Tuxedo Card, www.LaurasStampPad.com

This fun little card was created with the Whisper White striped paper. I could have added color but I wanted it to look like the under shirt of a tuxedo. I like this card due to the texture and fun better than my Tuxedo Card here! For the “V” cut out, I marked the center of the paper along the top and cut down the paper there. Then I cut diagonally to that center cut from the sides!!! I added the Designer Series Paper to a Basic Black card base. I added a few Pool Party Candy Dots for a little color and flare. You could always use Black Candy Dots too! For the Bow Tie, I used the Bow Builder Punch which is super simple to punch and assemble!!! If you mail this card, I’m sure the bow will flatten but that’s okay!!! I love it!! This would be great for a Groom’s Card on the wedding day, and engagement card, or just a little something fancy for the man in your life!!!

I love this paper!!! Check back for more samples using this paper!!!

Happy Stampin’

~Laura


Technique Tuesday – Coloring with Aqua Painters!!!

Posted on

Happy Tuesday everyone!!! Today I have a fabulous technique to share with you!!! Every once in awhile I pulling out my Aqua Painter Marker and enjoy coloring…..usually flowers!!! Check out this beauty!!!

Aqua Painter Coloring, www.LaurasStampPad.com

I love Black and White with a POP of color….any color!!! Isn’t this card just amazing??? Now let’s get started!

SUPPLIES NEEDED: Whisper White Cardstock, flower or other line image stamp, Ink Pads, Aqua Painter, Stazon Ink

For this card, I did not use Watercolor Paper. I used regular Whisper White cardstock! I inked up the flower from the You’ve Got This Stamp Set in Stazon Black and stamped it onto a piece of scrap Whisper White cardstock! Then I used Tangelo Twist and Cucumber Crush Ink Pads to color the flower in. To keep my ink pads clean, I just take a clear block and stamp it into the ink pad and use that as my color palette. When using the Aqua Painter, be sure not to squeeze the barrel of the pen because that makes lots of water come out and you get a puddle on your project. Lightly swipe some ink from clear block color palette and then start coloring your image. The more you use it, the more the ink starts to get lighter and lighter, because of this you can start on the edges of your image and when the color is lighter, move into the middle. This will give more of a watercolor look. Once you are done with one color, just squeeze the barrel to allow more water to come out and wipe it into a paper towel. Then move to your next color. For the yellow center, I used a Crushed Curry Marker. I like a nice bold yellow color so I prefer to use the marker. You can set this aside to dry while you prepare your card. The card base if Tangelo Twist and then I layered a piece of Basic Black (4″ x 5-1/4″) on top with Stampin’ Dimensionals. Then with a piece of Whisper White (3-3/4″ x 5″), stamp the same flower image from the You’ve Got This Stamp Set along the left side and top. Be sure to angle the flowers around for a slightly different look. I found that the more I overlapped the flower, the more of a mess it looked but that’s all up to you! The greeting is from the Happy Birthday Everyone Hostess Stamp Set. Oh how I love that large scroll-y font! Now for the “fun” part……fussy cutting that beautiful flower you colored!!! Once you are done cutting it out, you can add it to your card with Stampin’ Dimensionals! TIP: Cut some of the dimensional edge for those little leaves and tiny areas!!! Love it!!! I could create this card in every color!!!

Purple Watercolor Flower, www.LaurasStampPad.com

To see this in action, check out the Video Tutorial here!!! Don’t forget to give it a thumbs up if you liked it and be sure to Subscribe to My Channel so you don’t miss any other videos!!!

Happy Colorin’

~Laura


Technique Tuesday – Masking!

Posted on

Happy Tuesday everyone!!! You know what that means…..I have a technique to share with you today! This one is fun….minus the fussy cutting……and super amazing!!! NOTE: Save the cut out flower in the stamp case for future use!!!!!

Flower Masking, www.LaurasStampPad.com

Isn’t this card stunning in it’s simplicity? You could use this technique for some many different styles of cards as well! Let’s get started on this masking fun!!!!

SUPPLIES NEEDED: Scrap Paper, Stamps, Ink

The supplies this week are super simple. All you have to do is stamp your image onto a piece of scrap paper. I used the flower from the You’ve Got This Stamp Set! You don’t need to cut it out perfectly or even exactly on the lines. You can do a general cutting around the edges cut. This is the hardest part……boo for fussy cutting! 🙂 Now this part you can do 2 different ways depending on your preference! I did the next step by placing the mask on my Whisper White cardstock and stamping the background image from the You’ve Got This Stamp Set over top. Your mask leaves an open spot for you to stamp the flower next without having the background image behind it! I had a stamper at class ask me how you would do it if you have the Wood Block You’ve Got This Stamp Set. For that, you would stamp your flower, lay the mask on top, and then stamp your background. This way you don’t have to worry about exact placement when stamping the flower. Now you are all set. Layer that onto a piece of Crumb Cake and then onto your Pool Party card base with Stampin’ Dimensionals! I thought the sides needed a little something so I finished the card off with a few pearls on each side!!! You could also rotate your flower the other way, adhere it higher on the card and stamp a greeting of your choice on the bottom!!! This card is perfect for lots of different occasions!!!

You could also do this technique and color in the flower or use a greeting in the middle rather than a flower. So many fun ways using the masking technique!!! If you would like to see this in action, check out my Video Tutorial below! Don’t forget to give it a thumbs up if you liked it!!!

Happy Maskin’

~Laura


Technique Tuesday – Rock & Roll…or Ink & Pounce??

Posted on

Happy Tuesday, stampers!!! I hope your week is going well! Today is Tuesday so that means I have a fabulous technique to share with you. I’m loving this one because of the amazing colors!!! Of course you could pick any 2 colors to do this technique! I picked Melon Mambo and Rich Razzleberry!!!! Let’s Rock and Roll!!!!

Rock and Roll Background, www.Laurasstamppad.com

So I have always known this technique as the Rock and Roll Technique where you in the stamp up in a lighter color and then rock and roll the stamp on a darker color in pad to get those edges inked up. Welcome to Laura’s Stamp Pad and the love of Sponge Daubers….this is now called Ink & Pounce! I can make up any name for it, right? Let’s get started!

SUPPLIES NEEDED: Background stamp or any large solid stamp, 2 ink pads, Sponge Daubers

I used the background image from the You’ve Got This Stamp Set and inked it up in Melon Mambo. Then I sat the stamp down and took my Sponge Dauber and Rich Razzleberry Ink and pounced all around the edges!!! I prefer this method because then any excess Melon Mambo ink is going into my sponge dauber and not my ink pad. Also since this image isn’t perfectly round or the exact shape, I don’t have to worry that a spot didn’t get any Rich Razzleberry. Once you have both colors on your stamp, flip it over and stamp it down onto some Whisper White cardstock! It’s that simple! You could always add in more colors, create an ombre look going light to dark, or camouflage with a few colors. You can have fun with it and create lots of different looks! I stamped the greeting from Lovely Amazing You in the center with Stazon Black Ink. For the ribbon, I used the New Melon Mambo Satin Stitched Ribbon and tied it around a piece of Rich Razzleberry cardstock (1″ x 4″). I added that to the white carsdtock and then placed it on the Melon Mambo card base! Simple and yet super fabulous! Who else is loving these colors???? What colors would you pick?? Leave me a comment down below!

To see this in action, check out my Video Tutorial below! Don’t forget to give it a thumbs up if you liked it!!!

Happy Pouncin’

~Laura


Pastel Perfection!!!

Posted on

Flowers and Lace, www.LaurasStampPad.com

This is a new color combination I reached for and I am loving it!!! I know I’m usually a Brights Girl but every once in awhile I go light!! This card uses Mint Macaron and Blushing Bride! The soft colors make this card perfect for weddings, baby, sympathy, thinking of you, birthday, and everything in between! I love it!!!

I started with a Mint Macaron card base and just started adding layers. The Blushing Bride layer is 4″ x 5-1/4″ and the Whisper White layer is 3-3/4″ x 5″. I used the You’ve Got This Stamp Set for the images and Endless Birthday Wishes for the greeting! I adhered the white stamped piece to the Blushing Bride and then I wrapped the Mint Macaron Lace Trim around and tied a double knot. I am really loving this lace trim and I’m not really a lace person. This stuff is super easy to use, adorable and yet elegant, stretchy and thin so it lays flat. It is awesome!!! I layered the decorative piece on the card with Stampin’ Dimensionals!

What do you think of the color combination? What occasion would you use this card for? Let me know in the comments below!

Happy Stampin’

~Laura


2015-2017 In-Colors!!!!

Posted on

2015-2017 In-Colors, www.LaurasStampPad.com

How beautiful are these NEW 2015-2017 In-Colors????? I love them….okay wait to be honest, I LOVE two of them, two I like and one is growing on me. Can you guess which colors go into which category??

Watermelon Wonder – LOVE LOVE LOVE! It is such a bright and fun pinkie/red color! Watermelon! I love it!

Cucumber Crush – LOVE LOVE LOVE! This color is so vibrant. It is a bright green but not neon and not really lime colored. It is just fabulous! A fun green to play with….oh Night of Navy and Cucumber Crush. That would be fabulous!!

Tip Top Taupe – Believe it or not this is my #3! This is the perfect color between gray and tan. You all know I’m not a fan of browns but Crumb Cake is fabulous because it is more tan. Well this has a little more gray in it so it’s darker. I really like it for a neutral color!!!

Mint Macaron – I like this color but not so much right now since we are in the middle of Spring/Summer. I want bright colors. This color will be perfect for Winter, Baby Stuff, or those soft cards that you want to make. Just to clarify, it is pronounced Maca-RON….not maca-roon. There is a difference but don’t worry I’m sure I will catch myself saying it both ways! 🙂

Macaron.roon

Delightful Dijon – this color is ehh for me. You all know how I love bright colors and this one is far from it. It is a dark dirty yellow color. I might like it more in the Fall or maybe I never will fall in love!

These colors will be out for 2 years and there are lots of new products in these colors – Designer Series Paper, Lace Trim, Blossom Accents and so much more!!! The cards that I created above use the New You’ve Got This Stamp Set. I stamped the big background image in each of the In-Colors and used Basic Gray for the greeting and flower! Love it! Quick and simple for sure! All the stamping was done on a piece of Whisper White measuring 4″ x 5-1/4″ and layered onto the coordinating In-Color card base! You have no clue how bad I wanted to mix and match the bases with the stamped image. I love mixing it up but I also love the simplicity of one color!

You've Got This, www.LaurasStampPad.com

Let me know your favorite In-Color in the comments below! Also, let me know your favorite color combination – it can include the In-Colors or not!

Happy Stampin’

~Laura