Technique Tuesday – Carols of Christmas Bundle!!!

Posted on

Happy Tuesday!!! It’s August and Stampin’ Up pre-released the Carols of Christmas Bundle!!! The holiday mini catalog will come out next month but we get to enjoy this amazing stamp set and coordinating framelit….NOW!

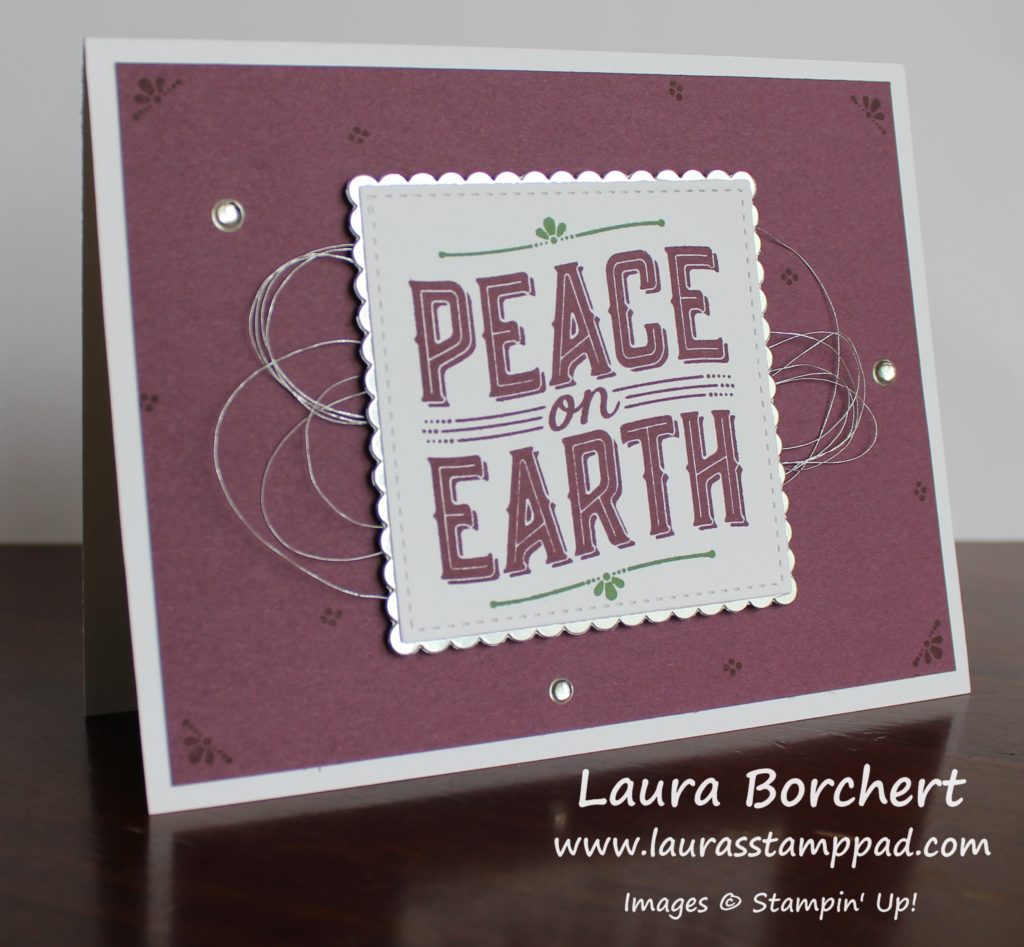
Peace on Earth, www.LaurasStampPad.com

This card is quick and simple and perfect for making multiples this holiday season!

I started with a Whisper White card base which is perfect for writing your message on the inside. Next I took a piece of Fresh Fig cardstock measuring 4″ x  5-1/4″ and stamped all over it with the Carols of Christmas Stamp Set. The corners each have the little fan image stamped in them. Then I used the four dots (pointsettia center) to add a little more decoration to the background. Next, I added this layer to the card front.

Carols of Christmas Bundle, www.LaurasStampPad.com

For the greeting, I used the Stitched Shapes Framelits for the Whisper White square. The greeting was stamped in Fresh Fig Ink and then lines with a fan were stamped in Garden Green. There are 2 images like this – one is straight across to use with the Deck The Halls greeting and the other one has a wave to it. I used the wave one to coordinate with the wave in the greeting. All of these images are in the Carols of Christmas Stamp Set. I layered the greeting onto a piece of Silver Foil Paper die cut with the Layering Squares Framelits.

Next, I took some Silver Metallic Thread and wrapped it around my finger 8-10 times. Then I slid the thread off my fingers and twisted it in the middle to create a figure 8. Set the twist down on the back of the greeting and secure it with a Stampin’ Dimensional. Then I fan out the loops and secure them with more dimensionals. Peel off the backs of the dimensionals and attach it to the card front. To finish off the card, I added a few Silver Enamel Shapes (or you can use Rhinestones).

If you would like to see more on the Carols of Christmas Bundle, check out the Video Tutorial below or click here! Be sure to give the video a thumbs up if you liked it and don’t forget to subscribe if you are new. If you would like a notification when I post a new video, be sure to click the bell right next to the subscribe!!!

Stay tuned as I will be posting more samples and fun with this bundle! 🙂 Click here to purchase your bundle so you can play along and earn Laura’s Loyal Stampers Stickers!

Happy Stampin’

~Laura

Let Love Sparkle!!!

Posted on

Love Sparkles, www.LaurasStampPad.com

This card warms my heart! I love that greeting and the little bit of bling! This card is perfect for Valentine’s Day without the typical red, pink, and white! It could be used for weddings and anniversaries too!

I started with an Elegant Eggplant card base. Then I took a piece of Whisper White (4″ x 5-1/4″) and stamped the heart from the Love Sparkles Stamp Set all over in Elegant Eggplant Ink. I added this piece to the card front. For the greeting, I used the Banner Triple Punch for the fabulous banner tips. The Whisper White is 1-1/2″ wide and the Gold Foil Paper is 2″ wide. I stamped the greeting in Elegant Eggplant Ink from the Love Sparkles Stamp Set. I adhered them together and added it to the card front. Once it was all together, I added Gold Glitz Dazzling Details to each of the little bling on the hearts and greeting! Love it! Be sure to add this after you are all done assembling so you can set it aside to dry completely.

Celebrate with Silver, www.LaurasStampPad.com

Of course I did this whole concept again with Silver Foil Paper and Silver Dazzling Details! I decided to use the star and mix up the greeting as well! I am loving this set!!!

Which do you prefer Love Sparkle Hearts or Celebrate the Stars??? Let me know in the comments below!!

Happy Stampin’

~Laura


Technique Tuesday – Diagonal Backgrounds!!!

Posted on

Happy Tuesday!!! You all know that means I have a fabulous technique to share with you!! Today we are using those scraps that you all have on hand…..come on, I know I’m not the only one with scraps! Check out this beauty!!!

Create a Background, www.LaurasStampPad.com

I love the combination of foil and cardstock in this background!! These are the two paper scrap bags that had the most in them so I went with it! I cut the Pool Party into 1/4″ strips and the Silver Foil Paper into 1/2″ strips. Love it!!! Thanks to Stampin’ Up! for showing this amazing technique!

I started with a Pool Party card base! Then I took a piece of Whisper White (4″ x 5-1/4″) and placed the scrap strips on it diagonally. I cut the Pool Party into 1/4″ strips and the Silver Foil Paper into 1/2″ strips but you can always do any size of strips you wish! There is no right or wrong way to do this technique. That is the fabulous thing about this! I used the Fine Tip Glue Pen to adhere the strips because it was easy and I didn’t have to worry about the width of the Snail Adhesive. Just place the strips down and trim off the ends. You can then use the cut off pieces again on the ends!

Striped Background Tutorial, www.LaurasStampPad.com

After you are all done with the background, add it to the card base and decorate!!! For the greeting, I stamped it from the Suite Sentiments Stamp Set onto Whisper White. Then I die cut it with the Stitched Shapes Framelits (coming back soon, stay tuned). I love that fabulous stitching for the texture and pattern without an additional layer!!! 🙂

A Friend Like You, www.LaurasStampPad.com

But I couldn’t stop there! I added some loops of Metallic Silver Thread to the back to the back of the greeting and secured it with some Stampin’ Dimensionals.

Silver Foil Strips, www.LaurasStampPad.com  Look at that shine!!! I just love this! You could do this technique with Cardstock, Designer Paper, Glimmer Paper, or Foil Paper. There are so many options! Whatever you have scraps of, use them for this fabulous design!!! Go all out and have fun!

If you would like to see this all in action, check out the Video Tutorial below or click here!! Don’t forget to give it a thumbs up if you liked it and be sure to subscribe if you are new! I post every Tuesday and Thursday!

Happy Stampin’

~Laura


Technique Tuesday – Santa’s Reindeer!!!

Posted on

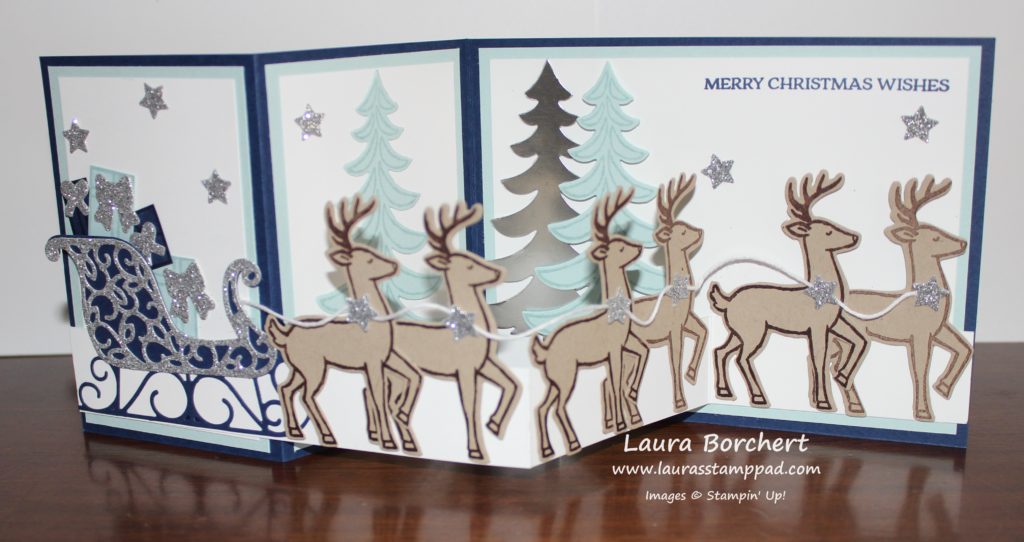
Happy Tuesday!!! Are you ready for this amazing masterpiece??? I have to say this is probably THE MOST amazing, detailed, stunning card I have ever made in my 12+ years of stamping. Check it out!!!

Double Z Fold Sleigh, www.LaurasStampPad.com

There are just no words for this card. I honestly don’t think I am going to send it out. I’m going to save it and display it every year ever so proudly. I just love it so much!!! Now let’s get started on how to make it with the Santa’s Sleigh Bundle (Save 10%)!!!

I started with a Night of Navy card base measuring 11″ x 4-1/4″ and a strip of Whisper White measuring 11″ x 1″. Both of these are scored at 2-3/4″ and 5-1/2″ which creates the Z folds! For the panels, I cut Soft Sky cardstock into the following measurements – 4″ x 5-1/4″ and two pieces of 4″ x 2-1/2″. Then I cut Whisper White to layer on top measuring 3-3/4″ x 5″ and two pieces of 3-3/4″ x 2-1/4″. Go ahead and layer the white onto the Soft Sky and then onto the card base. You can stamp the greeting in the upper right corner. I used the one from the Santa’s Sleigh Stamp Set!

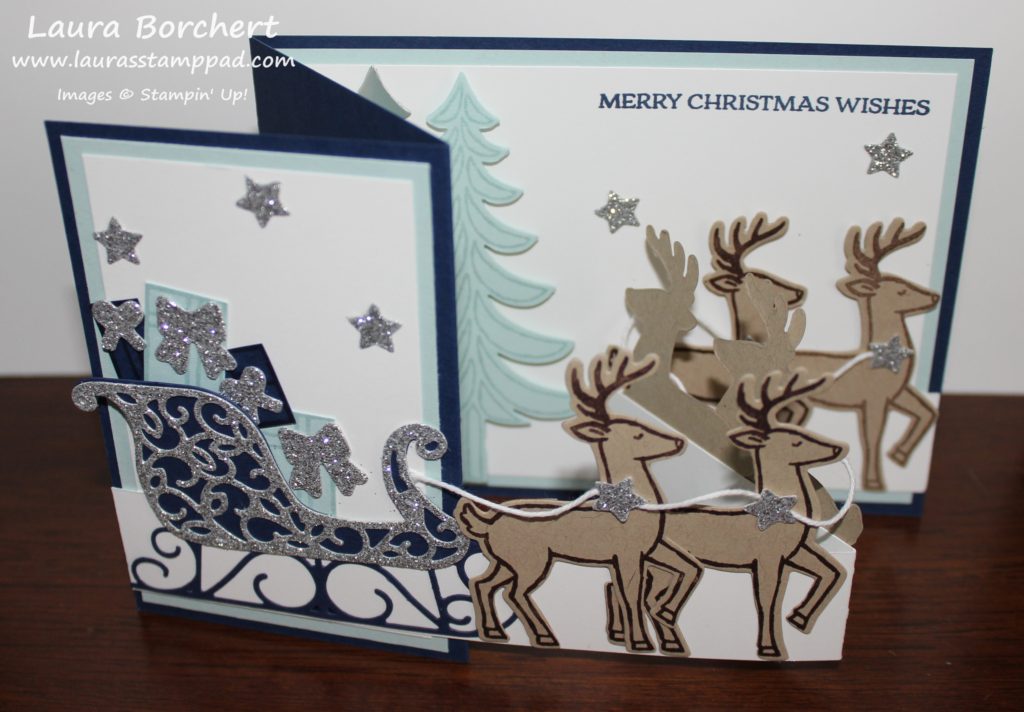
Reindeer Sleigh, www.LaurasStampPad.com

Now you can add the Whisper White strip to the bottom of the card. I lined it up with the bottom of the white on the panels. Be sure that you are only adding adhesive to the small flap and half of the long flap. I like to fold it all up and then add the adhesive to the spots showing (see video below). Place it on the card and then you can work on all of the decorations. I added the trees first. I stamped 2 blue trees using the Santa’s Sleigh Stamp Set and die cut them out with the Santa’s Sleigh Framelits (Bundle & Save 10%). I also cut out a tree in Silver Foil Paper! I added two trees to the large panel and one to the middle small panel. Next up are the reindeer. I stamped all of them in Chocolate Chip Ink onto Crumb Cake cardstock. You will need 6 reindeer. I die cut them out. I also die cut the sleigh in Night of Navy, the sleigh overlay in Silver Glimmer Paper, 12 stars in Silver Glimmer Paper (one for each reindeer and a few others to decorate, and a few bows for the presents in Silver Glimmer Paper!

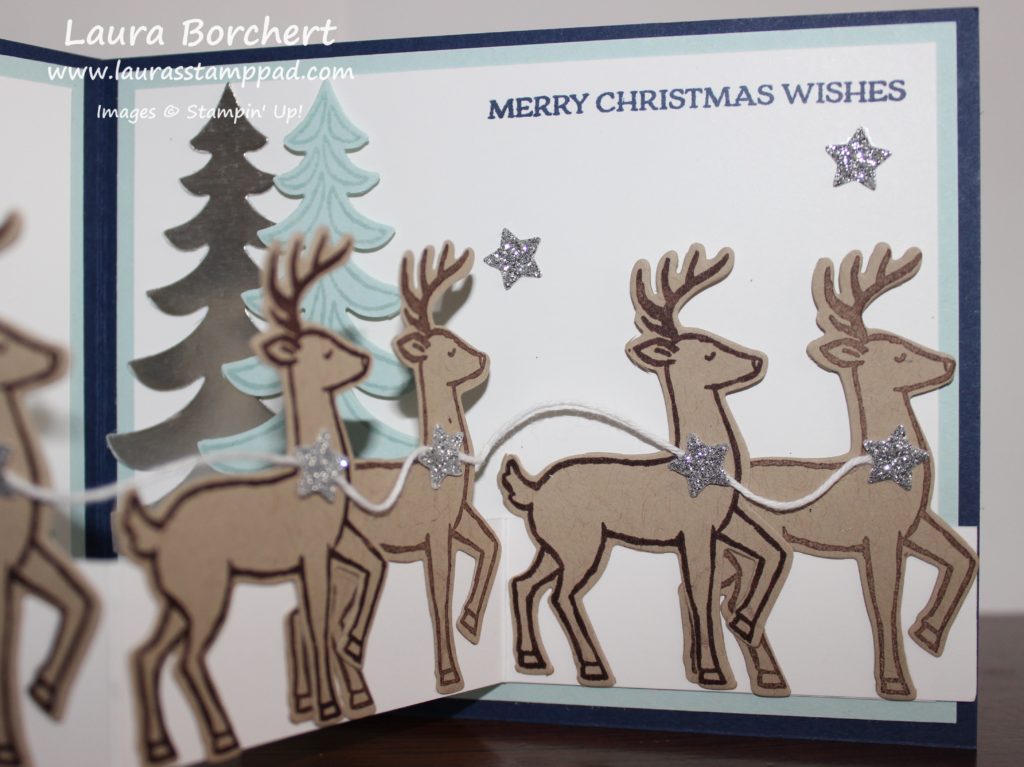
Santa's Reindeer, www.LaurasStampPad.com

Now to assemble the second Z with the Whisper White strip! All you need to do is take a strip of white scored cardstock and add it to your card opposite folds as the base. Fold it like a Z and the long panel will go across the front (sticking to the left side) and the short panel will adhere to the back right hand side. I used Fast Fuse Adhesive for a strong hold and placed it on the bottom lined up with the bottom of the white panel. I added 2 reindeer to each of the little panels of the white Z fold overlapping them just a little. Be sure that when you add adhesive to the reindeer that you are only adding it on the legs so that adhesive isn’t showing and then glues your card together.

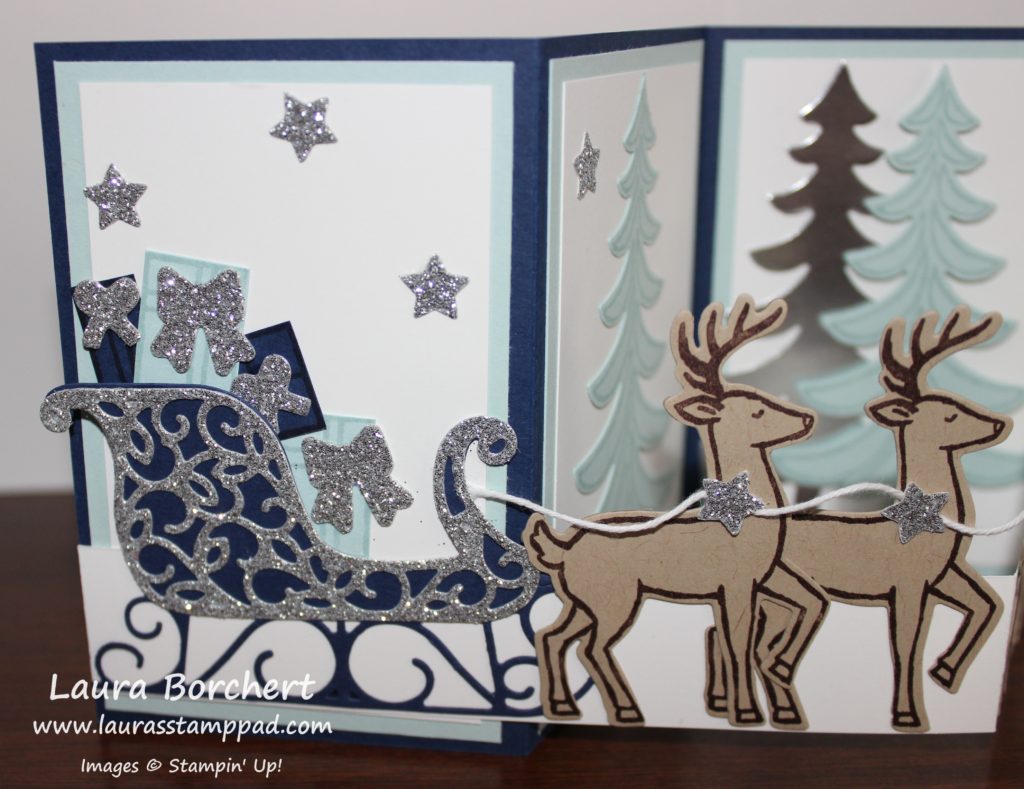
Presents in the Sleigh, www.LaurasStampPad.com

Before placing the last reindeer on, I added the sleigh to the card. I placed the Silver Glimmer overlap onto the navy sleigh with Fine Tip Glue Pen and then added it to the far left of the card. I did trim off a little bit of the sleigh on the bottom rung. Once the sleigh is in place, you can add that final reindeer. Now is also when you will add all of your presents. I stamped the 3 different styles of presents from the Santa’s Sleigh Stamp Set onto Night of Navy and Soft Sky cardstock and cut them out. They are super easy to cut since they are rectangles! Place as many presents as you wish in the sleigh. Then I added the ribbons and all of the Silver Glimmer stars to the card with the Fine Tip Glue Pen. For the reins, I added some of the glue from the Fine Tip Glue Pen to the first reindeer, placed the Whisper White Baker’s Twine down and then added a star. Press and hold for a few seconds and then move to the next one. You could also use a Mini Glue Dot for this part if you wish. Be sure to leave some slack between each reindeer so it doesn’t pull tight when you open the card and so it swags just a bit. I glued the end of the reins under the front of the sleigh at the end. Now you are all set! The most amazing card ever! Yes it is a bit time consuming but it is just so stunning!!! I can’t wait to display mine…..I don’t think I can part with it and send it out.

If you would like to see that all in action, check out my Video Tutorial below or click here! Don’t forget to give it a thumbs up if you liked it and be sure to subscribe if you are new!!!

Happy Stampin’

~Laura

Don’t forget about the Online Extravaganza going on all week long!!! Great chance to get fabulous product on super sale!! Click here to check it out!


Razzle Dazzle!!!

Posted on

Copper Designer Paper, www.LaurasStampPad.com

This color combination is AMAZING!!!!! Oh my goodness, the Paisley Suite is bringing out a whole new Laura and I am loving. The colors in this suite are ones I don’t like and ones I would never think to put together but they are just stunning!!! Here are a few other samples using this suite, check them out here, here, and here!

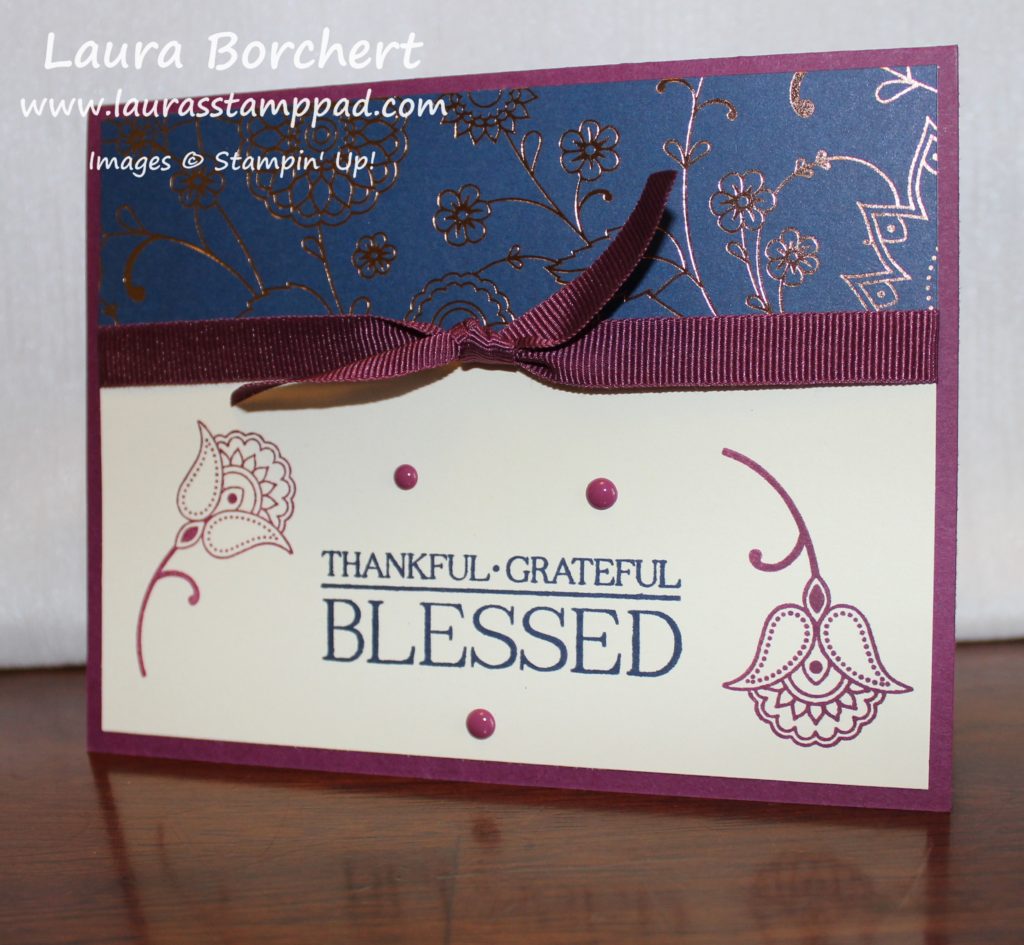
For this card, I started with a Rich Razzleberry card base. I cut a piece of Very Vanilla (4″ x 5-1/4″) and Petals & Paisley’s Specialty Designer Series Paper (1-1/2″ x 5-1/4″). I stamped the images from the Paisleys & Posies Stamp Set. The greeting was stamped in Night of Navy and the flowers in Rich Razzleberry. I added the designer paper to the top of the vanilla and added the Rich Razzleberry Ribbon along the line of the 2 papers. I added this to the card base and thought it needed a little bit more. Enamel Shapes are the perfect little accents and pops of color to finish off a card. I love it! These colors are so rich and beautiful!!!

Do you like the Paisley Suite from the Holiday Mini Catalog as much as me?? What is your favorite suite? Let me know in the comments below!!!

Happy Stampin’

~Laura

Don’t forget to stock up on Designer Series Paper this month with the Buy 3, Get 1 Free Special!!! Click here to start shopping!

dsp-special, www.LaurasStampPad.com


Flirty Flamingo!!!

Posted on

Flirty Flamingo, www.LaurasStampPad.com

I am loving the New In-Color – Flirty Flamingo and how amazing is it with a Flamingo?!?!?!?! LOVE IT!!!

For this card, I started with a Flirty Flamingo card base measuring 4-1/4″ x 11″. I decided on this size because then I wrap my ribbon around it and won’t use as much. I took a piece of Whisper White cardstock and stamped the Flamingo from the Pop of Paradise Stamp Set. I stamped him in Flirty Flamingo Ink twice without going back to the ink pad before the second one. That is how I got that lighter shade. Then I added a strip of the Silver Foil Paper which was a leftover scrap from another project. I added this piece to my card base and tied some of the Flirty Flamingo Ruched Ribbon around the card over that Silver Foil Paper. For the greeting, I stamped it onto Whisper White with Flirty Flamingo Ink and then punched it out with the 1-3/8″ Circle Punch! I added the greeting to the card over top of the ribbon with Stampin’ Dimensionals. I like to use Stampin’ Dimensionals when adhering something over ribbon or embossed images because it makes it look smooth and it falls into the grooves better for a perfect fit! I love it!

There is so much fabulous new product! Have you checked out the New Catalog? Click here to see it all! Don’t forget that June is a great time to get lots of items on your wish list. As a Hostess, you can earn an additional $35 in Free Product when your party reached $350. That can be a single order, catalog party, online party, or private class with your friends. If you Want It All, you can join Stampin’ Up in June and get $125 in any product of your choice for $99 PLUS 2 additional stamp sets!!! Click here for more information!

Happy Stampin’

~Laura


Let Us Celebrate!!!

Posted on

Celebrate with the Stars, www.LaurasStampPad.com

This card is super appropriate for today because there is so much to celebrate!!!! The end of April is full of Birthdays and Anniversaries in my family! My parents celebrated their 35th Wedding Anniversary earlier this week, my Aunt and Uncle celebrated their 25th Wedding Anniversary this week and tomorrow Brad and I will celebrate our 5th Wedding Anniversary!!! Also, today is my Dad’s Birthday!!! I also have a few friends with Birthdays this week as well! Super fun and exciting to let us all celebrate!!! Plus it is FRIDAY!!!

I started this card with a Crushed Curry card base. Then I took a piece of Whisper White (4″ x 5-1/4″) and stamped the little stars from the Balloon Celebration Stamp Set in Melon Mambo and Crushed Curry. Once it is all stamped, I ran it through the Big Shot with the Lucky Stars Embossing Folder! This gives the card some texture and even more stars! I love it! Then because there still aren’t enough stars. I die cut 3 stars with the Stars Framelits in Melon Mambo, Crushed Curry, and Silver Foil Paper. I stamped the Let Us Celebrate from the Balloon Celebration Stamp Set and it looked too small so I added the Congratulations as well! Then I added all of the stars to the card front with Stampin’ Dimensionals! To finish it off, I brushed some Wink Of Stella on the stars and tied some Melon Mambo Stitched Satin Ribbon on there!! I love the bling, the layers, the texture, and the colors!!

All the Stars, www.LaurasStampPad.com

Stars are great for lots of different occasions and they work for both girls and guys! Don’t forget that Graduation is around the corner. This would be great for that!!! What color combination would you use? Let me know in the comments below!

Happy Stampin’

~Laura

Button Retire

Be sure to check out the Retiring Items before they are gone at the end of May!


Technique Tuesday – Puzzle Pieced Roses!!!

Posted on

Happy Tuesday everyone!!! We are back at it with another Technique after last week’s celebration!! This technique uses my favorite Framelits – Rose Garden and some bling!!!! Check this out!

Glimmer Roses, www.LaurasStampPad.com

Aren’t those roses just stunning? I am still on the fence as to whether this card is a bit much or just fabulous! My husband says its a bit much and only one rose was needed. Let me know in the comments below what you think. Be honest!!!

SUPPLIED NEEDED: Rose Garden Framelits, Big Shot, Snail Adhesive, Paper of Your Choice

I used the Silver Foil Paper and Blushing Bride Glimmer Paper for these roses! I die cut the rose with the Big Shot once in the Silver Foil and once in the Blushing Bride Glimmer Paper. Then I popped out all of the pieces with the Big Shot Die Brush. Be very gentle with the Glimmer Paper. It could brush off a little glitter and we want all the bling!!! Be sure to keep track of all of the little pieces that you pop out. Then I took a piece of Blushing Bride cardstock measuring 4″ x 5-1/4″ and placed one of the rose frames in the corner where I wanted it. I took a pen and marked little dotted lines around the INSIDE of the rose frame. This was my guide for adding Snail Adhesive to the area. I took away the rose frame and filled the entire area with adhesive. Then I placed the Glimmer Rose down and started putting together the rose with the Silver Foil pieces inside. It really is like a puzzle!

Blush Rose, www.LaurasStampPad.com

You will repeat the same thing in the opposite corner with the Silver Foil Rose frame and glimmer puzzle pieces. If for some reason you don’t have enough adhesive, you can always add a dab of glue from the Fine Tip Glue Pen. I just found it to be much easier and less messy to use the Snail Adhesive for the majority of it, rather than gluing each piece in. Once I had my roses complete, I added some Whisper White Organza Ribbon around the middle and stamped my greeting. The greeting is from the Number of Years Stamp Set and I stamped it in Rose Red (stamp off once). I added this to a Whisper White Card base and Viola!!! Love it!!!

Silver Rose, www.LaurasStampPad.com

I played around with a few other looks as well. Here is a Black Glimmer Paper (ops….retired from the Holiday Mini Catalog) and Real Red Cardstock. You could always do Real Red Foil Paper or all cardstock!! I think this one is amazing!!!

Red Rose, www.LaurasStampPad.com

And then I just had to do a Pink Rose!!!! I used one of the other Framelits in the Rose Garden Set. The border is Dazzling Diamonds Glimmer Paper and the puzzle pieces are Melon Mambo and Pear Pizzazz cardstock! I LOVE IT!!!!

Pink Roses, www.LaurasStampPad.com

If you would like to see this all in action, check out my Video Tutorial below or click here! Don’t forget to give it a thumbs up if you liked it and be sure to subscribe so you don’t miss out on any future videos!

Let me know in the comments below which one your favorite is!!! I’m between the Red and Melon Mambo one….they are both amazing!!!

Happy Puzzle Piecin’

~Laura

Going Going Gone, www.LaurasStampPad.com

Be sure to check out the Retiring Items before they are gone at the end of May!


Silver Elegance!!!

Posted on


Silver Elegant Wedding Invitation, www.LaurasStampPad.com

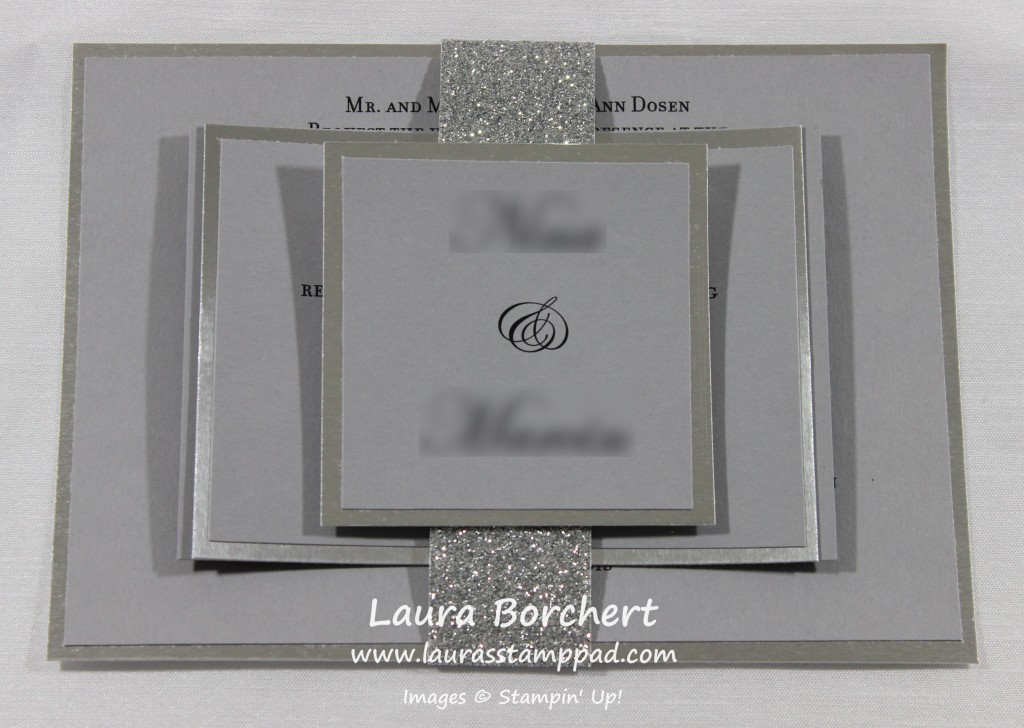
This wedding invitation is all about elegance and shine! It is just stunning in person when you can see the beauty of the Silver Foil Paper and Silver Glimmer Paper!

This invitation was very basic to create. I did all of the printing on Smoky Slate Cardstock – Invitation, RSVP, Reception Card and Belly Band. I layered the Invitation, Reception Card and Belly Band onto Silver Foil Paper! For the Belly Band, I cut Silver Glimmer Paper into 1-1/2 strips. I actually cut one strip of 1-1/2″ x 12″ and then rotated 90 degrees and cut the rest of the 1-1/2″ strips. Those strips measure 1-1/2″ x 10-1/2″. This way you are using every little piece of the Glimmer Paper! TIP: the glimmer paper goes together best with a hot glue gun!

Glitter Mess, www.LaurasStampPad.com

Unfortunately I don’t have any tips for containing the glittery mess. I did use the Simply Score Tool to score the belly band and make the folds easier. After I was all finished, I rinsed this off with water to clean it up.

Wedding Invitations, www.LaurasStampPad.com

Here is a small glimpse of my craziness when I am creating wedding invitations. I probably count each piece of the Invitation 10 times before it is all boxed up. I count as I cut, adhere, finish, double check it’s perfect, and final time. There are many times in between each of those steps as well. I love it though. Weddings make me so happy! Share the love!!!

Happy Stampin’

~Laura


Flurry of Wishes!!!

Posted on

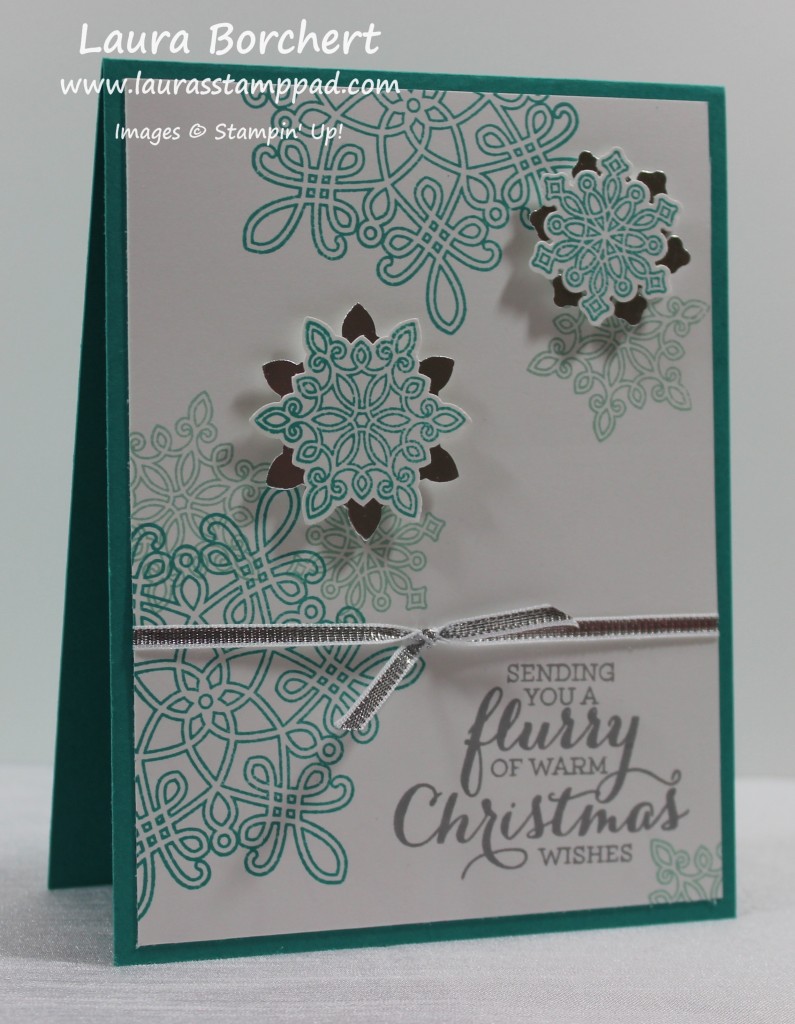
Flurry Christmas, www.LaurasStampPad.comThere is something so beautiful about a snowflake and you all know how I love Bermuda Bay!!! I love shades of blue and silver together for a holiday card! I started with a Bermuda Bay card base. Then I took a piece of Whisper White cardstock measuring 4″ x 5-1/4″ and stamped the large snowflake from the Flurry of Wishes Stamp Set in Bermuda Bay. I stamped the smaller snowflakes in Pool Party and the greeting in Smokey Slate! I wrapped a piece of Silver Ribbon around it and attached it to the card front. For the popped up snowflakes, I stamped the double snowflake in Bermuda Bay on a piece of scrap paper! Then I punched them out with the coordinating Snow Flurry Punch! You can bundle the set and punch together and save 15%! Also, I punched the snowflakes in Silver Foil Paper and layered the stamped snowflakes on top but off set! I added these to the card with Stampin’ Dimensionals! I love it….the card that is, not snow! I just thought I would make that clear! I am so not a fan of winter.

What are your favorite colors for snowflake cards?? Let me know in the comments below!

Happy Stampin’

~Laura