The Baby Wipe Technique has been around forever it seems. I have done it various times over the years and love the look! Here I created Baby Wipe Bells for this beautiful holiday card! What do you think?!?!
The Baby Wipe Technique is super easy and only requires a Baby Wipe and Ink Refills in any color that you would like! Simply fold the baby wipe to create 4-6 layers. This gives it enough squish to hold ink and press into the stamp. Next, add drips of color from the ink refills randomly all over, filling in all the white spots. For these bells, I used Real Red, Old Olive, and Cinnamon Cider. This is now your ink pad.
The first few images might come out a little odd or fabulous! It just depends. The more you use this “ink pad” the more the colors bleed together and mix for a fun look! I stamped the bells onto Shimmery White Cardstock for a little extra shine and because this cardstock is a hint thicker.
For this card, I used the Frosted Gingerbread Suite!!! You could try out this technique and use other images from the stamp set like the ornament and snowflake too!
For the inside of the card, I actually used Cinnamon Cider rather than the typical Basic White or Very Vanilla. Have you ever tried this?!?! Super cool and I think I’m going to try it more often!
If you would like to see this card in action, click here to watch! If you would like to recreate this card, check out the supplies listed below. Click Add All To Cart for quick and simple shopping!
Happy Technique Tuesday!!! Wowza it’s been a long time since I have said that! I have had so much fun with these Carousel Cards!!! They are super cute and still fit into a regular envelope! BONUS! They are a work of art and the perfect display piece for anyone to enjoy!
I did some for Halloween but then an all occasion one as well which you can see down below! There are 4 basic measurements for the pieces and then just decorate as you wish!
The “card base” is a 4-1/4″ x 4-1/2″ piece of designer series paper. Score along the 4-1/2″ side at every inch. This gives you four 1 inch panels and then 1/2″ at the end for adding adhesive. I like to use Tear and Tape for projects like these! Fold on all of the score lines and then with the piece laying flat, fold it over and adhere it together to create a long square tube. The pattern that you would like to show is the one that is on the inside of your tube. The pattern on the outside will be covered with the decorations!
Next you will need 4 pieces of cardstock measuring 4-1/4″ x 2-3/4″. These can be all the same color or different colors. As you can see in one of the cards above, I used Highland Heather and Pumpkin on it, alternating each panel! These panels will be adhered to each of those 4 sides of the square tube. All adhered on the left side with the right side hanging off. Now you have your card and it’s time to decorate!
The last 2 pieces measure 4″ x 2-1/2″ and 4″ x 1/2″ and that covers the small side panels and center panels. Then you can decorate as you wish with greetings, stamping, ribbon, die cuts, embellishments! So many possibilities are endless!
This feels super confusing so I feel like it is much easier to understand via video so check it out here! I hope you try out the Carousel Cards Technique and feel free to share it with me! I would love to see what you come up with!
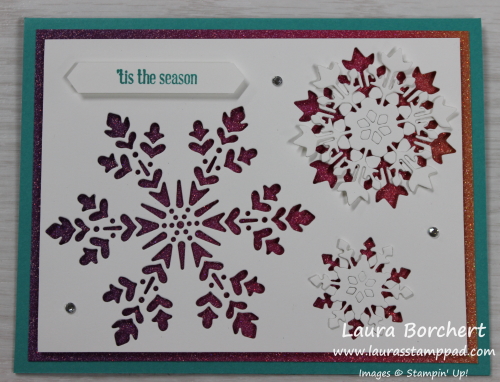
Disclaimer: Still not a fan of winter! LOL I sure have been stamping a lot lately with snowflakes and wintery themes as I’m working on my Christmas Cards. One of them is this gorgeous Rainbow Snowflakes Card!!! What do you think?
I just love the bright colors….surprise, surprise. 🙂 Also, this card is fairly simple to create with few layers and minimal stamping! The die cutting and poking out can make a person go crazy though! LOL
I started with a Bermuda Bay card base and then layered on a piece of that AMAZING Rainbow Glimmer Paper. This stuff is so beautiful and brings happiness to my life for sure! Each sheet is ombre of purple, blue, green, pink, orange, and yellow. Since this piece is only 4″ x 5-1/4″, you can pick which colors you use for your card! You can see 2 different color combinations with the samples here!
Next, I took a piece of Whisper White cardstock (3-3/4″ x 5″) and die cut 3 snowflakes using the So Many Snowflakes Dies. Try to leave a small little spot to put a greeting. I went super small since I used a greeting from the Itty Bitty Christmas Greetings Stamp Set! After die cutting the snowflakes, I delicately popped out the two smaller ones.
Check out the photo above and below these words. In the sample above, all of the pieces popped out from the snowflake center so I added Fine Tip Glue Pen to the edges and glues them off set to the coordinating one. The center is just hanging there. In the sample below, the snowflake centers stayed in and I added a Stampin’ Dimensional to the center to hold them in place and popped the snowflake in the middle. There was no intention on these 2 options, it just happened and I went with it!
I added the Whisper White cardstock to the card front with Stampin’ Dimensionals. This gives that 3D look and makes it pop more! The greeting was stamped in Bermuda Bay from the Itty Bitty Christmas Stamp Set. I did it on a piece of scrap Whisper White as to not mess us my super cute snowflake piece after all of that work. You can always use your favorite punch or just snip the ends diagonal. Then I finished off the card with some Rhinestones for additional bling!
This card would be perfect for any occasion throughout the Winter season so leave off the greeting till you need a card and then add it on!
For the inside of the card, I simply stamped some snowflakes and a greeting from the Snowflake Wishes Stamp Set in Bermuda Bay! Click here for one click shopping for the items used in this Rainbow Snowflakes cards!!!
REMINDER: Christmas is right around the corner. Let your friends and family know what you want with a Stampin’ Up List! Fill this out and pass it out to anyone who asks! All of my contact information is on there for them to reach out and place an order for you or order online! I have already had fun being an elf this year and helping some with early shopping!
Happy Tuesday……Technique Tuesday at that!!! Fall is in full swing and one of the amazing things about it is all of the beautiful colors! Today, I’m going to show you how to create Fall colors in your stamping projects too!!!
This card uses the Rooted in Nature Stamp Set but really any stamp with leaves, trees, or any Fall image would work!! The technique is super fun and simple but note that each time it will come out differently….kind of like watercoloring! That part sometimes drives me nuts as I love the look and want to do it again but it comes out a bit different!
To get started you need to place your image on the table face up! Next, pick out your favorite Fall colors. I used Crushed Curry, Cajun Craze, Pumpkin Pie, Cherry Cobbler, and Early Espresso. I found that inking up the entire image in the lightest color (Crushed Curry) helped give the stamp a nice all over coverage and you didn’t have to worry about missing a spot. Then, using a Sponge Dauber, I lightly dabbed ink in each of the other colors randomly on the stamp. Starting with Early Espresso on the tree trunk as well as 2 little spots with branches up in the tree. This kind of gave a green look on the stamped image but that still works!
Continuing on with each of the other colors, dab a little bit of ink all around. I did find that I needed to really focus on where I was dabbing each time so I didn’t always hit the same spot. This is what happens when you talk while stamping or try to multi-task. LOL Once you have all of your colors on, it’s time to stamp it down onto the cardstock.
Like I mentioned before, each time you stamp it will come out differently! Also, be sure to clean the stamp after each time since you won’t want to contaminate your Crushed Curry Ink Pad. The card below was actually stamped quickly a second time which resulted in a fabulous look just a bit lighter. This made all the hard work I did for the one image work for me again! 🙂
I used greetings from the same Rooted in Nature Stamp Set and layered this piece on Cajun Craze or Cherry Cobbler! The card bases are all Crumb Cake! To add some texture to the cards, I used some of the Early Espresso Faux Suede Ribbon and some of that soft cheesecloth type ribbon from the Forever Greenery Ribbon Pack. I love them all even though there is just a bit of difference in each!
I hope you try out this fun technique to create Fall colors on your next project! If you would like to see the list of supplies I used, check that out below!
Happy Tuesday!!!! I have a fabulous technique to share with you all today!!! Woot Woot! I’m creating an easel card today that is perfect for a Wedding or Anniversary. You could always change up the colors and sentiment for any occasion though!
I got the idea for this card from the fabulous stamper, Kim Peck at a recent virtual Stamping Event! I decided to change up the colors and the designer paper for a new look!
This card is super simple to create! It uses very minimal supplies actually! Any time you have leftover scraps of designer series paper, this is the perfect card to make. Add a little stamping and some embellishments to hold the easel up and you are golden! The best part is that it still folds up nice and perfectly for a regular sized envelope! Woot Woot!
To see this Easel Card in action, check out the video below or click here. Be sure to give the video a thumbs up if you liked it and don’t forget to subscribe if you are new. If you would like a notification when I post a new video, be sure to click the bell right next to the subscribe!!!
It’s Technique Tuesday!!! The Forever Greenery Suite contains the Greenery Embossing Folders which are super popular and why they are currently on backorder. Don’t worry they will be back in stock the first week of August!!! Check out this fun card!
The embossing folder makes this card have amazing texture and a cool greenery pattern. All I did was layer it all together for a fun look!
I started with a Just Jade card base. Next, I took a piece of Just Jade measuring 3″ x 5-1/2″ and embossed it with the Greenery Embossing Folder. Before adding this to the card front, be sure to add your greeting. I simply took a 3/4″ Whisper White scrap piece and stamped my greeting and placed it diagonal on the embossed piece. Snip the ends to make it fit and you are golden. This way you don’t have to worry about getting the angle correct or snipping off your stamped image.
Next, I added adhesive along the back of the embossed Just Jade along the long side. Then I added some In Color Designer Series Paper strips to each side. This strip can peak out a lot or just a little. Then I added this layer to the card front and finished it off with some Gilded Gems for texture and bling!
To see this Forever Greenery card in action, check out the video below or click here. Be sure to give the video a thumbs up if you liked it and don’t forget to subscribe if you are new. If you would like a notification when I post a new video, be sure to click the bell right next to the subscribe!!!
Happy Tuesday!!!! I’m excited to share a Technique Tuesday with you!!!! It’s been way to long for sure! 🙂 Today, we are creating a 2 Tone Flower with Sponge Daubers and it’s oh so fabulous! You all know how much I love flowers!!! 🙂
These flowers are just stunning and I am loving the color combination of Seaside Spray and Highland Heather so much! They are soft but yet still POP! For the centers of the flowers, I used Crushed Curry Ink and the leaves were stamped in Pear Pizzazz! One of the other bonuses to this card is the fact that it is all ONE stamp set – Blossoms in Bloom! When you can get a greeting and a fabulous image out of 1 set, it’s a killer deal in my opinion.
To finish off the card, I added Wink of Stella to the flowers for that amazing shine! Check out the video below to see what happens when you request even more glittery shine! 🙂 LOL It’s all good!
You will notice in the video tutorial I used Highland Heather behind the greeting rather than Seaside Spray as pictured above. Let me know in the comments which one you prefer!!
To see how to create a 2 Tone Flower in action, check out the video below or click here. Be sure to give the video a thumbs up if you liked it and don’t forget to subscribe if you are new. If you would like a notification when I post a new video, be sure to click the bell right next to the subscribe!!!
Happy Tuesday!!! You all know that means I have a fabulous technique to share with you today! I’m coloring foil paper to really make this amazing Flowering Foil Designer Paper shine!!!!
I just love how this card turned out! It’s so pretty and that color combination is fabulous – Highland Heather and Mint Macaron!
There are different ways to color the Flowering Foil Paper but you can also leave it as is with the white and foils! I colored with both sponge daubers and Stampin’ Blends. I prefer the Stampin’ Blends because I really like the clean look!
The piece on the right was done with all Sponge Daubers. The flower (Highland Heather) was really easy to do. The leaves (Mint Macaron) got a bit trickier as they come to a point and Sponge Daubers don’t have as precise of a point. Then when it came to doing those little buds (Calypso Coral) it got really messy. In order to make it look less messy, I filled in around the flowers with some Pool Party. It’s not horrible but not clean looking either. For the one on the left, I used Sponge Daubers for flowers and leaves and then Stampin’ Blends for the buds. I loved how that looked so then I did the 3rd one with all Stampin’ Blends and that’s the one I used on my card!
After coloring it, I layered it onto Highland Heather and then onto the Mint Macaron card base! I used the Tags in Bloom Sale-A-Bration Stamp Set and Label Me Fancy Punch for the greeting! It’s perfect for any occasion! Don’t forget that Sale-A-Bration ends a week from today!!! Also, my Free Stamp Set of the Month for this month is Full of Happiness. You will get this set for free when you order $75 or more before tax and shipping!
To see the different ways for coloring foil paper, check out the video tutorial below or click here. Be sure to give the video a thumbs up if you liked it and don’t forget to subscribe if you are new. If you would like a notification when I post a new video, be sure to click the bell right next to the subscribe!!!
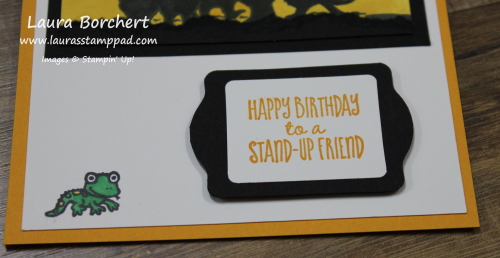
The cuteness factor: HIGH! The amazing view factor: HIGH! Fun technique factor: HIGH! This Meerkat Silhouette Sunset card is just adorable and I’m going to share with you how to make it!!!
I started with a Mango Melody card base. Next, I took a piece of Whisper White (4″ x 5-1/4″) and stamped the lizard in the corner and added it to the card front. I just had to add him to the card because he’s adorable!
Next, I took a piece of Whisper White and stamped the meerkats on there in Memento Black Ink. Then using the Dark Basic Black Stampin’ Blends Marker, I colored them all in. Then I placed a 1-1/2″ scrap circle over the center of the card. It should cover up some of the meerkats. Starting with Mango Melody, I sponged the color around the circle making sure it didn’t move. Next, I took a Daffodil Delight Sponge Dauber and colored the rest of the way out, making sure to blend the colors together. Be sure to go over the meerkats so the color gets everywhere. Now you have that fabulous sunset and silhouette look.
In order to make the meerkats not look like they were floating, I took a scrap piece of Basic Black and ripped it along the top. Then I placed this under the meerkats and trimmed off the excess. This layer was added to a Basic Black piece of cardstock before adding it to the card front. This makes the image pop more!!
For the greeting, I stamped it in Mango Melody Ink. All of these images are from the Sale-A-Bration Gangs All Meer Stamp Set. Woot Woot for free stamps! Using the Label Me Lovely Punch, I layered these images today. I just trimmed off pieces of the punched image to get a different look. Check out this video on that! I’m still debating on where I want to add a few rhinestones either above the lizard or on either sides of the greeting. The yellow/orange ones in the Holiday Basics Rhinestone Pack would work perfectly!
To see the Meerkat Silhouette Sunset all in action, check out the the video tutorial below or click here. Be sure to give the video a thumbs up if you liked it and don’t forget to subscribe if you are new. If you would like a notification when I post a new video, be sure to click the bell right next to the subscribe!!!
Happy Tuesday!!! This is just the cutest birthday surprise ever! I am just loving the Birthday Bonanza Suite! It is so much fun and sooooo cute!!!
This card is super cute and actually super easy to make! Let’s get started!
I started with a Coastal Cabana card base and then I cut 2 inches off the front panel. You could also cut the cardstock at 4-1/4″ x 9″ and score it at 5-1/2″. This would result in the same look. It just depends on which way you want to go. Next, I layered Crushed Curry and Birthday Bonanza Designer Series Paper on that front flap!
For the greeting, I used the Bonanza Buddies Stamp Set and the Label Me Lovely Punch! After stamping the greeting in Memento Ink, I punched it out with the Label Me Lovely Punch. Then I punched another one out in Coastal Cabana and cut it in half. Add a dab of adhesive to the back top side of the greeting and then press it onto a piece of the Coastal Cabana label allowing a nice layer of that color to show on the top. Then do the same to the bottom half. When adding this piece to the card front, just be sure to only add adhesive to the top portion of the greeting so it sticks to the top flap but doesn’t seal your card shut. Check out the video tutorial below to see this all in action!
For the inside of the card, I added a piece of Whisper White measuring 4″ x 5-1/4″. The greeting and presents are from the Bonanza Buddies Stamp Set. Thank goodness for photopolymer stamps so you can line up those images! 🙂
Check out more samples using these items here, here, and here! To make this birthday surprise card, just get the supplies listed below!
To this this all in action, check out the video tutorial below or click here. Be sure to give the video a thumbs up if you liked it and don’t forget to subscribe if you are new. If you would like a notification when I post a new video, be sure to click the bell right next to the subscribe!!!


")
 Designer Series Paper")


 Designer Series Paper")


")

")


 Faux Suede Trim")


")


 Designer Series Paper")
")


")


 Textile Ribbon")
")


")


