Fabulous Friday!!!

Posted on

HAPPY 4th OF JULY! Let the FIREWORKS begin! Check out these amazing deals before you head off for a weekend of fun or a neighborhood BBQ! These deals are HOT HOT HOT!!!!

Buy 3, Get 1 Free Designer Series Paper, www.LaurasStampPad.com

Buy 3 Packs of Designer Series Paper and Get 1 for FREE!!! I love this special at this time of the year because with the new catalog just coming out, all of the Designer Series Paper is NEW! With this special, you can stock up and try them all! So far, I am loving the Sweet Taffy because I love the bright colors!!! To see all of the Paper Packs you can pick from, click here! Also, if you need ideas for Designer Series Paper, check out these and these!!!

Weekly Deals 7.1.14

Of course, the Weekly Deals this week are HOT HOT HOT as well! I’m super excited about the Label Bracket Punch because I’ve been eyeing it for awhile and now it is going into my Cart!!!! Can’t pass up a sale!!! 🙂

Don’t forget to sign up for My Paper Pumpkin before July 10th so you can get in on this month’s kit!!!!

Happy 4th of July! Have an amazing weekend!

~Laura


Quick & Simple Work of Art Cards!!!

Posted on

Patriotic Word of Art, www.LaurasStampPad.co

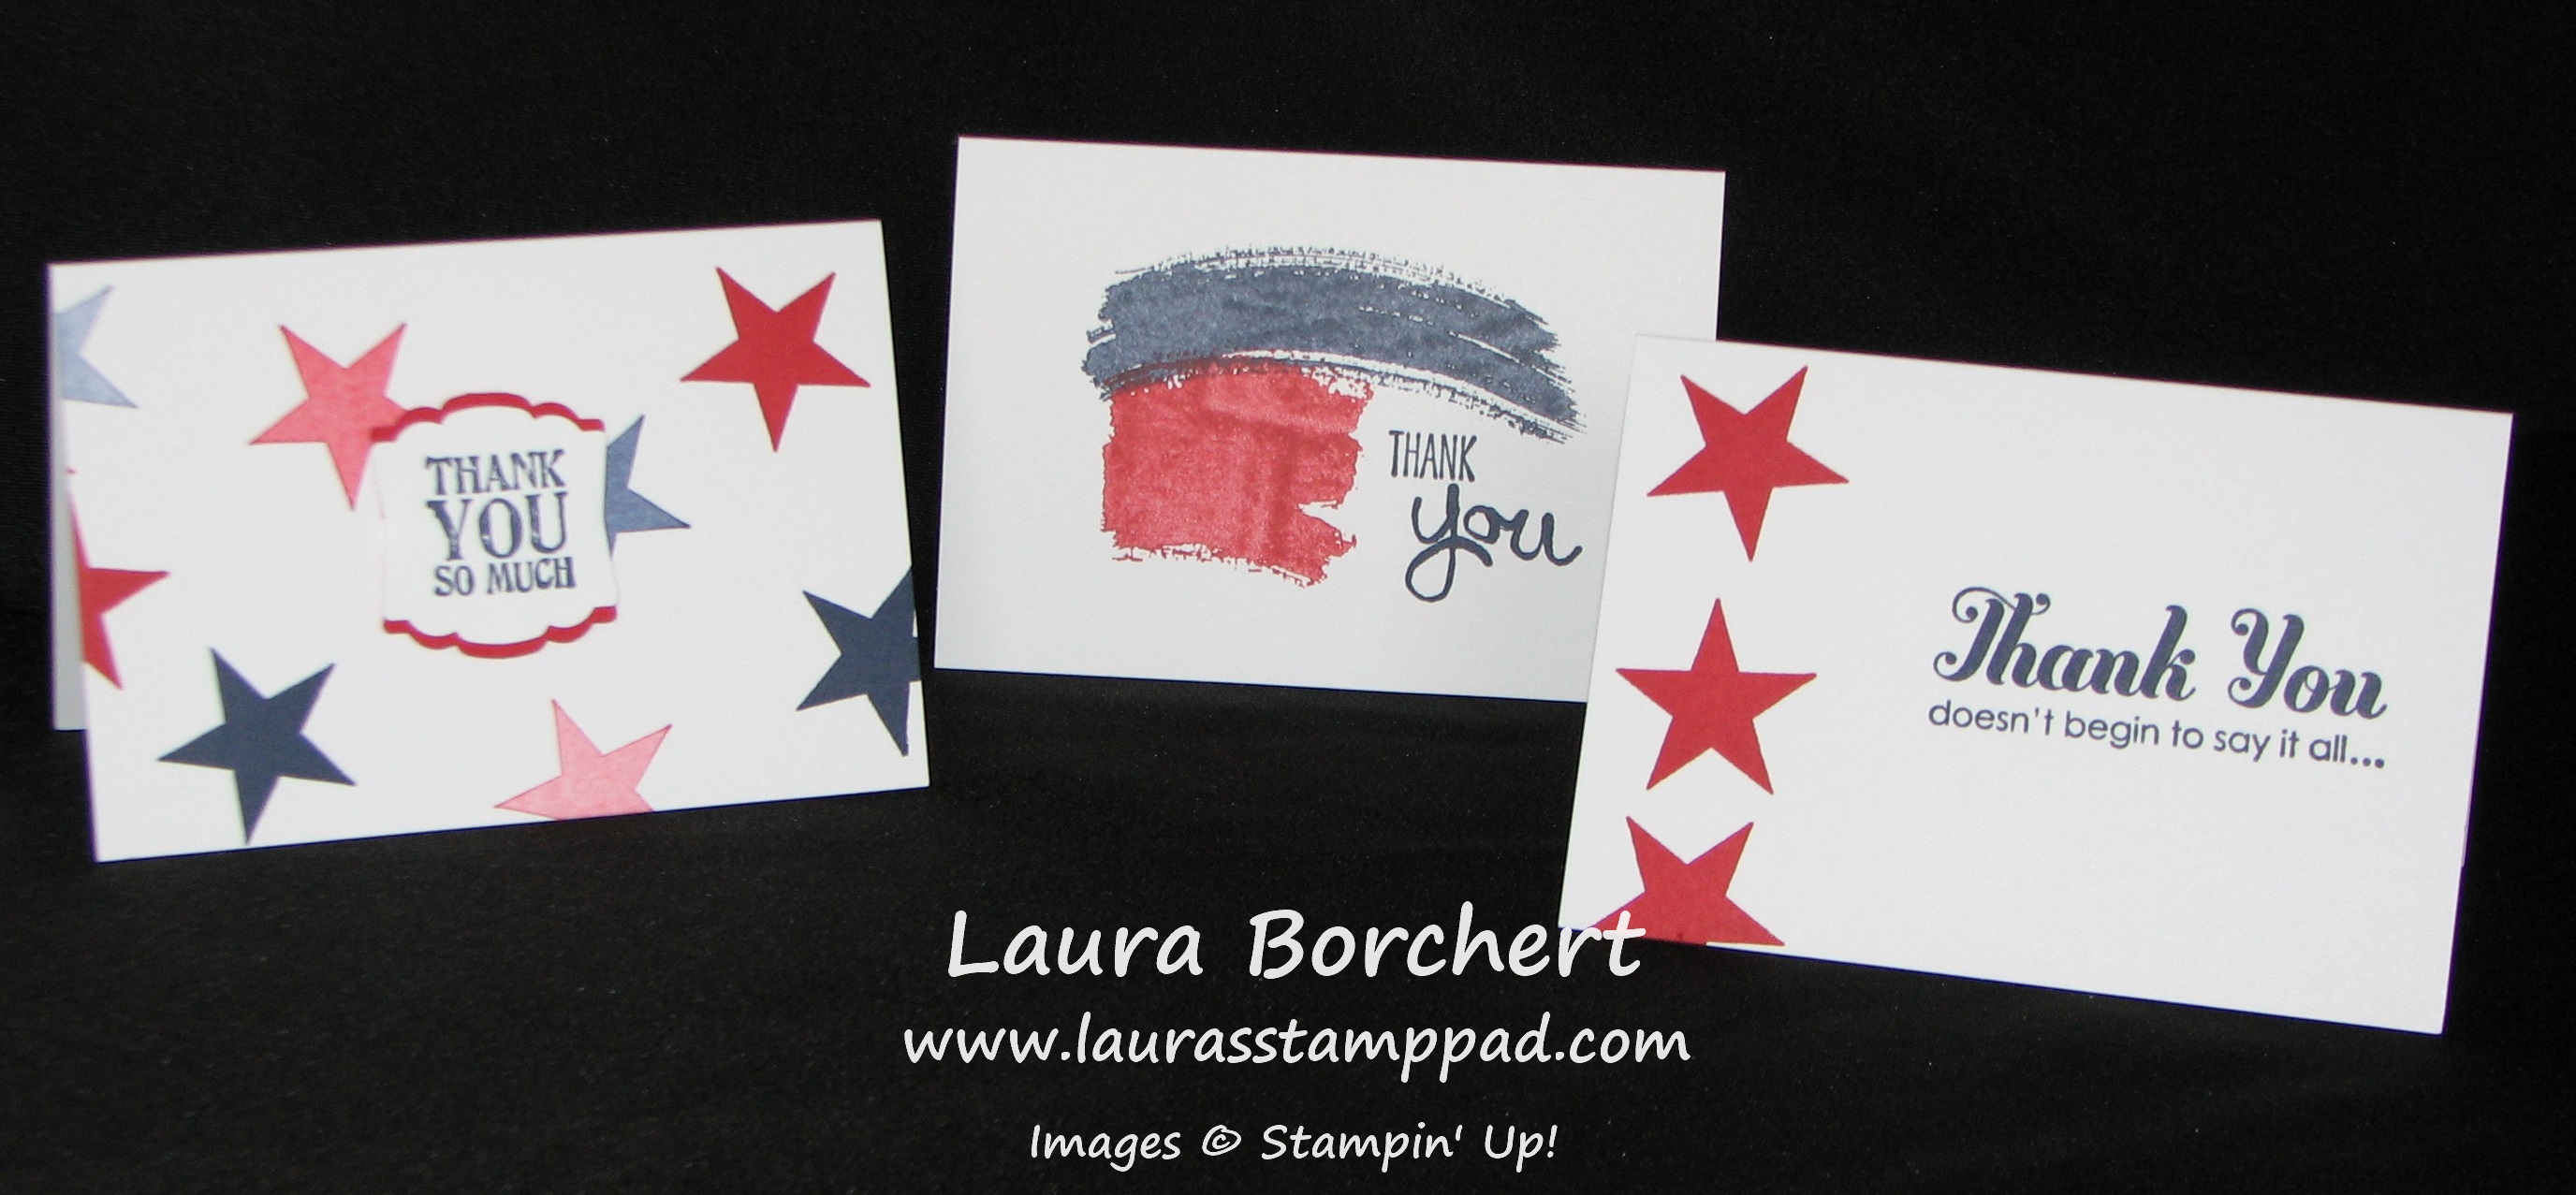
Aren’t these cards amazing??? I got out my Notecards and Envelopes Pack, Night of Navy Ink Pad, Cherry Cobbler Ink Pad, Work of Art Stamp Set, Perfect Pennants Stamp Set (the star), and Lots of Thanks Stamp Set! Boom! Amazing cards! There is no adhesive or layering on these cards so they really are quick and simple! The card on the far right was created by inking up the image and stamping all the way down without re-inking! I love the color variations you can get with just one color!

Patriotic Word of Art, www.LaurasStampPad.co

Here are a few others! The card in the middle was created at the same time as the card in the middle in the top photo. The top photo has the full strength ink and the bottom photo has the 2nd Stamp Ink which is why is it a shade lighter. Doing that really makes card making go fast! Now I did add a little cardstock and punching to the card on the left above! 😉 I needed the greeting to POP so I stamped the greeting onto Whisper White and used my Artisan Label Punch and then a second one to layer behind in Cherry Cobbler!

You can also check out my amazing Patriotic Wreath here! And be one the lookout for more quick and simple Work of Art Cards coming next week! 🙂

Happy Stampin’

~Laura


Fun with Fringe Scissors!!!!

Posted on

I have had so much fun with the Fringe Scissors since they arrived on my doorstep from the Big Brown Truck!!!!  I love making grass so easily like in this card and this card! But then I wanted to think outside the box and see what else I could come up. It seems when we play with them at all of my classes, the ladies always mention cutting hair…..that scares me a bit but check out these other amazing ideas!!!

Fabulous Fringe Scissors, www.laurasStampPad.com

Okay, I’m beyond excited about this card because it has so many of my favorite colors, the word Fabulous :), and some bling – Rhinestones! I love it!!!! I used Elegant Eggplant, Tempting Turquoise, Daffodil Delight, and Melon Mambo! I then tied some White Organza Ribbon along the time of the fringe pieces. I used Daffodil Delight Seam Binding in a few others as well! Then for the greeting….LOVE IT….Million and One Stamp Set! Here is a video showing off the Fringe Scissors! I hope you enjoy it and if so be sure to click the thumbs up button and don’t forget to subscribe so you don’t miss out on any of my videos!

Happy Cuttin’

~Laura


The Blendabilities are HERE!!!!

Posted on

Blended Bloom Blendabilities, www.LaurasStampPad.com

The Blendabilities are available starting TODAY!!!!! I’m so excited for you all because these new alcohol markers are lots of fun!!!! What are Blendabilities you ask? These are alcohol based markers (the regular markers are water based) and they come in packs of three (light, medium and dark). This is so you can blend the colors and create an amazing shade of color or that watercolor look! I’ll admit I’m not sure I have the technique down to an art yet but they are still super fun! The following colors are available starting today – Cherry Cobbler – #130995, Coastal Cabana – #131000, Daffodil Delight – #130998, Old Olive – #130999, Pumpkin Pie – #130997, Rich Razzleberry – #131003, and the Skin Tone Assortment – #129370! You can also start ordering the Memento Ink Pad & Refill which you will need to use to stamp your image in. This is a water based ink (similar to using Stazon which is a alcohol based ink for watercoloring). You can start ordering the Color Lifter as well. This is a marker which will lift (lighten) the area you wish. So if you color in a vase and would like it to look lighter along the left side to create a 3-D effect, you would take your color lifter and color a line along that left side. As a Demonstrator, I was able to pre-order these and here are a few of my creations! The one above was using the Cherry Cobbler Blendabilities but I layered it onto Real Red Cardstock!

Blended Bloom Blendabilities, www.LaurasStampPad.com

This one was created with the Rich Razzleberry Blendabilities and I layered it onto Daffodil Delight and Rich Razzleberry cardstock.

Blended Bloom Blendabilities, www.LaurasStampPad.com

This was one of the first ones I created and I feel like I got better the more I played with them. This one uses the Coastal Cabana Blendabilities and I layered it onto Pool Party and used my Chevron Embossing Folder! Can’t wait to play more with other images! I used the Blended Bloom Stamp Set in all of these!

If you would like to check out this Video that Stampin’ Up created to showcase these amazing markers click here!

Happy Blendin’

~Laura


Oh Little Lions Video Tutorial!!!!

Posted on

Lion made with Fringe Scissors, www.LaurasStampPad.com

I can’t believe how many of you are just loving my little lions! I think they are super cute too!!! For the full post on these that went up last week, click here! I got a request to do a Video Tutorial so I have created one for all of you!!!

Be sure to click the little thumbs up button to show you love and don’t forget to subscribe to my Channel so that you don’t miss out on any other videos. And as always, if you have a request, put it in the comments below!

Happy Stampin’

~Laura


Silver Doilies!!!!

Posted on

Hello There Silver Doily, www.LaurasStampPad.com

I love this card for so many reasons…..the amazing Elegant Eggplant color, the purple Rhinestones, the Silver Embossed Tea Doily, and the brushed edges!!!! It is just amazing! My card base was done in Wisteria Wonder and then I brushed Elegant Eggplant on the edges of the Whisper White cardstock with my Sponge Daubers (love them)!!! For the Silver Doily, I took my VersaMark Pad and pressed it into the Tea Lace Doily all over. Then I poured Silver Embossing Powder all over it and heated it with my Heat Tool to set it! It becomes so shiny and fabulous! It does curl along the edges which I loved for a little texture and 3-D look but it eventually flattened out more so no worries if you want it nice and flat. I stamped my greeting from the Hello There Hostess Stamp in Elegant Eggplant and added a few flowers from the Itty Bitty Punch Pack. For the adorable purple Rhinestones….you can use your Blendabilities to color them (available July 1)! LOVE IT! Now you can have matching pearls and rhinestones on your project! Here is an up-close look at the card!

Hello There Silver Doily, www.LaurasStampPad.com

I hope you enjoyed this card and try embossing your doilies! I think a gold one would look amazing too! Let me know in the comments below if you try it out and what colors you used!

Happy Embossin’

~Laura


Fabulous Friday!!!!

Posted on

Happy Friday!!! Another week has gone by and that means July is right around the corner…craziness! That means that the 4th of July is right around the corner and I’m just DYING to show you this fabulous project!!!!

Paper Pumpkin Wreath, www.LaurasStampPad.com

Oh I am loving this! It is just perfect for this time of the year! This was created with my June Paper Pumpkin Kit. It came with all of the items you see below!

June Paper Pumpkin Kit, www.LaurasStampPad.com

YES! All of that! There are 24 Die-Cut Pinwheels, 24 Silver Brads, 24 Red & White Straws (love these), 3 Stamps, Night of Navy Stampin’ Spot, 24 Silver Mini Paper Clips (not like real paper clips, but these look kind of like paper clips), 24 Treat Bags, Bakers Twine, Mini GLue Dots, and White Banners! This kit is AMAZING! I’m not throwing a 4th of July Party so I was trying to see how I would use this kit. Then I saw my wreath out front and thought it needed a new makeover and BOOM….idea hit. I made all of the pinwheels and hot glued them to a foam wreath. There were a few left over even! Woot Woot! Now I still have the treat bags and everything else to make someone else with! I love it! I plan on holding on to the wreath for Labor Day in September as well! If you would like to sign up for My Paper Pumpkin, click here! Also, you can gift My Paper Pumpkin with a pre-paid subscription or purchase one for yourself to get a discount on your subscription! Click here to check that out! Be sure to sign up before July 10th to get in on the July Kit! I can’t wait to see what arrives in July! Eeeee

Weekly Deals 6.26

Of course I wasn’t going to leave you stranded with out this week’s Weekly Deals! Here they are! 🙂 I was just too excited about my wreath not to share it first!

Have a fabulous weekend! I’m spending mine with my whole family and I can’t wait!!!!

~Laura


Oh Little Lions!

Posted on

Lion made with Fringe Scissors, www.LaurasStampPad.com

Is this not the more precious thing ever? I love them! The little eyes make them come to life and the adorable little noses. Eeee So cute and super simple to create, all you need are a few punches! I used the Blossom Punch for the mane (2 overlapping). On each of the petals, I cut in once with my Fringe Scissors….be careful not to cut too deep or you will end up cutting pieces off! I also used 2 petals from the Blossom Punch for the little feet. For the face, I used my 1-3/8″ Circle Punch and sponge daubered (that’s a word, right? 🙂 ) the edges. The little cheeks were punched out with my 3/4″ Circle Punch and then I took my Chocolate Chip Marker to create the whiskers. I got the little heart nose from the Owl Builder Punch and added on the googly eyes! See how simple was that….just a few punches and you can create just about anything! I love how the fringe scissors add so much texture and fluff to the lion mane and of course make amazing grass too! The colors of cardstock that I used here are Pumpkin Pie, So Saffron, and Hello Honey. I did all of the edges with Hello Honey (I know it looks more brown but it’s Hello Honey)! The Happy Birthday greeting comes from Remembering Your Birthday Stamp Set!

I hope you enjoyed this punch art card and try it out on your own! Let me know in the comments below what your favorite punch art item is. You can check out more punch art cards here and another version of the lion here!

Happy Punchin’

~Laura


Celebrating 4th of July!!!!

Posted on

The 4th of July is next week and while I probably should have posted this fabulous card a week or 2 ago, better late than never right? This card would be perfect for a 4th of July Party Invitation or if you have a friend like me who’s Birthday is ON the 4th then you could send it to them! This would be great for Labor Day Parties as well so keep it in mind for a few months! 😉

Flag Work Of Art, www.LaurasStampPad.com

This amazing card was created with the Work of Art Stamp Set (I’m telling ya, that set is fabulous)!!! I used Night of Navy and Cherry Cobbler for the flag and brushed the edges with Baked Brown Sugar! For the Night of Navy, I used the larger “swish” that is in the Work of Art Stamp Set and then added a Silver Glimmer Stars using my Itty Bitty Punch Pack star! The stripes were created using the long straight image from the set. I thought the Baked Brown Sugar softened the edges and made the flag look more rustic! I added that with my Sponge Daubers! All of this was stamped on a piece of Very Vanilla that I ran through my Big Shot with the Top Note Die! The possibilities are truly endless with this stamp set! Of course, I want to give a shout out to Lizz Orr who gave me the idea for the card!

Happy Stampin’

~Laura


Have you seen the Northern Lights???

Posted on

Happy Tuesday!!! You know what that means…..I have an amazing technique to share with you!!! This was blows my mind because you start out with just three colors but it creates so many more! Seeing the Northern Lights is on my Bucket List too! Until then, I shall just make the Northern Lights in my craft room!

Northern Lights Technique, www.LaurasStampPad.com

Supplies Needed: Sponge Daubers, Tempting Turquoise Ink, Rich Razzleberry Ink, Daffodil Delight Ink Pad, Night of Navy Ink Pad, Lovely As A Tree Stamp Set, Label Collections Framelits, Chalk Marker or White Gel Pen

You will need a piece of Whisper White cardstock and the size will depend on the size of Framelit you would like to use. I used a piece that is 5-1/2″ x 4-1/2.” Starting with the Daffodil Delight and your sponge dauber, you will make do up and down making a stripe. Then move over about a 1/2″ and make another one, continuing across the cardstock. Next you will do the same with your Rich Razzleberry and then Tempting Turquoise. Be sure to overlap the colors a bit because that is how your will get a little orange and green in there too! Don’t worry if it looks super bright and colorful at this time! That is the way it should look! Using one of the trees from the Lovely as a Tree Stamp Set, stamp it in the center with Stazon! Now you can pick the size of Framelit that you wish to use and cut it out with your Big Shot! After you have cut it out, you will take the Night of Navy Ink Pad and Sponge Dauber and fill in the bottom portion using the stamped “ground” as your guide. Also, I brushed the edges of the entire image as well. You can go over the entire image very lightly with the Night of Navy as well for a more subtle look. Then using your Chalk Marker or Signo White Gel Pen, makes dots all over your card for a starry look! Now you are all done and you can add it to your card. I layered mine onto a piece of Basic Gray that was ran through my Big Shot in the Perfect Polka Dots Embossing Folder and then only a piece of Night of Navy. I added a little Silver 1/8″ Ribbon too! In case some of the instruction listed above were a little confusing, here is a Video Tutorial for you to see this card in action!

I hope you enjoyed this technique and try it out! I want to thank Kay Kalthoff for this fabulous idea! Also, be sure to leave a comment down below and let me know what you think!

Happy Stampin’

~Laura