Happy Friday everyone! It is a Fabulous Friday because it is a holiday weekend!!! Before jumping into the weekend and end of the month, I wanted to share some reminders with all of you!!!
I’m starting with my favorite and most exciting one which is this amazing deal for Paper Pumpkin! I just love Paper Pumpkin because of the surprise, the wrapped up like a present, and ALL THE GOODIES it contains. There is always so much product and stuff in each box. It is totally worth it at the normal price but now at 25% off. Anyone who hasn’t tried it, totally should for at least these 3 months. It is normally $19.95 plus tax which ends up being just over $20. With the Promo Code: STARTHERE, it’s only $14.95 plus tax! You get a clear block to use on all of your clear stamps, stamps, ink, and supplies! How fabulous!?!?!? Click here to get signed up! Or course you also get a card from me each month as well! Who doesn’t love happy mail!?!?!
This is the last Fabulous Friday that you can purchase the Eastern Palace Suite in a Bundle! The Sneak Peak Promotion Bundles will no longer be available after May 31st! In June, all of these items will be sold individually and you will not get the free gift! There are 2 options of bundles – the Starter Bundle & the Premier Bundle! You can see samples using these products here, here, and here!
Next Wednesday is the last day to get the items that are Retiring. You can see the complete list of retiring items here! Many of the items have sold out already so be sure to shop from here to see what is left and what is on sale!!! Some items are 50% off!!! Great chance to get some goodies at a steal!
I hope you all have a wonderful weekend! I would like to thank all of the men and women for their great sacrifice and all they do and have done! THANK YOU!
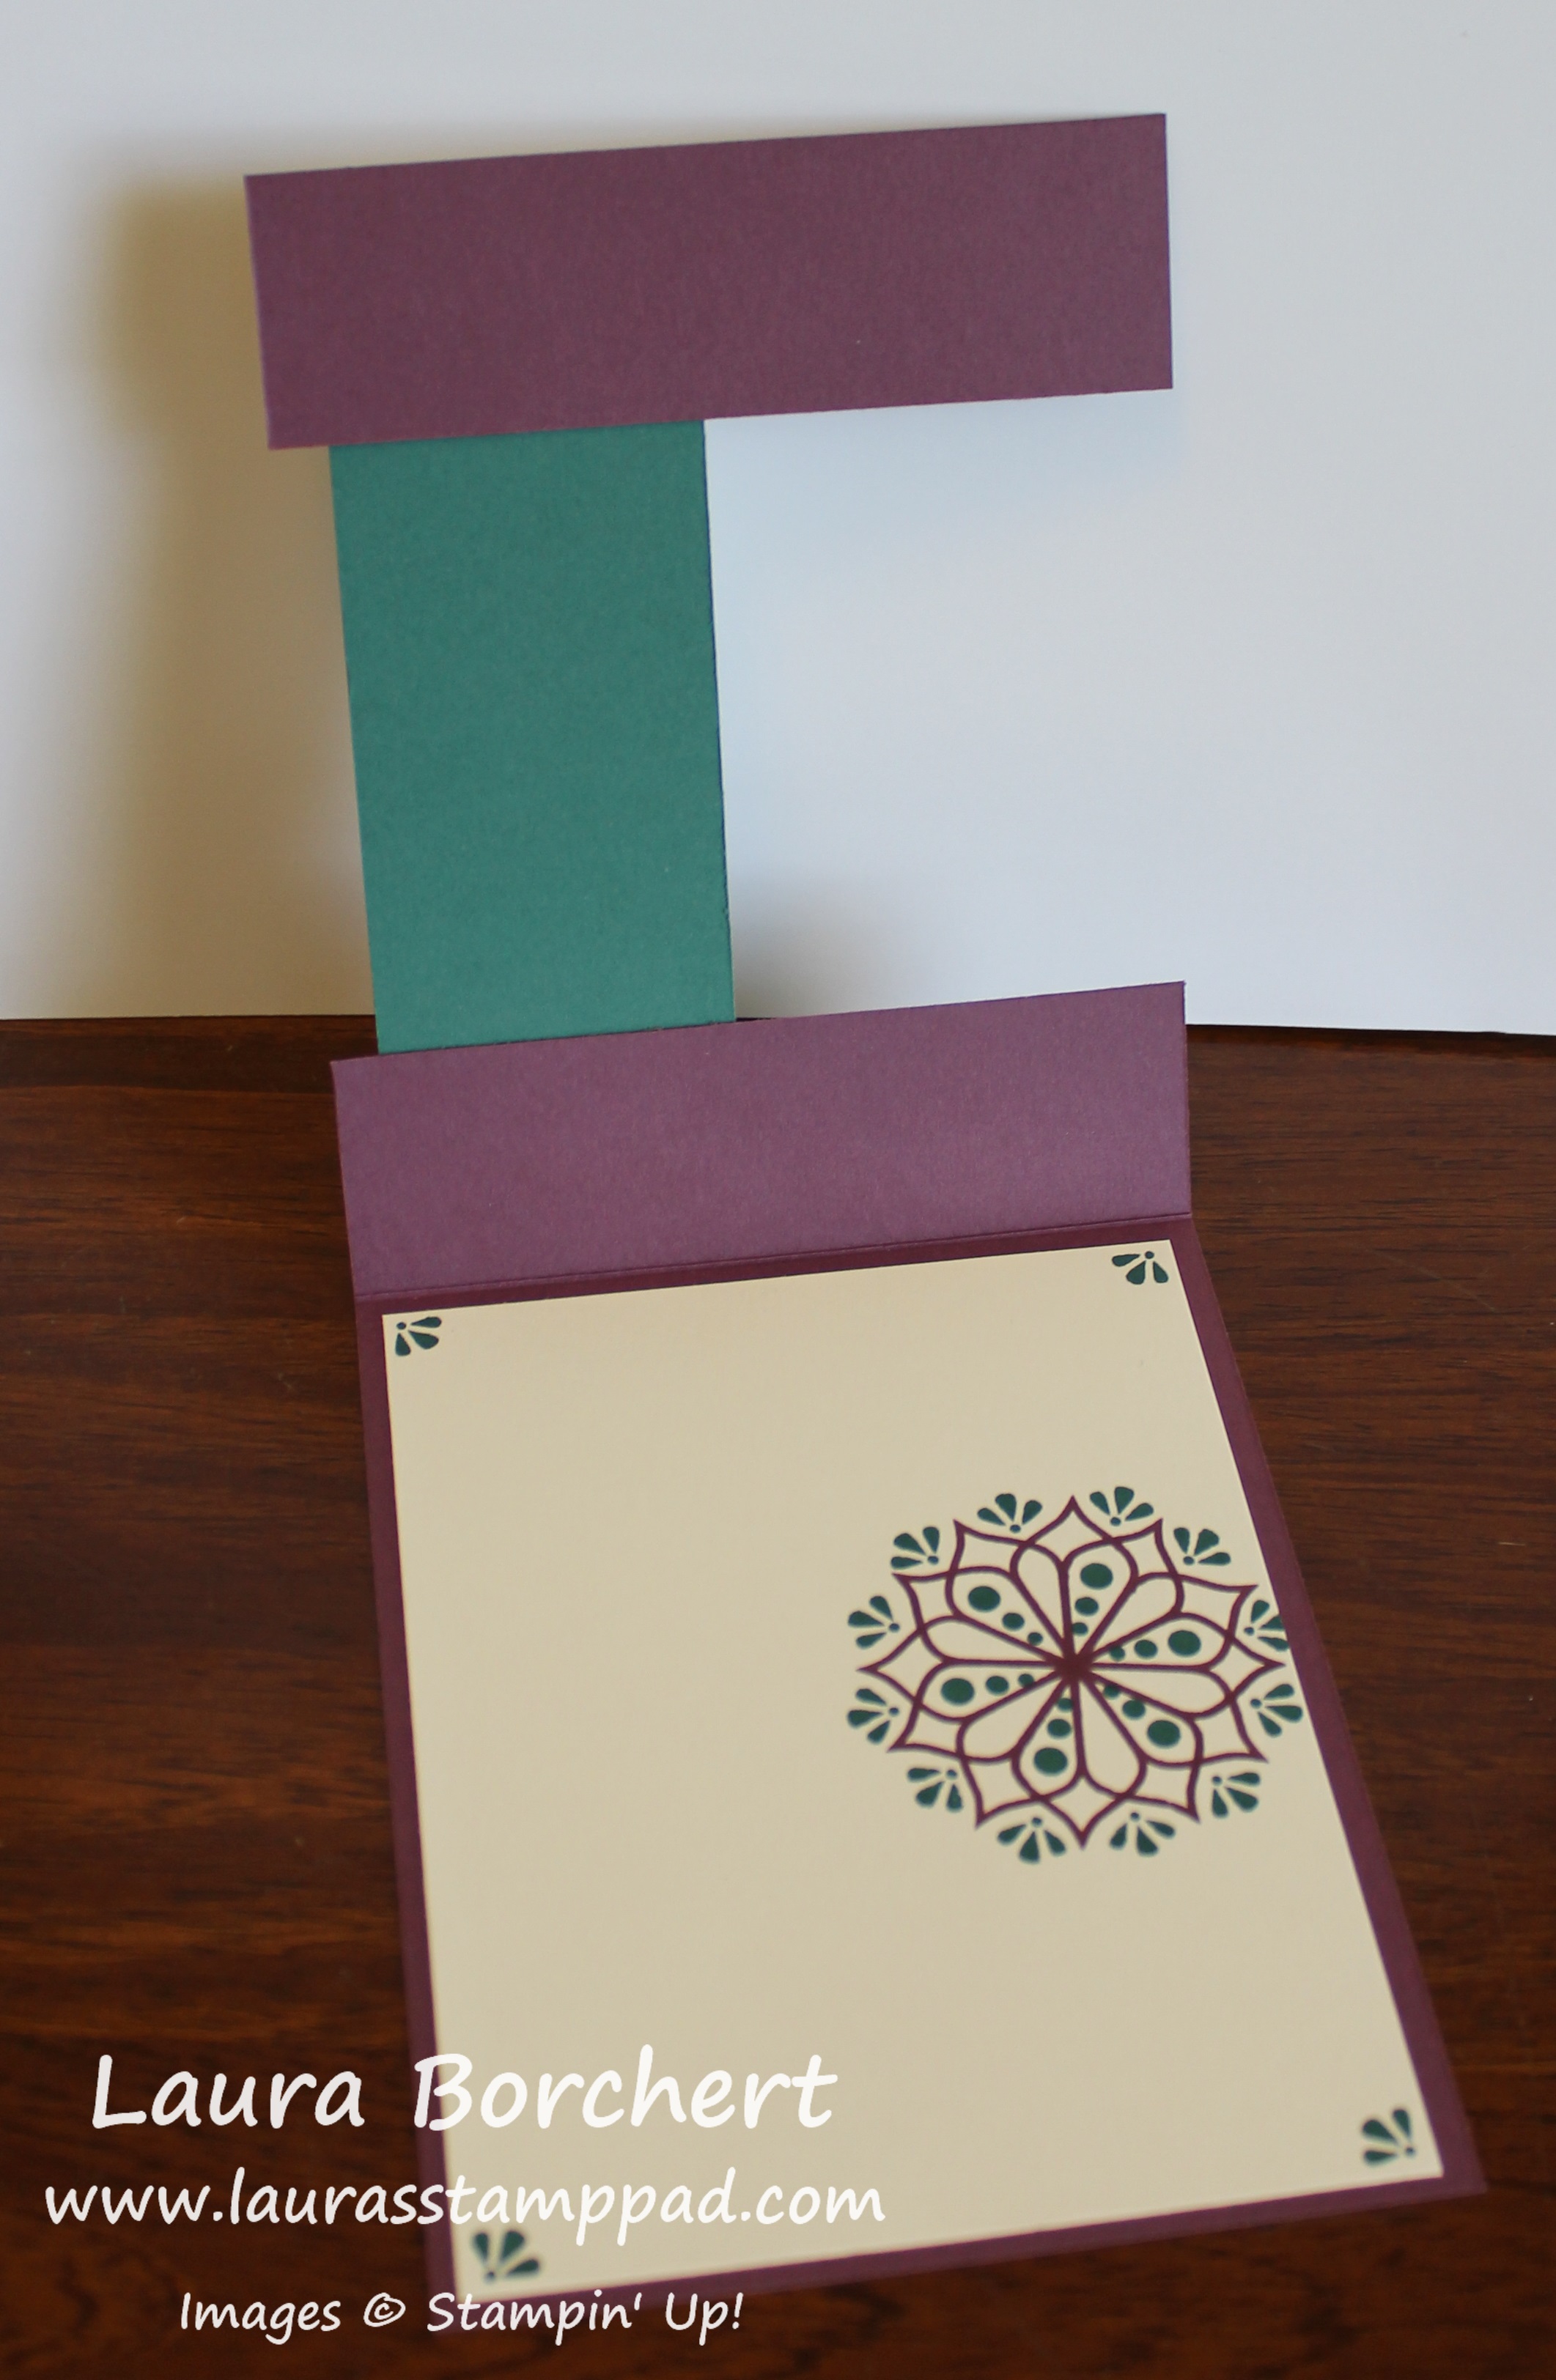
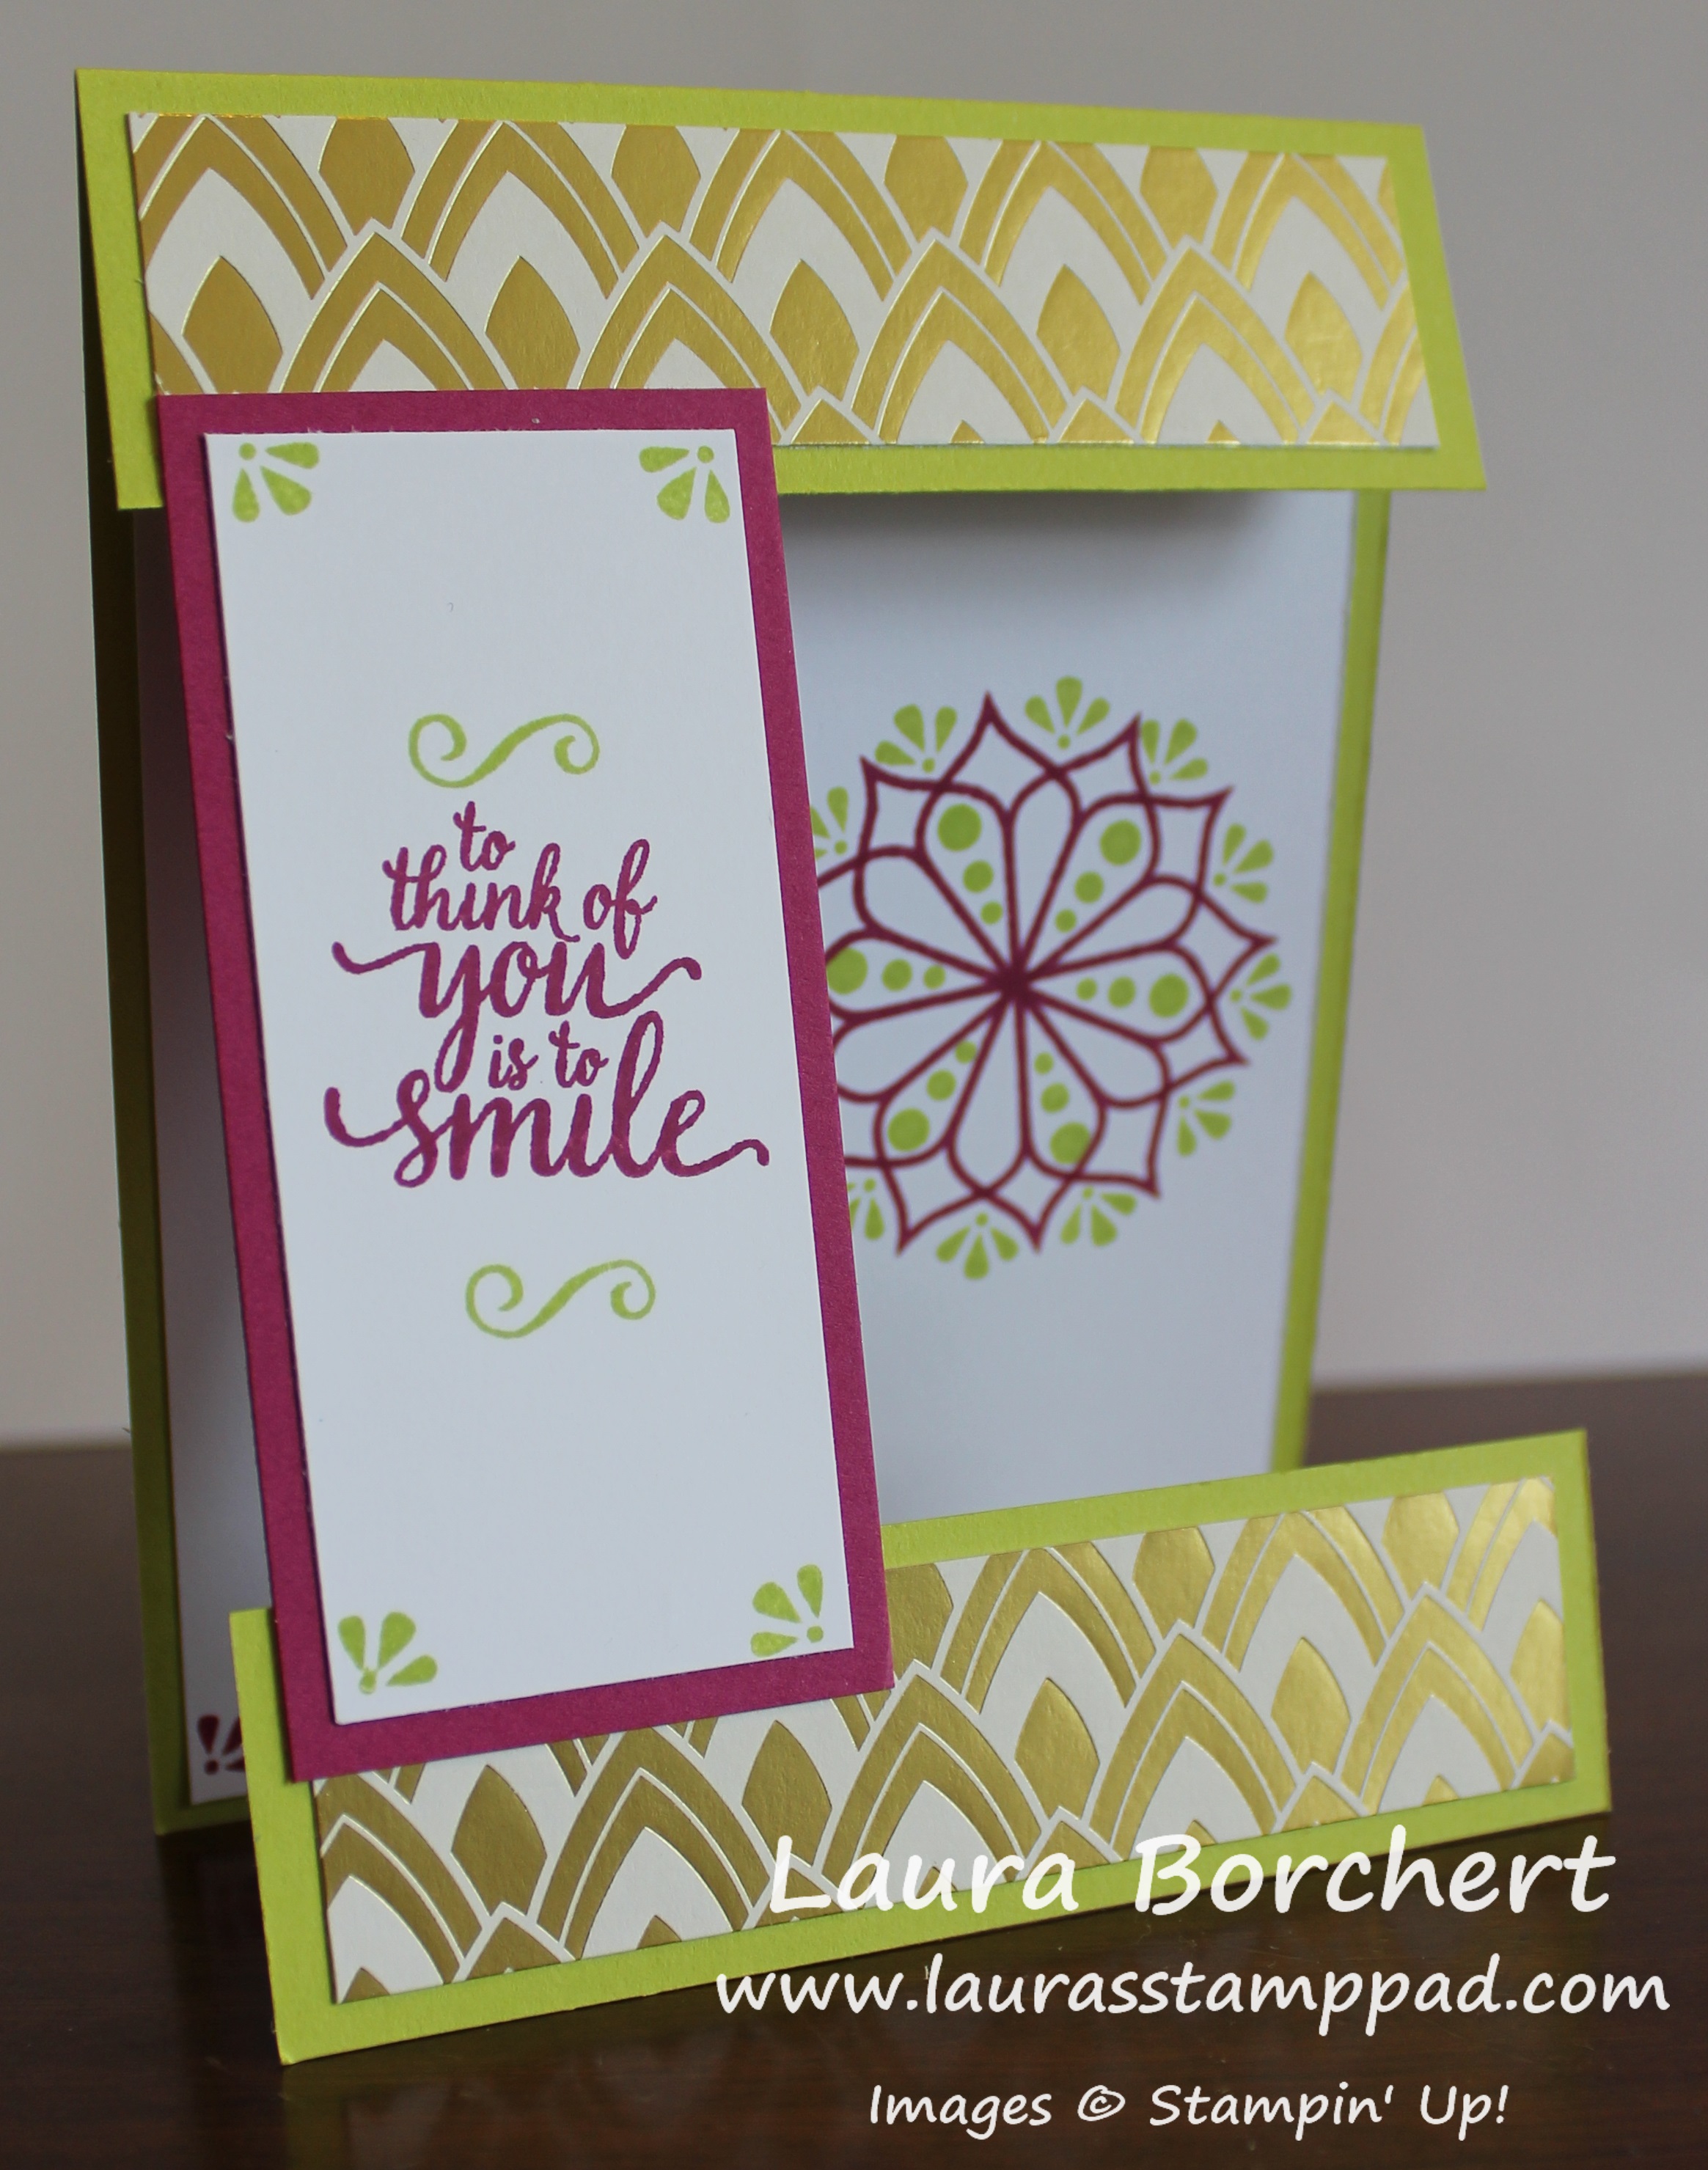
I fell in love with this card style when I got a swap card last November at Stampin’ Up! OnStage. The partial front peek through is just so cool because you can see the inside of the card! Check this out!!!!
See how the front of the card is only on the top, bottom, and left hand side. The inside of the card is peeking through on the right hand side! Super fun and cool and goes perfectly with the Eastern Palace Suite. Check out these cards for more ideas using this Suite. So let’s get started!!!
I started with a piece of Fresh Fig measuring 6-3/4″ x 4-1/4″ and scored it at 5-1/2″ to create the card base. Next I cut another piece of Fresh Fig measuring 1-1/4″ x 4-1/4″ for the bottom portion. The middle section that connects the top and bottom is Tranquil Tide (1-3/4″ x 3-3/4″). I layered on some of the Eastern Palace Designer Series Paper with that gold foil! Tip: Be sure that the pattern goes in the same direction on the top and bottom!
Since I didn’t want the front of my card to fall apart, I used Tear And Tape, which is super strong, to attach the front. The Tear And Tape is the perfect slim amount too! I placed that on the top and bottom of the Tranquil Tide and pealed off the top. The sample above wasn’t done like this but I found that in the others I created it was best to line up the edge of the Tranquil Tide with the edge of the Designer Paper and place it on the top portion just enough to cover the tape. Next, place the bottom portion of the card lined up on the bottom of the card, peel off the adhesive and close the card to adhere it to the bottom.
Now that the partial front is complete, let’s stamp. I took a piece of Very Vanilla measuring 1-1/2″ x 3-1/2″ and stamped the greeting and decoration using the Eastern Beauty Stamp Set. All the little decoration pieces in that set are super fun! Afterwards, I added that to the partial front piece. For the inside, I took a piece of Very Vanilla measuring 4″ x 5-1/4″ and placed it inside the card. I didn’t adhere it just yet, just in case I made a boo boo.
Closing the front of the card, I stamped the flower image in the opening. This way I knew it would be peaking through in the right spot! After stamping the first flower, I was all set to stamp the rest of the images so I pulled the cardstock out. For the flower, I inked it up again and stamped it over the top of the other one but rotated around just a bit. Then I filled in with the other fun images!
This was the sample I created in the video!!! I love the colors and it was super fun to create! If you would like to see it all in action, check out the video tutorial below or click here! Don’t forget to give it a thumbs up if you liked it and be sure to subscribe if you are new!!
Every time the New Catalog comes out in June, I hold a Girls Night Out Stamping Event! Don’t worry, there is a Girls Morning Out as well since I do it at 10 a.m. and 6:30 p.m.! I also like to travel over to see my Paris girls too so I have one over there on a Saturday! I thought I would share the invitations with you all today!!! Everyone is welcome to either of these events! Click here to see the Facebook Events for more information and RSVP! You can also email me your RSVP as well!
These invites were super quick and simple to create but adorable and fun too! I used the Eastern Palace Suite and just had fun with it!
I started by printing 4 invites on one sheet of Whisper White cardstock. Then I cut them into 4″ x 5-1/4″ rectangles. Using the Eastern Beauty Stamp Set, I stamped accents onto the invite for a little POP of color. I used the NEW In-Color, Lemon Lime Twist. I think that color is super fabulous for Summer time!! Finally, I layered the invite onto a piece of Melon Mambo measuring 4-1/4″ x 5-1/2″ which is a quarter sheet of cardstock. There is no waste there as I use every bit of the paper. I thought I would decorate the envelopes a little too but just a little bit more fun! Using the medallion, I stamped it once and then inked it up, rotated it a bit and stamped it again to create this flower. How amazing is that?!?!? I just love it!
See how quick and simple that was to create! This can be changed up for a baby shower, bridal shower, graduation party, birthday party or any type of celebration! I hope you try it out yourself for your next upcoming event!
If you are local to Maryville or Paris (Illinois), I would love to have you join in my Girls Night (Morning) Out Events showcasing the New Catalog in June!
Happy Tuesday!!! Today, I’m sharing an amazing technique with you – Eastern Elegance One Sheet Wonder! I know how much you all love One Sheet Wonders so here is another fabulous one! I am loving the Eastern Elegance Suite! It’s beautiful!
How amazing and beautiful are these cards?!?!?! I just love them and they were so quick to create because I used just 4 Ink Pads, 1 Stamp Set, 1 Framelit Set, and just a few colors! I used all Whisper White Cards Bases….except that one in Dapper Denim! 🙂 Now let’s get started on the cutting and assembling!
I started off by making lots of greeting tags. The Eastern Beauty Stamp Set has so many fabulous images to create the coolest greetings! I die cut them with the coordinating Eastern Medallion Framelits and they were ready to grab and go when I was assembling the cards! The colors I used were Tranquil Tide, Fresh Fig, and Lemon Lime Twist which are all NEW In-Colors!!!
I started out with a 12″ x 12″ piece of Eastern Palace Designer Series Paper and I cut it into 6″ x 6″ squares. With one of the squares, I cut it in half both ways creating four 3″ squares. Finally I cut 2 of those in half diagonally to create the top cards above and just used them as a square for the bottom two cards. I used a little bit of coordinating Fresh Fig and Tranquil Tide cardstock for layering. The stamps are from the Eastern Beauty Stamp Set!
Next, I took another 6″ Square and cut it into nine 1-1/2″ squares. I added those to the cards above in different ways with greetings and some of the Gold Vinyl Stickers to decorate!!! That gold tassel is just fabulous as well and not super bulky either! Bonus!
The next 6″ Square was cut at 4″. Then with the 4″ x 6″ piece, I cut it into three 1-1/2″ x 4″ strips. With the leftover piece of 2″ x 6″, I sniped off that last 1/2″ and used it for the lower right corner card. The other 3 pieces are perfect for layering across your card as a center band! I used Dapper Denim, Fresh Fig, and Tranquil Tide for layering on these cards!
For the final 6″ Square, I cut it at 5-1/2″. Using the 5-1/2″ x 6″ piece, I cut at 1-1/2 (along the 6″ side) to create four 1-1/2″ x 5-1/2″ strips. I really loved using the amazing stamp set to create background, borders, and greetings! The gold stickers are pretty amazing too for a little pop of bling!!! You can get all the items I used in this One Sheet Wonder in the Premier Bundle of the Eastern Palace Suite! I mean everything, even the Very Vanilla cardstock and envelopes which come FREE! This bundle is super fabulous and only available this month! Next month, each item will be sold individually and you won’t get the freebies!
To check out this One Sheet Wonder in action, see the Video Tutorial below or click here! Don’t forget to give it a thumbs up if you liked it and be sure to subscribe if you are new!!!
The May 2017 Paper Pumpkin Kit, Sprinkled With Love, is super cute and fun with it’s donut theme! I was able to make so many cards with this kit and all the leftovers. I love that about these kits. There is always so much product in each one!!! Sign up now with the Promo Code: STARTHERE and you can get June, July, & August at 25% off which makes it even more fabulous! Click here to get signed up!
LOOK AT ALL OF THESE!!!! I created 17 Cards and 9 Treat Bags with this kit!!! It technically states that it makes 9 cards and 9 treat bags but with all of the leftovers, I added a little bit of my own cardstock to create even more!!! Let’s look at it all!
So here are the original 9 cards that the kit creates! There are actually enough donut pieces (top and bottom cards) to make all the cards in the same style but I did 3 and 3 and then used the leftovers for my other cards! These cards were super simple to make and I just love the greetings. They are perfect for any occasion and super cute! Since my husband loves donuts, I got him to help me put this kit together. He did all of the pearl and sprinkle placement…….and then we went out to the local bakery for a donut! 🙂
I stamped all of the little greeting stickers so they will be ready when I am! The treat bags are the perfect size for a little something sweet and even have a nice score line to fold the top flap over! The gold twine adds a little extra bling to the treat! I did put one of the extra donuts on a treat bag for decoration. I thought this would be perfect to drop a Starbucks Gift Card into as a gift. Super cute and great to have on hand for a hostess gift or pick-me-up gift! I just love it!
These are all of the extra cards I created with the leftovers. I used Very Vanilla and Whisper White for my card bases. I added in some Pink Pirouette and So Saffron for a little bit of color! Then I just added the leftover pieces and tied some of the Gold Twine around it. I have 1 pearl and more twine to use on the treat bags left over. Oh, you can’t forget the Soft Suede Ink Pad and fabulous stamp set too!
Do you all love Paper Pumpkin as much as me??? You can see the unboxing and reveal of this kit here. My favorite part is the surprise of it each month. I also love that it is all wrapped up like a present. After all, we all deserve a present each month, don’t we?!?!?!
If you haven’t tried out Paper Pumpkin, what are you waiting for????? Sign up now with the Promo Code: STARTHERE and you can get the June, July, & August Kits at 25% off which makes it even more fabulous! That makes it like $15 for stamps, ink, a clear block, and all the goodies!!! Click here to get signed up today!
I thought I would go through and see what the Top 5 Blog Posts are from the past year – 2016-2017 Annual Catalog!!!! I wonder if they are some of my favorites?!?! Do they include items that are retiring?!?!?!
Something Borrowed One Sheet Wonder Set! Well I am not surprised to see this was #1!!!! I know that you all love this One Sheet Wonder so very much and look at this post a lot, everyday!
December 2016 Paper Pumpkin – This one surprised me a bit because I posted 12 Paper Pumpkin Kits in the past year and this was the best. I think it was because I did an alternative to what the kit actually was intended for. I made cards rather than a mini album!
Flower Bouquet One Sheet Wonder – not surprised to see another One Sheet Wonder! Also, this paper was just stunning! I loved it so much because you all know how much I love flowers and all the color!
Work of Art Holiday Cards! The Work of Art Stamp Set is so versatile and amazing! I’m excited this is one that you all love too! This set is not retiring which is super fabulous!
Fishy Shaker Card! This card is super cute and fun! Shaking all of the pieces around and seeing those little fish makes this card a major WOW!!!
The next few posts that were favorites included more of the One Sheet Wonders! I know how much you all love those. (SNEAK PEAK: I have another one coming next week!!!) 🙂
Let me know which of these is your favorite in the comments below! If your favorites wasn’t listed above, let me know which one it is! I can’t wait to share lots of samples with the 2017-2018 Annual Catalog! Until then, don’t forget that there are lots of retiring items in the current catalog. Some are even on super sale! Click here to start shopping!
I hope you all have a wonderful weekend and I’ll see you back here on Monday!
Today, we are creating a belly band!!! Using the So Detailed Thinlits, you can make a belly band or just a focal point on the front of your card! You may remember me showing off this card here which is just the focal point! Today, I’m showing you the belly band!
You can see how both of these cards look fairly similar. The card on the left is the one I posted before with the band across the front only. The card on the right has the belly band sitting on top. It will slide over the card securing it closed. The recipient would slide off the belly band and open the card.
I started with a Soft Sky card base and added a piece of Falling In Love Designer Series Paper to the front! Using the flowers from the So In Love Stamp Set, I stamped a few onto the designer paper all over the card front. I used Soft Sky Ink. I did more little flowers on this card since the focal point will be slid off when the open the card. Next, I die cut the little belly band in Very Vanilla with the So Detailed Thinlit Dies. I, also, cut a piece of Very Vanilla cardstock measuring 1-3/8″ x 4-1/4″. Using my score blade on the Stampin’ Trimmer, I scored the tabs on the die cut piece to make it easier to fold them back. You can always use a ruler and Bone Folder or just bend them back. Next, I added Tear & Tape to the tabs and placed it on the rectangle vanilla piece. A few tips is that you want to make sure your belly band fits your card. One way to make sure is to adhere it together while it is on the card or just make sure there is extra room on both sides.
If you would like to see this all in action, check out my Video Tutorial below or click here! Don’t forget to give it a thumbs up if you liked it and be sure to subscribe if you are new. I post a new video every Tuesday and Thursday!
Tis the season of Graduation and for many they are doing the Graduation Polka…..Dots!!! Teeeheehee! I know when I graduated….10 years ago!….I was doing all the dances. You couldn’t pay me to go back to school so graduation was a big celebration!!! As it should be!
This card is perfect to have on hand for any occasion even Graduation!!! I have done this card in boy colors like this and in girly colors like this sample! Not let’s get started on this fun debossed card!
I started with a Pacific Point card base. Then I took a piece of Whisper White (3-3/4″ x 5″) and ran it through the Big Shot with the Celebrations Duo Embossing Folder in the middle. I have found that stamping over the top of the de-bossed image turns out the best when you stamp on top of the Stampin’ Pierce Mat. This mat has some give for the cardstock to press into rather than a hard surface like the table. I used the Happy Celebrations Stamp Set to stamp the polka dots all over and make the greeting pop! I went with Pacific Point Ink and Cucumber Crush Ink. I stamped the dots all over the cardstock, some in full strength and some as the stamped off shade of ink.
For this card, I highly recommend going back to the ink pad each time and if you want the lighter shade, then stamp off onto a scrap piece of paper rather than on the card. The reason for this is because if you fall half off the cardstock, it makes the second stamp image have a line on it. Also, if you stamp over the celebrate greeting, the second stamp will have the letters in a darker ink so to avoid this, just go to the ink pad each time! 🙂 My favorite part of stamping with photopolymer, is that you can see the ink and paper touch! It’s so cool! Be sure to stamp the dots with firm even pressure so that your ink hit the cardstock around each piece!
Now that the focal point is complete, I wrapped some Silver Metallic Thread around it and secured the ends to the back with Stampin’ Dimensionals. Since it is a Man Card, I didn’t want to go all out with ribbons and bows but a little thread is perfect! I added more Stampin’ Dimensionals all over to raise this layer up from the Cucumber Crush layer (4″ x 5-1/4″). Finally, I added this piece to the card base! Perfect!
I love Graduations but they always make me cry. Just that amazing accomplishment and moving on to the next step in life is so fabulous and makes me emotional! It’s still crazy to think I graduated 10 years ago! How many years since your last graduation? Let me know in the comments below!!!
Happy Tuesday!!! Today’s technique is this amazing Pop & Twist Card. It’s one of those super WOW cards that you won’t really make tons of them but making at least one is super fun!!! Don’t worry, I did a video tutorial too to help out!
Okay, so the front looks pretty simple but that’s because the inside is the major WOW for this card!!! I got the idea for this card from LeeAnn Greff and made a few changes with the way I created it! Thank you, LeeAnn! Now let’s get started on this beauty!
Now for the inside…here’s the tricky part! 🙂 Don’t worry! I will walk you through it all. I found it best to create a template using normal printer paper because then you can practice without wasting cardstock. It was easier to create some of the folds with the printer paper and use them as a guide on cardstock as well. So with the printer paper (or your actual cardstock for the card), I made the following score lines:
Along the 11″ side: Score at 4-1/4″, 5-1/2″, and 6-3/4″
Along the 8-1/2″: Score at 2-1/4″, 4-1/4″, and 6-1/4″
Next, these scores create rectangles in each corner of the cardstock so I cut those off. I was left with a sort of cross looking template that was wide going up and down and little going side to side. I folded on the score lines but not each of them, just in half going both ways! The next 2 folds are the tricky ones because you will be folding diagonally. This fold is not corner to corner, it is actually line to line. With the thick/wide piece at the bottom/closest to you, fold the right hand (small piece) diagonally down. Go down to where the middle score line of the small piece lines up with the middle score line of the wide piece. This will create a diagonal line with the center, in the middle of your folded cross lines from scoring above. You will notice that the diagonal line doesn’t go corner to corner but just past it. That is correct! Next I rotated it 90 degree and folded diagonally again, creating an X. All red lines in the photo below are the lines I folded on.
Now I used this template for all of my card inserts. I just found it much easier to place on the top of the cardstock, score diagonally and fold than it was to try to get the cardstock to fold correctly the first time without the template. To finish the insert, I popped in the sides (small pieces). Mountain on that middle score line and valley on the sides. This will create a house look to the cardstock. Next, place it in your Stampin’ Trimmer with the point of the house at 5-1/4″ and trim off the extra. It should be about a 1/4″. This is so it fits into your card base perfectly and helps even things out on your little house.
Using Fast Fuse or Tear And Tape (a strong adhesive), outline one side of the house! I placed it inside the card, centered and sticky side up and then pressed the top closed to adhere it. Flip it over and repeat! Don’t try to place the sticky part on the card without closing it because then it might not close correctly. It could be off set a bit and you will want it to close and lay smooth. Now I can add my decoration pieces to either side. I used a piece of Party Animal Designer Paper (3″ square) to the left side and Whisper White (3″ square) to the right side so I could write my message.
Next up is the amazing pop out piece! I cut a piece of Crushed Curry measuring 2-3/4″ x 11″ and scored at 2-3/4″, 5-1/2″, and 8-1/4″. This creates four 2-3/4″ squares. I placed pieces from the Party Animal Designer Series Paper onto each square. Just be sure that all of your patterns go in the same direction, up and down. To add this, I like to use Tear & Tape because you can place it down and then reveal the sticky later! I placed a small piece in the upper left corner and lower right corner of the small pieces sticking out the sides (see template above). This is because the insert (Crushed Curry piece) will adhere to the top of one panel and the bottom of the other, making it twist sideways!
I placed the insert in there to make sure that my patterned pieces were going to twist right side up when I opened the card. Then I peeled off one of the pieces of tape and attached it. The piece will line up (on top of) the white or designer paper you placed down above. If it is centered on that and to the edge, you are golden. You don’t want the insert in too deep or our too far. Making sure the other adhesive side is on the opposite, reveal the sticky and press your card closed to adhere. Now it Pops & Twists! I found the first few times, you have to help it close up as it’s still a little stiff!
Of course to see this all in action, check out the Video Tutorial below or click here! Be sure to give it a thumbs up if you liked it and don’t forget to subscribe if you are new!
All of these items in the Party Animal Suite are retiring at the end of the month and many of them are on sale! Get them before they are gone by clicking here!
Memory keeping is super important because you can look back and everything is documented. It can be passed down for years as well! The pocket style is quick and simple! I have done all types of scrapbooking from small books to big books, digital and now pocket style. Here are my tips and ideas on the pocket style!
With all of the memory keeping I have done, I have loved how little supplies you need to create an amazing album! Of course you can always get all the goodies and have lots of options. Although that sometimes makes it overwhelming to have too many options! Just to get started, all you need is an Album, Pages, Journal Pens, and a Card Collection Kit of your choice! My favorites are always the all occasion/every day ones! I love bright colors too!
I honestly think that Project Life or Pocket Style Memory Keeping is the best way to go for someone who has never scrapbooked before. Project Life is cheaper, easier, and quicker. Now of course that can always be viewed differently by each person but being a scrapbooker, a digital scrapbooker, and a Project Life scrapbooker, that is what I would say.
Cheaper: Of course, you can always purchase tons of goodies but technically you could go as simple as the items above. You can always get a paper trimmer, adhesive, and go all out but you can also go simple too.
Easier: With Project Life, you can drop your photos in the pockets, journal on a card, and drop it in. I love that and how everything in the card collection coordinates. There is no need to pick your colors, papers, embellishments, and find ways to fill a large album page.
Quicker: It can be fairly quick to complete an entire album because of the few items you need and the ease of coordination.
Of course, you can always embellish, change up the colors, add layers, and go all out with Project Life as well! 🙂 It really is a fun way to keep your memories cherished forever. I hope this has given you some ideas and inspiration to start preserving your memories!!! You can see some of my other albums here, here, and here!