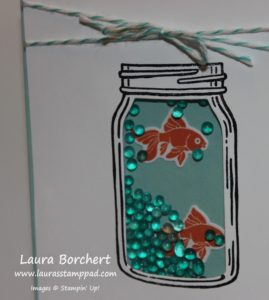
Happy Tuesday!!! I hope you are having an amazing week so far. If not, I hope this super fun card will make it better. Shaker cards are so much fun and sure to brighten anyone’s day!!!
Aren’t the little fish adorable?? When you add in the little blue “beads” that shake all over it’s even better!!!! Thank you to Rachel Chamberlain for the fun idea of coloring Silica Gel to add to your shaker cards! Now let’s get started!
SUPPLIES NEEDED: Jar of Love Stamp Set, Everday Jars Framelits, Re-Inker, Silica Gel, Adhesive Foam Strips, Window Sheets
I started with a Pool Party card base. Then I took a piece of Whisper White measuring 4″ x 5-1/4″ and stamped the largest jar from the Jar of Love Stamp Set in Basic Black Ink. Then I die cut out the center of the jar with the “soda can” looking image from the Everyday Jars Framelits (Bundle & Save 10%). Then stamp your greeting on the bottom of the cardstock below the jar. I used the greeting from the Party Wishes Stamp Set. Now you will place this white cardstock onto your card base in the center, set the die cut piece back in the open hole and hold it in place. While holding the die cut piece in place, remove the outside piece (the one with the jar and greeting on it). Now you will need to trace around the “soda can” piece in that exact spot. This is to ensure perfect placement of the shaker pieces. If you added everything to the back of the white cardstock, then it would be difficult to line up the card base and you can flip over the white piece once you have added your shaker items. Now that you have your template on the card base, place the Adhesive Foam Strip around the image over your pencil template. Now you can fill the area with your shaker goodies. For the sample shown, I added some fish from the Jar of Love Stamp Set which were stamped in Tangerine Tango and die cut out with the framelits. I also added some Silica Gel beads. These are the little packets that come in show boxes and purses that say “Do Not Eat” on the packet. I placed a few of them into a dish and added a drop of Bermuda Bay Re-inker to color them. Allow them to dry before adding them to your project. I usually put them by the vent or in front of a fan. Once they are ready you can pour some into the open area. For the top piece, you will need to place a piece of Window Sheet over the open jar cut out on the back side of the Whisper White cardstock. Now it is time to place it over your card base. I then added some Bermuda Bay Baker’s Twine around the top and placed a Stampin’ Dimensional on each of the 4 corners to secure them down. You can always add the dimensionals before placing it down but I like to do it after so I don’t have so many sticky pieces when working on the perfect placement. 🙂 How fun is that???
If you would like to see this all in action, check out the Video Tutorial below or click here. Be sure to give it a thumbs up if you liked it and don’t forget to subscribe if you are new!!!
Happy Stampin’
~Laura
Check out this fabulous offer for the Holiday Season!!!


What a cute idea!
Thank you! ~Laura
Oh I haven’t made shaker cards in years! They are so much fun!! This is just adorable with the fish and the blue beads.
They are super fun!!! Even the October Paper Pumpkin had shaker cards in them!! Love it!!! ~Laura
This is an adorable card. Thank you for sharing it at The Crafty Corner link party. I hope to see you there again (new party starts tomorrow at 6 am EST).
Well thank you!!! I’ll be there tomorrow! Thank you for stopping by! ~Laura
I’ve never made a shaker card. How fun!
They are super fun! You should totally try it out!!! Let me know if you have any questions on anything. Always happy to help! ~Laura
Pingback: October 2016 Paper Pumpkin – Season of Gratitude | Laura's Stamp Pad
Pingback: Top 5 Blog Posts From the 2016-2017 Catalog!!! - Laura's Stamp PadLaura's Stamp Pad