Get Them Now!!!

Posted on

Stampin’ Up’s NEW catalog is coming out in June! That means we need to make room for new stuff by retiring some of the current products!!! These items that are retiring are while supplies last so get them now!!

Get Them Now, www.LaurasStampPad.com

The 2018-2020 In Colors will be retiring in June. These supplies are while supplies last so they could be gone sooner! Blueberry Bushel, Call Me Clover, Grapefruit Grove, Pineapple Punch and Lovely Lipstick are the color names! My favorite is Lovely Lipstick and I’ll be sad to see it go. I just love shades of PINK! If you have the ink pad, be sure to grab an Ink Refill so you can enjoy the color for even longer!!! Grab some coordinating cardstock, ribbon, and other fun embellishments too!

Another tip is that Stampin’ Up retires all of the designer paper in the catalog. There has been a time or 2 where they keep one pack again for another year but otherwise all of them go. Grab your favorites now before they are gone. You can also check out my One Sheet Wonders for great ways to use the paper!

Check out the video below or click here to see all of these products! Be sure to give the video a thumbs up if you liked it and don’t forget to subscribe if you are new. If you would like a notification when I post a new video, be sure to click the bell right next to the subscribe!!!

Happy Stampin’

~Laura

Product List

16 Favorite Products!!!

Posted on

Happy Tuesday! To keep the celebration of my 16 years with Stampin’ Up going, I’m sharing my 16 Favorite Products!!! This has been an annual tradition for a few years now and I find it so interesting to see what they are! You can check out past years here and here!

16 Favorite Products, www.LaurasStampPad.com

These are my favorite products that I’m loving right now! What are some of yours?? Let me know in the comments below!

~Stampin’ Shammy – I use this so much and it’s AMAZING!!!
Champagne Rhinestones – Bling Bling in a fun, fabulous shade!!!
~Peaceful Moments Stamp Set – I love the greetings and that fabulous font!!!
Under My Umbrella Stamp Set – It’s perfect for Spring! Beautiful!!!
~Umbrella Builder Punch – Of course you have to get the coordinating punch!!!
Best Dressed Designer Series Paper – The flower side is just stunning!!!
~Take Your Pick Tool – This thing is so handy and makes crafting easy!!!
Ornate Style Stamp Set – That corner image is perfect for ALL Cards!!!
~Ornate Layers Dies – These are perfect for greetings, decoration, and more!!!

Lovely Lipstick & Daffodil Delight – These are my 2 favorite colors right now!!!
~Label Me Lovely & Label Me Fancy Punches – I grab for these for almost every card! Layering them and cutting them is super fun!!!
Stampin’ Blends…..ALL OF THEM! I am really starting to enjoy coloring because of these amazing markers!!!
~Daffodil Delight Ruched Ribbon & Petal Pink Metallic Edge Ribbon – Both of these are so beautiful and fun to use for any card occasion!!!


To see this all in action, check out the video below or click here. Be sure to give the video a thumbs up if you liked it and don’t forget to subscribe if you are new. If you would like a notification when I post a new video, be sure to click the bell right next to the subscribe!!!

Happy Stampin’

~Laura

Product List

Die Cutting Rectangles!

Posted on

I have another fabulous one of Laura’s Quick Tips to share with you today! I have received this question a few times lately so I thought I would share it on here too! If one person has it as a question, I’m sure many others do too! Today, I have tips for die cutting rectangles!!!

Die Cutting Rectangles, www.LaurasStampPad.com

Many times when die cutting rectangles, squares, or any image with a long straight line and the image doesn’t cut very well. There are also many times it cuts perfectly fine which is a win! 🙂 If you have this happen to you, my tip is to run it through at a diagonal. This allows the die cutting machine to apply pressure on a smaller section with each crank through, rather than hitting a long line at the same time. Also, it is really hard to crank it through when a solid line is going through at once. When you place it in at a diagonal, it goes through smoother and easier which is fabulous!!

To see this all in action, check out the video below or click here. Be sure to give the video a thumbs up if you liked it and don’t forget to subscribe if you are new. If you would like a notification when I post a new video, be sure to click the bell right next to the subscribe!!!

Happy Stampin’

~Laura

Product List
Precision Base Plate
[139684]
$25.00

Snail Adhesive Tips!!!

Posted on

Good morning everyone!!! Today, I’m sharing one of Laura’s Quick Tips! These Snail Adhesive tips are sure to make your crafting experience easier! After all Snail adhesive is the glue holding your projects together so let’s start off on the right foot! 😉

Snail Adhesive Tips, www.LaurasStampPad.com

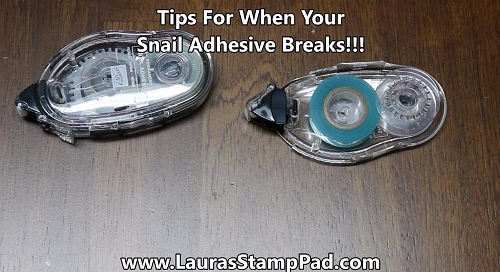
First off, Snail adhesive has a base and a refill piece. Be sure to save that base piece (the black side which is not shown in the above picture) because after you have that you only need to purchase refills! Getting a refill is cheaper to purchase each time!

Now for a few tips for when your Snail Adhesive isn’t working! Sometimes it is because it needs to be advanced for the adhesive to show and therefore grab onto the cardstock. Then there are times when the clear tape breaks and the adhesive rolls no longer advances at all. Simply lay the clear strip on your project and press and then pull the strip up! This will lay down a strip of the adhesive. Now you don’t have to throw it away and waste adhesive!

Check out the video below or click here to see this all in action as well as a few more tips! Be sure to give the video a thumbs up if you liked it and don’t forget to subscribe if you are new. If you would like a notification when I post a new video, be sure to click the bell right next to the subscribe!!!

Happy Stampin’

~Laura

Product List

Ornate Garden Designer Paper!!!

Posted on

Yesterday, Stampin’ Up! pre-released a new Suite that is coming out in the New Catalog in June. It’s so excited to get new product early! The Ornate Garden Designer Paper is stunning with it’s foil accents!

Ornate Garden Designer Paper, www.LaurasStampPad.com

You all know how much I love flowers so these prints are totally up my alley! They are fun Spring colors – Terracotta Tile, Early Espresso, Mint Macaron, and Old Olive. There is also a NEW In-Color called Bumblebee which is exciting. I’m guessing this is one of those beautiful shades of yellow but more details coming on that!

Click the supplies listed below to get your hands on these fabulous New Products!!! I also have a Virtual Stamp Class showcasing these products available for all of you! During this crazy time when we can’t stamp together in person, you can still stamp with me any time of the day in the comfort of your home! Click here to purchase the Ornate Garden Virtual Stamp Class!!!

To see this Ornate Garden Designer Paper completely, check out the video below or click here. Be sure to give the video a thumbs up if you liked it and don’t forget to subscribe if you are new. If you would like a notification when I post a new video, be sure to click the bell right next to the subscribe!!!

Happy Stampin’

~Laura

Product List

Try Out Double Stamping!

Posted on

You all know how much I love flowers so the more the better, right?!? Check out this fun double stamping technique to have more flowers on your card!!!

Double Stamping, www.LaurasStampPad.com

I started with a Pretty Peacock card base and layered on another piece that was embossed with the Basket Weave Embossing Folder. This adds subtle texture to the card. Next, I took a piece of Whisper White measuring 3″ x 3-1/2″. This is the piece I am going to double stamp on with the Tags In Bloom Stamp Set! Be sure to stamp with the label centered and the flowers in the upper left corner. Then flip the piece around and line up the label to stamp again for flowers on the other side. Photopolymer stamps makes this super easy!

I colored in the flowers with Daffodil Delight and Old Olive Stampin’ Blends! Then for the greeting, I used the stamps from the Tags In Bloom Set and punched it out with the coordinating Label Me Lovely Punch. I added it to the label with Stampin’ Dimensionals for a fabulous layered look! Next, I layered it onto some Daffodil Delight and added it to the card front. I went for an off set look just to go with someone different!

Tags In Bloom, www.LaurasStampPad.com

For the inside of the card, I added some flowers and another greeting from the Tags In Bloom Sale-A-Bration Stamp Set. Don’t forget that Sale-A-Bration ends on March 31st! This set is super fun and fabulous so I highly recommend it!!! 🙂

To see this double stamping in action check out the video tutorial below or click here. Be sure to give the video a thumbs up if you liked it and don’t forget to subscribe if you are new. If you would like a notification when I post a new video, be sure to click the bell right next to the subscribe!!!

Happy Stampin’

~Laura

Product List
Tags In Bloom Photopolymer Stamp Set (English)
$0.00
Pretty Peacock Classic Stampin’ Pad
$7.50
Daffodil Delight Stampin' Blends Markers Combo Pack
$9.00
Old Olive Stampin' Blends Markers Combo Pack
$9.00
Label Me Lovely Punch
$18.00
Daffodil Delight Classic Stampin' Pad
$7.50
Basket Weave Dynamic Textured Impressions Embossing Folder
$9.00
Gingham Gala Adhesive-Backed Sequins
$7.50

Coloring Foil Paper!!!

Posted on

Happy Tuesday!!! You all know that means I have a fabulous technique to share with you today! I’m coloring foil paper to really make this amazing Flowering Foil Designer Paper shine!!!!

Coloring Foil Paper, www.LaurasStampPad.com

I just love how this card turned out! It’s so pretty and that color combination is fabulous – Highland Heather and Mint Macaron!

There are different ways to color the Flowering Foil Paper but you can also leave it as is with the white and foils! I colored with both sponge daubers and Stampin’ Blends. I prefer the Stampin’ Blends because I really like the clean look!

Sponge Daubers vs Stampin' Blends, www.LaurasStampPad.com

The piece on the right was done with all Sponge Daubers. The flower (Highland Heather) was really easy to do. The leaves (Mint Macaron) got a bit trickier as they come to a point and Sponge Daubers don’t have as precise of a point. Then when it came to doing those little buds (Calypso Coral) it got really messy. In order to make it look less messy, I filled in around the flowers with some Pool Party. It’s not horrible but not clean looking either. For the one on the left, I used Sponge Daubers for flowers and leaves and then Stampin’ Blends for the buds. I loved how that looked so then I did the 3rd one with all Stampin’ Blends and that’s the one I used on my card!

Flowering Foil Designer Series Paper, www.LaurasStampPad.com

After coloring it, I layered it onto Highland Heather and then onto the Mint Macaron card base! I used the Tags in Bloom Sale-A-Bration Stamp Set and Label Me Fancy Punch for the greeting! It’s perfect for any occasion! Don’t forget that Sale-A-Bration ends a week from today!!! Also, my Free Stamp Set of the Month for this month is Full of Happiness. You will get this set for free when you order $75 or more before tax and shipping!

To see the different ways for coloring foil paper, check out the video tutorial below or click here. Be sure to give the video a thumbs up if you liked it and don’t forget to subscribe if you are new. If you would like a notification when I post a new video, be sure to click the bell right next to the subscribe!!!

Happy Stampin’

~Laura

Product List

Meerkat Silhouette Sunset Card!!!

Posted on

The cuteness factor: HIGH! The amazing view factor: HIGH! Fun technique factor: HIGH! This Meerkat Silhouette Sunset card is just adorable and I’m going to share with you how to make it!!!

Meerkat Silhouette Sunset Card, www.LaurasStampPad.com

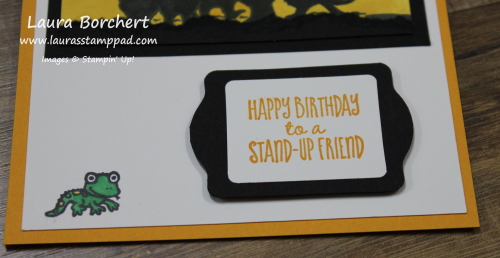
I started with a Mango Melody card base. Next, I took a piece of Whisper White (4″ x 5-1/4″) and stamped the lizard in the corner and added it to the card front. I just had to add him to the card because he’s adorable!

Sunset, www.LaurasStampPad.com

Next, I took a piece of Whisper White and stamped the meerkats on there in Memento Black Ink. Then using the Dark Basic Black Stampin’ Blends Marker, I colored them all in. Then I placed a 1-1/2″ scrap circle over the center of the card. It should cover up some of the meerkats. Starting with Mango Melody, I sponged the color around the circle making sure it didn’t move. Next, I took a Daffodil Delight Sponge Dauber and colored the rest of the way out, making sure to blend the colors together. Be sure to go over the meerkats so the color gets everywhere. Now you have that fabulous sunset and silhouette look.

In order to make the meerkats not look like they were floating, I took a scrap piece of Basic Black and ripped it along the top. Then I placed this under the meerkats and trimmed off the excess. This layer was added to a Basic Black piece of cardstock before adding it to the card front. This makes the image pop more!!

Happy Birthday To A Stand-Up Friend, www.LaurasStampPad.com

For the greeting, I stamped it in Mango Melody Ink. All of these images are from the Sale-A-Bration Gangs All Meer Stamp Set. Woot Woot for free stamps! Using the Label Me Lovely Punch, I layered these images today. I just trimmed off pieces of the punched image to get a different look. Check out this video on that! I’m still debating on where I want to add a few rhinestones either above the lizard or on either sides of the greeting. The yellow/orange ones in the Holiday Basics Rhinestone Pack would work perfectly!

To see the Meerkat Silhouette Sunset all in action, check out the the video tutorial below or click here. Be sure to give the video a thumbs up if you liked it and don’t forget to subscribe if you are new. If you would like a notification when I post a new video, be sure to click the bell right next to the subscribe!!!

Happy Stampin’

~Laura

Product List

Sale-A-Bration 2nd Release!!!

Posted on

We are coming to the end of Sale-A-Bration and Stampin’ Up did a Sale-A-Bration 2nd Release of fabulous items!!! I am loving them! There are 2 Specialty Designer Paper Packs that are amazing! They are both at the $50 level too!!!

Sale-A-Bration 2nd Release, www.LaurasStampPad.com

Is this not the most beautiful paper ever???? It is rose gold and silver foil on white paper. That means that you can use it as is for a super elegant look or you can add color. Using Stampin’ Blends, Marker, Sponge Brayer or Sponge Daubers, you can really make this paper POP! Plus it is flowers and you all know how much I love flowers. The paper pack is 12″ x 12″ and it comes single sided. There are 3 sheets each of the 4 designs!
So Very Vellum, www.LaurasStampPad.com

The So Very Vellum is another one of the $50 Level Free Items!!! This vellum screams Spring with the soft pastel colors of Pool Party, Purple Posy, and Soft Seafoam. That texture on the vellum really makes it stand out. It will be the perfect to add an entire background of this or even just a small piece!

To see each sheet of these Sale-A-Bration 2nd Release papers, check out the video tutorial below or click here. Be sure to give the video a thumbs up if you liked it and don’t forget to subscribe if you are new. If you would like a notification when I post a new video, be sure to click the bell right next to the subscribe!!!

Happy Stampin’

~Laura


Birthday Surprise!!!

Posted on

Happy Tuesday!!! This is just the cutest birthday surprise ever! I am just loving the Birthday Bonanza Suite! It is so much fun and sooooo cute!!!

Birthday Surprise, www.LaurasStampPad.com

This card is super cute and actually super easy to make! Let’s get started!

I started with a Coastal Cabana card base and then I cut 2 inches off the front panel. You could also cut the cardstock at 4-1/4″ x 9″ and score it at 5-1/2″. This would result in the same look. It just depends on which way you want to go. Next, I layered Crushed Curry and Birthday Bonanza Designer Series Paper on that front flap!

For the greeting, I used the Bonanza Buddies Stamp Set and the Label Me Lovely Punch! After stamping the greeting in Memento Ink, I punched it out with the Label Me Lovely Punch. Then I punched another one out in Coastal Cabana and cut it in half. Add a dab of adhesive to the back top side of the greeting and then press it onto a piece of the Coastal Cabana label allowing a nice layer of that color to show on the top. Then do the same to the bottom half. When adding this piece to the card front, just be sure to only add adhesive to the top portion of the greeting so it sticks to the top flap but doesn’t seal your card shut. Check out the video tutorial below to see this all in action!

Birthday presents, www.LaurasStampPad.com

For the inside of the card, I added a piece of Whisper White measuring 4″ x 5-1/4″. The greeting and presents are from the Bonanza Buddies Stamp Set. Thank goodness for photopolymer stamps so you can line up those images! 🙂

Check out more samples using these items here, here, and here! To make this birthday surprise card, just get the supplies listed below!

To this this all in action, check out the video tutorial below or click here. Be sure to give the video a thumbs up if you liked it and don’t forget to subscribe if you are new. If you would like a notification when I post a new video, be sure to click the bell right next to the subscribe!!!

Happy Stampin’

~Laura

Product List