Valentine’s Day Card Ideas!!!

Posted on

Today, I’m sharing with you some Valentine’s Day card ideas!!! I love Valentine’s Day because I feel like it’s a great chance to show your love, happiness, appreciation (whatever it may be) to those around you. I’m not a fan of the roses and chocolates but the CARD is a must!!!

Valentine's Day Card Ideas, www.LaurasStampPad.com

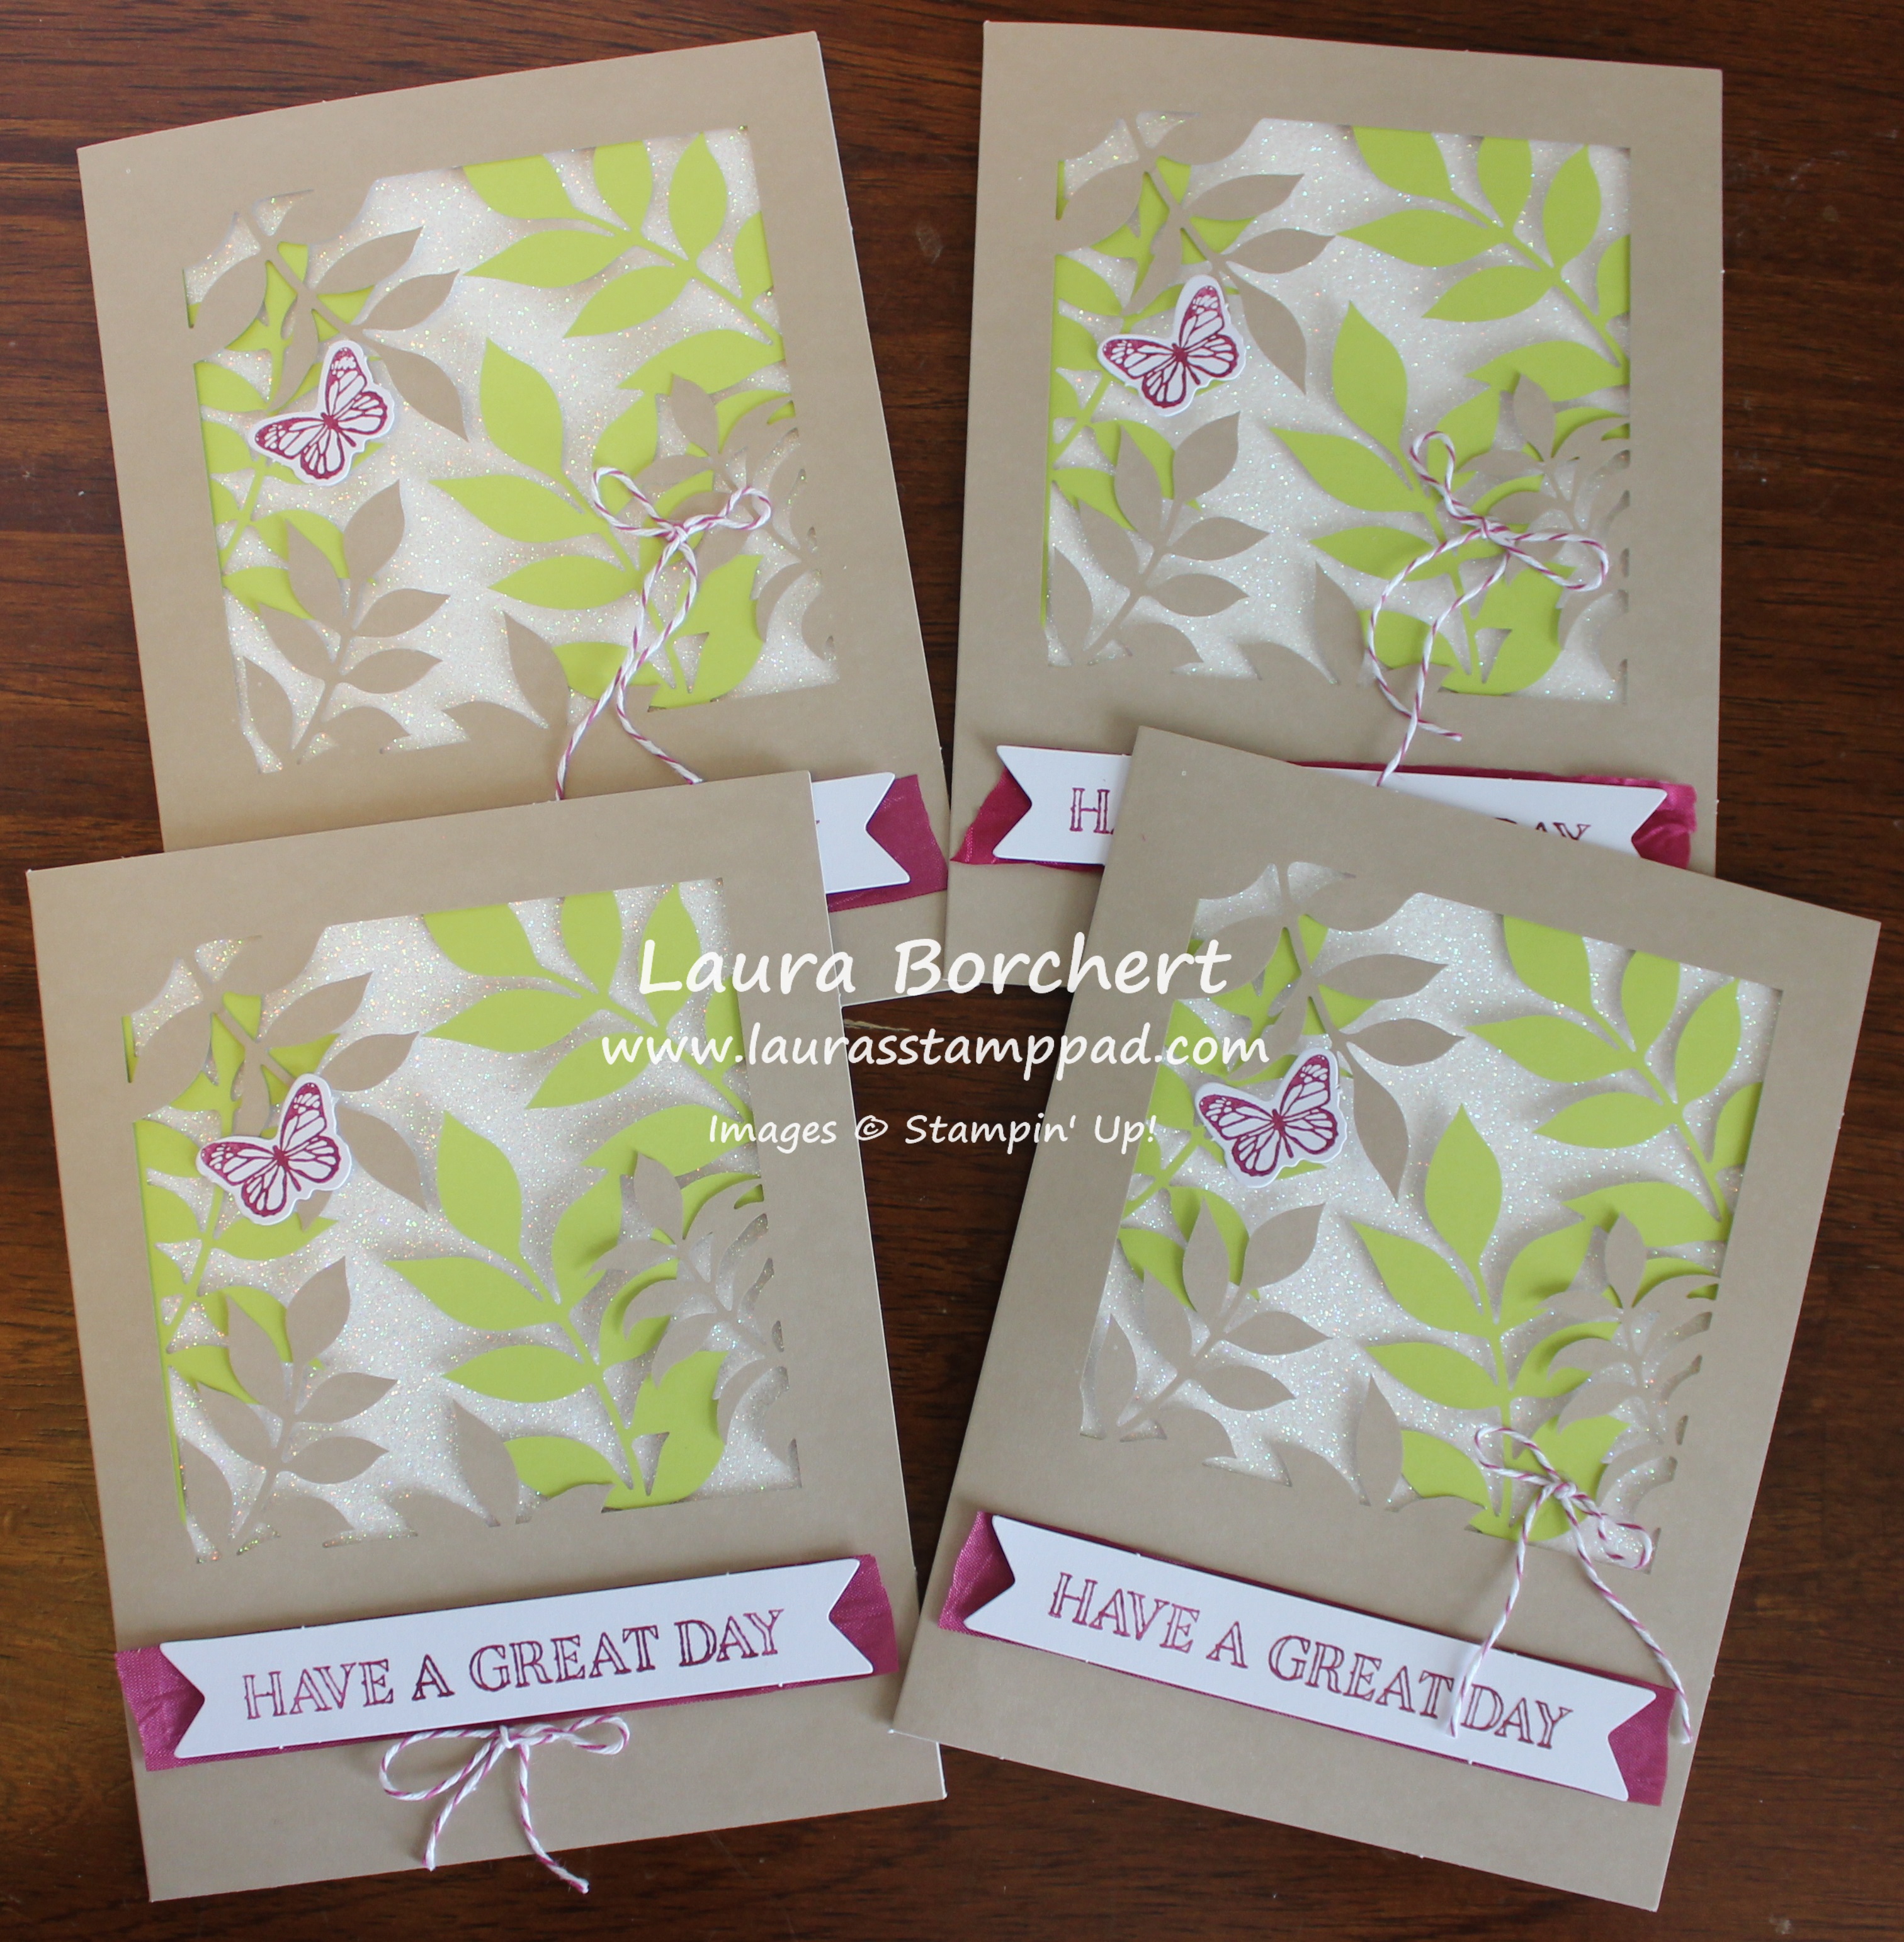
Here is a great concept using the Painted With Love Specialty Designer Series Paper from the Occasions Mini Catalog! It’s not super lovey dovey but still shows love!

I started with a Melon Mambo card base. Next, I cut 2 pieces of the Painted With Love Specialty Designer Series Paper measuring 5″ x 2″ and 3″ x  2″! I used the same sheet of 12″ x 12″ from the pack but used one side for one piece and the other side for the other piece! The larger piece is layered on Rich Razzleberry measuring 5-1/4″ x 2-1/4″. The smaller piece is layered on Gold Foil Paper measuring 3-1/4″ x 2-1/4″. I just love how this designer paper has those gold flecks in it. It is just stunning! Before adding the rectangles to the card, I stamped the greeting from the Special Celebrations Stamp Set in Rich Razzleberry Ink. The greeting is a bit tight so it’s best to stamp it first. Next, I layered on the piece to the left. The smaller piece has some Calypso Coral Sheer Ribbon wrapped around it and tied into a knot. Then I added this to the card front with Stampin’ Dimensionals for a little bit of texture. I finished off the front with a few Metallic Enamel Shapes.

Hugs & Happiness, www.LaurasStampPad.com

For the inside of the card, I added a piece of Whisper White (4″ x 5-1/4″) and stamped the second piece of the greeting on it.

If you would like to see this all in action as well as a few other Valentine’s Day cards, check out the Video Tutorial below or click here! Be sure to give the video a thumbs up if you liked it and don’t forget to subscribe if you are new. If you would like a notification when I post a new video, be sure to click the bell right next to the subscribe!!! Let me know if you have any tip and tricks to share in the comments below!

Stay tuned as I will be posting the other cards in the video next week!!!

Happy Stampin’

~Laura

Product List


Technique Tuesday – Brusho Crystal Colour!!!

Posted on

Happy Tuesday!!! That means I have a fabulous technique to share with you today! I’m showing you the NEW Brusho Crystal Colour from the Occasions Mini Catalog!

Brusho Crystal Colour, www.LaurasStampPad.com

I love the bright vibrant color that this stuff creates! Look at that stunning butterfly!!! Gorgeous!

I have found that Watercolor Paper works best with the Brusho Crystal Colour since it requires a decent amount of water to dissolve it! First, I stamped the butterfly from the Beautiful Day Stamp Set in Versamark Ink and added Gold Embossing Powder! I set it with the heat tool! Now for the coloring fun, I used the Aqua Painter to wet the area of the butterfly. Using the Red (Brilliant Red), Orange (Gamboge), and Yellow colors, I tapped some onto the butterfly. With yellow on the outside, then orange, and red in the middle. The thing about tapping it on is that you don’t really know where it is going to fall or how much. This is one of those techniques that no two are going to come out the same!

Beautiful Butterfly, www.LaurasStampPad.com

After tapping the powder on, I used the Aqua Painter to blend it all together. I did wipe off the brush tip after each color to try to keep a nice fade and not just blend them all together! Be sure to allow it to dry before assembling the card. When I don’t have a lot of patience, I used the Heat Tool!

Golden Butterfly, www.LaurasStampPad.com

Next, I layered the butterfly onto Pumpkin Pie (4″ x 3-1/4″) and then Real Red (4-1/4″ x 3-3/4″) cardstock! The Real Red was cut with more on the bottom so I could add the Double Stitched Daffodil Delight Ribbon! Before adding this to the Whisper White card base, I stamped the dots from the Beautiful Day Stamp Set all around in Daffodil Delight Ink! Of course, I added the butterfly layers to the card front with Stampin’ Dimensionals for a little bit of texture!

If you would like to see this all in action, check out the Video Tutorial below or click here! Be sure to give the video a thumbs up if you liked it and don’t forget to subscribe if you are new. If you would like a notification when I post a new video, be sure to click the bell right next to the subscribe!!!

Happy Stampin’

~Laura

Product List


Occasions Mini Catalog Designer Series Paper!!!

Posted on

Today, I’m sharing with you the Occasions Mini Catalog Designer Series Paper!!! The catalog just doesn’t do this amazing stuff justice!!! Here you will see it on a bigger scale and each piece front and back!!!

Painted With Love, www.LaurasStampPad.com

The Painted With Love Specialty Designer Series Paper is 12″ x 12″ and has gold foil on one side of each piece! I love the shades of pink, purple, coral, and gold! The hearts are great for Valentine’s Day too! Check out the Video of each sheet here!

Myths & Magic, www.LaurasStampPad.com

The Myths & Magic Specialty Designer Series Paper is 12″ x 12″ and one side of each sheet has a fabulous glitter image. The glitter is on the mermaids, wizards, unicorns, and other designs. This paper is super fun and will make amazing kid/teen cards! I love it!!! Check out the Video of each sheet here!

Occasions Mini Catalog Designer Series Paper, www.LaurasStampPad.com

The Petal Passion Designer Series Paper is 12″ x 12″ and all black and white. I love black and white paper that I can add a pop of color with cardstock, ribbon, or embellishments. This paper is fun to color with Watercolor Pencils, Stampin’ Blends, Markers, or the Sponge Brayer!!! Check out the Video of each sheet here!

Sweet Soiree, www.LaurasStampPad.com

The Sweet Soiree Specialty Designer Series Paper is 12″ x 12″ and has a silver foil design on one side of each sheet! These pastels and floral prints are great for the transition from Winter to Spring! I just love flowers! Also, there are cakes and other fun images that are perfect for Weddings, Bridal Shower, and more! Check out the Video of each sheet here!

True Gentleman, www.LaurasStampPad.com

The True Gentleman Designer Series Paper is 12″ x 12″ and perfect for man cards! I love the color scheme and prints. I always struggle with man cards but I think this paper will make it super easy!!! Check out the Video of each sheet here!

Picture Perfect Party, www.LaurasStampPad.com

The Picture Perfect Party Designer Series Paper Stack is 6″ x 6″. I love the bright colors and fun designs of these sheets. Birthday cards are my most used and this stack screams birthday!!! Check out the Video of each sheet here!

Tutti Frutti, www.LaurasStampPad.com

The Tutti-Frutti Designer Series Paper Stack is 6″ x 6″! These bright colors and fun fruits are perfect for Spring and Summer! Those are my favorite seasons so I love this stack!!! Check out the Video of each sheet here!

Which one is your favorite?? My favorites are the Painted with Love and Picture Perfect Party!!! Let me know yours in the comments below! Also, let me know if you like this display of the designer paper so you can really see it. Do you find it helpful? If so, I’ll be sure to do it for every new catalog release!

Happy Stampin’

~Laura


December 2017 Paper Pumpkin – Floral & Flutter!!!

Posted on

I am super in love with the December 2017 Paper Pumpkin – Floral & Flutter because the colors are amazing. It also makes me think of Spring with the butterflies and that makes me very happy!!!

December 2017 Paper Pumpkin,  www.LaurasStampPad.com

Look at this color combination!!! I am loving the Calypso Coral, Berry Burst, and Peek-A-Boo Peach! Add in the bling and wowza it’s amazing!!! I stamped all my greetings and butterflies first! Then I started an assembly line!

Small Card Instructions, www.LaurasStampPad.com

I actually had to read the instructions for this part. First, lay down a strip of the adhesive on the top and bottom of the cut out on the inside of the card. Next, add the peach lines piece with the peach facing down so it shows through to the front. Then place the glimmer paper face down on top and add a strip of adhesive diagonally on the back. Finally, add adhesive strips to all four sides of the solid white square. Peel off the backing of those four as well as the diagonal one and stick the square on top of the glimmer paper. This seals it all in and looks nice and clean when you open the card!

Square Cards, www.LaurasStampPad.com

Now it’s time to decorate the front of the card! I cut the seam binding to the length of the greeting. I used the adhesive strips to adhere both the ribbon and the greeting! The kit comes with glue dots as well which I used for the butterflies and the little Baker’s Twine bow!

Greenery Great Day, www.LaurasStampPad.com

The second set of cards are regular size cards that can go in the mail!!! The pop of Lemon Lime Twist makes me happy too! I swear I could have picked these colors as they are my favorites!!!

Full Size Card Directions, www.LaurasStampPad.com

This card is done the same way as the square cards! Add adhesive to the inside of the card (top and bottom) and place the green leaves face down. I had to double check how the greenery went down for each one to make sure it was  placed correctly. Sorry no trick for you there! 🙂 Then place the glimmer piece down with a diagonal strip on the back. Add the solid white over the top!

Regular Size Paper Pumpkin, www.LaurasStampPad.com

I added the greeting, butterfly, and bow to the front to finish it off! The bow is in different spots just to mix it up!

Stamped Envelopes, www.LaurasStampPad.com

I stamped the envelopes to coordinate. I used my own Lemon Lime Twist Ink Pad for the leaf and then stamped the butterfly in the provided Berry Burst Ink!

If you want to see all of the contents of this kit, check out my Video here! To sign up for Paper Pumpkin and enjoy the fun with me, click here! All the supplies to make the kit for just $19.99 is a steal! I love the surprise each month too!

Happy Stampin’

~Laura


Mixed Medallions Card Kit!!!

Posted on

In preparation for the Occasions Mini Catalog and Sale-A-Bration Promotion starting tomorrow, I’m not doing Technique Tuesday today! Instead, I’m sharing with you the Mixed Medallions Card Kit that can be earned for FREE with a $50 order tomorrow through the end of March!

Berry Burst, www.LaurasStampPad.com

I was super excited to see a kit like this again this year! The kit requires no stamping and it’s quick to assemble. I created these cards within minutes. Fun, pretty, and ready to use in no time at all!

First, I folded on all of the score lines to create this gate-fold card. The only tip that you need to know is that you don’t seal the card shut with the decorations!!! The greeting goes in the center and there are various flower combinations to add all around!

Crumb Cake Card, www.LaurasStampPad.com

The Crumb Cake, Berry Burst, and Calypso Coral combination is subtle and fabulous! Also, have you noticed how the inside color peaking through is solid?? Stampin’ Up thought of everything with this kit!

Mixed Medallions Card Kit, www.LaurasStampPad.com

There is a panel popping down from the top that covers up the written greeting on the inside. How fabulous is that?!?!?! This way you have that perfect clean look from the outside with the color peaking through. You don’t see your stamping or writing peaking through! I love that. It’s perfect!! Do you like quick and simple card projects like these or do you prefer the more detailed kits? Let me know in the comments below!

You can check out the unboxing and reveal of this kit below or click here! Don’t forget to give it a thumbs up if you are excited about this kit as much as I am! Be sure to subscribe to my Channel it you are new because I have lots of other products from the Occasions Mini Catalog and Sale-A-Bration Promotion to share. Also, Technique Tuesday will return next week!

Happy Stampin’

~Laura


The NEW Stamparatus!!!!

Posted on

The New Stamparatus has arrived and I’m so excited to get to start playing with it! I was on the team that worked with Stampin’ Up! to create this tool and it has been a long 2 years! Together I think we have come up with an amazing tool!!!!

The New Stamparatus, www.LaurasStampPad.com

My first thoughts when I first opened it:

~It has some weight to it….more than I thought. I was thinking it would be light and plastic but there is a little weight to it which makes it feel strong and sturdy! When I say weight, I don’t mean it weighs 5 pounds or anything.

~While I have watched a few videos from Stampin’ Up using it, I felt that just looking at it, it seemed fairly user-friendly.

~It is clean, sleek, and I love the grid lines!

~The magnets are SUPER STRONG!!!!! Be careful that they don’t snap together. It would be hard to pull them apart and if they snap together hard enough they could chip or break.

Stamp Positioning Tool, www.LaurasStampPad.com

After playing with it a little here are my thoughts:

~I LOVE IT!!!! This tool is super fabulous and solves the following problems! Rocking or having the clear block leave a mark on your project because it has ink on it. No worries because this tool doesn’t go down enough to touch your paper due to the magnets! Woot Woot! If you don’t get a portion inked up or stamped evenly, no worries because you can just ink it up again and stamp. It’s already perfectly lined up….even with the clear mount stamps that you can’t see through!

~The hinge moving ability is AMAZING! If you wanted to stamp an image all the way down you project, just stamp, move down a hinge, stamp, and so on. How fabulous is that?!?!?!

Stamp Perfect Everytime, www.LaurasStampPad.com

~See how those banners are perfectly lined up and with the same amount of swag for each one. That wasn’t luck….that was the Stamparatus and just moving it down 1 hinge each time. PERFECT!

~The “You make me so happy” was stamped all at once in Melon Mambo Ink even though it is 2 separate stamps. Creating lot of cards at once will be super easy with this tool. Just ink and stamp, place a new piece of paper down, ink and stamp! I am in love!!!

~A few things I have to get used to include using the magnets and positioning my paper in a memorable spot. A few of the times I was using it, I didn’t place the magnets down and just got too excited and stamped. This isn’t the end of the world but your paper could move. Also, take note as to were you position your paper so that you know how to line up the next one! Using a Post It Note on the edge of the line would make it super easy when making multiples!!!

Okay, I feel like I could go on and on about this tool. I will leave you with a little Video Tutorial and be sure to subscribe so you don’t miss future projects using this tool! If you have any questions, just reach out or leave a comment below! If you would like to reserve your own Stamparatus, click here! This  is just to reserve it for a shipment date of April/May! You will enter your credit card to reserve it but the card will not be charged till it’s available to ship. At that time you can add to your order, not order, or continue forward!

Enjoy the Video Tutorial below or click here! Be sure to give it a thumbs up it you liked it!

Happy Stampin’

~Laura


Even Pigs Can Fly!!!

Posted on

Happy Tuesday!!! This is a technique I have shared before but I have some more fabulous samples to share! The Stampin’ Blends are super fun to color with and easy to get lots of cool shading!! Check out these adorable little pigs….even pigs can fly!

Even Pigs Can Fly, www.LaurasStampPad.com

How cute is this little piggy?!?! Adorable! And the best part is that the wings have Wink of Stella on them so the perfect little shine!!! Eeee Thank you, Janet, for this amazing idea! I love what my stampers come up with during Stamp Club!

I started with a Whisper White card base and layered on a piece of Delightful Daisy Designer Series Paper (4″ x 5-1/4″). Next, I stamped the images from the This Little Piggy Stamp Set in Memento Black Ink. Then, I colored in the piggy with the Stampin’ Blends. I used Pink Pirouette for the pig, Smoky Slate for the wings and Crumb Cake for the feet!

Coloring the Piggy, www.LaurasStampPad.com

For the coloring, I always start with the dark Stampin’ Blends Marker and do an outline. Next, I fill in with the Light Stampin’ Blends Marker. Then I go around the overlap edge and swirl in a circular pattern till it blends together. If you stay away from the center, then you will get that light center and darker edges look. Don’t worry this takes a little practice and each one will always come our differently. Also, it’s all based on your preference too!! Just play with it and have fun!

Glitter Wings, www.LaurasStampPad.com

Look at that amazing Wink of Stella on the wings!!! Isn’t it just stunning? I love it!!! After coloring, I layered this piece onto Daffodil Delight. Then I added a little loop of Night of Navy Crinkle Seam Binding to the edge under Stampin’ Dimensionals and added it to the card front!!!

Happy Piggy, www.LaurasStampPad.com

Which little piggy card is your favorite – Happy Piggy or Sparkle Wings? Let me know in the comments below!!! Also, if you would like to see Stampin’ Blends in action, check out this video!

Today, I am sharing one of the new kits from the upcoming Occasions Mini Catalog on my YouTube Channel! You can check out the unboxing and reveal before or click here! Don’t forget to give it a thumbs up if you are excited about this kit as much as I am!

Happy Stampin’

~Laura

Product List


My Ribbon Storage!!!

Posted on

Happy Thursday! This week is flying by it seems. Today I’m sharing with you my ribbon storage. I recently changed it up to this style and I love it!!!

My Ribbon Storage, www.LaurasStampPad.com

I have all of my ribbons in one of these little show box plastic containers. The awesome thing about these is that they are cheap. I can typically get them from $89-$1.00. They can be found at a big box store (Wal-Mart, Target, etc.) so they are easy to find! They hold a decent amount of spools in each container and stack well. One of the things I love the most is that they are clear on the bottom!

Clear Box Ribbon Storage, www.LaurasStampPad.com

I can flip it over and look to see if I have a specific ribbon or to see which container it is in. They are fairly tight in there so it’s not like shaking it around will make a mess. (PS: It’s already a mess. I do have pins to put in the ribbon to keep them neat but I don’t always put them on there and sometimes the hole it creates makes it not worth the neatness.)

Shoe Box Container, www.LaurasStampPad.com

I have a little label on each of my containers so I know what is inside each…..not that I can’t tell. The labels are just so pretty though! My other container has baggies of the threads and baker’s twines as well. These containers fit so much stuff! I LOVE THEM!!!

If you would like to see this all in action, check out the Video Tutorial below or click here! Be sure to give the video a thumbs up if you liked it and don’t forget to subscribe if you are new. If you would like a notification when I post a new video, be sure to click the bell right next to the subscribe!!! Let me know if you have any tip and tricks to share in the comments below!

Happy Stampin’

~Laura

Don’t forget Stampin’ Up! Gift Certificates make great gifts…..even last minute!!! Click here to reach out and get a gift certificate!


Technique Tuesday – Boxes & Boughs!!!

Posted on

Happy Tuesday!!! That means I have a fabulous technique to share with you today! With Christmas less than a week away, it’s all about gift packaging and last minute gifts! These boxes and boughs are sure to make things merry and bright!

Boxes & Boughs, www.LaurasStampPad.com

These acetate boxes are super fun to decorate and I have put lots of different items in there as gifts – cards, Stampin’ Dimensionals, and gift certificates!

I started by popping up the Acetate Box. It’s already scored and all so just fold on the score lines and pop it up! Next, I took some Real Red cardstock and created a belly band. I have found that scoring the cardstock doesn’t work very well because the lines sometimes aren’t exact so it fits weird. What I do is just wrap it around, slide it off and press on the fold lines. This just seems to work best for me. Then I layered on a piece of Merry Little Christmas Designer Series Paper (retiring). The paper is black and white but I sponged on some green very lightly for a little more color! I used Tear And Tape to secure the ends of the belly band together.

Gift Packaging, www.LaurasStampPad.com

Now for the decoration, I used a hot glue gun! First, I added the little Green Sprig and pressed it into the glue. Next, I created 2 loops with the Striped Ribbon and tied the center tight using the Black Baker’s Twine. This is much easier that tying it into a knot and it allows for the stripes to show. If you do a knot, it will make the one side backwards. This ribbon does have wire in it so you can mold it as needed! The Mini Ornament is secured to the bow with the Black Baker’s Twine as well. I hot glued this to the front as well. Be sure it is all on the belly band so it can still slide off. The tag was created with the Merry Little Labels Stamp Set (retiring) and coordinating Everyday Label Punch! Cute and simple gift packaging!

What would you put in this box to give to a friend or family member? Let me know in the comments below!

Today, I’m sharing a sneak peak to the 2018 Occasions Mini Catalog. Check out the Video Tutorial below or click here! Be sure to give the video a thumbs up if you liked it and don’t forget to subscribe if you are new. If you would like a notification when I post a new video, be sure to click the bell right next to the subscribe!!! Let me know if you have any tip and tricks to share in the comments below!

Happy Stampin’

~Laura

Product List


Laura’s Craft Room Tips & Tricks!!!

Posted on

Hello Stampers! We all love to craft. We all go through times where we want to throw something away because it’s frustrating! Today, I’m sharing some Craft Room Tips and Tricks of mine to help you with a few frustrations you might have! I hope you find these useful!!!

Fine Tip Glue Pen, www.LaurasStampPad.com

My first one is with the Fine Tip Glue Pen. This stuff is amazing for adhering small objects or delicate die cuts! It can be frustrating trying to put the needle back in it though. I have found that placing your find behind the tip and using that as a guide to slide the needle down into the tip helps. If you hold it up in the air and try to get it in, it takes much longer trying to get things lined up!

Clear Block Color Palette, www.LaurasStampPad.com

When you need some color to use with the Blender Pen or Aqua Painter, just press a clear block into the ink pad! Then you have some color. Many like to press the ink pad into the lid but I find that messy. Also, sometimes I don’t want the ink pad open for the entire time I’m coloring. This way I have my color and I can add drips of water to dilute the color or not. Once I’m done with the color palette, I simply run it under water to clean, use a baby wipe, or wipe it with rubbing alcohol and a paper towel!

Craft Room Tips & Tricks, www.LaurasStampPad.com

The next tip is about cleaning your cleaning pad!!! I know that might sound odd but it’s true. After using the Stampin’ Scrub for a while, you might notice that cleaning your stamps on there is making them dirtier than before. That means it is time to clean the Stampin’ Scrub! Red really seems to stick to the pad so after using red a lot, it’s a good idea to clean it! Simply run it under water until the water runs clean. Sometimes I’ll add a little squirt of hand soap but it’s not really necessary! After rinsing all the color out, let it dry and it’s good as new again!

Scissor Tweezers, www.LaurasStampPad.com

This tip is one that I use a lot. Sometimes it’s hard to get those little Rhinestones and Pearls on your project and perfectly placed (cough cough on that ink spot that somehow appeared). I have found that using Paper Snips as little tweezers really helps. Simply snip under the rhinestone or pearl, lift up and place it exactly where you want it on your project. Then put your finger on the top to hold it there and slide the scissors out. Of course, you could use tweezers but the bonus to this is that the Paper Snips have multiple uses and they are always on my craft table where as I have tweezers in my craft room…..couldn’t tell you where though!

Blender Pen Tip, www.LaurasStampPad.com

It happens….no worries! The tip of the Blender Pen smooshes down into the barrel. It is not a lost cause! Simply take a pair of tweezers and pinch the end and lightly pull. This will bring the marker tip back out of the barrel and you can use the pen like normal again. I’m not sure if it’s the same pen or 2 different ones but I have had this happen twice now and this trick works  perfectly!

Post It Note Tape, www.LaurasStampPad.com


Post It Notes or Post It Note Tape is your best friend with die cutting! This stuff is sticky enough to hold the die in place but not so sticky that it will rip your cardstock. I use this to hold framelits in place. It’s always super frustrating to stamp an image and then have it cut wrong. Then you have to start all over again. Another way I use it is for lining things up. For example, the quilt die was centered on my card and rather than measuring each time, I added the Post It Note Tape to either side and put a pen mark for the edge of the paper. Then I added this to each card to die cut and knew it was lined up! I can usually get 5+ cranks through the Big Shot before the piece starts to fall apart or not be sticky.

If you would like to see this all in action, check out the Video Tutorial below or click here! Be sure to give the video a thumbs up if you liked it and don’t forget to subscribe if you are new. If you would like a notification when I post a new video, be sure to click the bell right next to the subscribe!!! Let me know if you have any tip and tricks to share in the comments below!

Happy Stampin’

~Laura

Product List