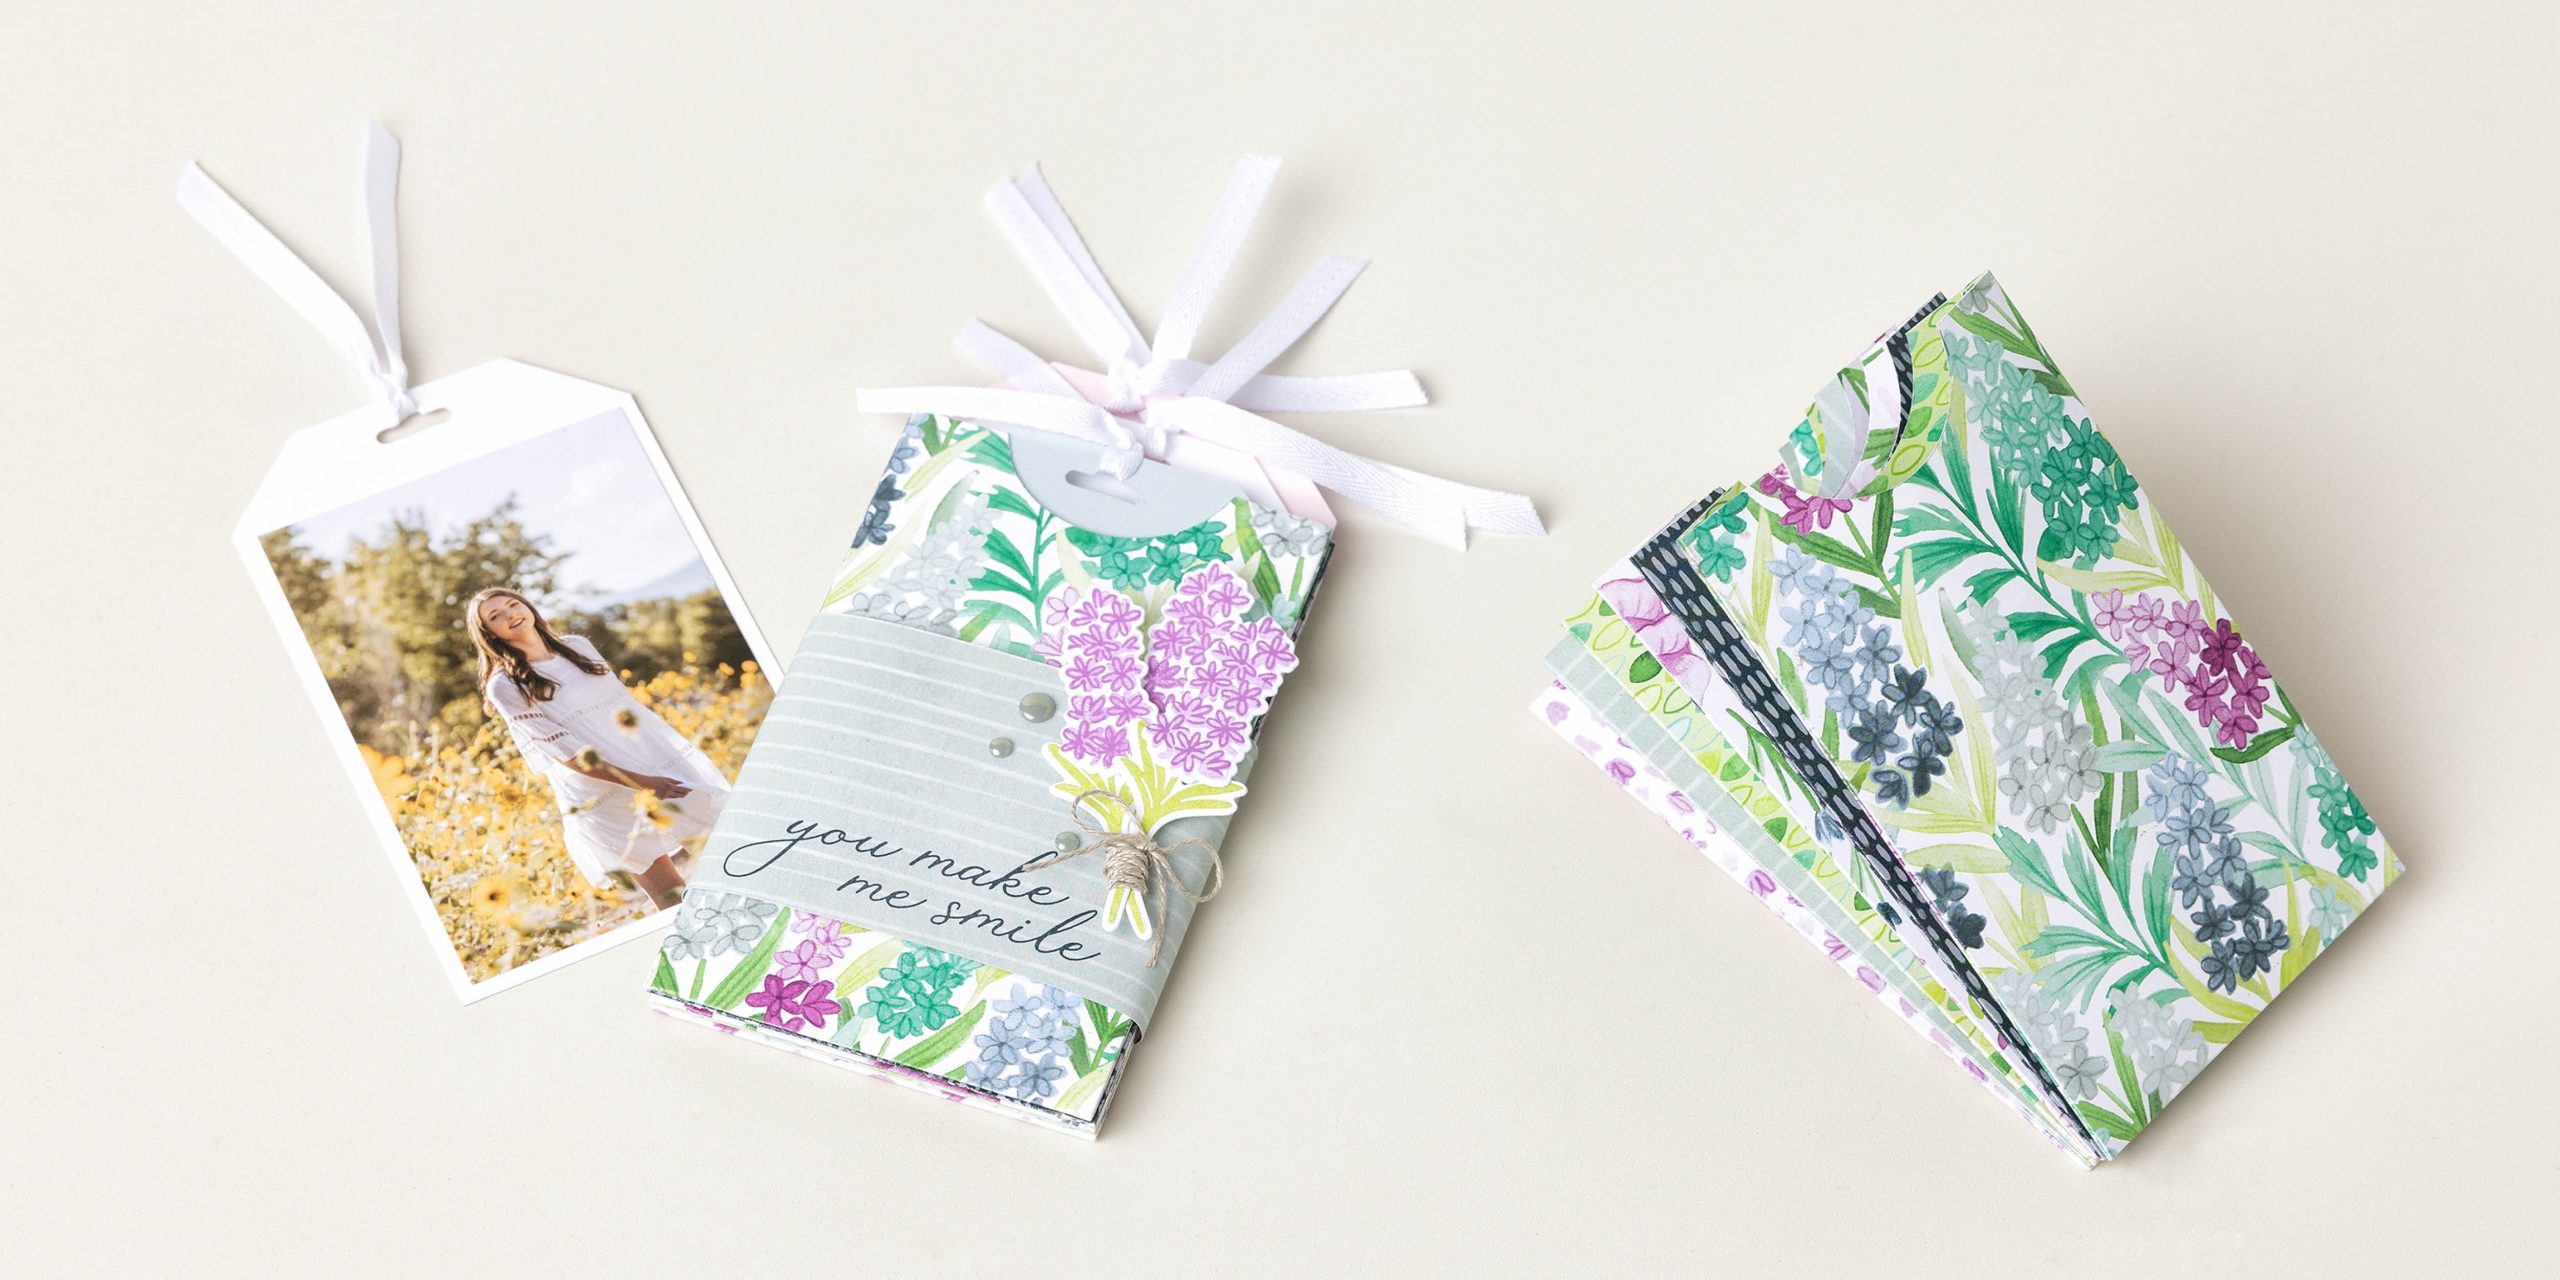
Are you a card maker, scrapbooker, or a little bit of everything?!? Whether you are a scrapbooker or not, this fun mini accordion album is cute and simple for everyone!
The fun thing about these mini accordion albums is that you can create it with as many pockets you wish! The one in the photo has six pockets! Each finished pocket measures 3-1/8″ x 5″ and holds a 3″ x 5″ tag.
INSTRUCTIONS:
For each pocket, start with a 3-5/8″ x 10″ piece of Designer Series Paper and score it at 1/4″ and 3-3/8″ on the short side, and at 5″ on the long side.
Assemble each pocket with Tear & Tape Adhesive, then join them by placing a strip of Tear & Tape Adhesive down the center between pockets to form the accordion.
Create six 3″ x 5″ tags and put them in the pockets! Feel free to add photos, journaling, and fun embellishments!
Wrap a piece of 7-1/2″ x 2-3/8″ Designer Series Paper around the album and adhere the ends together to create a belly band!
See how simple that is to create! The hardest part is deciding how to decorate or what photos to use! LOL Give this a try and let me know in the comments below how you decorated your mini accordion album!
It’s the season for wrapping gifts! Some like to use gift bags and others wrapping paper but what abut these fun DIY Gift Bags that are a combination of both! Using the Stampin’ Up! Product of the Month Designer Series Paper to create a gift bag is just stunning!!!
To create a gift bag:
Score two pieces of 12″ x 12″ Designer Series Paper with the same pattern at 3″ and 11-1/2″, then rotate a quarter turn and score at 3″.
Fold on all the score lines on both pieces and cut along one score line of the 3″ x 3″ square in the corner of the paper to create a tab. Repeat for the 1/2″ x 3″ corner tab!
Assemble the bag by adhering the 3″ side of one page to the 1/2″ side of the other page. I like to use Tear And Tape for a strong hold but I know many like to use liquid glue so they can slide it around and into place! Then tuck in the tabs and adhere the bottom flaps together!!
To create handles, score two 2-1/2″ x 12″ strips of Designer Series Paper along the short edge at 3/4″ and 1-3/4″. Fold at the score lines and adhere together!!
Adhere the handles to the inside of the bag and reinforce them by adhering a piece of 7-1/2″ x 2″ cardstock over the ends of each handle inside the bag!
What a beautiful look that you can create for your next gift! These DIY gift bags can come in handy when you need a gift in a pinch because let’s be honest, as a crafter, we all have tons of gorgeous Designer Paper on hand!
If you are loving this gorgeous Designer Paper and wondering how to get it, you certainly can but this month (December 2025) only! This is the True Blue Florals 12″ x 12″ Designer Paper which is the NEW Product of the Month! When your order reaches $75 (before tax and shipping), you will get to purchase the Exclusive Product of the Month for just $5! It will be different each month but always $5! Click here to shop and earn your True Blue Florals Paper!
I know I am way behind on posting this but I did remember to take photos before they left the house to those we love! The November 2021 Paper Pumpkin came in handy for Claire’s teachers and our neighbors!
I was able to roll a pair of fluffy cozy socks (REALLY TIGHT) and shove it into the little box and then I placed it into a large cellophane bag and dropped some chocolates in. I had to put them in a bag or Claire would have eaten all of the chocolate before they got to her teachers! Super cute and the tags and twine came in handy for added cuteness!
The rest of the boxes were stuffed with bags of Ritz Toffee and we took them to the neighbors! This stuff is AMAZING and so quick to make…..and so easy to inhale! 😉 I just love how it packaged up so cute to gift to everyone!
The November 2021 Paper Pumpkin saves the day again and I love it! My December Kit has arrived and I’m working on it now! It’s super cute with the puns! Now is the time to sign up for the January Kit which is themed Hugs & Kisses! The kit is all cards but there is an option to purchase a Treat Box Add-On perfect for Valentine’s Day!!! Paper Pumpkin for the win again and I love that it comes a month early to help me be prepared! Woot Woot! Click here to get signed up!
The Penguin Playmates Sale-A-Bration Designer Series Paper is beyond cute and so fun to play and create with! Check out this cute gift box that holds 3 little cards! It is so adorable but I can’t take the credit for this amazing idea. I got it from my upline, Meg Loven!
This would be a fabulous little gift to give a neighbor, co-worker, teacher, or friend! The little cards are 3″ x 6″ of Misty Moonlight with a 2-3/4″ square of the Penguin Playmates Designer Series Paper on the front. Then using some scraps of the designer paper and Basic White, I created the greeting. The greetings, stars, and presents are all from the Penguin Place Stamp Set! I stamped the images in Fresh Freesia and Misty Moonlight!
The little acetate box just has more designer paper wrapped around it and then one of the polar bears fussy cut out. How cute is he?!?! There are many images you could fussy cut out of the paper to add as your focal point!
Get started now on your Christmas Cards, Winter Birthdays, or even gifts for those you love with this adorable little set! All of the items are listed below and don’t forget that the Penguin Playmates Designer Series Paper is FREE with a $50 order till the end of September! Only 2 more days left!!!
Valentine’s Day is 1 month away so let’s get started on creating hand made goodies for those we love!!! They always say the way to someone’s heart is through their stomach. These Valentine’s Day Treats do just that. These are food and oven safe so a brownie or cookie would work perfectly!
Aren’t these little things adorable?? Little red heart shaped tins to fit just about anything. Chocolates, cookies, brownies, jewelry, conversation hearts, M&Ms and so much more fit in these tins.
Decorating these is super simple with the amazing products in the From My Heart Suite in the new mini catalog! There are heart shaped doilies that fit in the lid but also in the bottom of the tin for a super fabulous look! The doilies come in both red and pink! I also punched out a heart from the From My Heart Designer Series Paper and stamped a greeting in the center! The greeting is from the Heartfelt Stamp Set!
You all know that ribbon is my favorite embellishment so I just played with it in different ways to add texture to these adorable Valentine’s Day Treats. Just secure the ribbon with Stampin’ Dimensionals on the back of the punched out heart!
Don’t forget that Valentine’s Day is a month away so click on the supplies listed below to get all the goodies you need to make these adorable tins. Also, it’s Sale-A-Bration so you can enjoy a FREE item for every $50 you spend too!
Check out the full tutorial for these Valentine’s Day Treats in the video below or click here! Be sure to give the video a thumbs up if you liked it and don’t forget to subscribe if you are new. If you would like a notification when I post a new video, be sure to click the bell right next to the subscribe!!!
Happy Friday everyone!!! Today, I just wanted to share a little on how we have enjoyed spoiling the Doctors & Nurses at our Baby Ziggy appointments. It’s something that is so small and simple to me but yet I think it makes a great impact on them. We LOVE everyone in the office and really appreciate their kindness and thoughtfulness through this entire pregnancy. We actually enjoy going to each appointment because we get to see our friends! I will miss them once Ziggy arrives for sure! 🙂
Here are 2 of the goodies that we took. I fell in love with Jelly Beans over Easter and thought I would share some! I simply took a cellophane bag and added some Fresh Florals Designer Series Paper to the back with a little stamped greeting. The greeting says You Make Me So Happy but I crossed out me and wrote in Us! The top was tied off with some Lemon Lime Twist Striped Ribbon! This was easy and simple!
The April Paper Pumpkin Kit (check it out here) had those fabulous greetings with You Are a Lifesaver. I took some Lifesaver Mints and added them to a Clear Envelope. Then I just used some leftover twine from the kit to tie around it and add the card. This was a great way to use up those little cards since they were too small to mail and they fit the occasion perfectly!
Apparently I didn’t take pictures of most of the treats we took in. I used the January Paper Pumpkin Kit for our Valentine’s/February appointment. Paper Pumpkin really helped me out with lots of these! I just love how it sets you up for upcoming holidays with time to spare. Rather than thinking what will I do for the occasion that is tomorrow…….the kit comes a month early for that occasion! Click here to try out Paper Pumpkin and see how fabulous it is!
Most of our appointments were in the afternoon but then we got an 8:45 a.m. appointment on Ziggy’s Due Date! Early appointments means breakfast!!!! We took in cinnamon rolls. No, I didn’t make them at home but these cinnamon rolls do hold a special place in my heart. Side story: Every Sunday growing up we would go to church as a family and then go to my Grandparents house afterwards for “breakfast.” This consisted of milk and a sweet (cake, cinnamon roll, etc) for the kids and coffee and a sweet for the adults. We got to play with our cousins and have a good time! My Grandma would make the sweet item about 98% of the time but every once in a while she would buy these cinnamon rolls. I saw them in the store the other day and just had to get some. They were amazing and brought back so many memories. I love and miss you, Grandma!
I hope that this post helped give you some ideas on simple ways you can use your stamping/crafty side to share the love with those around you. We all know the power of a card and how much it can lift someone’s spirits. Little gifts like this can do the same but reach a larger audience – co-workers, nurses, doctors, firemen, teachers, police, postal workers, and so many others. Don’t just stash away your cards and projects, share them with those around you!
I hope you all have an amazing weekend and I’ll see you back here on Monday! Happy Stampin’
Happy Tuesday!!! You all know what that means….I have a fabulous technique to share. Awhile back I showed off my Welcome Frame (check that out here) and today I’m sharing some Memorial Day & Summer decor.
I love this flag decoration because it’s perfect for Memorial Day and 4th of July! Woot Woot! Let’s get started on how I created those amazing stars and stripes.
I started by die cutting Silver Foil with the Layering Circles Framelits. The bling and added texture of the scallop really made the flag pop, I thought! Next, I took the Swirly Scribbles Framelits and die cut out some Real Red for the stripes. I added this to a piece of scrap Whisper White that was big enough for the final circle to be die cut. The Fine Tip Glue Pen works wonders for small delicate images like this.
Then, for the stars, I tried two different ways. First, I stamped the stars from the Wood Words Stamp Sets in Night of Navy Ink all along the top of the white. Then I die cut out the circle. I thought it looked a little simple and wanted to step up my game with some silver bling! I took a piece of Night of Navy cardstock and stamped the stars in VersaMark Ink. Next, I heat embossed the stars in Silver Embossing Powder. Then to get that curve in the navy to match with my stripes, I used the outside edge of the Swirly Scribbles Framelit. Simply place it on the edge and run it through the Big Shot. It won’t come out perfectly the same but it gives a little swoop rather than being straight across. Check out the video below for more details on that as it’s a bit hard to explain! 🙂
Once I had the stars ready, I adhered them to the Whisper White and then die cut all of it with the Layering Circles Framelit. I did the circle at the end so that everything was cut out perfectly (the stars, stripes, and white base). Also, it was much easier than cutting the circle and trimming each piece that I layered on top!
I’m so excited that Summer is right around the corner. Eeeee I just love summer! This decor was super simple and just required lots of circles die cut to get each layer. First, I started with a Daffodil Delight circle die cut with the Laying Circles Framelits. Then I die cut out a Bermuda Bay one and snipped off the top to allow my sun to show through. I showed in the video how I used a scrap piece of Bermuda Bay which die cut out more like a strip with rounded edges. That works too as long as you have enough “ocean water” showing. Layering the ocean onto the sunset with the same curve of the circle.
Finally, for the sand, I spritzed some Crumb Cake cardstock with Chocolate Chip ink refill mixed with rubbing alcohol. This gives a nice speckled, textured look for my sand. Then I die cut out a circle and ripped it along the top to look like a rough edge of the beach. This gives some texture to the scene! Then I added the die cut Adirondack chair from the Seasonal Layers Framelits with the Fine Tip Glue Pen. I only added glue to the bottom rectangle and the arms of the chair. This allows the top (back) of the chair to not be glued down for a more 3D look. I love it!
Here are all of the amazing decor pieces I have created so far. Click here to see more details on the frame, Spring decor, and Birthday decor. Click here to check out the adorable box to store all the pieces in. Stay tuned for more decor pieces to come as we move throughout the seasons and holidays of the year!
If you would like to see all of this in action, check out the Video Tutorial below or click here! Be sure to give the video a thumbs up if you liked it and don’t forget to subscribe if you are new. If you would like a notification when I post a new video, be sure to click the bell right next to the subscribe!!!
Yesterday I showed off a fabulous home decor Welcome sign with interchangeable images for seasons and occasions. You can check that out here. In order to store the little decorations when not in use, I decorated a pizza box. This adorable thing is just pizza box perfection and great to use on gifts and so much more!
It’s just so fabulous and super super easy to make!!!! Just some ribbon and designer paper!!! It looks amazing too and perfect for gift giving! Gift cards, money, tags, mini cards, jewelry, food, and more fits in there. The box is food safe so putting in a cookie or something would be fabulous!
First I folded on all of the score lines for the Pizza Box. The plastic side goes inside the box (food safe liner). Once the box was assembled, I actually went ahead and added some Tear And Tape to the back inside flaps to keep the box from laying open. This is because the ribbon holds the frame of the box and I wanted it to be extra secure and not pulling on that ribbon. Then I cut 3 pieces of the Fresh Florals Designer Series Paper Stack measuring 3-1/4″ x 3-1/4″. That means I can get 9 squares (3 boxes) from one sheet of Designer Paper. Woot Woot! I added one to the top, one to the bottom and one to the inside lid!
For the ribbon, I added a strip of Tear And Tape all around the box. Then I pressed the Berry Burst Finely Woven Ribbon into the tape starting and ending in the front where the bow is. I picked this spot to start and end so that my bow would cover up the meet up point. Next, I made a little bow and added it to the front of the box with Mini Glue Dots! I just love it!!! Super cute and simple!
Do you like to make fun gift packaging? Let me know your favorite in the comments below! Also, stay tuned for more details on that cute summer decor in the box! It’s one for my Welcome Frame!
To purchase any of the items used today, click the images below! The Designer Paper is retiring and while supplies last!
Happy Tuesday!!! You all know what that means! I have a fabulous technique to share with you today and it’s this Welcome home decor frame! It is super fun and the interchangeable decoration keep it fresh every season/occasion!
I started with a frame measuring 12.5″ x 7.25″ which I got off of Amazon. It was actually a sports frame for an individual photo on the left and a team photo on the right. It was the perfect long shape for what I needed though! 🙂 I cut a piece of 12″ x 12″ Whisper White cardstock down to fit. Using the Large Letters Framelits, I die cut out the letter in Basic Black and glued them on with Fine Tip Glue Pen. When I did this in class some did it straight across, some diagonal left to right, and some up and down like mine. TIPS: Make sure you allow enough space for the decoration since it’s bigger than a letter. Also, be sure to stay away from edge enough for the frame to fit in since there is a bit of a lip.
For Spring, I did these beautiful butterflies using the Watercolor Wings Stamp Set. I started with a Pool Party scallop circle die cut from the Layering Circles Framelits. Then I stamped the butterfly in Calypso Coral (full strength, stamped off once, stamped off twice)! Using the Bold Butterfly Framelits and Butterfly Thinlits (both retiring), I die cut out the butterflies. I added them to the scallop with Stampin’ Dimensionals and put a magnet on the back!
I made Birthday decorations to display the month, week, or day of someone’s birthday. Here is the strawberry cupcake which I stamped in Flirty Flamingo Ink (full strength, stamped off once, stamped off twice). I used the Sweet Cupcake Stamp Set and coordinating Cupcake Cutouts Framelits (both retiring). For the liner, I used Soft Suede Ink, Crumb Cake Ink (full strength) and Crumb Cake Ink (stamped off once).
I added the cupcake with Stampin’ Dimensionals to a scallop circle die cut from the Myths & Magic Glimmer Paper. YUM! Can’t wait to display this in August for my birthday!!! Also, don’t forget to add the magnet to the back!
Here is a chocolate cupcake too! I’m more of a white cake girl over chocolate any day but thought I would do one of each. I used more Myth’s & Magic Glimmer Paper for the base. The cupcake was stamped with Chocolate Chip Ink (full strength, stamped off once, stamped off twice) and the same liner as the Strawberry one! Don’t forget to add the magnet to the back!
This one will go up in December at our house because Brad loves chocolate and his birthday is then! 🙂
Stayed tuned for tomorrow where I will show the adorable little box to store all of these in and I’ll be making more decorations as the year goes on. Feel free to give suggestions in the comments below of some good ones for holidays or seasons. I would love to hear what you think.
If you would like to see this all in action, check out the Video Tutorial below or click here! Be sure to give the video a thumbs up if you liked it and don’t forget to subscribe if you are new. If you would like a notification when I post a new video, be sure to click the bell right next to the subscribe!!!
Happy Tuesday!!! That means I have a fabulous technique to share with you today! With Christmas less than a week away, it’s all about gift packaging and last minute gifts! These boxes and boughs are sure to make things merry and bright!
These acetate boxes are super fun to decorate and I have put lots of different items in there as gifts – cards, Stampin’ Dimensionals, and gift certificates!
I started by popping up the Acetate Box. It’s already scored and all so just fold on the score lines and pop it up! Next, I took some Real Red cardstock and created a belly band. I have found that scoring the cardstock doesn’t work very well because the lines sometimes aren’t exact so it fits weird. What I do is just wrap it around, slide it off and press on the fold lines. This just seems to work best for me. Then I layered on a piece of Merry Little Christmas Designer Series Paper (retiring). The paper is black and white but I sponged on some green very lightly for a little more color! I used Tear And Tape to secure the ends of the belly band together.
Now for the decoration, I used a hot glue gun! First, I added the little Green Sprig and pressed it into the glue. Next, I created 2 loops with the Striped Ribbon and tied the center tight using the Black Baker’s Twine. This is much easier that tying it into a knot and it allows for the stripes to show. If you do a knot, it will make the one side backwards. This ribbon does have wire in it so you can mold it as needed! The Mini Ornament is secured to the bow with the Black Baker’s Twine as well. I hot glued this to the front as well. Be sure it is all on the belly band so it can still slide off. The tag was created with the Merry Little Labels Stamp Set (retiring) and coordinating Everyday Label Punch! Cute and simple gift packaging!
What would you put in this box to give to a friend or family member? Let me know in the comments below!
Today, I’m sharing a sneak peak to the 2018 Occasions Mini Catalog. Check out the Video Tutorial below or click here! Be sure to give the video a thumbs up if you liked it and don’t forget to subscribe if you are new. If you would like a notification when I post a new video, be sure to click the bell right next to the subscribe!!! Let me know if you have any tip and tricks to share in the comments below!
![Sweet Blooms Photopolymer Stamp Set (English) [ 165181 ]](https://assets1.tamsnetwork.com/images/EC042017NF/165181s.jpg "Sweet Blooms Photopolymer Stamp Set (English) [ 165181 ]")
![Pretty Florals Bundle [ 165179 ]](https://assets1.tamsnetwork.com/images/EC042017NF/165179s.jpg "Pretty Florals Bundle [ 165179 ]")
![Hole Punch Assortment [ 165409 ]](https://assets1.tamsnetwork.com/images/EC042017NF/165409s.jpg "Hole Punch Assortment [ 165409 ]")
![1-3/4" (4.4 Cm) Circle Punch [ 119850 ]](https://assets1.tamsnetwork.com/images/EC042017NF/119850s.jpg "1-3/4\" (4.4 Cm) Circle Punch [ 119850 ]")
![Granny Apple Green Stampin' Pad [ 147095 ]](https://assets1.tamsnetwork.com/images/EC042017NF/147095s.jpg "Granny Apple Green Stampin' Pad [ 147095 ]")
![Petunia Pop Classic Stampin Pad [ 163811 ]](https://assets1.tamsnetwork.com/images/EC042017NF/163811s.jpg "Petunia Pop Classic Stampin Pad [ 163811 ]")
![Secret Sea Classic Stampin' Pad [ 165285 ]](https://assets1.tamsnetwork.com/images/EC042017NF/165285s.jpg "Secret Sea Classic Stampin' Pad [ 165285 ]")
![Basic White 8 1/2" X 11" Cardstock [ 166780 ]](https://assets1.tamsnetwork.com/images/EC042017NF/166780s.jpg "Basic White 8 1/2\" X 11\" Cardstock [ 166780 ]")
![Cloud Cover 12" X 12" (30.5 X 30.5 Cm) Two Tone Cardstock [ 166708 ]](https://assets1.tamsnetwork.com/images/EC042017NF/166708s.jpg "Cloud Cover 12\" X 12\" (30.5 X 30.5 Cm) Two Tone Cardstock [ 166708 ]")
![Petunia Pop 12" X 12" (30.5 X 30.5 Cm) Two Tone Cardstock [ 166690 ]](https://assets1.tamsnetwork.com/images/EC042017NF/166690s.jpg "Petunia Pop 12\" X 12\" (30.5 X 30.5 Cm) Two Tone Cardstock [ 166690 ]")
![Pretty In Pink 12" X 12" (30.5 X 30.5 Cm) Two Tone Cardstock [ 166693 ]](https://assets1.tamsnetwork.com/images/EC042017NF/166693s.jpg "Pretty In Pink 12\" X 12\" (30.5 X 30.5 Cm) Two Tone Cardstock [ 166693 ]")
![Misty Moonlight & White 1/4" (6.4 Mm) Starter Ribbon Pack [ 165276 ]](https://assets1.tamsnetwork.com/images/EC042017NF/165276s.jpg "Misty Moonlight & White 1/4\" (6.4 Mm) Starter Ribbon Pack [ 165276 ]")
![Linen Thread [ 104199 ]](https://assets1.tamsnetwork.com/images/EC042017NF/104199s.jpg "Linen Thread [ 104199 ]")
![2025–2027 In Color™ Flat Pearls [ 165192 ]](https://assets1.tamsnetwork.com/images/EC042017NF/165192s.jpg "2025–2027 In Color™ Flat Pearls [ 165192 ]")
![Stampin' Dimensionals [ 104430 ]](https://assets1.tamsnetwork.com/images/EC042017NF/104430s.jpg "Stampin' Dimensionals [ 104430 ]")


")
 Designer Series Paper")


 Envelopes")
 Acetate Card Boxes")


")
 Double-Stitched Satin Ribbon")


 Mini Striped Ribbon")


")


 Striped Ribbon")

