Faux Embossing with Punches!!!

Posted on

Happy Technique Tuesday!!! You all know what that means!!! I have a fabulous technique to share with you all today! I’m not really sure if there is an official name for this so I’m calling it Faux Embossing with Punches!!

Faux Embossing with Punches, www.LaurasStampPad.com

Look how fabulous that white panel looks with those butterflies all over. The awesome thing about this technique is that 1. it uses up scraps and 2. you can do it with any of your punches.

I started with a Grapefruit Grove card base. Next, I took a piece of Whisper White cardstock measuring 2″ x 5-1/4″ and placed a lot of punched butterflies all over it. I punched the butterflies out of scrap white cardstock using the Butterfly Duet Punch. Don’t worry! For those of you who haven’t had a chance to order this yet, it will be available again soon. The butterflies can be placed straight up and down or angled all over. Be sure to allow the butterflies to fall off the edges so it looks like the pattern continues.

Once you have all the butterflies in place, simply turn it over and use the edge of the cardstock as a guide to trim off the butterflies hanging over the edge. Then I added this to the card front and tied some ribbon around it. Using the Butterfly Gala Stamp Set, I stamped the greeting in the lower right corner

Butterfly Duet Punch, www.LaurasStampPad.com

 For the butterflies, I stamped the outline in Grapefruit Grove full strength.  Then the solid image was stamped off once for that lighter look. The centers and antennae were done in Memento Black Ink. TIP: To get the antennae in the right spot, place the butterfly where you would like it, then move it down a smidge. Stamp the antennae above the butterfly. Then attach the butterfly to the card correctly placed on the antennae. This is much easier than trying to stamp the antennae after the butterfly is placed down and hoping they look attached.

If you would like to see this all in action, check out the video below or click here! Be sure to give the video a thumbs up if you liked it and don’t forget to subscribe if you are new. If you would like a notification when I post a new video, be sure to click the bell right next to the subscribe!!!

Happy Stampin’

~Laura


Technique Tuesday: Sponging Butterflies!!!

Posted on

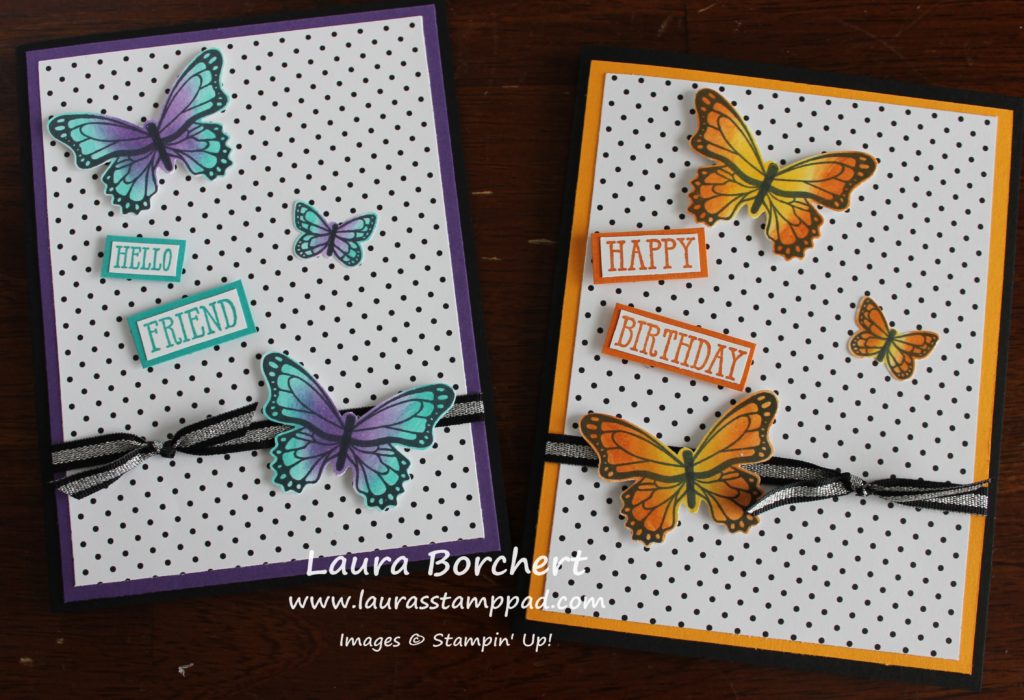
Happy Technique Tuesday, everyone!!! You all know I am loving butterflies right now! I also know that you all are loving them too because the Butterfly Duet Punch flew off the shelves like magic. Wowza there were so many sold so quickly, Stampin’ Up couldn’t keep up and trust me they were ordering more just as fast as we were buying. So for those of you who have this amazing bundle, check this out. For those of you still waiting, Pin This or save it for later! Sponging butterflies is soooooo much fun and endless color options! A big shout out to Patty Bennett for the fabulous inspiration!

Sponging Butterflies, www.LaurasStampPad.com

Are these not the most stunning things you have ever seen??? LOVE IT!!!!! It is super easy to do too which is just icing on the cupcake!

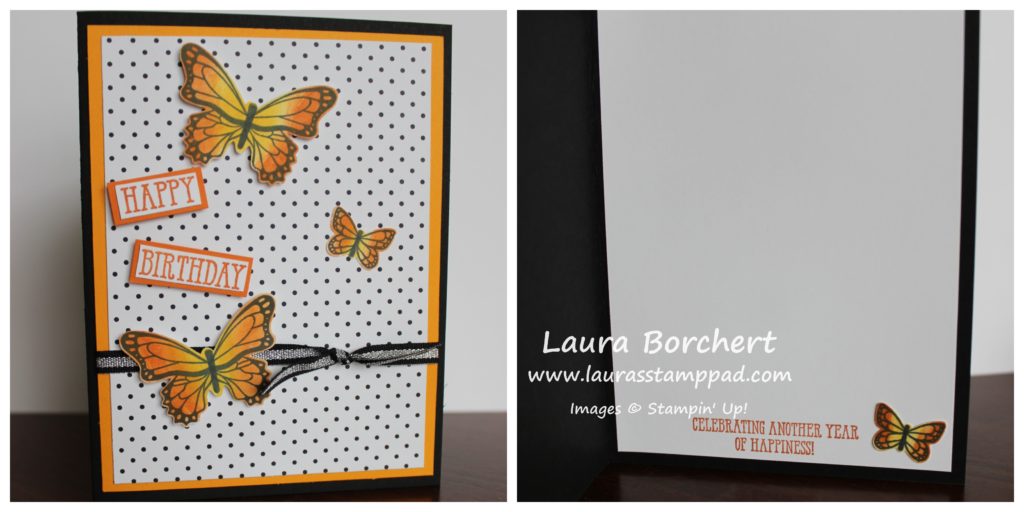
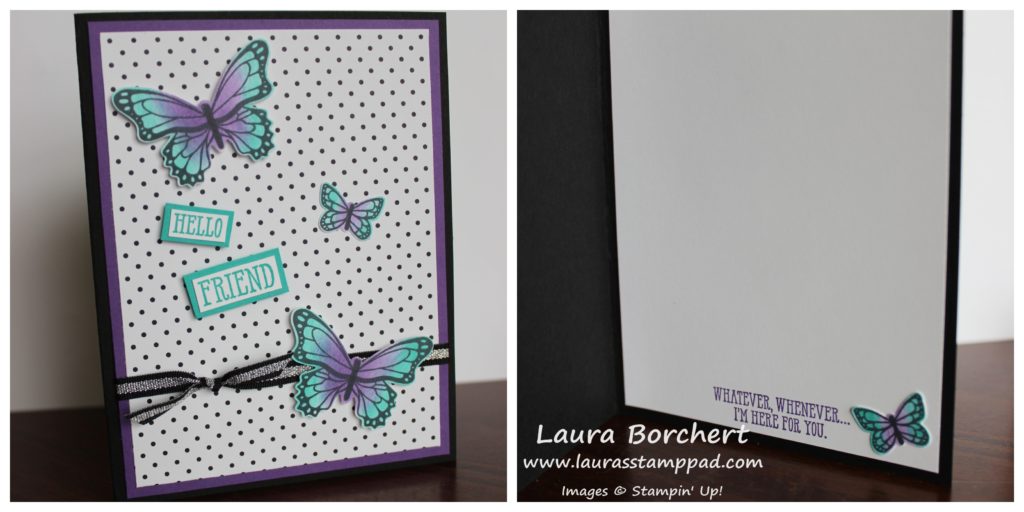
I started with a Basic Black card base. Next, I layered a piece of the Botanical Butterfly Sale-A-Bration Designer Paper (3-3/4″ x 5″) onto a piece of colored cardstock (4″ x 5-1/4″). I used Gorgeous Grape and Mango Melody for the samples above! Before adding this layer to the card front, I tied some Black/Silver Striped Ribbon around the bottom. I love the little hint of shimmer in this ribbon but still sticking to a black and white with pops of color theme!

Orange Butterflies, www.LaurasStampPad.com

Also, since the card base is black, I had to add a piece of Whisper White to the inside of the card. Using the Well Said Stamp Set, I stamped the coordinating greeting from the front on the bottom of the inside. The 4th little butterfly that is punched out fits perfectly on the inside as well for a fabulous look!!! The greeting on the front was just stamped, trimmed around and layered on to coordinating cardstock to really make it POP! I added the greeting with Stampin’ Dimensionals. For the card above, I used Pumpkin Pie on the greeting!

Color Combinations, www.LaurasStampPad.com

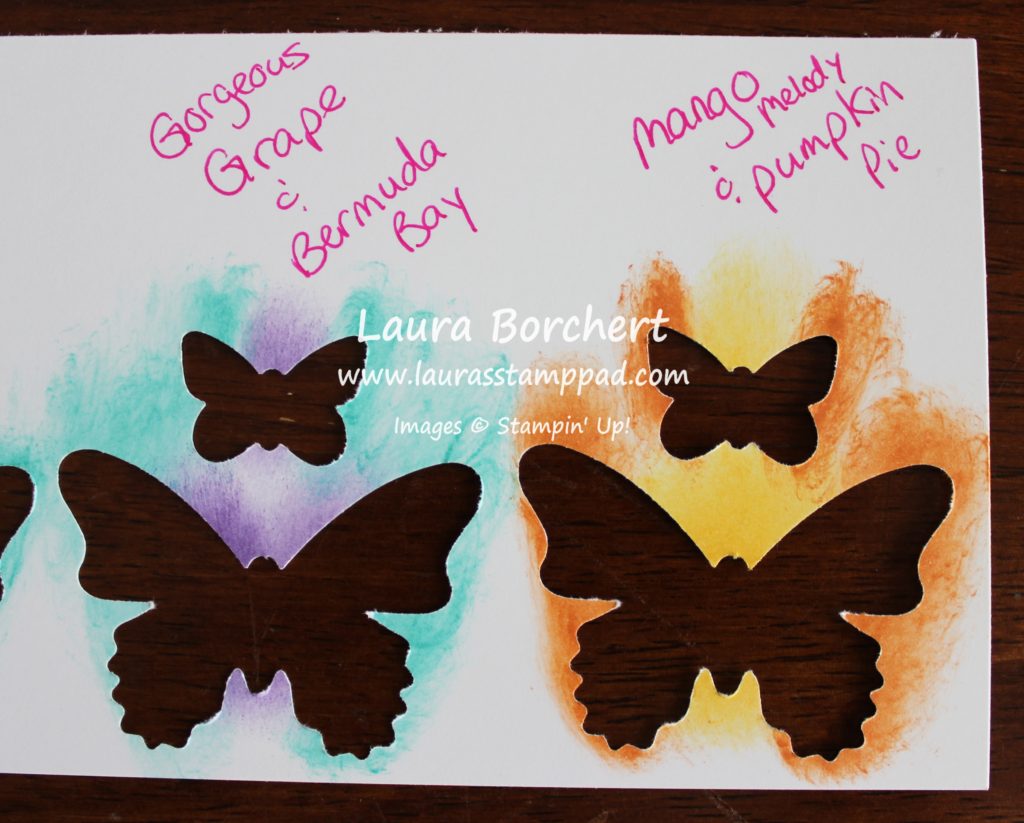
Okay now for sponging butterflies to make them look stunning! Simply stamp your favorite butterfly style from the Butterfly Gala Stamp Set in Black Ink onto Whisper White cardstock. Then using a Sponge Dauber, add some color down the center. For the big butterfly, I was able to just dauber up and down. For the little butterfly, I had to sort of tilt it to the side to only add a little bit of color. If I used the full dauber, it would have covered the whole butterfly. As you can see, I used Gorgeous Grape and Bermuda Bay for one of the butterflies and Pumpkin Pie and Mango Melody for the other. After the centers are complete, take the second color and brush the edges, making sure to blend into the center color a bit. Don’t worry, it will look a bit messy but once you punch them out. AMAZING!

Purple Butterflies, www.LaurasStampPad.com

If you are dying to recreate this and don’t have the Butterfly Duet Punch yet, you can always fussy cut the butterflies! Which color combination is your favorite?

If you would like to see this all in action, check out the video below or click here! Be sure to give the video a thumbs up if you liked it and don’t forget to subscribe if you are new. If you would like a notification when I post a new video, be sure to click the bell right next to the subscribe!!!

Happy Stampin’

~Laura

Product List


Technique Tuesday – Banner Front Card!!!

Posted on

Happy Tuesday!!! I have a fabulous technique to share with you today! This banner front card is fun and different from just a regular card! It’s also a fabulous masculine card which I struggle with! Luckily it works for Valentine’s Day, Father’s Day, and even Birthdays and Graduation. Just mix up the greeting!!! Also, a shout out to Karla Endris for the inspiration on this card!

Banner Front Card, www.LaurasStampPad.com

Which one do you like best?? Let me know in the comments below! Not only is the greeting different but I have a different color banner for each. On the Smoky Slate banner card, I stamped off once with the grease spots. For the Basic Gray banner, I stamped in full strength Smoky Slate!!!

I started with a 7-3/4″ X 4-1/4″ card base and scored it at 5-1/2″ (or 2-1/4″) depending on which way you prefer to measure). This allows for just a small flap for the card front. Next, I layered on a piece of the Classic Garage Designer Series Paper measuring 2″ x 4″. With this size, you can get 4 pieces from one sheet of 6″ x 6″. Then I die cut the gears from the Garage Gears Framelits in Real Red cardstock. Using the Fine Tip Glue Pen, I added the gears to the card front!

Geared Up Garage, www.LaurasStampPad.com

Using the grease spot stamp from the Geared Up Garage Stamp Set, I stamped it along the right inside edge in Smoky Slate. You can either go full strength or stamped off once or a little bit of both! For the banner, I cut a piece of Basic Gray (or Smoky Slate) measuring 2″ x 5-3/4″. Using the Banner Triple Punch, I punched the banner tips and then placed it inside the card. I closed that front flap and placed my finger along the edge as a guide. Then I added adhesive up to that edge where my finger was. This is to make sure I don’t have too much adhesive that it peaks out of the flap. Then simply close the flap over the banner with adhesive to adhere it. Using the coordinating Garage Gears Framelits, I die cut the greeting pieces and stamped it. Of course, I added it to the card front with Stampin’ Dimensionals for some texture.

All Geared Up To Celebrate, www.LaurasStampPad.com

For this version of the card, I stamped the greeting on a banner that is 1″ wide and used the Banner Triple Punch. Adhere the two banners together before adhering it to the card base.

If you would like to see this all in action, check out the video below or click here! Be sure to give the video a thumbs up if you liked it and don’t forget to subscribe if you are new. If you would like a notification when I post a new video, be sure to click the bell right next to the subscribe!!!

Happy Stampin’

~Laura
Product List


Laura’s Quick Tips: Did My Stamp Just Move??

Posted on

Happy Tuesday, everyone! I have a little bit of a Technique Tuesday and a little Laura’s Quick Tips today! If this has happened to me, surely it has happened to you. I have my Stamparatus all lined up and ready to go. After stamping a few, I line up the next one and just as a go to stamp it down, I realize it is not lined up correctly. Did My Stamp Just Move???

Did My Stamp Just Move, www.LaurasStampPad.com

Nope!!! The stamp didn’t move but the grid/scrap paper did or the foam mat did. My mind has been boggled so much on this and wondering how it moved and I could have thought I lined it up correctly. Then after looking at it more, I realize the paper or foam moved and it’s like Ahhh Hah!!! So when you think the stamp moved……check your paper and foam mat! 🙂

This fabulous card was created using the Stamparatus for that 2 step stamped image of flowers! The Stamparatus makes that image a breeze. One plate holds the folders for a fun color of your choice and the other plate holds the greenery piece! Boom Boom and you have a fabulous stamped image…..just make sure your grid and foam mat are in place!

I started with a Crumb Cake card base and then added a 2″ strip of the All My Love Designer Series Paper. I punched the bottom of it with the Banner Triple Punch to get those banner tips! Next, I added a piece of the All My Love Ribbon by just putting a little bit of Snail Adhesive down the banner and pressing the loop into it. It won’t feel secure at this time but when you place the stamped floral image over the top with Stampin’ Dimensionals, that will secure it better. For the floral piece I used Soft Sea Foam and Lovely Lipstick Inks.

Wishing You a Lovely Day, www.LaurasStampPad.com

For the greeting, I stamped it from the Forever Lovely Stamp Set in Lovely Lipstick. Can I say Lovely any more in one sentence?!?!? Then I punched it out with the 1-3/4″ Circle Punch! For a little texture, I die cut some of the greenery pieces from the coordinating Lovely Flowers Framelits. One of the framelits is actually a 2 for 1 piece. There are 2 of that greenery piece in the 1 framelit. I die cut the 3 framelits in Soft Sea Foam and got the 4 pieces to use around the greeting! The greeting piece was added to the card front with Stampin’ Dimensionals as well! Just lovely! (I had to do it.)

If you would like to see this all in action, check out the video below or click here! Be sure to give the video a thumbs up if you liked it and don’t forget to subscribe if you are new. If you would like a notification when I post a new video, be sure to click the bell right next to the subscribe!!!

Happy Stampin’

~Laura
Product List


Technique Tuesday – Dashing Deer Duplicates!!!

Posted on

Happy Tuesday!!! You all know what that means! I have a fabulous Technique to share with you today! I’m sharing this fun idea of creating Dashing Deer Duplicates!!! Today I’ll be sharing one card today and then the coordinating one tomorrow!!! Get a sneak peak of it in the video below!

Dashing Deer Duplicates, www.LaurasStampPad.com

For this card, I used Gold Foil, Whisper White, and Merry Merlot paper. The only ink used was Merry Merlot Ink and the only stamp set was the Dashing Deer Stamp Set. I also, used the Detailed Deer Framelits (Bundle & Save 10%). With these products I created this card and then used a similar layout and the die cut deer to create another card. Come back tomorrow for that one!

I started with a Whisper White card base which is great for writing on the inside of the card too! Next, I layered on a piece of Merry Merlot cardstock after stamping the floral image on the top and bottom. The image was stamped in Merry Merlot for that subtle look. Then I took a 4″ x 4″ piece of Gold Foil Paper and die cut the deer out with the Detailed Deer Framelits. I also die cut out a few flowers in Merry Merlot cardstock. BONUS: Stampin’ Up put a few of the flower framelits in the set so that you can die cut multiples at the same time. So I got all 3 of these flowers with just 1 crank through the Big Shot!

Detailed Deer Framelits, www.LaurasStampPad.com

Using the Fine Tip Glue Pen, I added the flowers around the deer! For the greeting, I stamped it in Merry Merlot from the Dashing Deer Stamp Set. To make the banner tips, I just used the Banner Triple Punch! Since I hadn’t used any Stampin’ Dimensionals just yet, I thought I needed to for the greeting! 🙂 You all know how much I love those things!

Come back again tomorrow to see how I used the die cut deer to create another card with the same stamps, ink, and paper!!!

If you would like to see this all in action, check out the video below or click here! Be sure to give the video a thumbs up if you liked it and don’t forget to subscribe if you are new. If you would like a notification when I post a new video, be sure to click the bell right next to the subscribe!!!

Happy Stampin’

~Laura
Product List


Technique Tuesday – Securing Chicken Wire to Your Card!!!!

Posted on

Happy Tuesday!!! That means I have a fun technique!!! We are securing Chicken Wire to your card….well not real chicken wire! Instead Stampin’ Up has created this fun Chicken Wire Element that is super cute and easy to add to your project!

Securing Chicken Wire to Your Card, www.LaurasStampPad.com

This card is perfect for Fall and Thanksgiving! I’m loving the colors and elements so much from the Country Lane Suite!

I started with an Old Olive card base. Next, I took a piece of Crumb Cake (4″ x 5-1/4″) and stamped the cotton floral image from the Country Home Stamp Set in Memento Black Ink. I used the Stamparatus so I had even spacing side to side and the images didn’t overlap. Not having to stress about stamp placement is amazing! Using the Stampin’ Blends, I colored the flowers. For the white cotton, I used the White Watercolor Pencil. It worked perfectly! Next, I added this piece to the card front.

Harvest Blessings, www.LaurasStampPad.com

For the greeting, I stamped it in Pumpkin Pie from the Country Home Stamp Set. I made sure to stamp it on the right hand side so I had room for my ribbon and bow on the left. Next, I layered this onto a piece of Pumpkin Pie cardstock. For the bow, I actually added a small piece of Braided  Linen Thread to the end, wrapping the ends to the back side and securing with Stampin’ Dimensionals. Then I took another piece to tie a bow and secure it on with a Mini Glue Dot. This faux bow look makes it look like it is wrapped around but yet the bow is not sideways! It’s perfect!

Before adding this on, I placed the Chicken Wire Element on the bottom of the Crumb Cake cardstock. I didn’t actually use adhesive on that piece but secured it with the Country Lane Designer Paper. Be sure to place the greeting piece off to the side as a guide for how low the designer paper needs to go so you aren’t covering up the designer paper or all of your stamped flowers. After securing the designer paper, I added the greeting on top with Stampin’ Dimensionals!!!

If you would like to see this all in action, check out the video below or click here! Be sure to give the video a thumbs up if you liked it and don’t forget to subscribe if you are new. If you would like a notification when I post a new video, be sure to click the bell right next to the subscribe!!!

Happy Stampin’

~Laura
Product List


Technique Tuesday – Black Ice Technique!!!

Posted on

Happy Tuesday!!! That means I have a fabulous technique to share with you!!! Today, it is the Black Ice Technique which I learned from the fabulous stamper, Karla Endris!!! Thanks Karla for this fun technique!!!

Black Ice Technique, www.LaurasStampPad.com

This picture sure doesn’t do this card any justice because you need to rotate it to see the fun shine!!!

I started with a piece of Coastal Cabana cardstock and stamped the tin tile image on each corner. This is from the Country Home Stamp Set and I used Coastal Cabana Ink for that subtle look. Next, I took a piece of the Galvanized Metallic Paper and lightly brushed Stazon Ink up and down the cardstock. Don’t be too heavy handed as you want it to look streaky and not solid. Then I stamped the flowers and pitcher from the Country Home Stamp Set in Stazon Ink and set it with the Heat Tool so it wouldn’t smear.

Flowers in a Kettle, www.LaurasStampPad.com

Now it is time for the ice part of the Black Ice Technique. Simply press the VersaMark Ink all over the top of your image to coat the entire piece. Then add Clear Embossing Powder for all of it and set it with the heat tool. Now you have that glassy shine of your image! I finished it off by coloring with the Stampin’ Blends Markers and layering it onto Basic Black cardstock. Using Stampin’ Dimensionals for some texture, I added it to the card front!

Teal Milk Pail, www.LaurasStampPad.com

Here is another sample that I created using that same Country Home Stamp Set!

Brown Milk Pail, www.LaurasStampPad.com

If you would like to see this all in action, check out the video below or click here! Be sure to give the video a thumbs up if you liked it and don’t forget to subscribe if you are new. If you would like a notification when I post a new video, be sure to click the bell right next to the subscribe!!!

Happy Stampin’

~Laura

Product List


Technique Tuesday – Diagonal Opening Card!!!

Posted on

Happy Tuesday!!! You all know that means I have  a fabulous technique to share. This one might not look cool at first but then when you open it you see the real magic. This diagonal opening card is super fun and the concept can be used for any occasion! Thank you to Margo Richardson for the amazing idea!

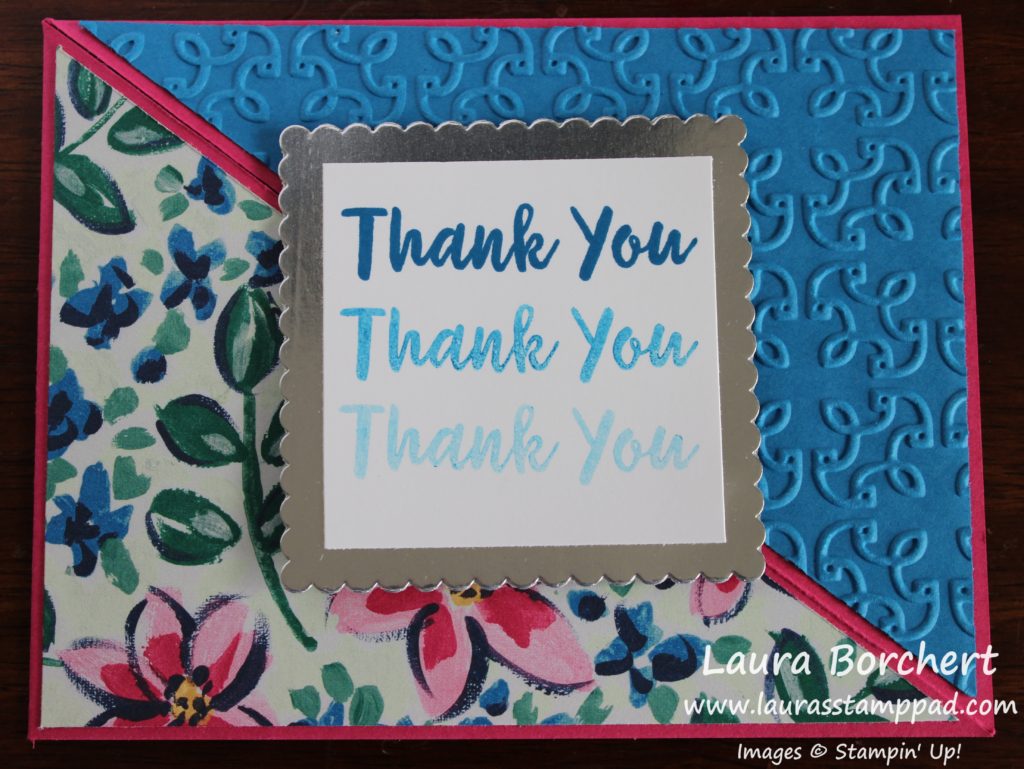
Diagonal Opening Card, www.LaurasStampPad.com

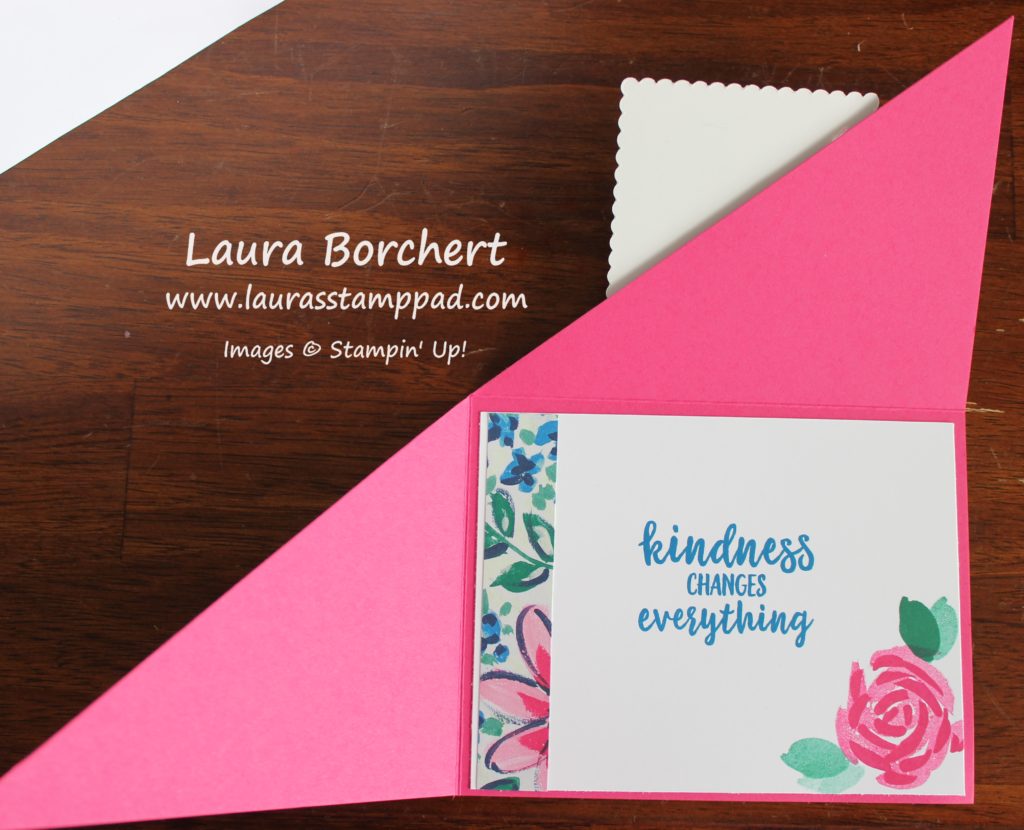
At first, I started with an 8-1/2″ x 11″ piece of Melon Mambo cardstock. I cut it diagonally from corner to corner using the Stampin’ Trimmer. Be sure to take out the scoring blade and then the cutting blade will be able to cut all the way to the ends. Also, I recommend starting in the middle and pushing out so you don’t crinkle the corner tips. Now that you have a giant triangle, it’s time to score. Score from the corner over to 5-1/2 and up at 4-1/4″. This will create a 4-1/4″ x 5-1/2″ rectangle in the corner and two triangle flaps to fold over as the front of the card!

Triangle Card, www.LaurasStamppad.com

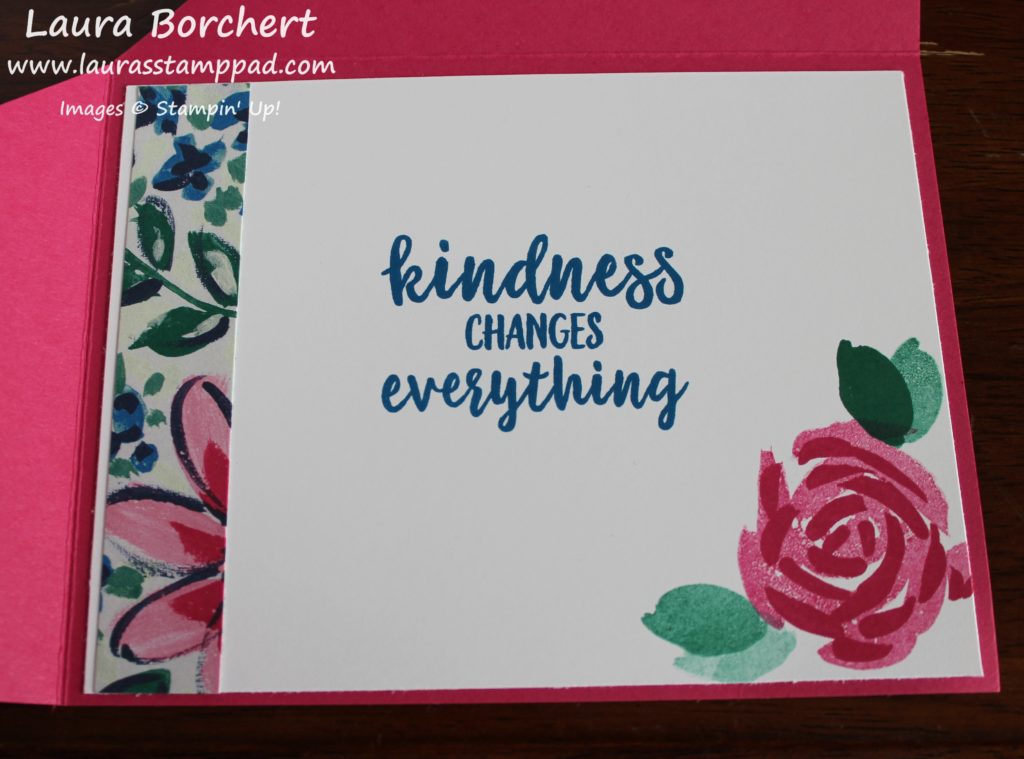
Now that we have the card base complete, it’s time to decorate. For the inside, I added a piece of Whisper White measuring 4″ x 5-1/4″. I stamped the greeting and flower from the Abstract Impressions Stamp Set. The greeting was done in Pacific Point Ink and the flower was Melon Mambo and Emerald Envy Ink. On the left hand side, I added a little piece of the leftover designer paper after cutting for the front of the card!

Roses, www.LaurasStampPad.com

For the front of the card, I cut a piece of Pacific Point cardstock into a 4″ x 5-1/4″ rectangle and then I cut it diagonally from corner to corner. Making sure I had the piece positioned correctly for the card, I placed it into the Garden Trellis Embossing Folder. There is only one way the paper can go on the card. These weird sized triangles make that part a little tricky. Using a piece of the Garden Impressions Designer Series Paper, I cut it into a 4″ x 5-1/4″ piece and cut it diagonally as well. The greeting was stamped in Pacific Point Ink from the Abstract Impressions Stamp Set. I inked it up and then stamped three times without going back to the ink for that ombre look. This piece was layered on to a scallop square of Silver Foil Paper. I used the Layering Squares Framelits to die cut it out. When placing the greeting on the front of the card, be sure to only add adhesive to the one corner/triangle so that it doesn’t seal the card closed! 🙂

If you would like to see this all in action, check out the video below or click here! Be sure to give the video a thumbs up if you liked it and don’t forget to subscribe if you are new. If you would like a notification when I post a new video, be sure to click the bell right next to the subscribe!!!

Happy Stampin’

~Laura

Product List


Technique Tuesday – Stamping-In-The-Round!!!

Posted on

Happy Tuesday!!!! Today, I have a fabulous technique to share with you!!! I am showing off the Stamping-In-The-Round Technique with the Stamparatus!!! Some techniques like watercoloring come out different each time but this is one that comes out the same each time and  it’s fabulous!!! I got this technique from fellow stamper Joanne Cantrell.

Stampin-In-The-Round, www.LaurasStampPad.com

This card is just so fabulous and rather easy to create. I love the added bling with the Glimmer Paper. 🙂

I started with a Smoky Slate card base and added a piece of the Merry Merlot Glimmer Paper from the Joyous Noel Pack. The Glimmer Paper measures 2″ x 5-1/2″. Next, I took a Mossy Meadow 3-1/2″ square and added it to the card front with Stampin’ Dimensionals. After placing that down, I knew where I could stamp the greeting. I used Merry Merlot Ink and the Peaceful Noel Stamp Set.

Peaceful Noel Wreath, www.LaurasStampPad.com

Now for that fabulous wreath that I created using the Stamparatus. First I created a template with squares and diamonds in a 3″ square. I placed the Whisper White 3″ square on the template and then placed the greenery piece from the Peaceful Noel Stamp Set on the edge. This is the start of the wreath. Using Mossy Meadow Ink, I stamped the first greenery piece. Then I rotated the square to the diamond template and stamped again. Continue rotating around and around until your wreath is complete. Next, I added a few holly berries in Merry Merlot. I found that it looked best to stamp them off to the side (on the white) so they would show up better. I added this to the card front and then tied a bow using the Copper & Merry Merlot Ribbon. Using Mini Glue Dots, I adhered the bow to the card front!

This technique is super handy for lots of different stamped images on corners or in a circle.

If you would like to see this all in action and what the template looks like, check out the video below or click here! Be sure to give the video a thumbs up if you liked it and don’t forget to subscribe if you are new. If you would like a notification when I post a new video, be sure to click the bell right next to the subscribe!!!

Happy Stampin’

~Laura

Product List


Technique Tuesday – Duplicate-able Holiday Card!!!

Posted on

Happy Tuesday!!! That means I have a fabulous technique for you today! This one is a super easy duplicate-able holiday card. I know this time of the year can be super crazy but we still want to send out a card made with love. Also, there is nothing like a little stamping therapy! 🙂

Duplicate-able Holiday Card, www.LaurasStampPad.com

This simple yet fabulous card with a little bit of bling is perfect for the Holiday Season! The other bonus to this card is that if you get them done early or late, it still applies because it says season. 🙂 Right?!?!?!

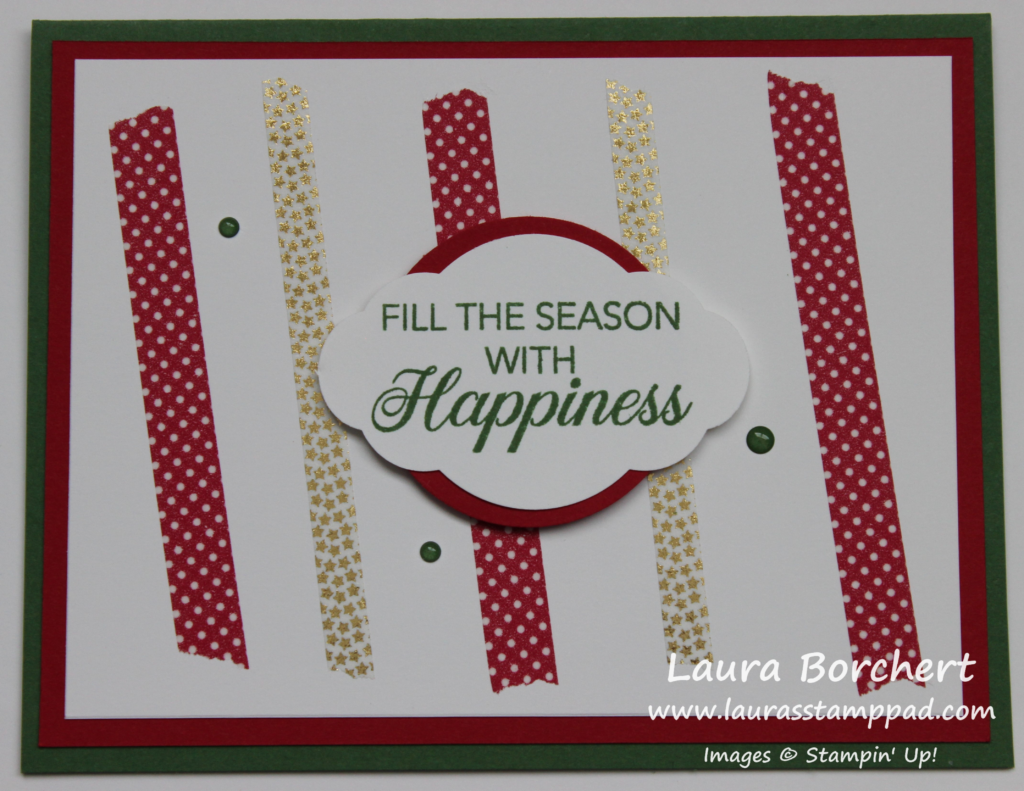
I started with the Suite Seasons Designer Washi Tape which has Garden Green, Cherry Cobbler and Real Red in it. Since Garden Green can be used with both reds, I used that as my card base. Then for the middle layer which is 4″ x 5-1/4″, I used Real Red or Cherry Cobbler based on which washi tape I used.

Filled with Happiness, www.LaurasStampPad.com

The Whisper White layer measures 3-3/4″ x 5″. I added the Suite Season Designer Washi Tape on each of the pieces. I like to start in the middle and work my way out. This seems to work best for spacing. Typically I like to go at a bit of a diagonal with the washi tape as well. There is no way I am going to get it perfectly straight so why not just angle it on purpose!

Suite Season Designer Washi Tape, www.LaurasStampPad.com

There are lots of different color combinations that you can create with the 5 rolls of washit tape in this pack. Three of the rolls have a foil shine in them as well – copper, silver, and gold! I love the little bit of bling!

Holly, Jolly, and Bright, www.LaurasStampPad.com

For the greeting, I used the Pretty Label Punch and 1-3/4″ Circle Punch. The greetings are from the Joyous Noel Stamp Set from the Holiday Mini Catalog but you could use whatever greeting will fit in the punch! All of the greetings were stamped in Garden Green Ink. This way I could use them on both the red and cherry cards. I layered the punched pieces together and added it to the card front with Stampin’ Dimensionals for a little bit of texture.

Washi Tape Holiday Card, www.LaurasStampPad.com

To finish off the cards, I added a few Rhinestones for some bling. Also, I used some of the Santa’s Workshop Enamel Shapes from the Holiday Mini Catalog.

I was able to create a lot of cards in no time at all and with minimal supplies. I love that I could get different looks but not have to use tons of different products. This is perfect for making multiples. How many Christmas or Holiday cards do you make each year? Let me know in the comments below!

If you are loving this look and want to make these to send out to your family and friends, click the supplies listed below to get started!

If you would like to see this all in action, check out the video below or click here! Be sure to give the video a thumbs up if you liked it and don’t forget to subscribe if you are new. If you would like a notification when I post a new video, be sure to click the bell right next to the subscribe!!!

Happy Stampin’

~Laura

Product List