Technique Tuesday – Flip Fold Mother’s Day Card!!!

Posted on

Happy Tuesday!!! I have a fabulous flip fold Mother’s Day Card to share with you today!!! Just in time to make for Mother’s  Day which is on May 14th!!! You could also change up the designer paper and greetings to make this card for any occasion!

Flip Fold Mother's Day Card, www.LaurasStampPad.com

So of course you can’t see the flip fold part until you watch the video tutorial below. So stay tuned!!! I got this amazing idea from fellow stamper, Julie Davison! She is amazing! Let’s get started!

Mother's Day Card, www.LaurasStampPad.com

First, I cut 2 card fronts (4-1/4″ x 5-1/2″) and one card base (3-3/4″ x 11″). I did my card fronts in Watermelon Wonder and Mint Macaron and the card base in Whisper White. Next, I scored the card base at 1″ & 6″. I added adhesive to the bottom rectangle (3-3/4″ x 5″) and placed it in the center of the Mint Macaron card base. Then I folded the rectangle above that down and the little 1″ flap fold back/up. I added adhesive to this flap and placed the Watermelon Wonder card base over the top, lining up both card bases. You want to make sure you line up the card bases rather that place the on the Watermelon Wonder with a border so that it lays flat. Now your card base is complete and it’s time to decorate!

For the front of the card, I added a piece of Affectionately Yours Designer Series Paper (3″ x 4/1/4″) to the bottom. I tied some Mint Macaron Sheer Linen Ribbon around the card to cover up the seam of the 2 types of paper! For the greeting, I die cut an oval using the Stitched Shapes Framelits. I just love how fabulous these are! The greeting was stamped in Night of Navy Ink and the flowers in Watermelon Wonder Ink. I used the Love & Affection Stamp Set. The greeting was added to the card front with Stampin’ Dimensionals.

Flip Fold Card, www.LaurasStampPad.com

Now for the inside panel, I added another piece of the Affectionately Yours Designer Series Paper (3-1/4″ x 4-3/4″). The copper accents really give a fabulous look to the card. I die cut another Stitched Shapes Oval and stamped the greeting from the Teeny Tiny Wishes Stamp Set. You could also use another greeting from the Love & Affection Stamp Set as well. Using that stamp set, I stamped a few flowers on the bottom panel and left the rest open to write in. Another option would be to stamp the middle and bottom panel and leave a lot of space for writing! It’s the perfect Mother’s Day card!

Technique Tuesday, www.LaurasStampPad.com

If you would like to see this all in action, check out my Video Tutorial below or click here! Don’t forget to give it a thumbs up if you liked it and be sure to subscribe if you are new. I post a new video every Tuesday and Thursday!

Happy Stampin’

~Laura


Tempting Techniques – T-Shirt Builder Bundle!!!

Posted on

Happy Tuesday!!! That means I have a fabulous technique to share with you using the T-Shirt Builder Bundle from the Occasions Mini Catalog! I love how this set is perfect for all ages and both men and women!!!

T-Shirt Builder Bundle, www.LaurasStampPad.com

This card is perfect for Father’s Day or change up the greeting and make it a Birthday Card!!! Either way, it’s the perfect Man Card and I really struggle with those! Let’s get started!

I used the T-Shirt Builder Bundle for this entire card! Starting with the shirt, I stamped the men’s shirt, buttons down the front, and the collar. All of them are stamped in Basic Black onto Pear Pizzazz. I stamped the tie in Basic Black onto Whisper White. Using the T-Shirt Builder Framelits, I die cut the shirt, collar, and tie. I thought the tie needed a pop of color so I colored in every other stripe with the Pacific Point Marker.

For the card, I started with a Pear Pizzazz card base. Next, I took a piece of Pacific Point cardstock (4″ x 5-1/4″) and stamped the tie on the background in Pacific Point Ink. This gives the background a some pattern. After stamping the background, I adhered it to the card base. Then I took a piece of Crumb Cake (4″ x 2″) and ripped around the top edge for a little texture. I stamped the greeting from Custom Tee Stamp Set. The set actually says RAD DAD but I omitted the Rad part but just inking Dad. I stamped it below the #1! Then I adhered it to the bottom of the Pacific Point on the card . Then I added the shirt. The actual shirt was added flat to the card but I added the collar with a Stampin’ Dimensional to make the shirt look more real!

If you would like to see this all in action, check out my Video Tutorial below or click here! Don’t forget to give it a thumbs up if you liked it and be sure to subscribe if you are new. I post a new video every Tuesday and Thursday! Check back tomorrow as I will be posting another sample using the T-Shirt Builder Bundle!

Happy Stampin’

~Laura


Technique Tuesday – Beautiful Reflection!!!

Posted on

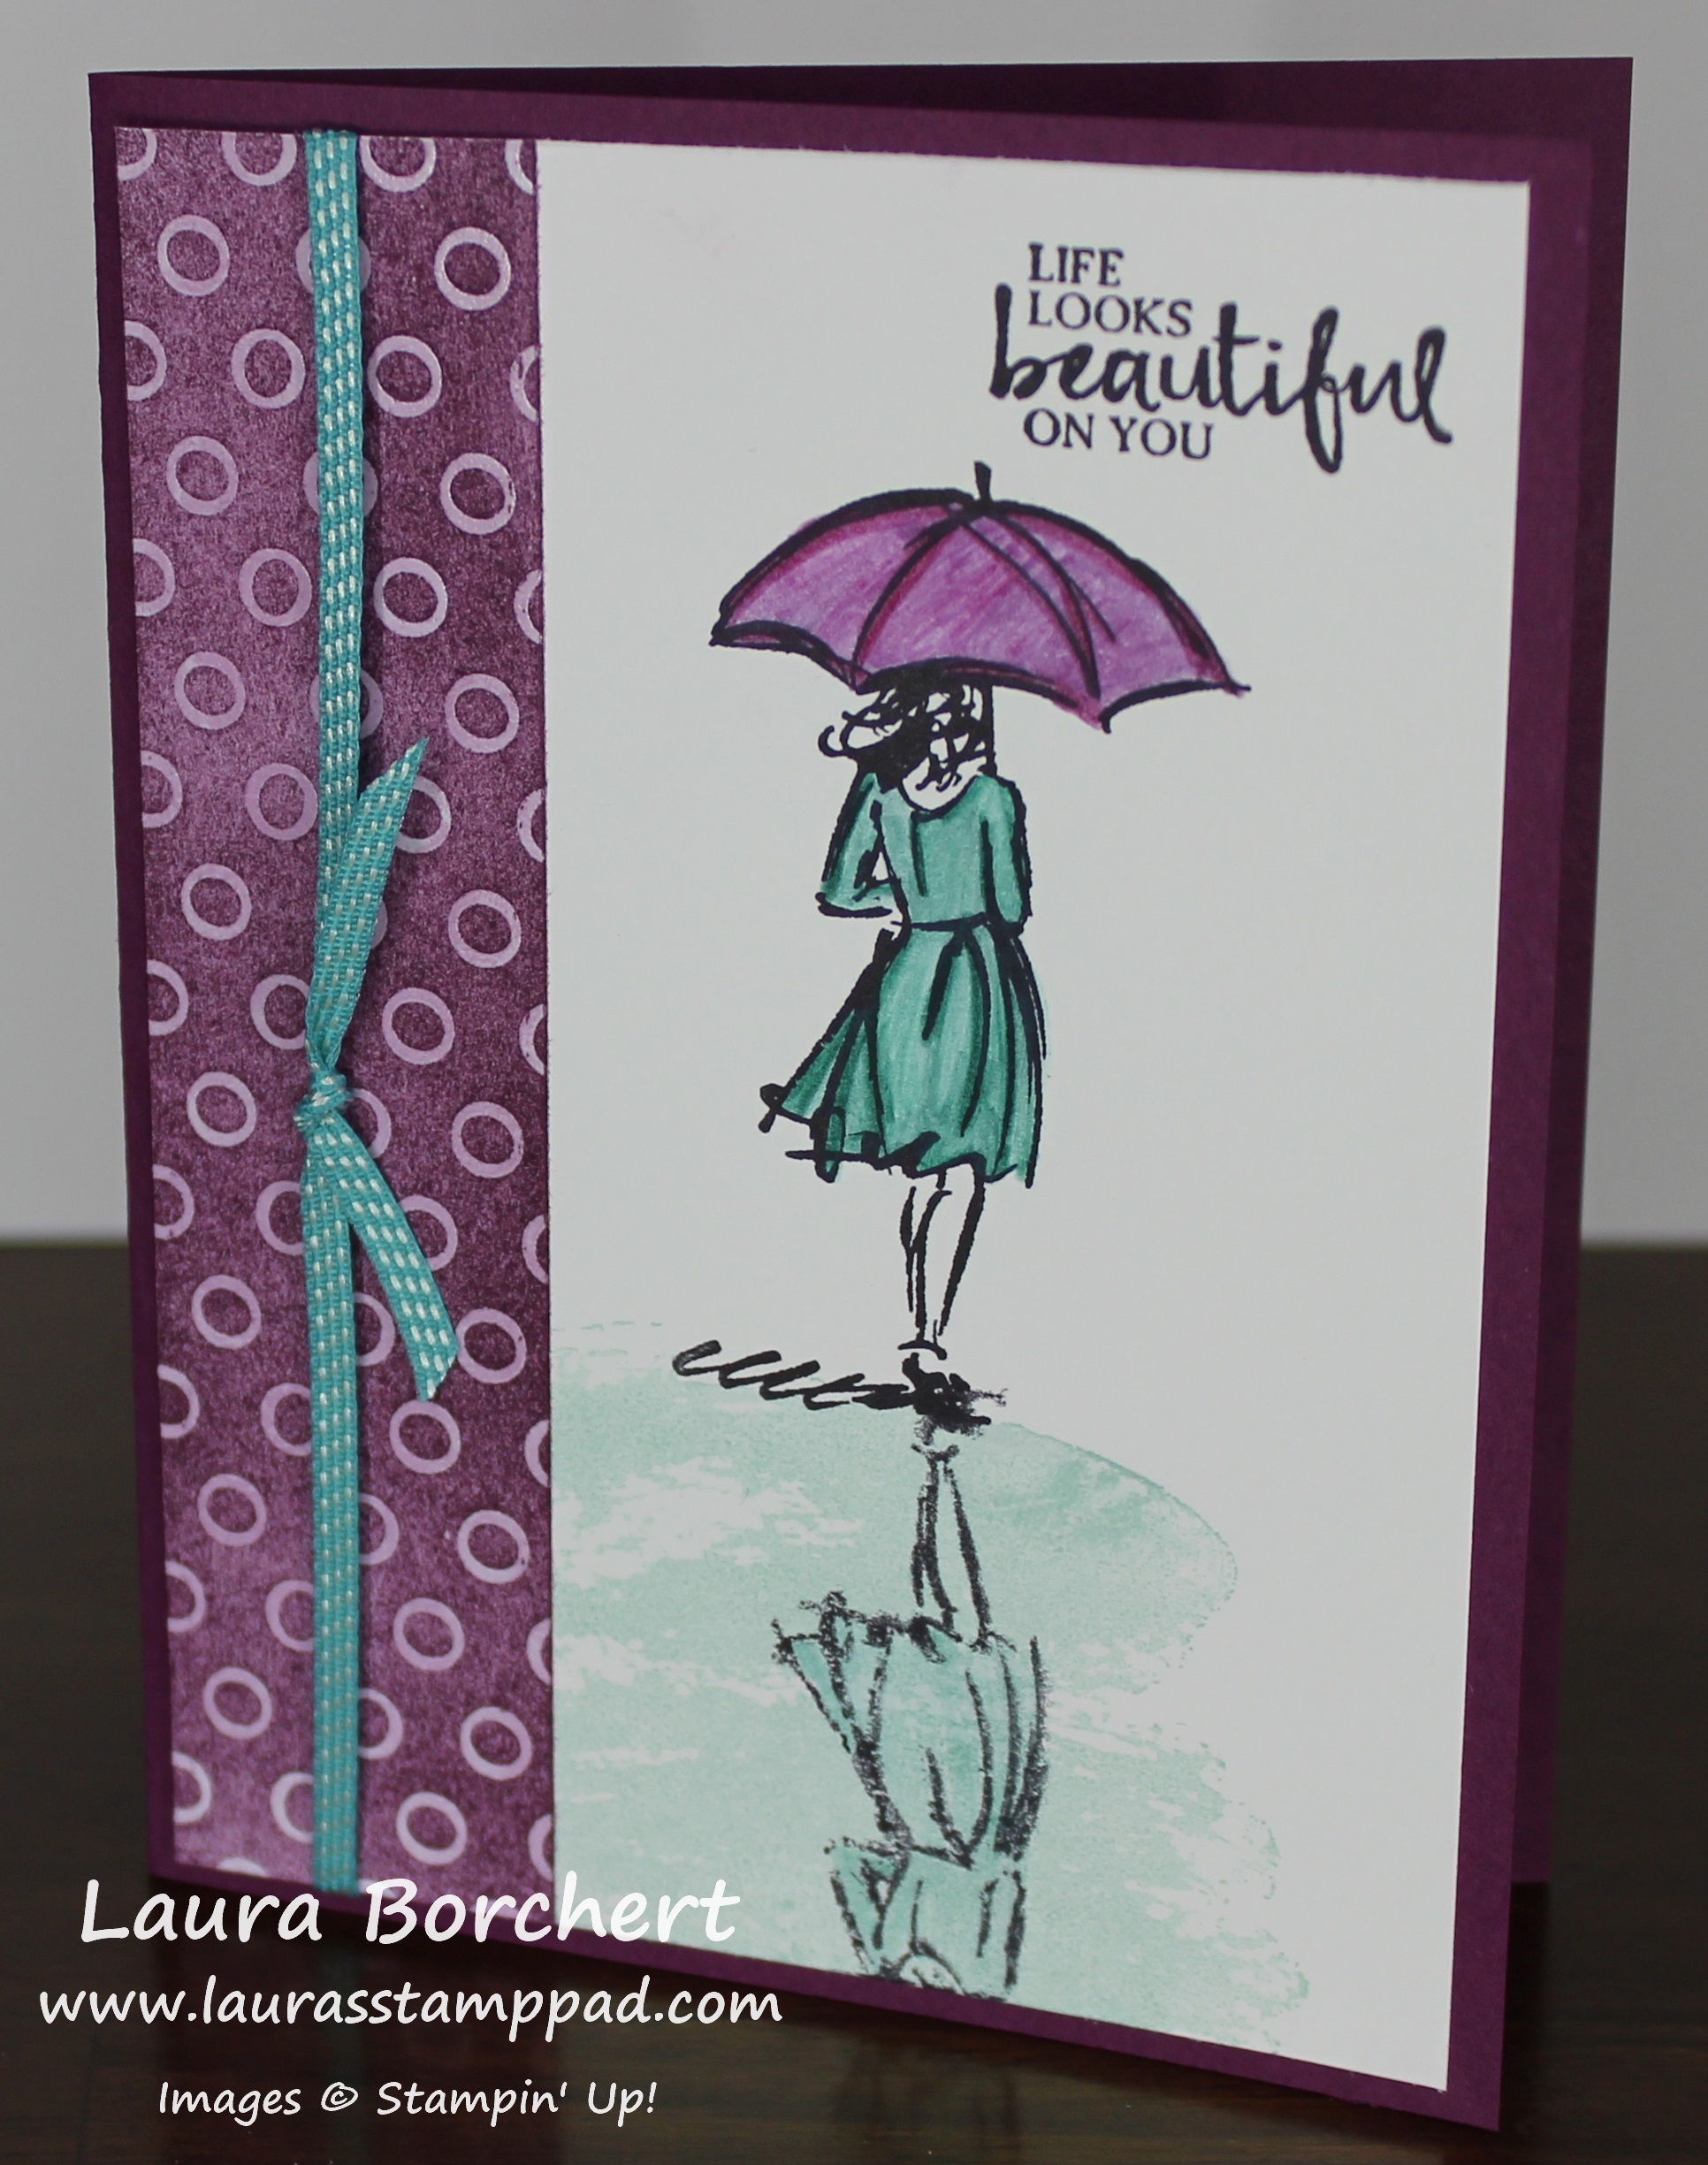
Happy Tuesday!!! That means I have a fabulous beautiful reflection technique to share with you today! I am super loving the Beautiful You Stamp Set. Check out more samples here, here, and here!

Beautiful Reflection, www.LaurasStampPad.com

Isn’t this card just stunning? It’s beautiful and peaceful! I just love it so let’s get started!

I started with a piece of Whisper White (4″ x 5-1/4″) cardstock and stamped the greeting from the Beautiful You Stamp Set at the top. I did it after the fact in mine but it helps to do it first! Next, I stamped the girl from the same stamp set in Basic Black Ink onto the cardstock and then onto a piece of Window Sheet. Be careful when you stamp on the Window Sheet because it is slick! Then I flipped the Window Sheet over and placed it on the cardstock, matching it with the black squiggle on the bottom. Press over the window sheet to make sure the ink transfers to the cardstock. I love how it looks foggy and incomplete because that is how it would look as a reflection. Also, it helps make your card still look good when it doesn’t come out perfect! 🙂

For coloring, I used the Watercolor Pencils to color her dress and umbrella (Bermuda Bay & Rich Razzleberry). I used the Blender Pen to blend the color around! Then I went back through and added accents with the pencils. I didn’t trust myself to get the perfect watercolor wash for the puddle so I used the Watercolor Wash Stamp Set and Pool Party Ink. I stamped off once for a lighter look!

I really wanted a piece of Designer Series Paper for the left hand side but didn’t have any that was Rich Razzleberry. Then I realized I could make my own with the Irresistibly Floral Designer Series Paper. Using the Sponge Brayer and Rich Razzleberry Ink, I colored the Designer Paper to match! Be sure to wipe off any excess ink to really make the embossed design pop! I added this piece to the left hand side of the card and tied some Bermuda Bay Stitched Ribbon around it! Next I adhered this piece to a Rich Razzleberry card base! I just love it!!!

If you would like to see this all in action, check out my Video Tutorial below or click here! Don’t forget to give it a thumbs up if you liked it and be sure to subscribe if you are new. I post a new video every Tuesday and Thursday!

Happy Stampin’

~Laura


Technique Tuesday: The Baby Wipe Technique with Butterflies!!!

Posted on

Happy Tuesday!!! That means I have a fabulous technique to share with you – the Baby Wipe Technique!!! I have done this many times before but each time it looks so amazing! Just playing with different stamp sets makes it so much fun! I just love it!!!

Baby Wipe Technique, www.LaurasStampPad.com

Butterflies are just so uplifting and beautiful! While I would love to make them in reds, yellows, and oranges, I thought I would branch out and use different colors! Now let’s get started on this super cool, easy technique – the Baby Wipe Technique!

I took a wet baby wipe and folded it a few times. Be sure the size is still bigger than the image you are going to stamp on it. Then I took a few ink refills and randomly dripped dots of ink on the baby wipe creating a big inky blob. The colors I used were Pacific Point, Cucumber Crush, and Soft Sky. This is now what I used as my ink pad for my butterflies!

Using the Watercolor Wings Stamp Set, I stamped the image into my “baby wipe ink pad” and then onto Whisper White scraps. Sometimes it takes a few stamps to get the colors to mingle together and then you get fabulous ones! You don’t have to worry about cleaning the stamp before going back to the “ink pad” because it’s not like you are going to ruin it. In fact, it will only make it more fun!! After stamping the butterflies, I die cut them with the coordinating Butterflies Thinlits! I did not stamp the center part of the butterfly until I die cut it out. I have found that I usually stamp too high or low and it get cut off so doing it afterwards is best!

Butterflies Baby Wipe, www.LaurasStampPad.com

Now to assemble the card, I started with a Pacific Point card base. Then I took a piece of Soft Sky (4″ x 5-1/4″) and stamped the three dots from the Watercolor Wings Stamp Set all over the background using my “baby wipe ink pad.” I adhered that to the card front and placed my butterflies on the card (no adhesive yet) and stamped the antennas. Then I added Stampin’ Dimensionals to the butterflies and placed them right next to their stamped antennas! For the greeting, I took a piece of scrap Whisper White 3/4″ wide and stamped the greeting from the Watercolor Wings Stamp Set in Basic Black Ink. I added those three little dots as well for an extra pop. Next, I cut the banner tips on the end and cut it as long as it needed to be for the greeting and dots. This can vary card to card. I layered it onto Pacific Point 1″ wide and long enough to layer. The greeting is on the lower left hand side of the card!

If you would like to see this all in action, check out my Video Tutorial below or click here! Don’t forget to give it a thumbs up if you liked it and be sure to subscribe if you are new. I post a new video every Tuesday and Thursday!


Only 2 more days to get entered into the Ink Pad Giveaway! I will be drawing a name for a Color Family of Ink Pads (10 total) on Friday!!! Click here for all the details!!!

Ink Pad Collection Giveaway, www.LaurasStampPad.com

Happy Stampin’

~Laura


Loving this Bushel Basket of Apples!!!

Posted on

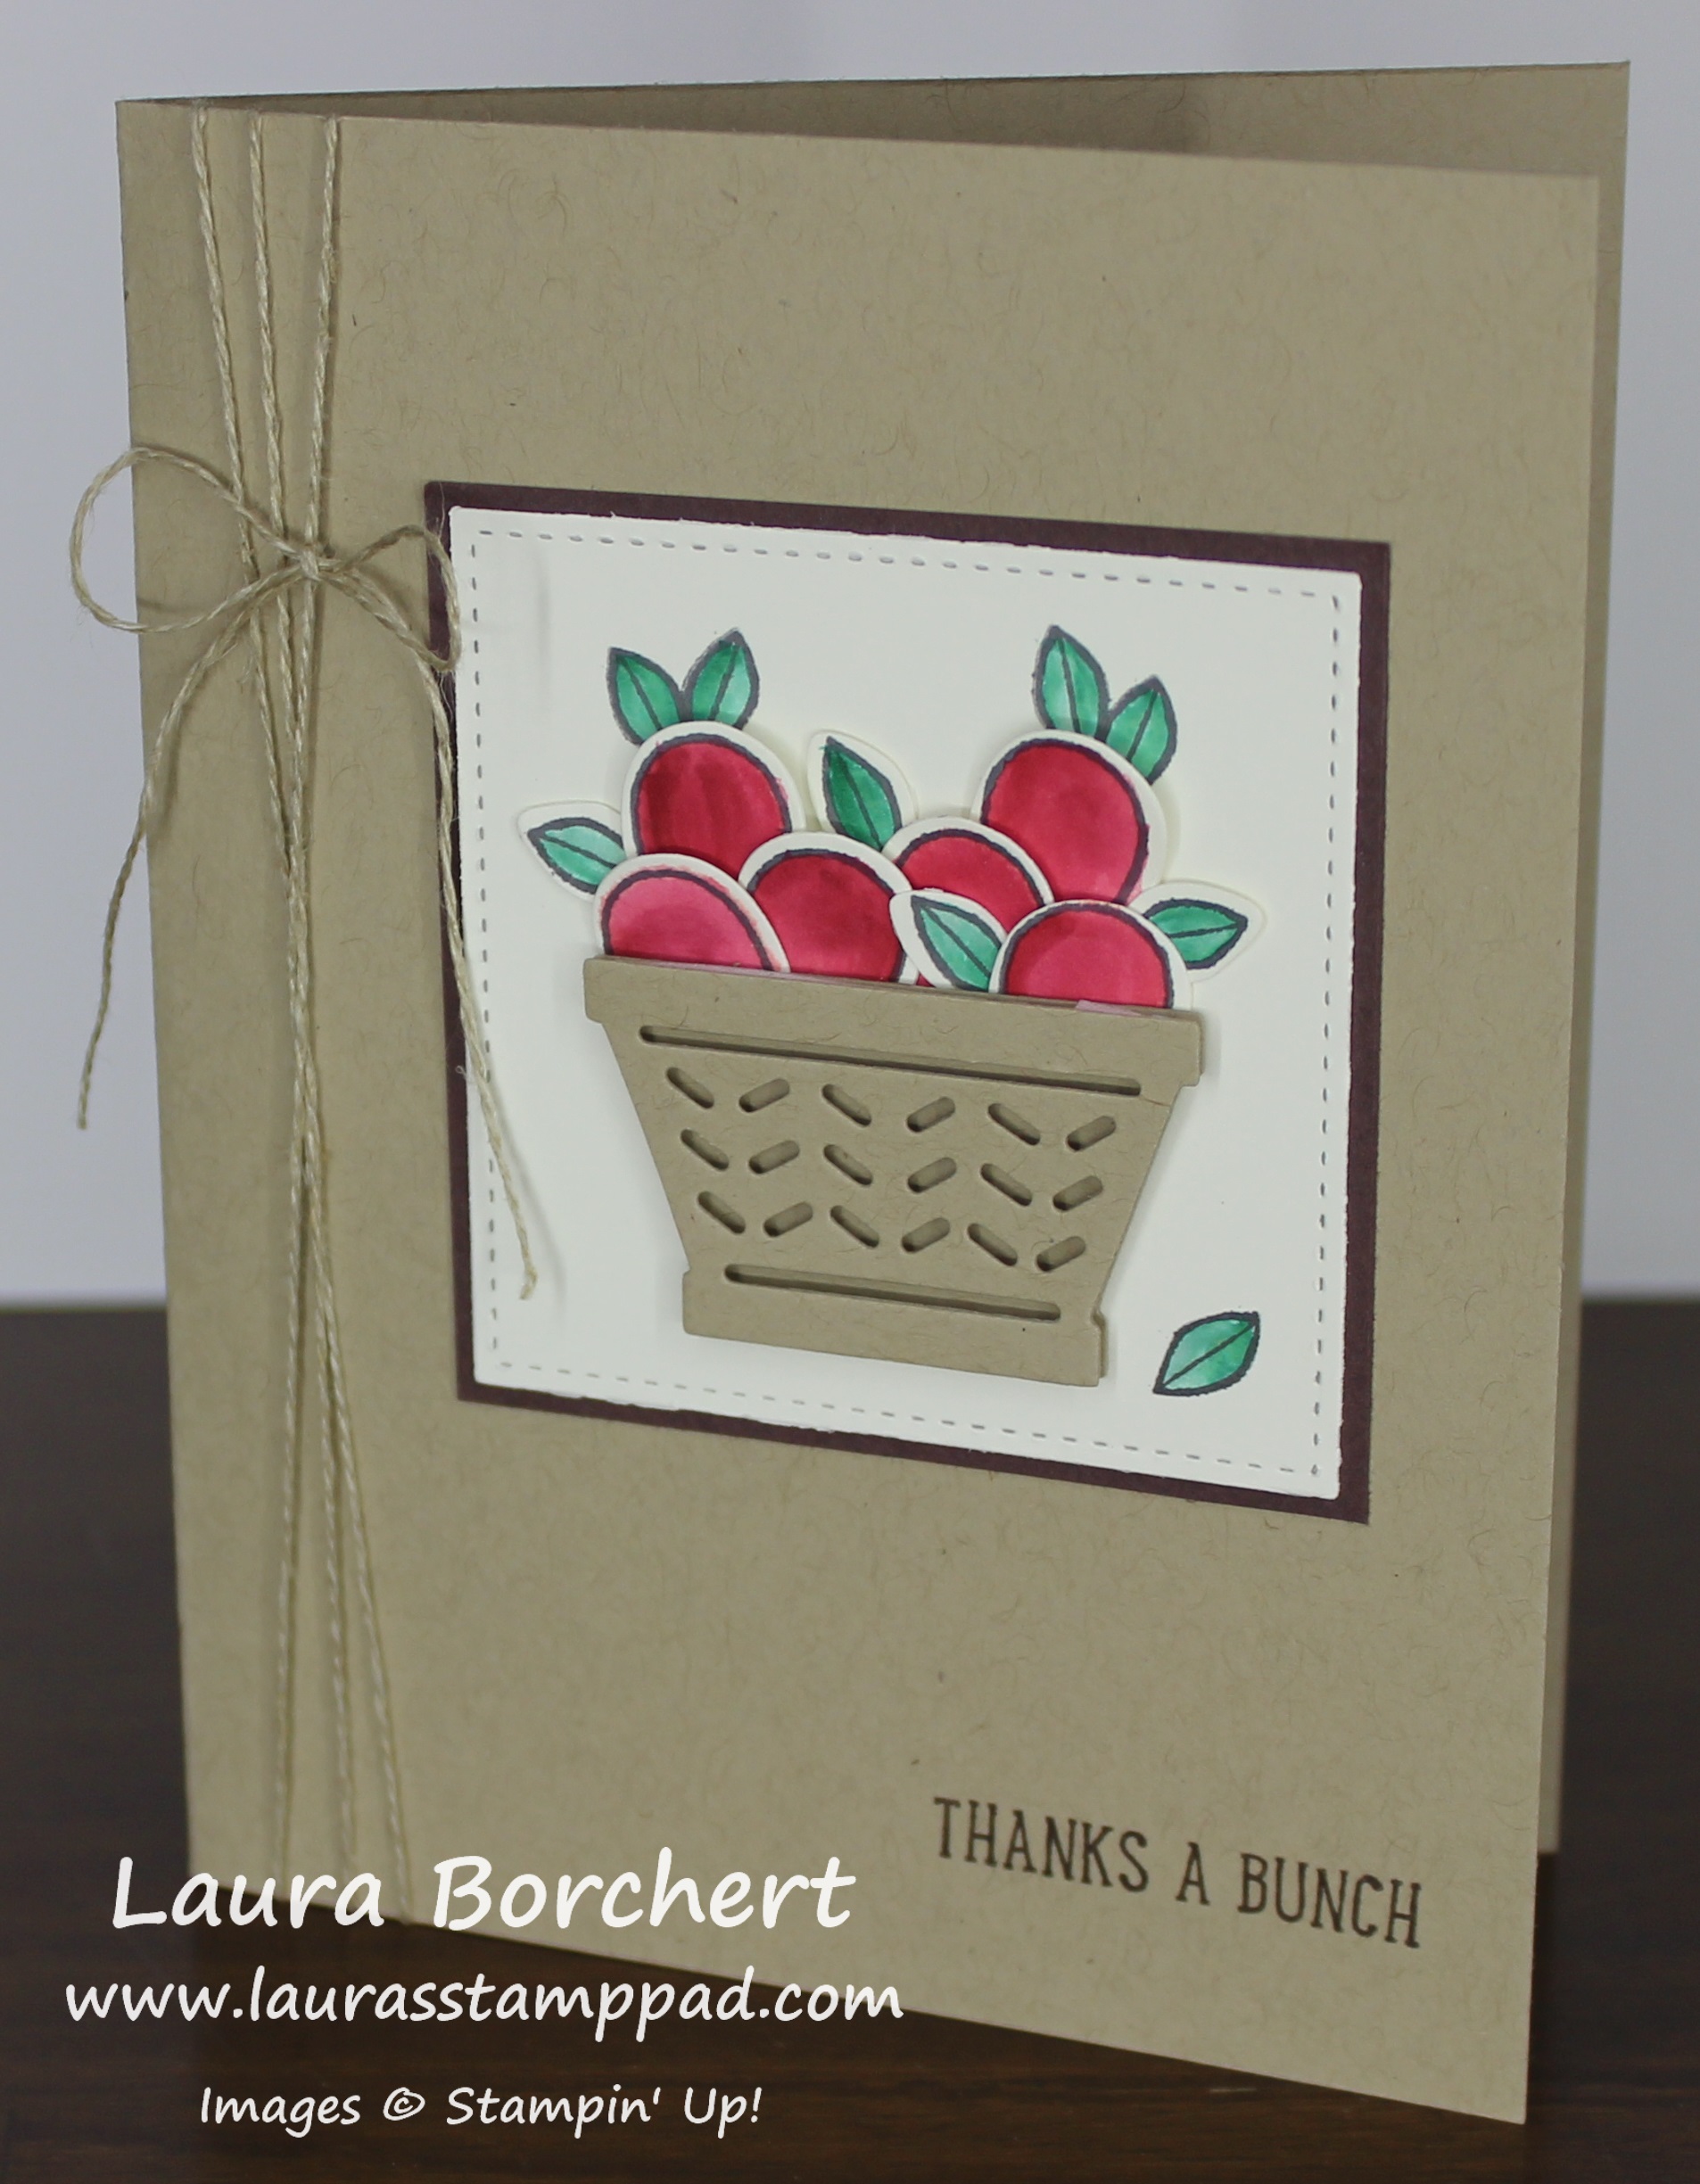
Happy Tuesday!!! Today I have a fabulous technique to share with you today! It’s a bit out of the box but super cool! This bushel basket of apples was created with the Basket Bunch Bundle from the Occasions Mini Catalog

Bushel Basket of Apples, www.LaurasStampPad.com

I got the idea for this card from the amazing, Shelli Gardner who showed it at the Stampin’ Up Event last November!! It sold me on this set….the outside the box ways to use the Basket Bunch Stamp Set. This looks like an Easter Stamp Set but I got so many other styles of cards out of  it! These apples, a baby card  with the bunny and many others can be created! Now let’s get started on this one!

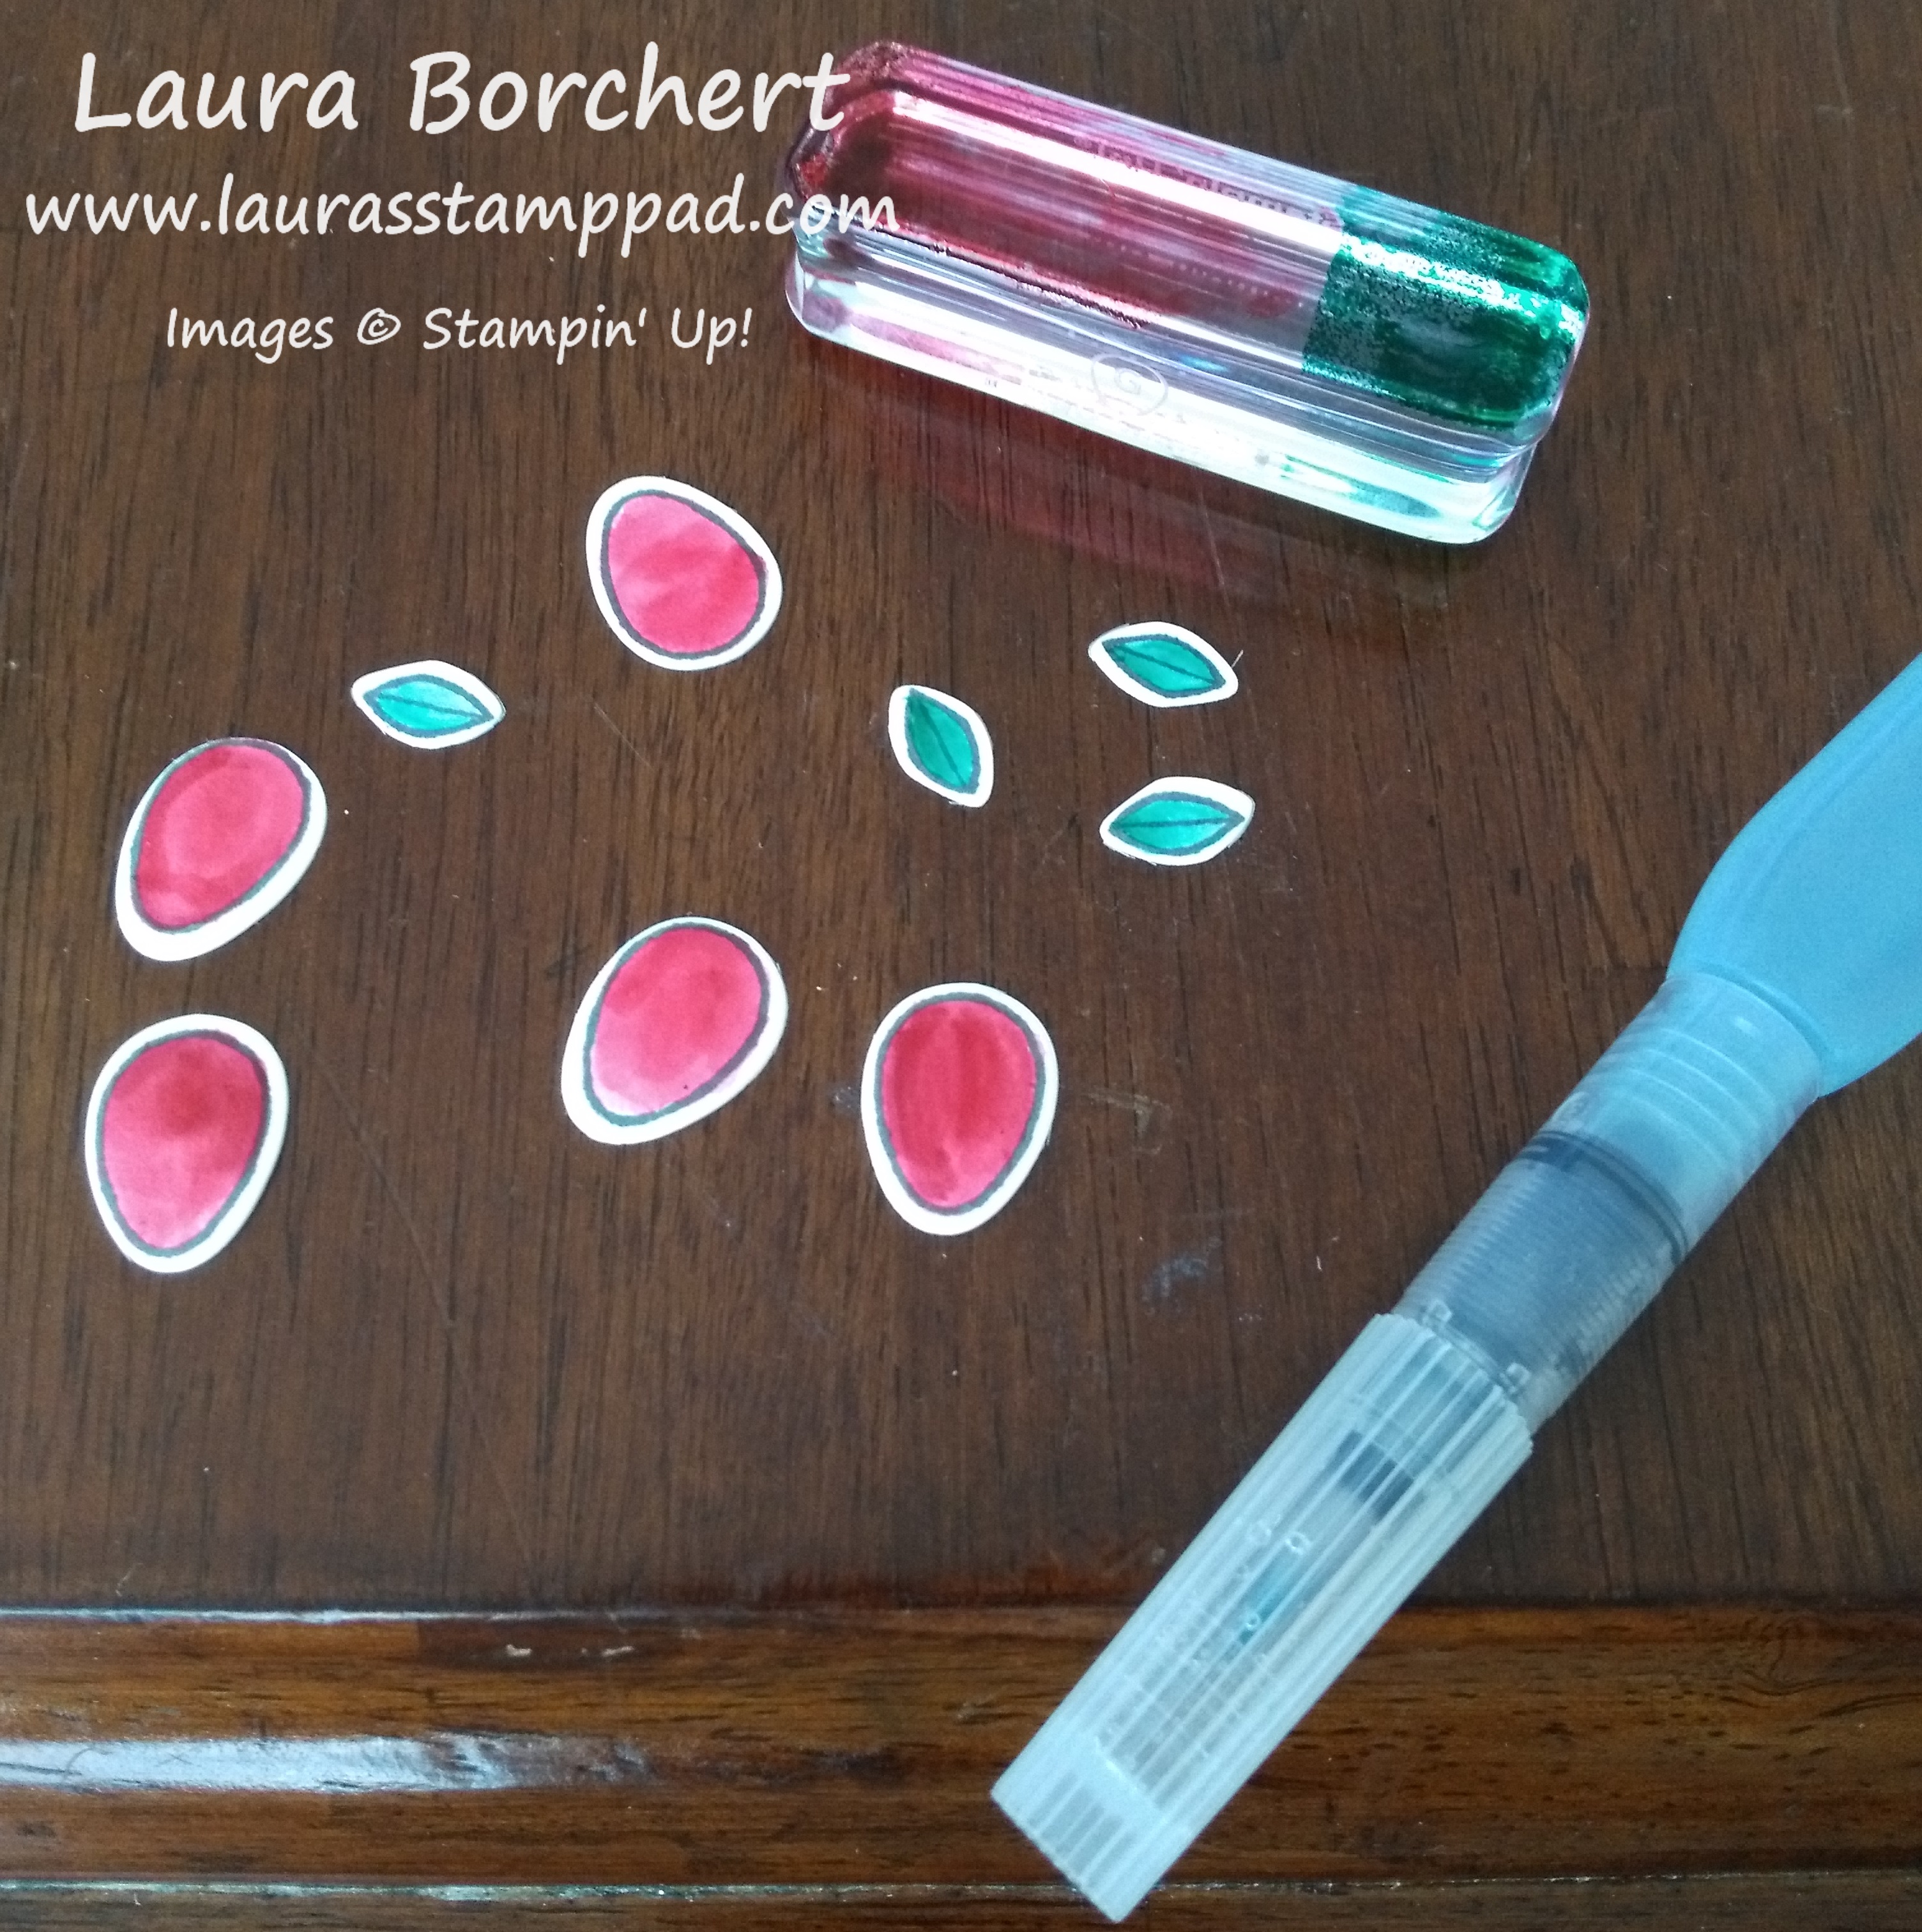
I started with a scrap piece of Very Vanilla and stamped lots of leaves and the smaller solid outline Easter egg. All of these come from the Basket Bunch Stamp Set and stamped in Basic Gray Ink! I like the softer look of gray over black. Next, I die cut out each of them using the coordinated Basket Builder Framelits (Bundle & Save 10%). A little tip for die cutting lots of little pieces, use a  post-it note to hold the die to the cardstock! After I had all of the pieces die cut, I colored them with Real Red and Emerald Envy Ink and an Aqua Painter!

Watercolor Apples, www.LaurasStampPad.com

It’s time to assemble!!! I die cut the basket bottom (solid & detailed) in Crumb Cake. I stuck the two basket pieces together with some cut pieces Stampin’ Dimensionals. This gives the basket a bit of a 3D look! Next, I adhered the basket to a piece of Very Vanilla that I die cut with the Stitched Shapes Framelits! I love the rustic look of the stitches! TIP: Be sure to only add adhesive to the basket on the bottom half so that you can tuck in the “apples”! I placed some of the apples on with pieces of Stampin’ Dimensionals. So that I didn’t have to die cut so many of the leaves, I actually stamped a few of the leaves directly onto the vanilla and colored them in! Just be sure to tuck the “apples” in deep enough that they look like apples and not eggs!

After the bushel basket is all complete, I added this  to a layer of Chocolate Chip cardstock and then to the center of a Crumb Cake card base! The greeting from the Basket Bunch Stamp Set is stamped in the lower right corner in Chocolate Chip Ink. To finish off the card, I wrapped some Linen Thread around the card and tied it into a bow! I love it!

If you would like to see this all in action, check out the Video Tutorial below or click here! Be sure to give it a thumbs up if you liked it and don’t forget to subscribe if you are new!!!

Happy Stampin’

~Laura


Technique Tuesday – Peek-A-Boo Designer Paper!!!

Posted on

Happy Tuesday!!! You all know that means I have a fabulous technique to share with you today! Today, I’m sharing the Peek-A-Boo Designer Paper Technique. I love this one so much because you can see both sides of the Designer Paper and you don’t have to pick which side to use!!! 🙂

Peek-A-Boo Designer Paper, www.LaurasStampPad.com

How beautiful is this card?!?!? I love that it is simple but still has a great wow factor! Love it!!!

I started with a Sweet Sugarplum card base. Then for the Peek-A-Boo Designer Paper Technique, I used a piece of Succulent Garden Designer Series Paper measuring 4″ x 5-1/4″. Along the long 5-1/4″ side, find the middle (2-5/8″) and cut in 2″. Now I just folded the triangles back from the corner of the Designer Paper to the that cut line! It’s as simple as that!!! I did add a little bit of Snail Adhesive to hold my triangles back and in place!

To complete the card,  I took a piece of 2-1/4″ x 5-1/4″ Whisper White and adhered it to the back of the Designer Paper on the side with the Peek-A-Boo. Just add a little bit of Snail Adhesive to the back of the Designer Paper, place the corners of the Designer Paper on the edge of the Whisper White and press down. Now you can add this to your card base!!! You can have the Peek-A-Boo portion on the right or left or top or bottom!

That is all up to you! I added the greeting from the Rose Wonder Stamp Set in Sweet Sugarplum Ink. I thought the card  needed a bit of a pop so I stamped the flower from the Flower Shop Stamp Set in Calypso Coral Ink. Next, I punched it out with the Pansy Punch and added it to the card front with Stampin’ Dimensionals. I finished it off with a White Perfect Accent in the middle of the flower! These things are perfect for flower centers! I love them!!! For the final touch, I put some Linen Thread around the card and tied it into a bow! Perfect!!!

I love how you don’t have to hide one side of the Designer Series Paper for this card!!! It’s perfect for all those amazing pieces of paper you have been saving because you love both sides! To see this all in action, check out the Video Tutorial below or click here!!! Be sure to give it a thumbs up if you liked it and don’t forget to subscribe if you are new! I post every Tuesday and Thursday on YouTube!

Don’t forget that Sale-A-Bration ends this week (March 31st)! Stock up on those items and enjoy all the freebies!!!

Happy Stampin’

~Laura


Technique Tuesday – Doing The Smack Down!!!

Posted on

Happy Tuesday!!! You know what that means??? It means I have a fabulous technique to share with you and that is doing the Smack Down Technique!!! Check this out!!!

Doing The Smack Down, www.LaurasStampPad.com

I know I love flowers a lot a lot but this technique is amazing with these flowers. How can you not love this card?!?!?! I got this technique from fellow demonstrator – Mary McNeely! I love sharing ideas with others stampers!

This card starts with a Island Indigo card base. Then I took a piece of Whisper White (3-3/4″ x 5″) to create this masterpiece. Using the Flower Patch Stamp Set, I stamped down the largest flower (Rose Red Ink) down. Then without going back to the ink, smack down the stamp all around that original stamped flower. Just pound, pound, pound it all around. Then go back to the ink, stamp another flower and then smack down all around it. I did the next flower (pointy one) in Peekaboo Peach Ink and the smaller rounded petal flower in Island Indigo Ink. The leaves were done in Pear Pizzazz Ink. I’m telling you this card is so much fun to create and lets out any and all stress you might have. Stamping is such amazing therapy!

After stamping all the flowers, I layered this onto a piece of Pear Pizzazz (4″ x 5-1/4″). Next, I wrapped some Peekaboo Peach Ruched Ribbon around it and tied it into a knot. I added this piece to my card base with Stampin’ Dimensionals so it would be nice a smooth with that ribbon! I finished off the card with a few White Perfect Accents in the middle of the large flowers!

For the greeting, I used the Suite Sentiments Stamp Set and stamped it onto Whisper White. I punched it out with the Decorative Label Punch! Next, I punched out another one in Rose Red and cut it in half to layer a piece to the top and a piece to the bottom for that perfect layered look. I added the greeting to the card front with Stampin’ Dimensionals.

If you would like to see this all in action, check out the Video Tutorial below or click here! This is my 300th Video!!! Be sure to give it a thumbs up if you liked it and don’t forget to subscribe if you are new!!! I post a new video every Tuesday and Thursday!

Happy Stampin’

~Laura


Technique Tuesday – Rock ‘N Roll!!!

Posted on

Happy Tuesday!!! I have this fabulous Rock ‘N Roll technique to share with you today!!! It can be used with many different images and it’s super fun!!!

Rock 'N Roll, www.LaurasStampPad.com

How cool are these flowers with the dark tipped petals?!?!?! It is a super fun and cool technique that you can do with any of your favorite images! Let’s get started!

I started with a Wisteria Wonder card base and layered on a piece of Elegant Eggplant (4″ x 5-1/4″). Next I took a piece of Whisper White (3-3/4″ x 5″) to stamp these beautiful flowers on. Using the Avant Garden Sale-A-Bration Stamp Set, I took the flower and placed it on Block B. You will want to use the smallest block to you can use on your image because otherwise your rock ‘n roll will just ink up the block and not your image if it’s much larger. I inked it up in the light color – Wisteria Wonder Ink and then I took Elegant Eggplant Ink and did the Rock ‘N Roll Technique. Just roll the edges of the images around on the darker color, avoiding the middle of the image.

Check out the video below to really see how this works as I’m not so sure I’m explaining it well! 🙂 Once you have inked it up, stamp it down on the cardstock towards the top and to the left side. I actually stamped it twice to get that lighter and darker shade. Also, then I didn’t have to do this whole thing 3 times. I do find that cleaning the stamp in between is good since you can’t really Rock ‘N Roll exactly the same each time.

Rock & Roll Flowers, www.LaurasStampPad.com

After doing the 3 flowers, I stamped the stem and leaves in Cucumber Crush Ink. Some of them are stamped twice for that variation in color too! TIP: Use a mask to cover the bottom portion when you are stamping your flower stems so that they don’t go below the ribbon. Then you can cover up all of the overlaps of the stems with the ribbon! I used the Cucumber Crush Mini Striped Ribbon! I used the greeting from the Avant Garden Stamp Set and stamped it in Elegant Eggplant. Next, I added this to the card front with Stampin’ Dimensionals! To finish it off, I added little Elegant Eggplant Enamel Shapes.

If you would like to see this all in action, check out my Video Tutorial below or click here! Be sure to give it a thumbs up if you liked it and don’t forget to subscribe if you are new. I post a video every Tuesday and Thursday!

If you would like to see more samples using the Avant Garden Sale-A-Bration Stamp Set, click here, here, and here! You can get this stamp set for FREE with a $50 order till the end of the month! Don’t forget that the items are while supplies last so hurry up! You will also be earning Laura’s Loyal Stampers Stickers too!!!

Happy Stampin’

~Laura


Technique Tuesday – Coloring with the Fine Tip Glue Pen!!!

Posted on

Happy Tuesday!!! That means I have a fabulous technique to share with you today. It’s a fabulous one today – coloring with the Fine Tip Glue Pen!!! Check out this glossy frog…or toad!

Coloring with the Fine Tip Glue Pen, www.LaurasStampPad.com

How adorable is he? I colored him with some re-inker in my Fine Tip Glue Pen! I got this idea from the fabulous Sara Douglass, Stampin’ Up! CEO. Let’s get started!

~ Card Instructions ~

All you need for this technique of coloring with your Fine Tip Glue Pen is the glue and the color of your choice in Ink Refills! I have a few bottles of Fine Tip Glue so to not make a big batch, I poured as much as I could into the other 2 bottles. There was maybe 1/3 of the bottle left and I did 10 drips of Cucumber Crush and it was BRIGHT! I ended up adding some glue back to it. I would go with maybe 3-5 drops and then add more if you want a bolder color! You can always add more but you can’t take it out! 🙂 Shake well and then color with the fine tip! It’s super fun and simple because you are literally coloring with the fine tip and can get into small spaces too!

Glossy Toad, www.LaurasStampPad.com

For this card, I stamped the toad from the You’re Sublime Stamp Set in Basic Gray Ink onto Whisper White. Then I took the colored Fine Tip Glue and filled him in. I actually did his eyes in regular/uncolored Fine Tip Glue. Allow this to dry. It will take at least an hour depending on how thick it was applied. As it dries you will notice the color is darker in certain spots! I love how that works! Coloring with the Fine Tip Glue Pen is super fun and there are endless possibilities! For my card base, I used Cucumber Crush and layered on a piece of Pacific Point that I ran through the Big Shot with the Seaside Embossing Folder. I added a few loops of Whisper White Baker’s Twine to the back of the toad and added it to the card front with Stampin’ Dimensionals.

If you would like to see this all in action, check out my Video Tutorial below or click here! Be sure to give it a thumbs up if you liked it and don’t forget to subscribe if you are new! I post every Tuesday and Thursday!

What color would you add to your Fine Tip Glue Pen?? Let me know in the comments below! I’m thinking I need to do Melon Mambo and do the tips of flowers for that dew and highlighted look! How amazing would that be?!?!?

Happy Stampin’

~Laura


Technique Tuesday – Creating a Marbled Background!!!

Posted on

Happy Tuesday!!! You all know what that means!!! I have a super fun technique to share with you – creating a marbled background!!! Check this out!!

Best.Guy.Ever., www.LaurasStampPad.com

Isn’t the background super cool?? It is super easy as well. All you need are ink pads and baby wipes!!! I got this technique from fellow demonstrator, Sandy Jacobson! I love sharing ideas!!!

SUPPLIES NEEDED: Ink Pads, Baby Wipes

For creating the marbled background, I started with a piece of Shimmery White cardstock measuring 4″ x 5-1/4″. You can use regular Whisper White or Very Vanilla cardstock if you wish! It works the same with all but I liked the little hint of shimmer! Next, I took a wet baby wipe and balled it up and very lightly tapped it into an ink pad and then pounced all over the cardstock. I used Bermuda Bay Ink, Cucumber Crush Ink, and Pumpkin Pie Ink. You can pounce with each color as little or as much as you wish. It’s as simple as that! Super fun and comes out different each time. You can mix and match any color combination!

To finished the above card off, I placed it onto a Bermuda Bay card base. I stamped the birthday greeting in the lower right corner from the Balloon Adventures Stamp Set. The die cuts came from the Stitched Shapes Framelits in Cucumber Crush and a t-shirt from the T-Shirt Builder Framelits in Bermuda Bay. I stamped the front of the shirt with the Suite Sentiments Stamp Set. Next, I added the t-shirt to the square with Stampin’ Dimensionals to make it look a little more 3D. I added loops of Whisper White Baker’s Twine to the back of the square, securing it with Stampin’ Dimensionals and then adding it to the card front! Perfect Man Card!

Razzleberry Dress, www.LaurasStampPad.com

I used Wisteria Wonder Ink and Rich Razzleberry Ink for this one. For the decoration, I stamped the lady from the Beautiful You Stamp Set in Basic Black and her dress in Rich Razzleberry. The greeting was done in Wisteria Wonder. I went over her dress with a Wink of Stella Pen which added a little shine and blended it together a bit. I used the leftover bit of ink on the tip to color in her hat. Then, I layered this piece onto Silver Foil Paper and added it to the card front. To finish it off, I added a few White Perfect Accents. Love it!

If you would like to see this all in action, check out the Video Tutorial below or click here! Don’t forget to give it a thumbs up if you liked it and be sure to subscribe if you are new! I post every Tuesday and Thursday!

Have fun trying this out yourself! What color combination will you use? Let me know in the comments below!

Happy Stampin’

~Laura