Technique Tuesday – 2-Step Tranquil Tulips!!!

Posted on

Happy Tuesday!!! You all know that means I have a fabulous technique to share with you! Today, I am playing with the 2-Step Tranquil Tulips Hostess Stamp Set! Aren’t these flowers amazing?!?!?!

Tranquil Tulips Hostess Set, www.LaurasStampPad.com

Aren’t these flowers so amazing and real looking?? The best part is I got this stamp set for FREE with Hostess Benefits! The other best part is they are super simple to 2-step stamp. There is no remembering to stamp off or lining up every side and curve. It’s amazing!!!

I started with a Pool Party card base (11″ x 4-1/4″). Then I took a piece of Whisper White (4″ x 3-1/4″) to stamp the tulips on. I used the Tranquil Tulips Hostess Stamp Set with Berry Burst Ink and Old Olive Ink. Starting with the stems, I stamped those around the middle of my paper so that my tulips weren’t falling off the top. Next, I stamped the leaves. Then it was time for the tulips and I did the large solid image first. Next I did the more detailed smaller image right on top.

Both of these images are in full strength ink so no worries on remembering to stamp off. Since the second image is smaller, all you have to look for when stamping it is that it is close to the bottom of the solid stamped image. If it’s not, that’s okay too! The variation in color on these stamps is the texture in the stamp. How cool is that?!?! So don’t worry that your image isn’t coming out smooth or dark and solid, it’s suppose to look like this. There are 2 different sizes of flowers to play with! I love it! There are also little dot images for the center of the flower. I stamped those in Basic Gray Ink for a softer look than black.

Now that I am done with the focal point, I added it to the card base on the left side. Next I tied some Berry Burst Finely Woven Ribbon around the card, right over the edge of the cardstock. For the greeting, I used the Label Me Pretty Stamp Set and coordinating Pretty Label Punch. (Bundle & Save 10%) First, I stamped the decorative edge in Pool Party Ink and then the greeting in Berry Burst Ink. Next, I punched it out and added to the card with Stampin’ Dimensionals! 🙂

I love this set so much because there are 22 images in there for just $10 in Hostess Dollars which is earned with a $150 order or party! It’s fabulous!!! Also, the ease of not having to remember to stamp off is super amazing!! Don’t forget about Bonus Bucks this month for every $50 you spend too!!! It’s a great time to order and have a party (in home, virtual, or catalog).

If you would like to see this all in action, check out the Video Tutorial below or click here! Be sure to give the video a thumbs up if you liked it and don’t forget to subscribe if you are new. If you would like a notification when I post a new video, be sure to click the bell right next to the subscribe!!!

Happy Stampin’

~Laura


Technique Tuesday-Golden Happy Birthday!!!

Posted on

Happy Tuesday!!! Happy 4th of July!!! Today I have a fabulous technique to share with you. This golden happy birthday with roses all over is just stunning! You know how I love bling with flowers and pink!!! Amazing!

Golden Happy Birthday, www.LaurasStampPad.com

Isn’t this card just stunning with that glimmer wording?? I love it! It was fairly simple to create as well!!

I started with a Sweet Sugarplum card base. Next I layered on a piece of Berry Burst (4″ x 5-1/4″) with Stampin’ Dimensionals. Since this card didn’t have a lot of dimension, I thought I would pop up a layer! Also, Berry Burst and Sweet Sugarplum look amazing together! Finally for the top layer, I used a piece of Whisper White measuring 3-3/4″ x 5″. The first step is to die cut the greeting in Gold Glimmer Paper with the Happy Birthday Framelit. I added the greeting to the card with a Sponge and Multi Purpose Liquid Glue but the Fine Tip Glue Pen works too!

Now for the beautiful roses, I used the Happy Birthday Gorgeous Stamp Set (Bundle & Save 10%)! For the bigger rose, I used Sweet Sugarplum Ink and stamped off once for the solid image. I used full strength ink for the outline image. For the smaller rose, I used Berry Burst and the same technique! Be sure to fall off the cardstock and stamp all around so it looks like the pattern is continuous. I used Old Olive Ink for the leaves. The mini leaves, I stamped twice before going back to the ink to get that variation in color. Once I was done with the flowers, I added this to the card base!

Birthday Roses All Over, www.LaurasStampPad.com

So I thought I would share with you the first card I made which I stamped all over the background first. Then I placed the greeting on top and it just didn’t POP like I wanted. I tried again by adding the greeting first and stamping around the greeting and it worked out so much better! Just thought I would share my boo boo card as well so you could see it doesn’t always come out right the first time but we keep on trying! 🙂

If you would like to see this all in action, check out the Video Tutorial below or click here! Be sure to give the video a thumbs up if you liked it and don’t forget to subscribe if you are new. If you would like a notification when I post a new video, be sure to click the bell right next to the subscribe!!!

Happy Stampin’

~Laura


Technique Tuesday – Creating a Drop Shadow Greeting!!!

Posted on

Happy Tuesday!!! You know that means I have a fabulous technique for you today and that is creating a drop shadow greeting!!! There are so many color combinations that you could do for this card. I love it!!!

Creating a Drop Shadow Greeting, www.LaurasStampPad.com

This is a perfect Man Card and we all know I struggle with those since I love PINK! I am also loving this Night of Navy and Lemon Lime Twist color combination too! Perfect!!!

I started with a Lemon Lime Twist card base. Then I took a piece of Whisper White measuring 4″ x 4-1/4″ to use for the greeting. Using the Happy Birthday Framelit, I die cut the greeting in Night of Navy and Lemon Lime Twist. For adhering them onto the Whisper White, there is always the Fine Tip Glue Pen! If you find that hard to use, try out this technique. I use a Silicone Craft Mat, Sponge, and Multi Purpose Liquid Glue. Just pounce in the glue a bit and then all over the die cut image. This gives the perfect amount and nice even coverage. First, I laid down the Lemon Lime Twist greeting. Second, I added the Night of Navy greeting just a smidge down and over from the other one. This gives that drop shadow look! Be sure your greeting is up high on the cardstock so that the rest of the design doesn’t cover it.

Layered Birthday, www.LaurasStampPad.com

Now to assemble the card! I took a piece of Night of Navy (2″ x 4″) and ran it through the Big Shot in the Oh My Stars Embossing Folder. Next, I adhered this to the lower portion of the white piece, making sure it was the correct size for my card front. Then I placed a strip of Finely Woven Ribbon in Lemon Lime Twist across the cardstock where they meet together. I added this piece to the card base with Stampin’ Dimensionals! For the mini greeting, I used the Happy Birthday Gorgeous Stamp Set (Bundle & Save 10%). I punched the greeting out with the Classic Label Punch and added it to the card with Mini Stampin Dimensionals! I just love it!

If you would like to see this all in action, check out the Video Tutorial below or click here! It’s great to know what all of the pieces of each flower are for! Be sure to give the video a thumbs up if you liked it and don’t forget to subscribe if you are new. If you would like a notification when I post a new video, be sure to click the bell right next to the subscribe!!!

Happy Stampin’

~Laura


Technique Tuesday-Layering the Eastern Palace Suite!!!

Posted on

Happy Tuesday!!! Today’s technique is all about laying the Eastern Palace Suite!!! I used the Eastern Medallion Framelits, Eastern Beauty Stamp Set, and Gold Vinyl Stickers for this amazing card! Isn’t it beautiful?!?!

Layering Eastern Palace Suite, www.LaurasStampPad.com

The layers and details of this card just give such a WOW factor. I know this isn’t a card I would make every day for every occasion. It’s always fun to go above and beyond for that one special card sometimes. Let’s get started!

I started with a Tranquil Tide card base and layered on a piece of the Eastern Palace Designer Series Paper (4″ x 5-1/4″). Next, I took a piece of Very Vanilla (3-1/4″ x 4-1/4″) and die cut out the circle in the upper left corner. I used the small circle and the next layer up circle from the Eastern Medallion Framelits. There are lots of different cut out creations you can make. Then I stamped the circle from the Eastern Beauty Stamp Set (Bundle & Save 10%) in Fresh Fig Ink. Now it’s time to put on the Gold Vinyl Sticker. The sticker will fall off on the left side and maybe the top depending on where the die cuts were placed. It’s important to do these layers in this order because otherwise this happens…..

A Note for You, www.LaurasStampPad.com

Notice how the stamped circle is messy and missing a portion on the left hand side, that’s because I stamped after the sticker. The circle fits like just perfectly or doesn’t fit just perfectly so stamping afterwards is not a good deal. Some of the stamped image went onto the sticker and then just smeared off. By stamping first, it is underneath the sticker and peaks through perfectly no matter what! I stamped the greeting from the Eastern Beauty Stamp Set after adding the sticker so I knew it would be placed at the edge of the image!

Now it is time to assemble! I layered the stamped vanilla piece onto a piece of Tranquil Tide (3-1/2″ x 4-1/2″) flush with the upper left corner with Stampin’ Dimensionals. The dimensionals give that nice little peekaboo for the die cut potion. Next, I layered this onto the card base, again placing it flush with the upper left corner. To finish off the card, I tied some Vanilla Baker’s Twine around the card and added 2 of the Mini Tassels.

Gold Vinyl Inside, www.LaurasStampPad.com

Since I didn’t want to waste that little piece of Gold Vinyl Sticker that I trimmed off. I placed it on the inside of the card for a little decoration piece! I love it!

If you would like to see this all in action, check out the Video Tutorial below or click here! Be sure to give it a thumbs up if you liked it and be sure to subscribe if you are new! I post a new video every Tuesday and Thursday! Also, check out more samples using the Eastern Palace Bundle here, here, and here!

Happy Stampin’

~Laura


Technique Tuesday – Creating an Open Shutter Card!!!

Posted on

Happy Tuesday!!! Today’s amazing technique is all about creating an open shutter card. The greeting just pop out behind the camera shutter look as you open it up! Check it out below and be sure to watch the Video Tutorial to see in all in action!!Creating Open Shutter Card, www.LaurasStampPad.com

Okay so you thought I would show the amazing WOW factor in this first picture, huh? Did you scroll down and check it out??? That’s okay I would have too! let’s get started on this beauty! I got the idea for this card from Frenchie Martin who is amazing! Thank you for this great card idea!

I started with a Whisper White card base measuring 5-1/2″ x 8-1/2″ and scored  it at 2-1/8″ x 6-3/8″ for the gate fold! For the front panels, I cut 2 piece of Night of Navy measuring 5-1/4″ x 1-7/8″. Then I layered on some of the Delightful Daisy Designer Series Paper measuring 5″ x 1-5/8″. The belly band  that wraps around the card is Night of Navy measuring 1″ x 11″. I didn’t actually score it but instead just wrapped it around the card and pressed on the edges. Then I unwrapped it and used a Bone Folder on the creases. This works best I think because otherwise it seems mine is too tight or too loose. Next, I used Tear And Tape to secure the belly band because it’s a nice strong adhesive. I cut the end into banner tips for a little fun texture! Next, I took a piece of Whisper White (3/4″ x 4″) and stamped the greeting from the Daisy Delight Stamp Set. I added the banner tips  on the right and secured it to the belly band, cutting off any extra on the left hand side.

Half Open Shutter Card, www.LaurasStampPad.com

Now it’s time for the amazing inside of the card – the Open Shutter part! I cut 2 pieces of Daffodil Delight cardstock measuring 4″ x 3-1/2″ and scoring 1/2″ in along the 4″ side. This creates the little tab to adhere the shutter pieces. On the opposite side of the score line, measuring half way up (half of 3-1/2″ is 1-3/4″) put a dot with a pen. Then measuring 2″ in, place another dot. This is so you know how far in to cut your banner tips. I cut from the corner to that 2″ in dot. After doing one of them, I just placed  it over the other one as a template. The less measuring the better, right? 🙂 Now the shutter pieces are ready!

Open Shutter Card, www.LaurasStampPad.com

Isn’t it beautiful?!?!?! Now that we created the shutter pieces, it’s time to do that middle piece. I took a piece of Whisper White (3″ x 5-1/2″) and layered on some Delightful Daisy Designer Series Paper (2-3/4″ x 5-1/4″) before die cutting a 2-1/2″ circle out of it. I used the Layering Circles Framelits but you could use a punch too! Then I added Stampin’ Dimensionals along the very top and very bottom of the piece and placed it in the center of the card. The dimensionals lift up this piece so the shutter can slide underneath! Now for adding the shutter pieces, I put Tear And Tape all along the 1/2″ tab, slide the left on under the daisy piece. With it lined up flush with the score line/fold in the card and centered up and down, I closed the left panel of the card. This will then grab onto that adhesive and secure the left shutter. For the right side, I did the same thing but there are a few tips.

Be sure that your banner tips are both under the left side banner tips. They can’t be one up/one down or it won’t close correctly. Another tip is to be sure that the banner tips aren’t peaking out on the left side because it is uneven. They should be hiding perfectly below the left side.

Now that the shutter is complete, I opened up the card completely and stamped the greeting! I used the coordinating greeting from the Daisy Delight Stamp Set in the center! It is best to stamp this after creating the shutter so that you are sure it will fit and peak out in the right spot.

If you would like to see this all in action, check out the Video Tutorial below or click here! Don’t forget to give it a thumbs up if you liked it and be sure to subscribe if you are new. You won’t want to miss Thursday’s video!

Happy Stampin’

~Laura


Tempting Techniques – Color Block Card Making!!!

Posted on

Happy Tuesday!!! You know what that means…..I have a fabulous technique to share with you today! This color block card is a super fun and a great style for lots of different card types!

Color Block Card Making, www.LaurasStampPad.com

How fabulous is this card?!?! I just love the color combination and how simple it is. You can adapt this card style to any stamp set. I simply measured the greeting and lawn chair and that’s how I determined the size of the rectangles! Simple! Let’s get started on the dimensions for this one!

I started with a Whisper White card base. Next I cut some Whisper White for both the greeting (3″ x 2″) and the chair (2″ x 2-1/4″)! For the chair from the Colorful Seasons Stamp Set, I used Chocolate Chip Ink for the base and Berry Burst for the fabric. Since this is a Photopolymer Stamp Set, it was easy to line up the chair. There are notches in the chair as well that help! 🙂 For the greeting, I stamped it in Old Olive Ink!

Now it is time to layer and assemble the card! I layered the chair onto Old Olive (2-1/4″ x 2-1/2″) and the greeting onto Berry Burst (3-1/4″ x 2-1/4″). Next I took a piece of Old Olive Color Theory Designer Series Paper (4″ x 5-1/4″) and wrapped some ribbon around it and into a knot. I used the New Berry Burst Finely Woven Ribbon which I love because it’s not bulky! It’s perfect! I layered this onto the card base and then added the greeting with Snail and the chair with Stampin’ Dimensionals!

I’m loving this summery card look and the Colorful Seasons Stamp Set! There is just so many amazing images and greetings. You can check out another sample here!

If you would like to see this all in action, check out the video tutorial below or click here! Don’t forget to give it a thumbs up if you liked it and be sure to subscribe if you are new!!!

Happy Stampin’

~Laura


Technique Tuesday-Creating a Perfect Beach Scene!

Posted on

Happy Tuesday…..but feels like Monday! Today I’m sharing with you this amazing technique of creating a perfect beach scene! I am using the NEW Colorful Seasons Bundle from the 2017-2018 Annual Stampin’ Up Catalog which comes out on Thursday!!!!! Woot Woot! I so can’t wait!!!

Creating a Perfect Beach Scene, www.LaurasStampPad.com

How amazing is this card?!?!?! I just love it for that amazing greeting, the calming blues, and the relaxing chairs. Can you feel the sun on your face or cool ocean breeze just looking at this card? I think I can! Let’s get started on how I created it!

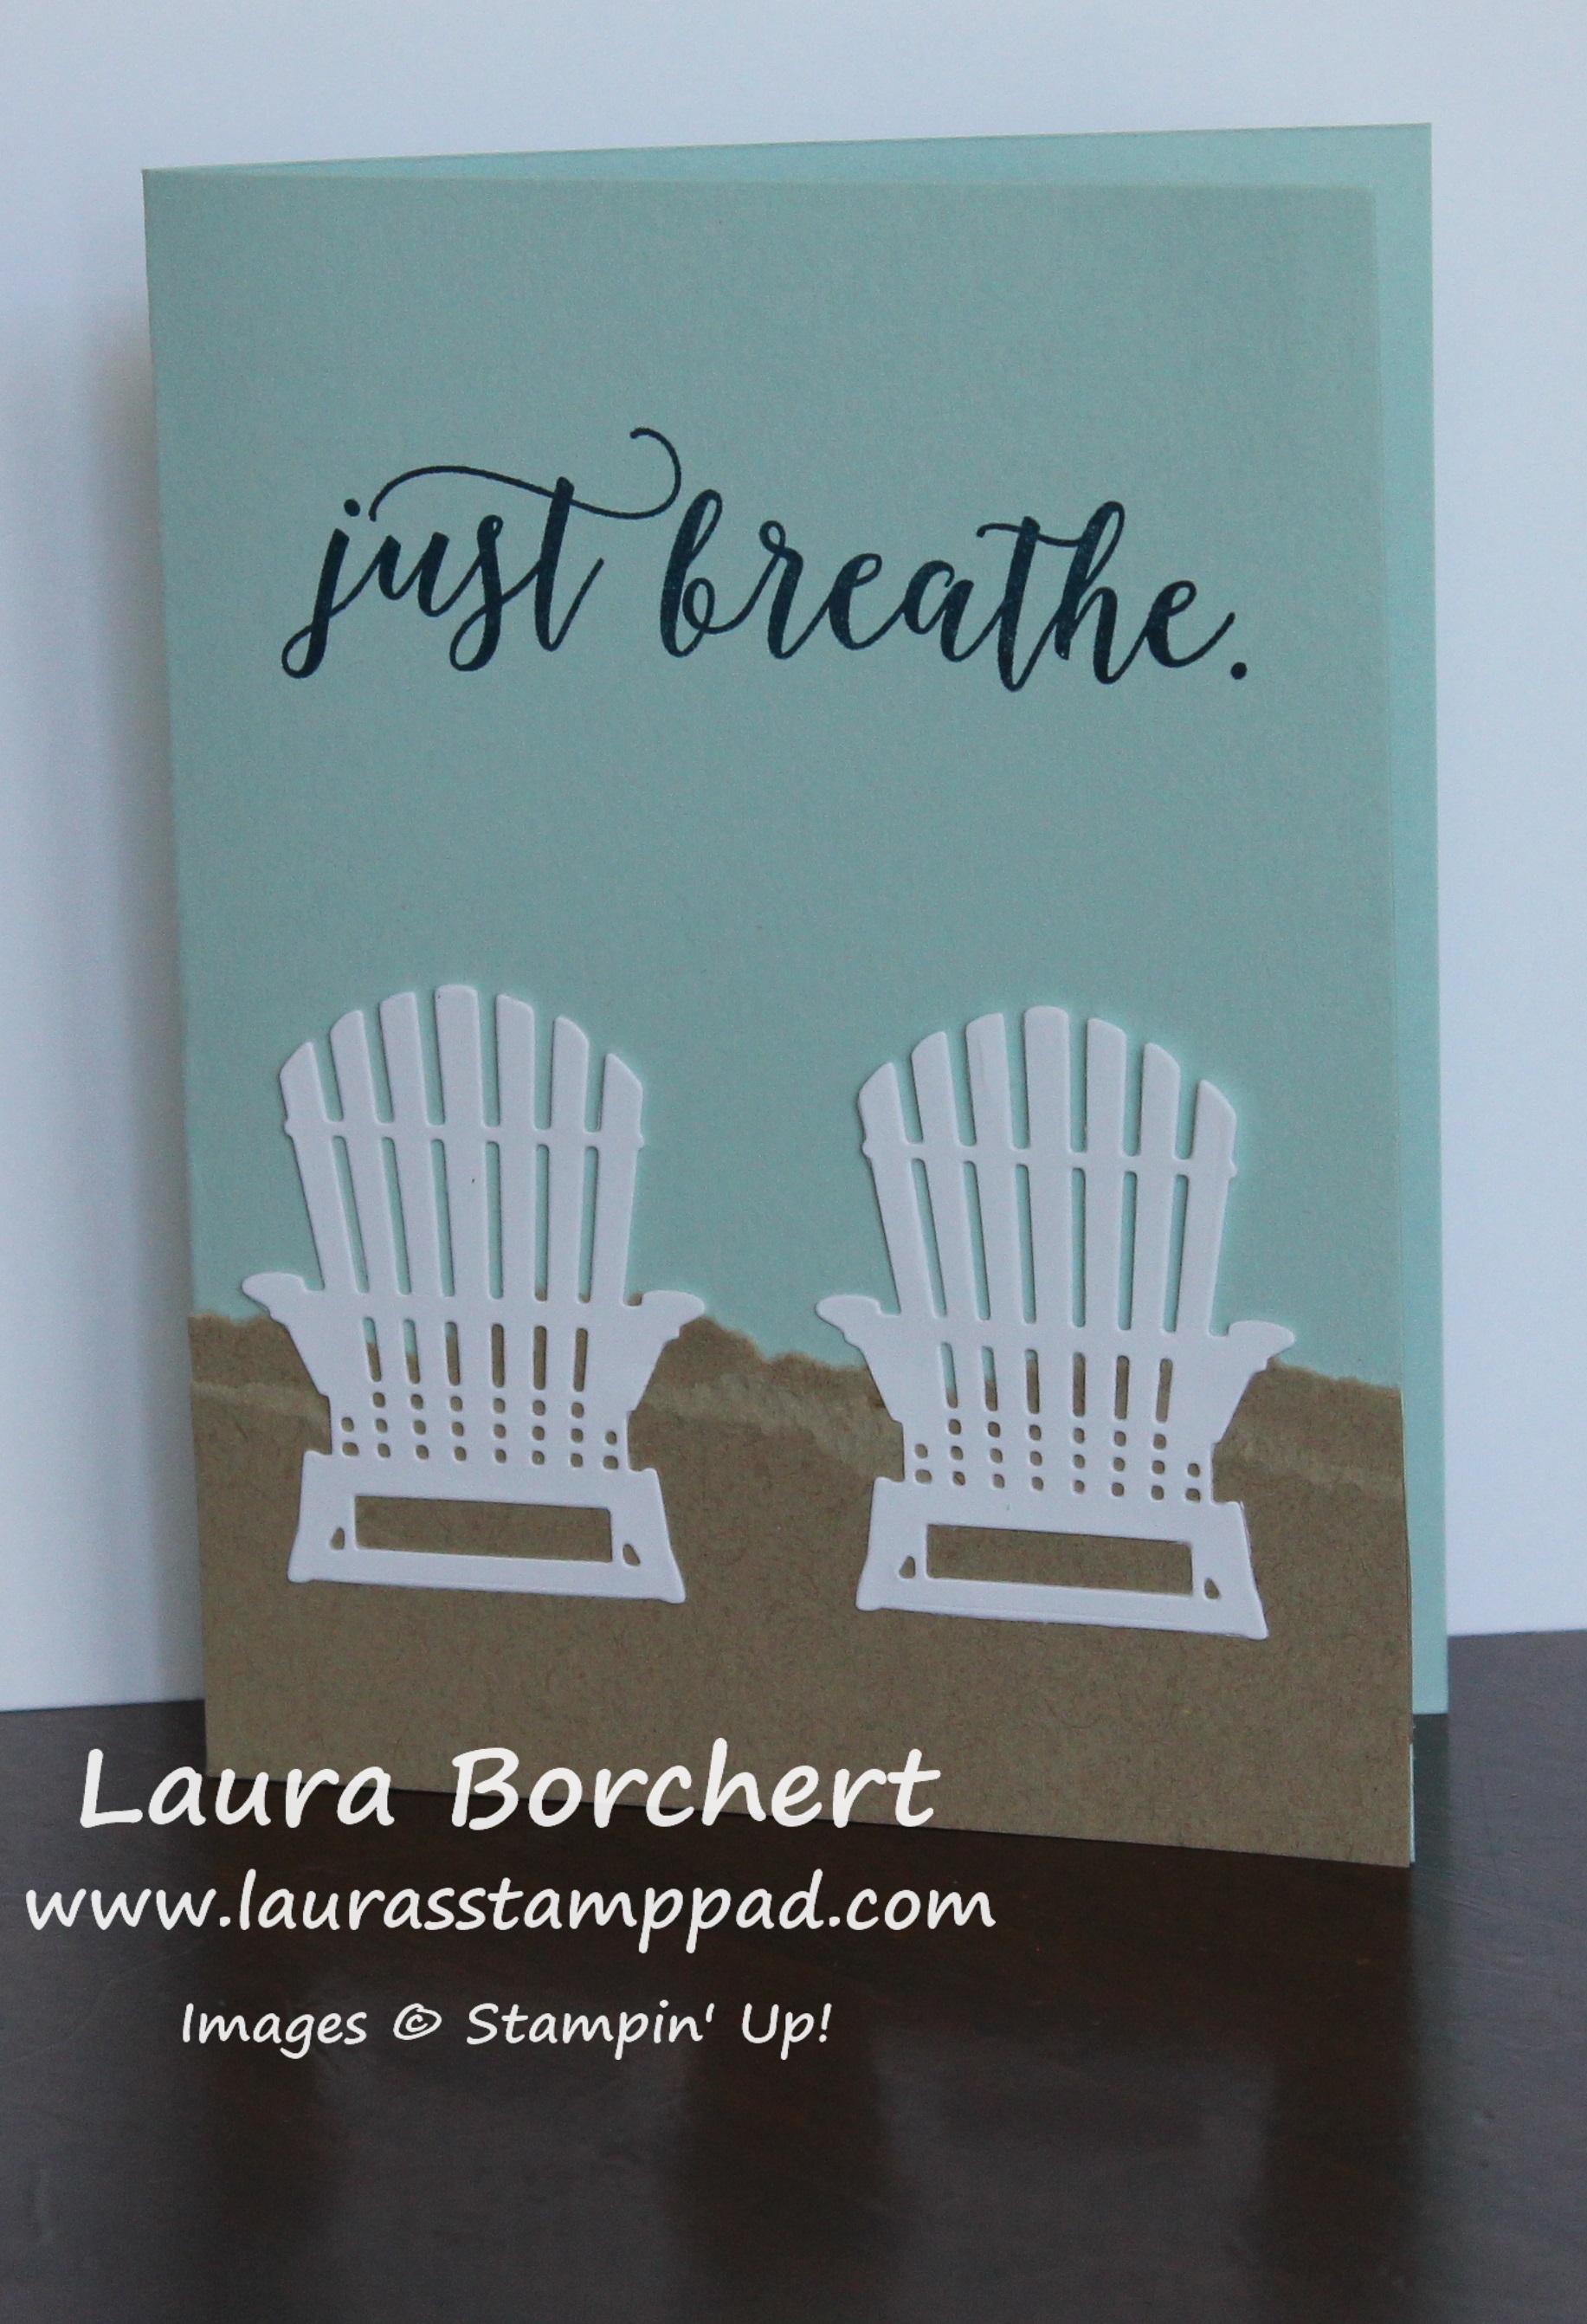
I started with a Whisper White card base. Next, I layered a piece of the ombre Dapper Denim from the Color Theory Designer Series Paper Stack onto some Dapper Denim cardstock (4″ x 5-1/4″). Then I stamped the greeting, Just Breath from the Colorful Seasons Stamp Set in Dapper Denim. That greeting is just amazing. I added this to the card from with Stampin’ Dimensionals for a little pop!

Creating Sand, www.Laurasstamppad.com

Now for creating a perfect beach scene, it’s time to make the sand. I took a piece of Crumb Cake (2″ x 5-1/8″) and placed it in a box to spritz. Spritzing can be messy so I use a box on it’s side to spritz into. I place the cardstock laying down flat (on the side of the box since it’s sideways). Using a Spritzer with alcohol and Chocolate Chip Re-Inker, I spritzed the bottom of the box, allowing the spray of it to drop down onto the Crumb Cake. This way the cardstock just has little dots of ink all over and not a direct splatter of ink. Also, another BIG TIP is be sure to use an alcohol of 70 proof or less. If it is higher, it will start to break down the plastic in the spritzer and it will clog.

After spritzing, I ripped the Crumb Cake in half and layered it together on the bottom of the card front. Those amazing adirondack chairs are from the coordinating Seasonal Layers Framelit. I die cut them in Whisper White and added them to the card front with the Fine Tip Glue Pen. I put the adhesive on the bottom rectangle piece as well as the arms of the chair. This allows the top of the chair to pop out a bit since it isn’t secured down and it looks more 3D! I just love it!!!

Just Breathe, www.LaurasStampPad.com

Here is another version of the same card but fewer layers. This is the simple version and the stepped up version is at the top! For this card, I used a Soft Sky card base and stamped directly onto it. Then I added the sand and chairs below. Which card do you prefer – the simple or stepped up?

If you would like to see it all in action, check out the video tutorial below or click here! Don’t forget to give it a thumbs up if you liked it and be sure to subscribe if you are new!!!

Get ready for the NEW catalog on June 1st! It’s so fabulous!!!!

Happy Stampin’

~Laura


Tempting Techniques – Eastern Elegance One Sheet Wonder!

Posted on

Happy Tuesday!!! Today, I’m sharing an amazing technique with you – Eastern Elegance One Sheet Wonder! I know how much you all love One Sheet Wonders so here is another fabulous one! I am loving the Eastern Elegance Suite! It’s beautiful!

Eastern Elegance One Sheet Wonder, www.LaurasStampPad.com

How amazing and beautiful are these cards?!?!?! I just love them and they were so quick to create because I used just 4 Ink Pads, 1 Stamp Set, 1 Framelit Set, and just a few colors! I used all Whisper White Cards Bases….except that one in Dapper Denim! 🙂 Now let’s get started on the cutting and assembling!

Eastern Palace Greetings, www.LaurasStampPad.com

I started off by making lots of greeting tags. The Eastern Beauty Stamp Set has so many fabulous images to create the coolest greetings! I die cut them with the coordinating Eastern Medallion Framelits and they were ready to grab and go when I was assembling the cards! The colors I used were Tranquil Tide, Fresh Fig, and Lemon Lime Twist which are all NEW In-Colors!!!

3x3 Squares, www.LaurasStampPad.com

I started out with a 12″ x 12″ piece of Eastern Palace Designer Series Paper and I cut it into 6″ x 6″ squares. With one of the squares, I cut it in half both ways creating four 3″ squares. Finally I cut 2 of those in half diagonally to create the top cards above and just used them as a square for the bottom two cards. I used a little bit of coordinating Fresh Fig and Tranquil Tide cardstock for layering. The stamps are from the Eastern Beauty Stamp Set!

2x2 Squares, www.LaurasStampPad.com

Next, I took another 6″ Square and cut it into nine 1-1/2″ squares. I added those to the cards above in different ways with greetings and some of the Gold Vinyl Stickers to decorate!!! That gold tassel is just fabulous as well and not super bulky either! Bonus!

One Sheet Wonder, www.LaurasStampPad.com

The next 6″ Square was cut at 4″. Then with the 4″ x 6″ piece, I cut it into three 1-1/2″ x 4″ strips. With the leftover piece of 2″ x 6″, I sniped off that last 1/2″ and used it for the lower right corner card. The other 3 pieces are perfect for layering across your card as a center band! I used Dapper Denim, Fresh Fig, and Tranquil Tide for layering on these cards!

Eastern Beauty, www.LaurasStampPad.com

For the final 6″ Square, I cut it at 5-1/2″. Using the 5-1/2″ x 6″ piece, I cut at 1-1/2 (along the 6″ side) to create four 1-1/2″ x 5-1/2″ strips. I really loved using the amazing stamp set to create background, borders, and greetings! The gold stickers are pretty amazing too for a little pop of bling!!! You can  get all the items I used in this One Sheet Wonder in the Premier Bundle of the Eastern Palace Suite! I mean everything, even the Very Vanilla cardstock and envelopes which come FREE! This bundle is super fabulous and only available this month! Next month, each item will be sold individually and you won’t get the freebies!

To check out this One Sheet Wonder in action, see the Video Tutorial below or click here! Don’t forget to give it a thumbs up if you liked it and be sure to subscribe if you are new!!!

Happy Stampin’

~Laura


Technique Tuesday – Creating a Pop & Twist Card!!!

Posted on

Happy Tuesday!!! Today’s technique is this amazing Pop & Twist Card. It’s one of those super WOW cards that you won’t really make tons of them but making at least one is super fun!!! Don’t worry, I did a video tutorial too to help out!

Pop & Twist Card, www.LaurasStampPad.com

Okay, so the front looks pretty simple but that’s because the inside is the major WOW for this card!!! I got the idea for this card from LeeAnn Greff and made a few changes with the way I created it! Thank you, LeeAnn! Now let’s get started on this beauty!

I started with a Pacific Point card base measuring 11″ x 4-1/4″. For the front, I used a piece of Party Animal Designer Series Paper (5″ x 3-3/4″). This designer paper is retiring and on sale!!! Woot Woot! I wrapped some Emerald Envy Ribbon around the card and added a little Party Animal Embellishment with some Whisper White Baker’s Twine! I stamped the greeting from the Balloon Adventures Stamp Set in Pacific Point Ink.

Side View - Pop & Twist, www.LaurasStampPad.com

Now for the inside…here’s the tricky part! 🙂 Don’t worry! I will walk you through it all. I found it best to create a template using normal printer paper because then you can practice without wasting cardstock. It was easier to create some of the folds with the printer paper and use them as a guide on cardstock as well. So with the printer paper (or your actual cardstock for the card), I made the following score lines:

Along the 11″ side: Score at 4-1/4″, 5-1/2″, and 6-3/4″

Along the 8-1/2″: Score at 2-1/4″, 4-1/4″, and 6-1/4″

Next, these scores create rectangles in each corner of the cardstock so I cut those off. I was left with a sort of cross looking template that was wide going up and down and little going side to side. I folded on the score lines but not each of them, just in half going both ways! The next 2 folds are the tricky ones because you will be folding diagonally. This fold is not corner to corner, it is actually line to line. With the thick/wide piece at the bottom/closest to you, fold  the right hand (small piece) diagonally down. Go down to where the middle score line of the small piece lines up with the middle score line of the wide piece. This will create a diagonal line with the center, in the middle of your folded cross lines from scoring above. You will notice that the diagonal line doesn’t go corner to corner but just past it. That is correct! Next I rotated it 90 degree and folded diagonally again, creating an X. All red lines in the photo below are the lines I folded on.

Pop & Twist Template, www.LaurasStampPad.com

Now I used this template for all of my card inserts. I just found it much easier to place on the top of the cardstock, score diagonally and fold than it was to try to get the cardstock to fold correctly the first time without the template. To finish the insert, I popped in the sides (small pieces). Mountain on that middle score line and valley on the sides. This will create a house look to the cardstock. Next, place it in your Stampin’ Trimmer with the point of the house at 5-1/4″ and trim off the extra. It should be about a 1/4″. This is so it fits into your card base perfectly and helps even things out on your little house.

Using Fast Fuse or Tear And Tape (a strong adhesive), outline one side of the house! I placed it inside the card, centered and sticky side up and then pressed the top closed to adhere it. Flip it over and repeat! Don’t try to place the sticky part on the card without closing it because then it might not close correctly. It could be off set a bit and you will want it to close and lay smooth. Now I can add my decoration pieces to either side. I used a piece of Party Animal Designer Paper (3″ square) to the left side and Whisper White (3″ square) to the right side so I could write my message.

Technique Tuesday, www.LaurasStampPad.com

Next up is the amazing pop out piece! I cut a piece of Crushed Curry measuring 2-3/4″ x 11″ and scored at 2-3/4″, 5-1/2″, and 8-1/4″. This creates four 2-3/4″ squares. I placed pieces from the Party Animal Designer Series Paper onto each square. Just be sure that all of your patterns go in the same direction, up and down. To add this, I like to use Tear & Tape because you can place it down and then reveal the sticky later! I placed a small piece in the upper left corner and lower right corner of the small pieces sticking out the sides (see template above). This is because the insert (Crushed Curry piece) will adhere to the top of one panel and the bottom of the other, making it twist sideways!

I placed the insert in there to make sure that my patterned pieces were going to twist right side up when I opened the card. Then I peeled off one of the pieces of tape and attached it. The piece will line up (on top of) the white or designer paper you placed down above. If it is centered on that and to the edge, you are golden. You don’t want the insert in too deep or our too far. Making sure the other adhesive side is on the opposite, reveal the sticky and press your card closed to adhere. Now it Pops & Twists! I found the first few times, you have to help it close up as it’s still a little stiff!

Of course to see this all in action, check out the Video Tutorial below or click here! Be sure to give it a thumbs up if you liked it and don’t forget to subscribe if you are new!

All of these items in the Party Animal Suite are retiring at the end  of the month and many of them are on sale! Get them before they are gone by clicking here!

Happy Stampin’

~Laura


Technique Tuesday – Baby Bear Peek-A-Boo Glimmer!

Posted on

Happy Tuesday!!! Today, I have a fabulous technique to share with you – Baby Bear Peek-A-Boo Glimmer greeting!!!

Baby Bear Peek-A-Boo Glimmer, www.LaurasStampPad.com

Isn’t he precious….or she?!?!?! That little teddy just looks so real with the 3 step stamping images. You can always do a blue card base and silver glimmer paper or even yellow for gender neutral! I just think this card has such a WOW factor to it!

I started with a Blushing Bride card base. Next I took a piece of Very Vanilla (4″ x 5-1/4″) and die cut the congrats greeting out of the top with the Sunshine Wishes Framelits! Now, before adhering it to the card front, I stamped little Baby Bear on there. Since this is a 3-step stamping technique, I stamped the solid  image in Crumb Cake Ink (stamped off once). I stamped image #2 in Crumb Cake (full strength). Finally, the #3 image was stamped in full strength Tip Top Taupe Ink. A few tips for this 3-step stamping, be sure to ink it up well and press firmly all around the image since it is a larger image. When stamping, I always looked to line up that little rounded bum and the ears. If I had those 2 points lined up, I was golden. Another tip is that if you think you are right on top of the image and need to move down a bit, stay exactly where you are and it will be perfect. It’s when I think I need to go down a bit that I end up off a bit. You got this!

Baby Bear, www.LaurasStampPad.com

Now that Baby Bear is stamped, it is time to add this to the card front! I used a piece of Blushing Bride Glimmer Paper that was big enough to cover the greeting. This could vary depending on your greeting of choice. Next, I added adhesive to the back side of the glimmer and placed it behind the greeting (glimmer side up). Then I placed this piece onto my card front with the vanilla piece centered all around. Press over the greeting/glimmer paper so that the adhesive sticks. Now I know that my glimmer paper is in the correct spot. Then I took the vanilla piece off and added Stampin’ Dimensionals all around and placed it back over the glimmer paper. The dimensionals make it look a little more 3D and gives a little peek-a-boo glimmer look!

To finish off little Baby Bear, I added a Very Vanilla Satin Ribbon bow to his neck securing it with a Mini Glue Dot. Isn’t he precious?!?!?

Of course, if you would like to see this all in action, check out my Video Tutorial below or click here! I did the one in the video as a Baby Boy card! Don’t forget to give it a thumbs up if you liked it and be sure to subscribe if you are new. I post a new video every Tuesday and Thursday!

Happy Stampin’

~Laura

Some of the items used for this card are retiring as well as a lot of others. You can check out the complete list here:

2017 Retiring List – PDF

2017 Retiring List – Excel

These items are all while supplies last and some are sold out already! You can start shopping here!