Let’s Celebrate You!!!

Posted on

This greeting – Let’s Celebrate You – is perfect for any occasion. It would work for birthday, promotion, achieving a goal, becoming a mom, graduation and so much more!!! We can celebrate YOU each and every day!!!

Let's celebrate you, www.LaurasStampPad.com

Last week, I did another fabulous card using this Bloom & Grow Stamp Set and I just can’t get enough! That’s no surprise though since you all know I love flowers!

I started with a Soft Sea Foam card base. Next, I stamped all around the edges of the base with the flower image from the Bloom & Grow Stamp Set. I stamped these flower in Mint Macaron for that slightly darker shade of green! Clean off the stamp and then stamp 2 more in Basic Gray onto scrap white cardstock! I like using Basic Gray when I’m coloring because it makes the image softer looking. It tends to blend in better than being so bold like black can be.

Color Options for coloring flowers, www.LaurasStampPad.com

Using Stampin’ Blends, I colored the beautiful flowers and greenery. There are so many fun options for this. I was blown away by all the fabulous looks that my stampers combined at class. I wanted to keep all of their cards!!! Once the image is colored, I die cut it with the coordinating framelits Budding Blooms (Bundle & Save 10%).

The greeting was stamped from the Bloom & Grow Stamp Set onto one of the NEW Stitched Nested Labels. These are so fun and pretty!!! Two of the cards above have a greeting stamped in Lovely Lipstick Ink and the bottom one was stamped in Rich Razzleberry Ink! The greeting was added to the card with Snail Adhesive but the flowers are popped up on Stampin’ Dimensionals! To finish off the card, I used some of the Basic Sequins and Glittered Enamel Shapes!

Bloom & Grow Stamp Set, www.LaurasStampPad.com

For the inside of the card, I just stamped some flowers from the Bloom & Grow Stamp Set!!! If you love to color, this card is perfect for you!!! Check out the supplies listed below so you can recreate it! Don’t forget that today and every day….Let’s Celebrate You!!!

Happy Stampin’….and colorin’

~Laura

Product List


Creating a Double Fold Card!!!

Posted on

Happy Tuesday!!! You know what that means! I have a fabulous technique to share with you today!!! We are creating a double fold card and it is beautiful!!!

Creating a Double Fold Card, www.LaurasStampPad.com

I used the Perennial Essence Suite and I love how it turned out. The little flower piece opens to the right and then the designer paper piece opens to the left! It’s super fun! Also, the flower is all blingy with Wink of Stella. This photo just doesn’t show how amazing this card is!

I started with a card base of Purple Posy measuring 5-1/2 x 7-1/4. So this is like a normal card base but with a little 1-1/4″ piece taken off the front. Next, I layered on the Blackberry Bliss (5-1/4″ x 2-3/4″) and Perennial Essence Designer Series Paper (5″ x 2-1/2″). For the inside piece, I stamped 3 flowers from the Floral Essence Stamp Set along the left hand side of a piece of Whisper White (4″ x 5-1/4″). I found that stamping the middle flower first and then the two side ones worked best for spacing!

For the 2nd fold out piece, I started with a piece of Purple Posy measuring 3″ x 6″ and I folded it in half. Next, I layered on a piece of Blackberry Bliss measuring 2-3/4″ x 2-3/4″. On the 2-1/2″ square of Whisper White, I stamped another one of those big flowers and colored it with Stampin’ Blends. I used the Blackberry Bliss Dark Marker for all of the lines and accents on the flower. Then I went over it and filled in with the Blackberry Bliss Light Marker. For the center and greeting, I stamped them with Crushed Curry Ink. To finish it off, I added Wink of Stella all over it. #SafeGlitter 🙂

Floral Essence Stamp Set, www.LaurasStampPad.com

Next, I layered the flower onto the Blackberry Bliss square and stamped the greeting inside the mini card. Make sure the crease of the card is on the right hand side. Then I added adhesive to the back and placed like a sandwich around the left side flap. Making sure it was centered up and down and in far enough on the side so it wasn’t hanging off, I pressed it down! Now you are done creating a double fold card.

Check out more samples using the Perennial Essence Suite here and here. Also, if you would like to make these cards, click the supply list below!

If you would like to see all of this in action, check out the video below or click here! Be sure to give the video a thumbs up if you liked it and don’t forget to subscribe if you are new. If you would like a notification when I post a new video, be sure to click the bell right next to the subscribe!!!

Happy Stampin’

~Laura

Product List

It is a Tree!!!

Posted on

Did you know that it is a tree stamp in the Memorable Mosaic Stamp Set? I totally thought the tree top was just a background or mossy greenery dangling down. Then I looked at the trunk image and couldn’t figure it out. I thought maybe a koi fish or something. When I looked in the catalog, I realized it is a tree. Of course, it is!

It is a tree, www.LaurasStampPad.com

It is not just any tree….it is a beautiful one!!! How cool is this card?!?! I thought the greeting from the Colorful Seasons Stamp Set was perfect for this card! It is perfect for any card because lets be honest, sometimes we all need to be told to just breathe! Am I right??

I started with a Night of Navy card base. Next, I cut a piece of Pool Party (4″ x 5-1/4″) and stamped the greeting from Colorful Seasons along the bottom. It was stamped in Night of Navy Ink. Then I took a piece of Very Vanilla (3-3/4″ x 4-1/4″) for the focal point. It is a bit longer so that I could rip off the bottom after stamping and coloring for some texture.

Mosaic Tree, www.LaurasStampPad.com

For the tree, I stamped the leaves first in Call Me Clover Ink. I stamped down once, lifted and moved it over just a bit and stamped again. This gives more leaves and colors for a fuller look on the tree. Next, I stamped the trunk in Soft Suede Ink. By stamping the tree first and working your way down, you know you won’t run out of room. If you stamped the trunk and it was too high, your leaves would fall off the top of the cardstock.

After stamping, I took the brush tip of the Stampin’ Blends and just colored in. I used Pool Party Light for the sky and Soft Suede Light for the ground. Simply swipe the ink across in a rough look. Don’t worry about filling it all in perfectly, just swipe across. It might look crazy at first but set it aside and work on the rest of the card and then come back and it will be fabulous! I ripped the bottom and then added it to the Pool Party layer. Using some of the new Night of Navy/Sahara Sand Baker’s Twine, I wrapped it around and tied it into a knot. Since the twine is bumpy, I added this layer to the card front with Stampin’ Dimensionals for a smooth look!

Mosaic Card Insert, www.LaurasStampPad.com

For the inside of the card, I added a layer of Very Vanilla (4″ x 5-1/4″) and stamped the mosaic circles on the corners in Night of Navy Ink. This are from the Memorable Mosaic Stamp Set! The perfect little decoration!

If you would like to make this fabulous card, check out the supplies listed below! You can also check out another sample I created with this set by clicking here and here!!!!

Happy Stampin’

~Laura

Product List

How To Get Your Spacing Right!!!

Posted on

Sometimes I just wing it and sometimes I measure and sometimes I have fun little tips like this one!!! Today, I’m sharing how to get your spacing right on stamped flowers so you can fit a greeting in the middle!!!

How To Get Your Spacing Right, www.LaurasStampPad.com

The Bloom & Grow Stamp Set makes my heart happy!! I just love all the flower combinations and how they can be stamped so beautifully!

I started with a Gorgeous Grape card base. Next, I took a piece of Whisper White (4″ x 5-1/4″) to stamp the flowers from the Bloom & Grow Stamp Set. These were stamped in Basic Gray because I like that softer look for coloring rather than the bold black look.

So now for the hot topic: How To Get Your Spacing Right?!?! I simply placed the greeting strip (Highland Heather measuring 4-1/4″ x 1″) to the side of the white cardstock and in the middle where I wanted it to be placed. Then I stamped the top flowers making sure to be at the top of that greeting strip. Ink it up again, flip it over, and stamp the bottom flowers near the bottom of that greeting strip. By placing the guide on the side, it helps get that perfect spacing where they aren’t too far apart or too close together! Simple and fabulous!

Stampin' Blends Coloring, www.LaurasStampPad.com

Here are the colors of Stampin’ Blends that I used for these flowers. I like to take a photo with my phone right after I am done so I know which colors were used. Then if I want to recreate it exactly, I don’t have to guess!!!

You are Simply Wonderful, www.LaurasStampPad.com

Once I finished coloring, I added this layer to the card base. Then I stamped the greeting from the Bloom & Grow Stamp Set in Gorgeous Grape Ink. This piece was then attached to the center of the card. For a little bit of texture, I added a Baker’s Twine bow with a Mini Glue Dot and some Basic Sequins.

Simply Wonderful Card Insert, www.LaurasStampPad.com

For the inside, I added a piece of Whisper White (4″ x 5-1/4″) and stamped some greenery on the corners from the Bloom & Grow Stamp Set. Perfect coordination to complete the card! Here are some more color options for this amazing card!

Coloring Options, www.LaurasStampPad.com

If you would like to see all of this in action, check out the video below or click here! Be sure to give the video a thumbs up if you liked it and don’t forget to subscribe if you are new. If you would like a notification when I post a new video, be sure to click the bell right next to the subscribe!!!

Happy Stampin’

~Laura

Product List

Laura’s Quick Tips: Saving Ribbon!!!

Posted on

I know it is Tuesday and I usually do Technique Tuesday but instead we are doing one of Laura’s Quick Tips! This is kind of a technique! It’s a great way to use less ribbon off the spool and possibly use those little scraps you have laying around!

Laura's Quick Tips: Saving Ribbon,  www.LaurasStampPad.com

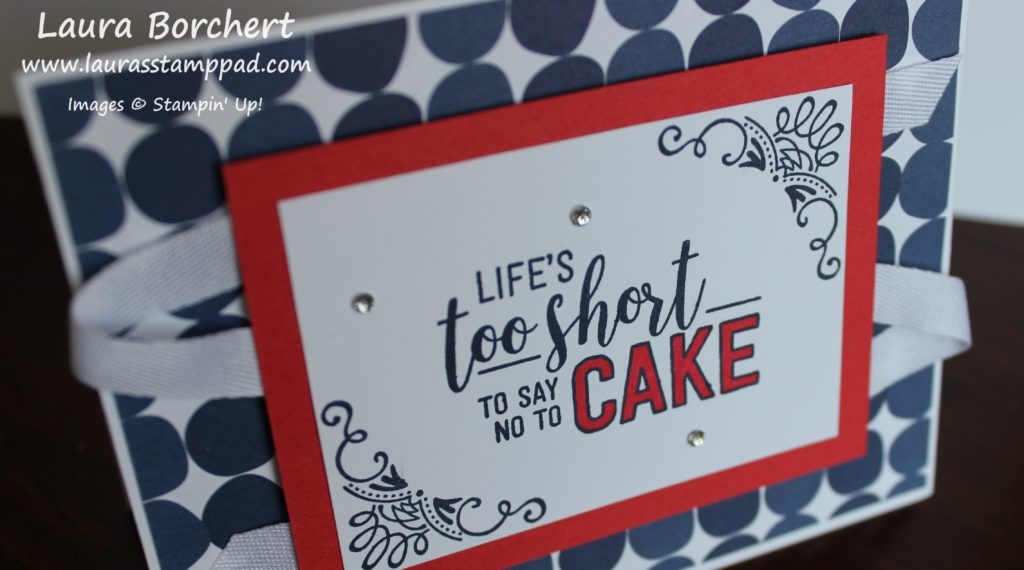
This is a fairly simple card to create. The fabulous colors, designer series paper, and fun greeting make it amazing! To create a bit of texture, I added in the ribbon!!!

I started with a Whisper White card base and layered on a piece of the Happiness Blooms Designer Series Paper! Next, I took a piece of Whisper White and stamped the greeting and fun corner images with Stamparatus. These images are from the Amazing Life Stamp Set (retiring soon). The Stamparatus makes those corner images fit perfectly into place. Using the Poppy Parade Dark Stampin’ Blends Marker, I colored in the word Cake! I love how it makes it POP!

Life's Too Short To Say No To Cake, www.LaurasStampPad.com

One the images were stamped, I layered it onto a piece of Poppy Parade cardstock and flipped it over to add ribbon! Rather than adding one long strip of ribbon that starts at the top, loops across, back across, and comes out the bottom. It was over 12 inches of ribbon I would have needed. Instead, I laid the first piece down, secured it with Stampin’ Dimensionals and trimmed it off. Next, I cut a small loop and secured it to the other side with Stampin’ Dimensionals. I did this with another loop and another end piece. By only using small pieces of ribbon, I saved over 6 inches of ribbon. You could also use ribbon scraps that you have laying around!!

Ribbon Saving Tip, www.LaurasStampPad.com

If you would like to see this all in action, check out the video below or click here! Be sure to give the video a thumbs up if you liked it and don’t forget to subscribe if you are new. If you would like a notification when I post a new video, be sure to click the bell right next to the subscribe!!!

Happy Stampin’

~Laura

Product List

Creating Stained Glass!!!

Posted on

Happy Tuesday!!! You all know that means I have a fabulous technique for you and this one is super cool! Creating stained glass on a card makes it look gorgeous and so real!!! This Easter card is perfect because it looks like a church window!

Creating Stained Glass, www.LaurasStampPad.com

Isn’t it just BEAUTIFUL?!?!?! I love it! I used the Stampin’ Blends to color the stained glass and the butterflies!!!

Starting out, I cut a Pool Party card base. Next, I took a piece of Whisper White measuring 3-3/4″ x 5-1/2″ and added it to the card front! Using a piece of the Graceful Glass Designer Series Paper, I colored the BACK of it with Stampin’ Blends Markers!

Coloring Vellum With Stampin' Blends, www.LaurasStampPad.com

I used the Dark Stampin’ Blends colors because the vellum makes the color lighter already and I love bright colors over a super light pastel. Once it was colored, I had to trim off the top and bottom a bit to make it fit my card. The piece is 6″ tall and my card is just 5-1/2″! Stampin’ Up vellum is amazing because it is thick enough that Snail adhesive doesn’t show through. In the past I have hated vellum because it is so hard to adhere it without the adhesive showing through. This is not the case and I am pumped!!!

Church Stained Glass Window, www.LaurasStampPad.com

I finished off the card with stamping a butterfly from the Butterfly Gala Stamp Set. Using the Butterfly Duet Punch, I punched it out and colored it with the same Stampin’ Blends! It is amazing!!! You could use the lighter marker for the butterfly since you don’t have that vellum toning down the color. Again, I love bold colors so I went with it! I added the butterflies with Stampin’ Dimensionals for some texture. The greeting is from the Itty Bitty Greetings Stamp Set and punched out with the Classic Label Punch. Then I added some Gingham Gala Adhesive-Backed Sequins for some texture and bling! It’s perfect!!!

If you would like to see this all in action, check out the video below or click here! Be sure to give the video a thumbs up if you liked it and don’t forget to subscribe if you are new. If you would like a notification when I post a new video, be sure to click the bell right next to the subscribe!!!

Happy Stampin’

~Laura

Product List

Flippin’ Frogs!!!

Posted on

These little frogs from Sale-A-Bration are just adorable. When looking at this card, I thought Flippin’ Frogs because they are all over the place. That reminds me of this crazy “game” at my parents house for the kids to play. The adults hate it because it’s just a tree with rubber frogs all over and then after some time the tree pops and the frogs go flying. There is no real “game” or strategy to it but the kids (grandkids) LOVE IT and pull it out every time. I’ll take this card over that game any day!!!

Flippin' Frogs, www.LaurasStampPad.com

Aren’t they adorable?? I really love how this card turned out!!! The framelits I used for these are no longer available as they sold out very quickly. So for those of you who snagged them before they were gone, have fun recreating this card. For those who didn’t get them, I hope you enjoy fussy cutting! 🙂

I started with a Call Me Clover card base. Next, I stamped the flies from the So Hoppy Together Sale-A-Bration Stamp Set all over a piece of Whisper White (4″ x 5-1/4″) and colored a few of them with the Daffodil Delight Stampin’ Blends. I really struggled with this because I wanted a bit of color to make them pop but didn’t really want to color them all. I decided to color 5 and that was it….no more or less. Random doesn’t really work well with me as I tend to color this one and that one and one over here and soon I have colored them all. 🙂

So Hoppy Together, www.LaurasStampPad.com

I stamped each of the frogs from the So Hoppy Together Stamp Set and used the coordinating Hop Around Framelits (sold out) to die cut them. You may wonder where that middle front came from….I cut the unicycle off. Each frog was stamped in Call Me Clover and colored with the Call Me Clover Stampin’ Blends. To make the frogs stand out a bit more, I added a punched circle of vellum cardstock behind each one. I really love that look….subtle but adds texture and pop!

Frogs & Flies, www.LaurasStampPad.com

For the inside, I added a piece of Whisper White with a few stamps flies and a frog! I have really been loving to decorate the insides of my cards!!!

Don’t forget that Sale-A-Bration ends on March 31st so there are only a few days left to get this So Hoppy Together Stamp Set and other freebies for every $50 you spend. Click here to start shopping!

Happy Stampin’

~Laura

Product List

A Friend Is Thinking Of You!!!

Posted on

Happy Monday!!! I hope you are ready to tackle the week. Sometimes Monday can seem like a fresh start, back on routine from the chaos of a weekend, and I’ve got a superwomen attitude! Then there are the weeks that I’m ready to crash from a busy weekend, my to-do list for the week isn’t created so I wander around wondering what to work on first. Those are the days that a simple smile from a stranger at the grocery store, a random text from a friend, or happy mail in the mailbox mean the most!!! Everything is quickly turned around and superwomen comes back! So today, I just want to say, “A friend is thinking of you and you got this!!!”

A Friend is Thinking of You, www.LaurasStampPad.com

This is a quick and simple card that can be created in any color scheme and with any designer series paper. Perfect to create and have some on hand all the time!

I started with a Highland Heather card base and added a strip of the Sale-A-Bration Botanical Butterflies Designer Series Paper (2″ x 5-1/4″). Next, I took a piece of Whisper White and stamped the adorable huggers in Gorgeous Grape Ink. This is from the Artfully Aware Stamp Set in the Occasions Mini Catalog!! I love the images and greetings in this set as they are so heartwarming and perfect!

Then I layered this piece onto a layer of Gorgeous Grape. The greeting in the corner was stamped from the Part of My Story Sale-A-Bration Stamp Set in Gorgeous Grape Ink. Before adding the focal point, I laid down a strip of the Flax Ribbon. The Stampin’ Dimensionals on the back of the focal point help to hold the ribbon in place!

Part of My Story, www.LaurasStampPad.com

Here is another similar version. I created this one portrait rather than landscape and I left off the ribbon. The card uses a different image and greeting but again using the same stamp sets! For this card, I colored in the image using Stampin’ Blends. I did use some of the Gingham Gala Sequins on both for a little extra flare.

Which one is your favorite??? If you want to recreate these cards, click the supply list below and remember there are only a few days of Sale-A-Bration left!! Every $50 in orders earns you a FREE item!

Happy Stampin’

~Laura

Product List

Hot Hawaiian Pink!!!

Posted on

You all know how much I love PINK! I’m super loving this hot Hawaiian pink flower too! It had me dreaming of warmer weather, sunny days, and all the flowers blooming!!! Of course, being in Hawaii is a whole other dream! 🙂

Hot Hawaiian Pink, www.LaurasStampPad.com

I created a very similar card to this one a few months ago. I had some leftover card pieces already cut but wanted to use some of my new stamps! Here is what I came up with using the Humming Along Stamp Set from the Occasions Mini Catalog!!!

I started with a Shaded Spruce card base. Next, I took a piece of Whisper White measuring 3-3/4″ x 5″ and stamped the greeting and flower from the Humming Along Stamp Set! Since I colored using Stampin’ Blends, I stamped in Memento Black Ink! For the flowers, I just played with various colors and shades and had fun with it. As always, I color with the dark marker first and then blend and fill in with the lighter marker.

Humming Along, www.LaurasStampPad.com

Which one is your favorite?? Let me know in the comments below!

For a little extra texture on the card, I used the Detailed Trio Punch for the corners. I rounded two of the corners and punched the floral image on the other two! This layer was added to the card base with Stampin’ Dimensionals for some texture and to allow the color and light to pop through those punched corners! Quick and simple! #SimpleStamping

Happy Stampin’

~Laura

Product List


Technique Tuesday – Securing Chicken Wire to Your Card!!!!

Posted on

Happy Tuesday!!! That means I have a fun technique!!! We are securing Chicken Wire to your card….well not real chicken wire! Instead Stampin’ Up has created this fun Chicken Wire Element that is super cute and easy to add to your project!

Securing Chicken Wire to Your Card, www.LaurasStampPad.com

This card is perfect for Fall and Thanksgiving! I’m loving the colors and elements so much from the Country Lane Suite!

I started with an Old Olive card base. Next, I took a piece of Crumb Cake (4″ x 5-1/4″) and stamped the cotton floral image from the Country Home Stamp Set in Memento Black Ink. I used the Stamparatus so I had even spacing side to side and the images didn’t overlap. Not having to stress about stamp placement is amazing! Using the Stampin’ Blends, I colored the flowers. For the white cotton, I used the White Watercolor Pencil. It worked perfectly! Next, I added this piece to the card front.

Harvest Blessings, www.LaurasStampPad.com

For the greeting, I stamped it in Pumpkin Pie from the Country Home Stamp Set. I made sure to stamp it on the right hand side so I had room for my ribbon and bow on the left. Next, I layered this onto a piece of Pumpkin Pie cardstock. For the bow, I actually added a small piece of Braided  Linen Thread to the end, wrapping the ends to the back side and securing with Stampin’ Dimensionals. Then I took another piece to tie a bow and secure it on with a Mini Glue Dot. This faux bow look makes it look like it is wrapped around but yet the bow is not sideways! It’s perfect!

Before adding this on, I placed the Chicken Wire Element on the bottom of the Crumb Cake cardstock. I didn’t actually use adhesive on that piece but secured it with the Country Lane Designer Paper. Be sure to place the greeting piece off to the side as a guide for how low the designer paper needs to go so you aren’t covering up the designer paper or all of your stamped flowers. After securing the designer paper, I added the greeting on top with Stampin’ Dimensionals!!!

If you would like to see this all in action, check out the video below or click here! Be sure to give the video a thumbs up if you liked it and don’t forget to subscribe if you are new. If you would like a notification when I post a new video, be sure to click the bell right next to the subscribe!!!

Happy Stampin’

~Laura

Product List