Technique Tuesday – Brusho Crystal Colour!!!

Posted on

Happy Tuesday!!! That means I have a fabulous technique to share with you today! I’m showing you the NEW Brusho Crystal Colour from the Occasions Mini Catalog!

Brusho Crystal Colour, www.LaurasStampPad.com

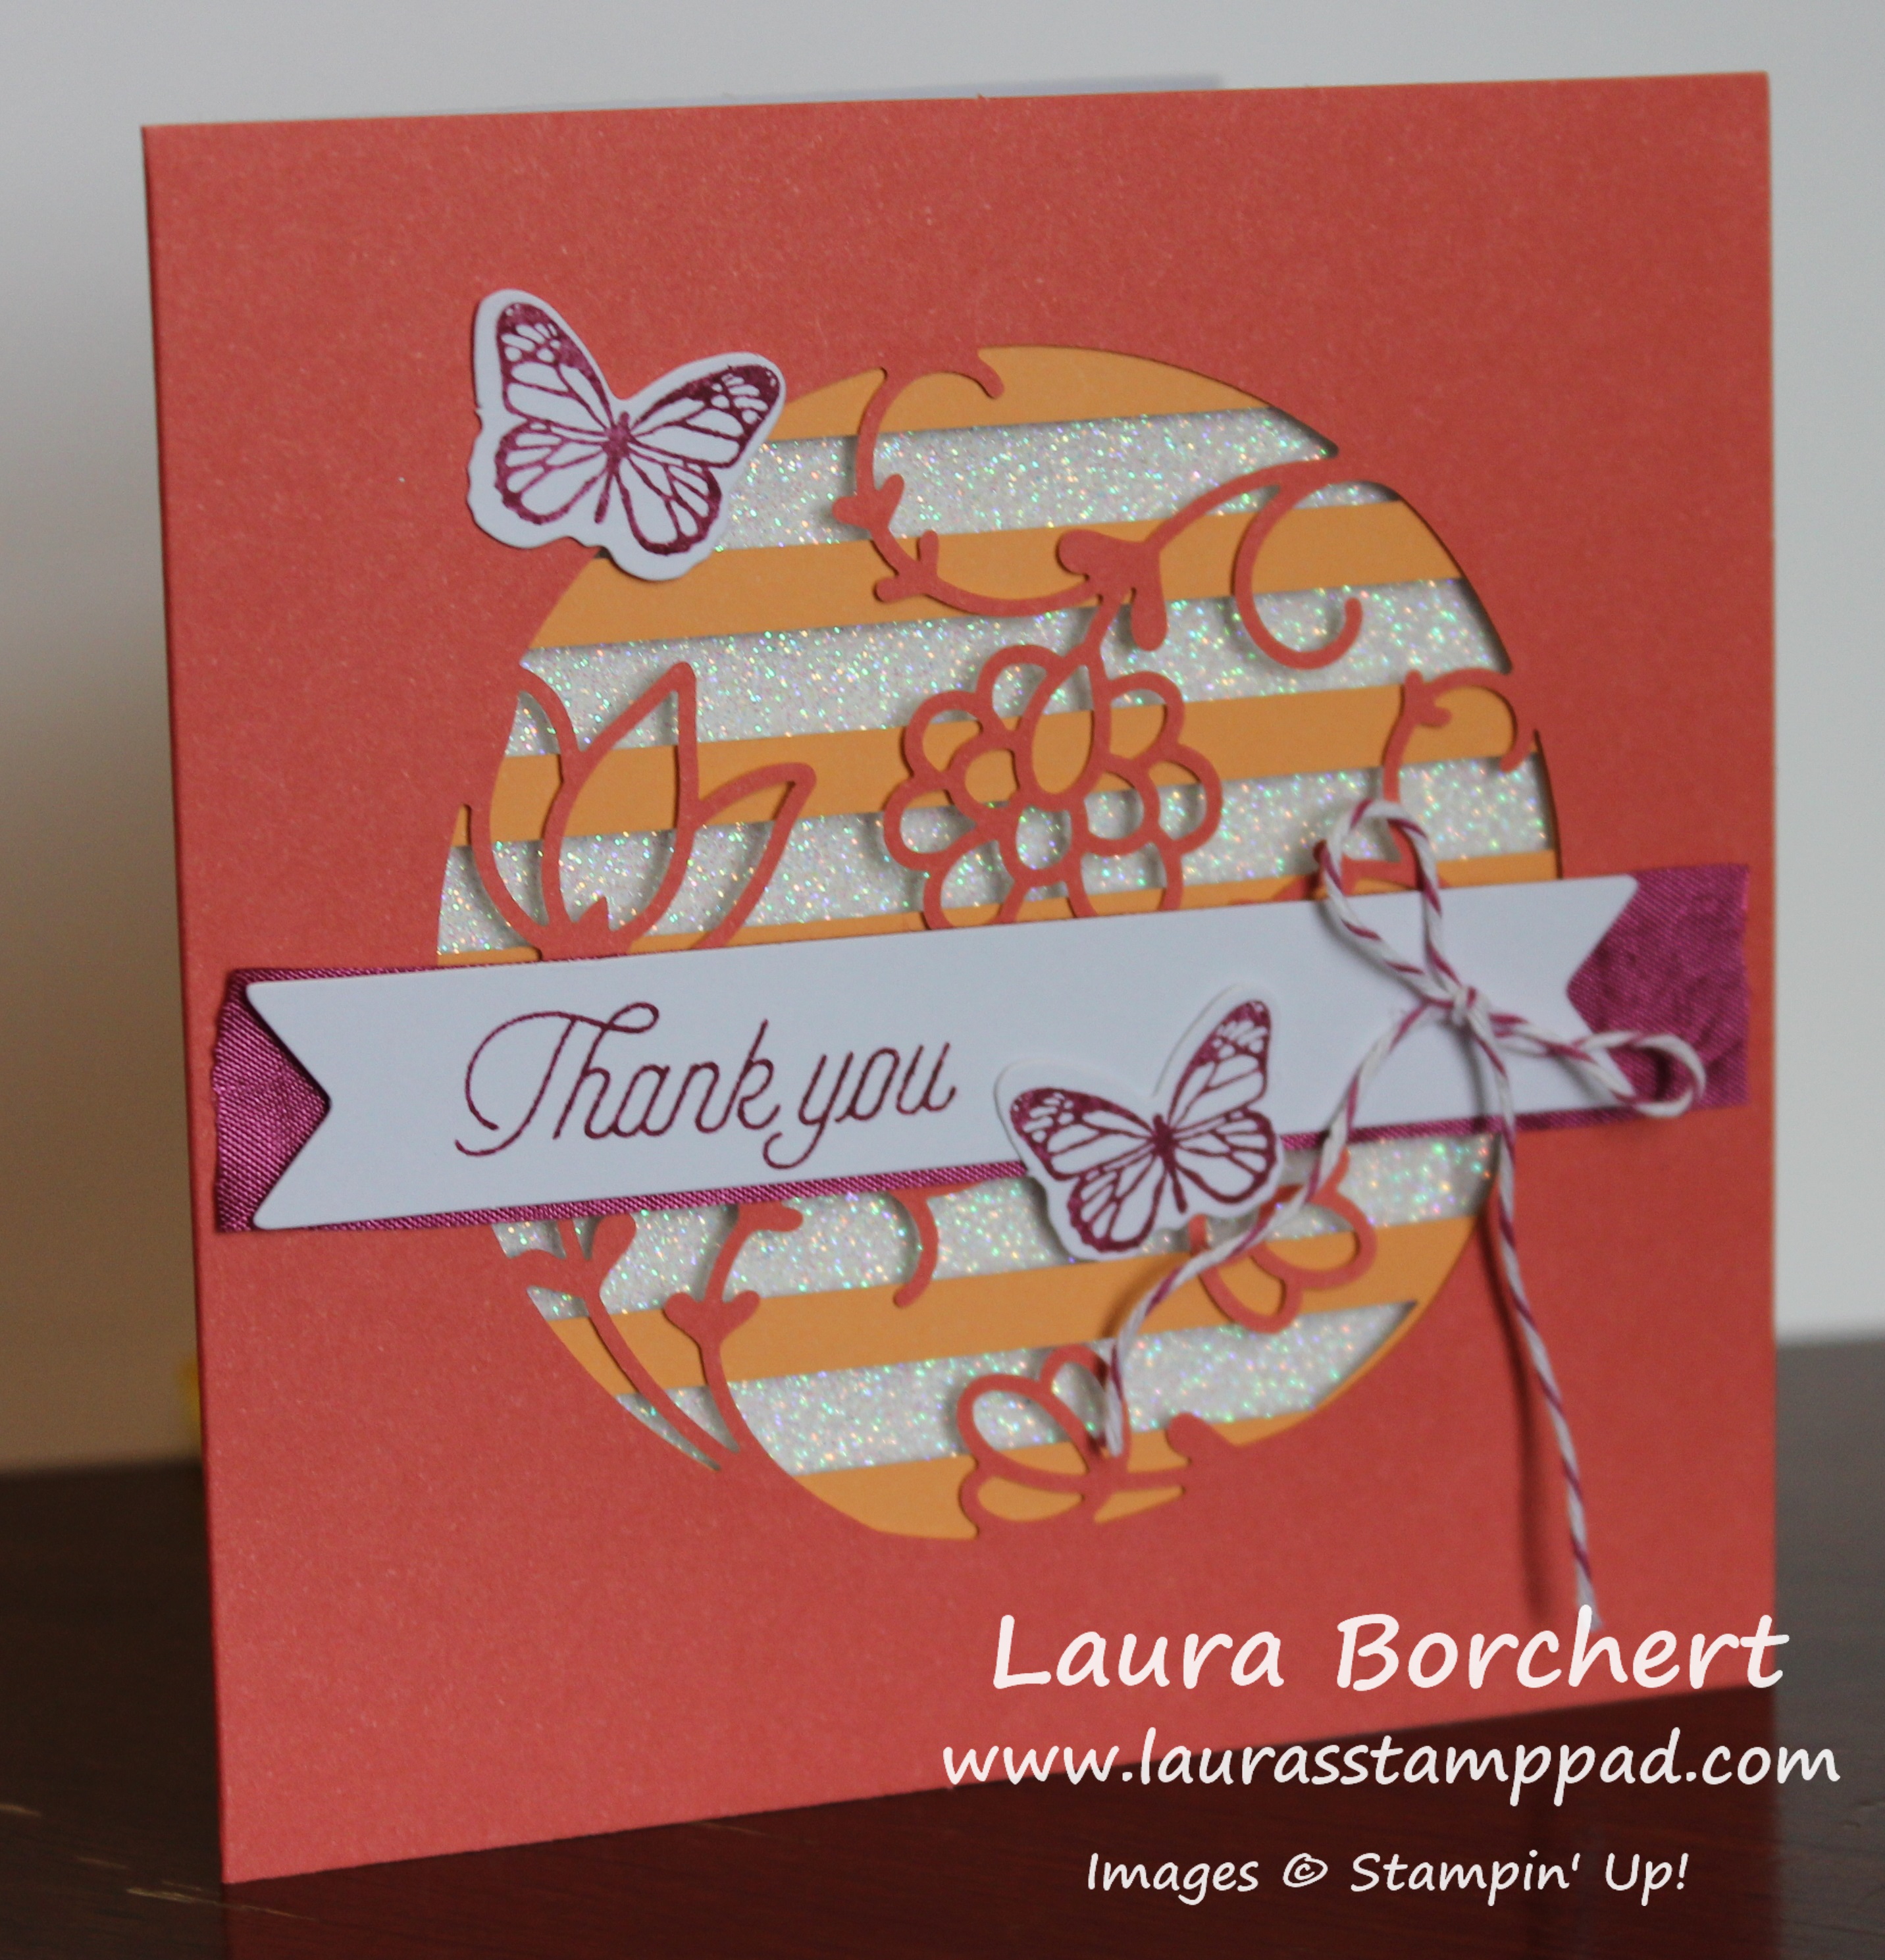
I love the bright vibrant color that this stuff creates! Look at that stunning butterfly!!! Gorgeous!

I have found that Watercolor Paper works best with the Brusho Crystal Colour since it requires a decent amount of water to dissolve it! First, I stamped the butterfly from the Beautiful Day Stamp Set in Versamark Ink and added Gold Embossing Powder! I set it with the heat tool! Now for the coloring fun, I used the Aqua Painter to wet the area of the butterfly. Using the Red (Brilliant Red), Orange (Gamboge), and Yellow colors, I tapped some onto the butterfly. With yellow on the outside, then orange, and red in the middle. The thing about tapping it on is that you don’t really know where it is going to fall or how much. This is one of those techniques that no two are going to come out the same!

Beautiful Butterfly, www.LaurasStampPad.com

After tapping the powder on, I used the Aqua Painter to blend it all together. I did wipe off the brush tip after each color to try to keep a nice fade and not just blend them all together! Be sure to allow it to dry before assembling the card. When I don’t have a lot of patience, I used the Heat Tool!

Golden Butterfly, www.LaurasStampPad.com

Next, I layered the butterfly onto Pumpkin Pie (4″ x 3-1/4″) and then Real Red (4-1/4″ x 3-3/4″) cardstock! The Real Red was cut with more on the bottom so I could add the Double Stitched Daffodil Delight Ribbon! Before adding this to the Whisper White card base, I stamped the dots from the Beautiful Day Stamp Set all around in Daffodil Delight Ink! Of course, I added the butterfly layers to the card front with Stampin’ Dimensionals for a little bit of texture!

If you would like to see this all in action, check out the Video Tutorial below or click here! Be sure to give the video a thumbs up if you liked it and don’t forget to subscribe if you are new. If you would like a notification when I post a new video, be sure to click the bell right next to the subscribe!!!

Happy Stampin’

~Laura

Product List


Heartfelt Blooms!!!

Posted on

Happy Monday! The first real week of the year! Today I’m sharing a quick and simple card created from the Sale-A-Bration Heartfelt Blooms Stamp Set!!!


Heartfelt Blooms, www.LaurasStampPad.com


I just love the coral and navy color combination! One question I have for you…..do you use vanilla or white with color and navy?? Let me know in the comments below! I really struggled with that for a bit and finally settled on Whisper White!

For this card, I started with a Night of Navy card base measuring 4-1/4″ x 11″. Next, I cut 2 pieces of Whisper White measuring 4″ x 5-1/4″. One is for the front and the other is for the inside since navy is so dark to write on. I used the Heartfelt Blooms Sale-A-Bration Stamp Set for all of the stamping. The floral piece was stamped in Calypso Coral Ink and the greeting in Night of Navy Ink. After stamping, I added this piece to the card front and tied some Night of Navy Crinkle Seam Binding around the top. To finish off the card, I added a few Rhinestones for some bling! I love it!

This card is really quick to make which is awesome because 1. time is not in abundance and 2. sometimes you need a thinking of you card like yesterday. So the faster you can get it in the mail or ready to deliver, the better. I prefer to make more Thinking of You cards rather than Sympathy because I feel like they can be used for a sympathy card, get well, or even just a card to cheer someone up. I have a New Years goal to send out more cards just because so having a lot of these on hand will be perfect!

Earn this Heartfelt Blooms Stamp Set for free with a $50 order from now till the end of March with Sale-A-Bration!!! Click here to start shopping and earning freebies!

Happy Stampin’

~Laura

Product List


Baby Ziggy is a….

Posted on

Happy Friday!!! We found out the gender of our Lil Ziggy right before Christmas and shared it with family! Of course I couldn’t forget about all of you. Baby Ziggy is a….

Hello Baby, www.LaurasStampPad.com


Do you know yet??? I used the Baby Moon Stamp Set and Stampin’ Blends to create this card! The greeting was punched out with the New Scallop Circle Punch from the Occasions Mini Catalog. Then I layered it onto a Pretty Label Punch. Next, I layered this onto Daffodil Delight cardstock and added some Silver Metallic Edge Ribbon around the bottom. This was all layered onto a Melon Mambo card base!!!

Lil Ziggy is a, www.LaurasStampPad.com

Yep, it’s true!!! Little Ziggy is a girl and growing well!! She looks strong and healthy! We are very excited and I was surprised because everyone was guessing Boy and I was convinced!!!

For the inside of the card, I added a piece of Whisper White cardstock (4″ x 5-1/4″). I added some silver washi tape from the Year of Cheer Washi Tape from the Holiday Mini Catalog (retired). The alphabet set I used is also retired (sorry). I used the Sophisticated Serifs Stamp Set. Alphabet Stamp Set are fabulous and those are one thing that I don’t get rid of when they retire! Any alphabet set would work!

I had a lot of fun making this card and it is super special. If you would like to check out a little Video Clip I created from of the first half of the pregnancy, check it out below or click here!!! Give it a thumbs up if you liked it and let me know if you want me to share more about my baby crafting projects!!

Happy Stampin’

~Laura

Product List


December 2017 Paper Pumpkin – Floral & Flutter!!!

Posted on

I am super in love with the December 2017 Paper Pumpkin – Floral & Flutter because the colors are amazing. It also makes me think of Spring with the butterflies and that makes me very happy!!!

December 2017 Paper Pumpkin,  www.LaurasStampPad.com

Look at this color combination!!! I am loving the Calypso Coral, Berry Burst, and Peek-A-Boo Peach! Add in the bling and wowza it’s amazing!!! I stamped all my greetings and butterflies first! Then I started an assembly line!

Small Card Instructions, www.LaurasStampPad.com

I actually had to read the instructions for this part. First, lay down a strip of the adhesive on the top and bottom of the cut out on the inside of the card. Next, add the peach lines piece with the peach facing down so it shows through to the front. Then place the glimmer paper face down on top and add a strip of adhesive diagonally on the back. Finally, add adhesive strips to all four sides of the solid white square. Peel off the backing of those four as well as the diagonal one and stick the square on top of the glimmer paper. This seals it all in and looks nice and clean when you open the card!

Square Cards, www.LaurasStampPad.com

Now it’s time to decorate the front of the card! I cut the seam binding to the length of the greeting. I used the adhesive strips to adhere both the ribbon and the greeting! The kit comes with glue dots as well which I used for the butterflies and the little Baker’s Twine bow!

Greenery Great Day, www.LaurasStampPad.com

The second set of cards are regular size cards that can go in the mail!!! The pop of Lemon Lime Twist makes me happy too! I swear I could have picked these colors as they are my favorites!!!

Full Size Card Directions, www.LaurasStampPad.com

This card is done the same way as the square cards! Add adhesive to the inside of the card (top and bottom) and place the green leaves face down. I had to double check how the greenery went down for each one to make sure it was  placed correctly. Sorry no trick for you there! 🙂 Then place the glimmer piece down with a diagonal strip on the back. Add the solid white over the top!

Regular Size Paper Pumpkin, www.LaurasStampPad.com

I added the greeting, butterfly, and bow to the front to finish it off! The bow is in different spots just to mix it up!

Stamped Envelopes, www.LaurasStampPad.com

I stamped the envelopes to coordinate. I used my own Lemon Lime Twist Ink Pad for the leaf and then stamped the butterfly in the provided Berry Burst Ink!

If you want to see all of the contents of this kit, check out my Video here! To sign up for Paper Pumpkin and enjoy the fun with me, click here! All the supplies to make the kit for just $19.99 is a steal! I love the surprise each month too!

Happy Stampin’

~Laura


Deer In the Forest!!!

Posted on

One last Christmas card that I never got a chance to share. This deer in the forest card could be used for a great man card. Just change up the greeting and you are all set!


Deer In the Forest, www.LaurasStampPad.com

I started with a piece of Whisper White measuring 4-1/4″ x 11″ for the card base. Next, I layered on a piece of the Tranquil Tide from the Fresh Florals Designer Series Paper to the bottom portion. The trees and deer use the Carols of Christmas Bundle (Bundle & Save 10%). Be sure to stamp the deer before die cutting it with the Card Front Builder Framelits. It is always easier to line up the framelit rather than stamp in such a small area! The deer was stamped in Chocolate Chip and the trees were cut in Tranquil Tide.

Stitched Shapes, www.LaurasStampPad.com

Next, I added the double trees to the card right above the designer paper. The single tree off to the right was placed up higher so it wasn’t all covered by the greeting. Next, I layered on a small strip of Gold Glimmer Paper. This is a great chance to use up some scraps. Feel free to put a piece that is thin or rather wide. It’s all up to you! Then I tied some Whisper White Baker’s Twine around to the inside of the card. I added the little deer just above the glimmer paper. For the greeting, I die cut a circle with the Stitched Shapes Framelits and stamped the greeting in Fresh Fig Ink. I added the greeting to the card front with Stampin’ Dimensionals!

Just change up the greeting to Happy Birthday for a great man card. If the gold glimmer is too much, Foil Paper would work too! Let me know if you would use this as a man card in the comments below! If you would change it up, let me know the changes as well!

Happy Stampin’

~Laura

Product List


All the Metallics!!!

Posted on

Happy Friday!!! I thought I would share one more card before Christmas! This one is rather simple and uses up little pieces you might have! I just love mixing all the metallics!!!

All the Metallics, www.LaurasStampPad.com

This card is fairly basic but there are a few tricks that I would like to share. This is the first one that I created and I did more afterwards that were even more fabulous!

TIP #1: When you are embossing a big image like this Winter Wonder Embossing Folder, it is best to lightly spritz the cardstock with water. This allows the cardstock to be soft when the embossing folder pushes and pulls the fibers into the image. When I spritzed the cardstock, I had fewer creases like the one you can see a bit at the top of the card.

TIP #2: Mixing and matching metallics is so in right now so don’t be afraid! Gold, Silver, Copper, and Champagne can be mixed together!

TIP #3: I used the Silver Ribbon for this sample but after it was smashed (it happens in envelopes and my stack of samples) it did not look as good. Since this ribbon is a little more stiff, it just smashed rather than laying nicely as loops. I used Silver Sequin Trim on the others and it was even more fabulous!

I started with a Whisper White card base measuring 4-1/4″ x 11″. Next, I embossed with the Winter Wonder Embossing Folder in the middle! Using the Year of Cheer Washi Tape, I added copper washi tape to the top and bottom. The pack comes with copper, silver and gold so you can create lots of these using the different colors!

Snowflake Layers, www.LaurasStampPad.com

Using some Silver Foil Paper and the Year of Cheer Designer Series Paper, I punched out circles with the 2-1/4″ Circle Punch  and 2″ Circle Punch. For the greeting, I stamped it in Basic Gray Ink from the Snowflake Sentiments Stamp Set. I used the 1-3/4″ Circle Punch to cut it out! With the greeting upside down, I placed the Silver Ribbon (or Silver Sequin Trim) down and added Stampin’ Dimensionals down to secure it in the fun loops! Of course I used probably 4 or 5 of them on the little circle! 🙂 You all know I’m an over-user of those things. I finished off the card with a few Rhinestones! If you use the sequin trim, you can always pull a few off and add those all over with some Fine Tip Glue Pen.

I hope you all have a wonderful weekend, safe travels, good times, and hearts full of joy!

Happy Stampin’

~Laura

Product List


My Ribbon Storage!!!

Posted on

Happy Thursday! This week is flying by it seems. Today I’m sharing with you my ribbon storage. I recently changed it up to this style and I love it!!!

My Ribbon Storage, www.LaurasStampPad.com

I have all of my ribbons in one of these little show box plastic containers. The awesome thing about these is that they are cheap. I can typically get them from $89-$1.00. They can be found at a big box store (Wal-Mart, Target, etc.) so they are easy to find! They hold a decent amount of spools in each container and stack well. One of the things I love the most is that they are clear on the bottom!

Clear Box Ribbon Storage, www.LaurasStampPad.com

I can flip it over and look to see if I have a specific ribbon or to see which container it is in. They are fairly tight in there so it’s not like shaking it around will make a mess. (PS: It’s already a mess. I do have pins to put in the ribbon to keep them neat but I don’t always put them on there and sometimes the hole it creates makes it not worth the neatness.)

Shoe Box Container, www.LaurasStampPad.com

I have a little label on each of my containers so I know what is inside each…..not that I can’t tell. The labels are just so pretty though! My other container has baggies of the threads and baker’s twines as well. These containers fit so much stuff! I LOVE THEM!!!

If you would like to see this all in action, check out the Video Tutorial below or click here! Be sure to give the video a thumbs up if you liked it and don’t forget to subscribe if you are new. If you would like a notification when I post a new video, be sure to click the bell right next to the subscribe!!! Let me know if you have any tip and tricks to share in the comments below!

Happy Stampin’

~Laura

Don’t forget Stampin’ Up! Gift Certificates make great gifts…..even last minute!!! Click here to reach out and get a gift certificate!


Technique Tuesday – Boxes & Boughs!!!

Posted on

Happy Tuesday!!! That means I have a fabulous technique to share with you today! With Christmas less than a week away, it’s all about gift packaging and last minute gifts! These boxes and boughs are sure to make things merry and bright!

Boxes & Boughs, www.LaurasStampPad.com

These acetate boxes are super fun to decorate and I have put lots of different items in there as gifts – cards, Stampin’ Dimensionals, and gift certificates!

I started by popping up the Acetate Box. It’s already scored and all so just fold on the score lines and pop it up! Next, I took some Real Red cardstock and created a belly band. I have found that scoring the cardstock doesn’t work very well because the lines sometimes aren’t exact so it fits weird. What I do is just wrap it around, slide it off and press on the fold lines. This just seems to work best for me. Then I layered on a piece of Merry Little Christmas Designer Series Paper (retiring). The paper is black and white but I sponged on some green very lightly for a little more color! I used Tear And Tape to secure the ends of the belly band together.

Gift Packaging, www.LaurasStampPad.com

Now for the decoration, I used a hot glue gun! First, I added the little Green Sprig and pressed it into the glue. Next, I created 2 loops with the Striped Ribbon and tied the center tight using the Black Baker’s Twine. This is much easier that tying it into a knot and it allows for the stripes to show. If you do a knot, it will make the one side backwards. This ribbon does have wire in it so you can mold it as needed! The Mini Ornament is secured to the bow with the Black Baker’s Twine as well. I hot glued this to the front as well. Be sure it is all on the belly band so it can still slide off. The tag was created with the Merry Little Labels Stamp Set (retiring) and coordinating Everyday Label Punch! Cute and simple gift packaging!

What would you put in this box to give to a friend or family member? Let me know in the comments below!

Today, I’m sharing a sneak peak to the 2018 Occasions Mini Catalog. Check out the Video Tutorial below or click here! Be sure to give the video a thumbs up if you liked it and don’t forget to subscribe if you are new. If you would like a notification when I post a new video, be sure to click the bell right next to the subscribe!!! Let me know if you have any tip and tricks to share in the comments below!

Happy Stampin’

~Laura

Product List


Oh Joy!!! The Holidays are Here!!!

Posted on

Happy Monday!!! It’s the week before Christmas and some may be saying Oh Joy!!! That might be an exclamation or a sarcastic remark, either way, this card is super fabulous and the Holidays are here! Whether you are ready or not, it’s here!!

Oh Joy, www.LaurasStampPad.com

I love the bling on this card the most and that greeting is so simple and yet powerful!

I started with a Whisper White card base. Then I added a piece of the Year of Cheer Designer Series Paper (retiring) measuring 4-1/4″ x 5″! After, placing the designer paper down, I added some gold washi tape on either end from the Year of Cheer Washi Tape pack. There is silver and gold in the pack so you could pick either one! Next, I added some Whisper White Baker’s Twine around the top of the card and tied it into a bow. Before the final bow, I slide on one of the Year of Cheer Embellishments!

Joy of Snowflakes, www.LaurasStampPad.com

Now for that fabulous greeting! I took a piece of Whisper White 1-1/2″ wide and punched the end with the Banner Triple Punch. I stamped the greeting in Basic Gray Ink from the Watercolor Christmas Stamp Set. The little snowflakes are from the Snowflake Sentiments Stamp Set and I stamped off once before stamping on my project for a lighter look! Then I took a piece of Gold Foil Paper 2″ wide and punched it with the Banner Triple Punch too! Before, layering these together I added 3 little bumps from the Foil Snowflake (retiring) to the bottom! Then I added this all to the card front. I love the little bits of bling and how that washi tape looks just as fabulous as foil paper but much cheaper and thinner! Perfect!!!

Don’t forget that many of these items are retiring on January 2nd. Some of these are on sale which is super fabulous! Get them before they are gone. Start shopping here!

Happy Stampin’

~Laura

Product List


He or She?? What Will Ziggy Be??

Posted on

Happy Friday everyone! I thought I would do a little update and show off this cute little jar I made for everyone to guess the gender of our little one (Ziggy). Isn’t it adorable?!?!?! He or She? What will Ziggy be?

He or She? What will Ziggy Be?, www.LaurasStampPad.com

Isn’t this jar just the cutest?? I took a regular mason jar and decorated it all up. First, I added some Year of Cheer Designer Series Paper (retiring) around the jar. My piece didn’t go all the way around but like just about perfectly lined up with itself. So I took Tear & Tape and added it to both ends of the paper. Then I stuck it on the jar. This worked perfectly! The little gold stickers are from the Eastern Gold Vinyl Stickers Set.

Now for the focal point!! I added a Gold Foil Snowflake (retiring) to the center, right over the spot where the designer paper meets together. I used Tear & Tape for all of these to make sure it had a nice strong hold! Then I printed the wording onto Whisper White cardstock and die cut it out with the Stitched Shapes Framelits. I layered the greeting onto Soft Sky and Powder Pink scallop circles. These were cut out with the Layering Circles Framelits. Some of the layers have Stampin’ Dimensionals while the others are flat with Tear & Tape!

Ziggy Gender Guess, www.LaurasStampPad.com

Now for the ribbons, I took a piece of the Whisper White Metallic Edge Ribbon long enough to go around the jar and tie. Then using Powder Pink Shimmer Ribbon and Soft Sky Classic Weave Ribbon, I tied knots around it. I actually did this part before I did the greeting and at that time I was thinking I would use gold, silver, and different shades of pink and blue. Then I changed my mind and decided to stick to these colors. Well then I needed to cover up the silver on the edge of the ribbon on the jar so I added enough knots around to do so! There was no way I was re-stringing those knots! 🙂 I added it to the lip of the jar!

Using the Pretty Label Punch, I punched out Soft Sky, Powder Pink and So Saffron. I will have everyone guess what they think Ziggy will be and write there name on the coordinating color. If someone just can’t decide but wants to wish us well, they can do a yellow one! 🙂 I’m thinking these will go in the baby album and be super cute! If you would like to make a guess or send well wishes, leave it in the comments below and I will write out the coordinating label for you to put in the jar!!!

Weeks 14-17, www.LaurasStampPad.com

Here are my weekly belly shots for Week 14-17!!! I’m 17.5 today!!! Can’t wait to see little Ziggy, hear little Ziggy, and find out whether Ziggy is a boy or girl!

I hope you all have a wonderful weekend! See you back here on Monday!

Happy Stampin’

~Laura

Product List