I am not a fan of snow so while some may say let it snow……I am not saying that! 🙂 While it’s super pretty and I enjoy it coming down, I wish it would melt and be gone quickly! Do you love snow? Let me know in the comments below!
I started with a Soft Sky card base. Then I placed a piece of the Merry Little Christmas Designer Series Paper (4″ x 5-1/4″) in the middle. I actually used some from this pack and some from the Merry Music Designer Series Paper Pack as well. Any black snowflake design will work! Next, I took a piece of Silver Foil Paper (1-1/2″ x 5-1/4″) and added a piece of Soft Sky Classic Weave Ribbon down the center. I just wrapped the ends to the back side of the foil paper and then added it to front of the card!
For the greeting, I used the Merry Little Labels Stamp Set and coordinating Everyday Label Punch (Bundle & Save 10%). I stamped the greeting in Basic Black Ink onto Whisper White cardstock. Then I punched it out. Remember it is always best to stamp first and then punch it out because it is easier to line up the image in the punch than it is to line up the stamp on a small punched image. Of course, I used Stampin’ Dimensionals to add the greeting to the card front. You all know I love those things but I also like how it looks smooth over the ribbon and all as well.
So then I had a thought……is this card good or does it need a little more? A few Enamel Shapes in Soft Sky or another color? The struggle was real and I finally just did 2 cards, one with and one without. In my classes, some used them and some did not!
This card is great for Christmas but also for any Winter occasions! Let me know what you would use it for in the comments below!
Happy Tuesday!!! That means I have a fabulous technique to share with you and it’s a One Sheet Wonder! I know how much you all love these!!!
I created these 6 cards using various pieces from the Petal Garden Designer Series Paper Stack. I’m going to show you how I cut and created these as well as how you can make a lot more from this one stack! Let’s get started!
You can always use the front and back of one sheet for a card like this but I went with 2 different sheets! The smaller floral piece is 3″ x 2″ and you can get 6 pieces from a full sheet of the paper with no waste!!! I layered that onto a piece of Calypso Coral measuring 3-1/4″ x 2-1/4″ and I tied a piece of Calypso Coral Sheer Ribbon. The striped piece measures 5″ x 2″ and you can get 3 of these pieces from one sheet with a small leftover piece. I layered this piece onto Pool Party (5-1/4″ x 2-1/4″). The greeting was from the Special Occasions Mini Catalog Stamp Set and I used the Everyday Label Punch for the words and the background piece! I finished off the card with a few Enamel Shapes!
The top card was created with the floral piece measuring 2″ x 5-1/2″ and the green stripes measuring 1-2″ x 5-1/2″. You can get 2 cards from each sheet with this style. I added some Rich Razzleberry Sheer Ribbon. Then I used the greeting from the Specials Occasions Stamp Set and I used the Classic Label Punch.
The lower card uses a piece of designer paper measuring 2″ x 5-1/4″. You can get 3 pieces of the designer paper from each sheet with this style! I used the Scallop Squares Framelits for this greeting and the same Special Occasions Stamp Set. I love the Silver Foil scallop and those little Metallic Enamel Shapes!
Next up, the card on the top, I used a piece measuring 4″ x 5-1/4″. While I love this big piece, you can only get 1 piece from each sheet. The 2 leftover pieces can be used in other styles! I added some Whisper White Classic Weave Ribbon. I added a little Old Olive Mini Chevron bow that I created using the Fork Bow technique! The greeting was stamped from the Beautiful Bouquet Stamp Set onto an oval from the Stitched Shapes Framelits!
The lower card uses a piece of designer paper measuring 2″ x 5-1/2″. You can get 3 pieces from each sheet. I layered this onto Pool Party (2-1/4″ x 5-1/2″). The greeting is from the Special Occasions Stamp Set on an oval from the Stitched Shapes Framelits. I finished off the card with a few White Perfect Accents!
This is another card that you could use the same sheet for both pieces. I went with 2 different sheets. If you use the same sheet, cut a piece measuring 5-1/4″ x 4″ and then cut it in the middle (or off if you wish for a larger piece on top or bottom). I cut the bottom piece into a 3″ x 4″ piece which you can get 2 pieces for a card like this and have leftovers. The upper piece measures 2-1/4″ x 4″. You can get 2 pieces like this from one sheet with leftovers as well. I used the Beautiful Bouquet Stamp Set for the greeting. The greeting uses the Stitched Shapes Framelits, Scallop Circle Framelits and a Water Tea Lace Doily. I added a little ribbon using the Old Olive Sheer Ribbon. This helps to cover up the over lap of the 2 papers!
Since there are 4 sheets of each paper in the stack, you can get over 50 cards using these patterns. There are also a few sheets in the stack that I didn’t use so you could use those to create even more! How fabulous is that?!?!?! I love One Sheet Wonders because they are quick and simple and require very little supplies. I used 2 stamp sets, 5 colors of ink pads, and only a few colors of cardstock! That’s why these are my fabulous!
If you would like to see this all in action, check out the Video Tutorial below or click here! Be sure to give the video a thumbs up if you liked it and don’t forget to subscribe if you are new. If you would like a notification when I post a new video, be sure to click the bell right next to the subscribe!!!
Happy Monday!!! Awhile back I showed you this simple, all stamping card with the Night in Bethlehem Stamp Set! Today, I’m showing this City of Bethlehem “stepped up” card using the coordinating Bethlehem Framelits!!!
This card is just stunning with that double layer of the city but does require a little bit more work with using the Big Shot.
I started with a Night of Navy card base. Next, I cut two pieces of Whisper White measuring 4″ x 5-1/4″. One piece is for the front and the other is for the inside since Night of Navy is such a dark color so writing on white is better! Before adding the white to the front, I did all of the stamping. This way if I make a mistake I can flip it over or grab another piece. First, I die cut the two villages with the Bethlehem Framelits; one in Night of Navy and the other in Silver Foil Paper. I adhered the two together and then added Stampin’ Dimensionals on the back to add it to the card front.
Now for the stamping!! First, I stamped the star in Crushed Curry Ink and then the greeting in Night of Navy Ink. If you wish to stamp before adding the city, you can place it there as a guide, stamp, and then add it. Just go with whatever you are more comfortable with. Be sure that the greeting is low enough to add the ribbon! Next, I added this piece to the card front and tied the Night of Navy Crinkled Seam Binding around the card. To finish it off, I added some Rhinestones for a little more bling!!!
I did play around with this one for a while wondering what to add and my spacing. Mary and Joseph just looked so big in front of the city but I was trying to get them in there. I could have put the city up higher and it would have looked more “in the background” but I was happy with what I came up with. Do you ever have that where you spend forever trying to get the placement and idea to all come together?? Let me know in the comments below! Also, let me know if you prefer the simple stamped one or this stepped up version!!!
Happy Tuesday!!! You all know what that means! I have a fabulous technique to share with you today!!! I am showing you how to create these stunning roses with the New Stampin’ Blends alcohol markers!!!
This rose is so much fun!!! Some of these samples are from my amazing Stamp Club attendees and the others are ones I created! Shout out to Janet, Mary, and Kacie!!
I started with a Whisper White card base! Then I cut the black layer (4″ x 5-1/4″) and another Whisper White layer (3-3/4″ x 5″). I didn’t assemble these layers till after I was done stamping and coloring….just in case I made a boo boo! Using the Graceful Garden Stamp Set, I stamped the rose and the greeting in Memento Black Ink! This is the ink you must use when playing with the Blends because it won’t bleed.
Now for the coloring! This is where you can go simple and easy or go all out and adventurous. You will notice in some of the samples at the top I mainly just colored in the petals. I did the center with the light and did the outside with the dark. Then I added a few dark accents to the middle for a little variation of color. For the stem, I did either light or dark. Then on the petals, I did a little combination of either the center or the outside in the dark and blended it together for the rest.
For the light pink flower above and a few more samples below, I got more adventurous and really had fun with the coloring. I did the stem from the top to the leaves in dark and then blended and coloring the bottom in light. This gives the stem a little more variation in color. For the rose, I colored the edges of all the petals in the dark and then blended it in with the light! I LOVE this look! It’s so stunning and really gives the entire rose an amazing look!
You can see the colored petals better on this flower in Daffodil Delight and then I started coloring in with the lighter marker. After filling in the flower completely, I go back though and blend it to reduce any lines.
I feel like I have like 10 more roses to show off but I’ll stop with this one! This red rose was done basic with a light colored stem and dark leaves. I did the rose with a light center and dark edges and accents.
After coloring, I layered the pieces the together and added some Metallic Edge Ribbon around it. Then I added this to the card front and finished it off with a few Metallic Enamel Shapes! Let me know your favorite color in the comments below!
If you would like to see this all in action, check out the Video Tutorial below or click here! Be sure to give the video a thumbs up if you liked it and don’t forget to subscribe if you are new. If you would like a notification when I post a new video, be sure to click the bell right next to the subscribe!!!
Happy Monday!!! Yesterday was Brad’s Birthday and so today I’m sharing his Nintendo Birthday Card!!!
I think it turned out really cute and Brad loved it. It’s not exactly like a controller due to some things I couldn’t really recreate but it’s pretty close. I had to write the A & B and Nintendo on the gray because it wouldn’t show up on the black. Also, I wasn’t able to put the gray area down the center because spacing was difficult. Trying to scale things correctly is probably my hardest part of making these cards! You can check out some of my past creations here, here, and here!
I started with a piece of Whisper White for my card base and made it s 5″ x 7″ card! I knew I needed a larger card for this concept or those little pieces would be even smaller. 🙂 Next, I took a piece of Real Red (4-3/4″ x 6-3/4″) and layered it on top! For the controllers, I used Smoky Slate as the base and Black Baker’s Twine as the cord! For all of the decorations, I hand cut them out except the red circles and hearts which were punched out with the Cookie Cutter Builder Punch. I really wish I could have punched more out but the pieces were so oddly shaped. Thank goodness for my Stampin’ Trimmer to get those small pieces though! The greeting was stamped from the Happy Birthday Gorgeous Stamp Set.
He loved it and that’s all that matters!!! I don’t always make custom cards but when I do it is fun and makes it even more special! Do you like to make custom cards for family and friends?? Let me know in the comments below!!
Happy Tuesday!!! You know what that means! I have a fabulous technique to share with you today! We are embossing vellum!!!
I have been having so much fun with this Quilt Bundle! You can check out a few more samples here and here!
I started with a Pool Party card base and stamped the little flower from the Christmas Quilt Stamp Set. I stamped it in Pool Party Ink for just a subtle background look. Next, I took the dotted flower image and stamped it with VersaMark. Using White Embossing Powder, I heated the image with the Heat Tool to set it. This gives a little texture and more pop of color. Then I took a piece of Vellum cardstock (1″ x 4″) and ran it through the Big Shot in the Quilt Top Embossing Folder. I just love how it comes out all white and textured! Amazing! Vellum can be tricky because you can see adhesive through it. I only added adhesive on the left hand side where I put the flower. Between adding the flower on top and having the greeting on the left, it was nice and secure!
Now for all the decorations! I stamped the solid flower image in Blushing Bride Ink onto Whisper White scraps. Using the Quilt Builder Framelits (Bundle & Save 10%), I die cut out the 2 flowers. I simply off set the 2 flowers for that fuller look on the flower. Then I added this to the card front with Stampin’ Dimensionals. Of course, I needed even more texture but I also wanted the flower secure over the bumps of the embossed vellum. I finished that off with a little White Accent in the middle! For the greeting, I stamped it from the Beautiful Bouquet Stamp Set in Lemon Lime Twist Ink. I tied a little bow of Whisper White Baker’s Twine around the greeting and added this to the card front with Stampin’ Dimensionals as well.
I love that color combination of Blushing Bride, Pool Party, and Lemon Lime Twist. Soft colors but also a bit of a pop too! It’s always fun to try a new color combination!
If you would like to see this all in action, check out the Video Tutorial below or click here! Be sure to give the video a thumbs up if you liked it and don’t forget to subscribe if you are new. If you would like a notification when I post a new video, be sure to click the bell right next to the subscribe!!!
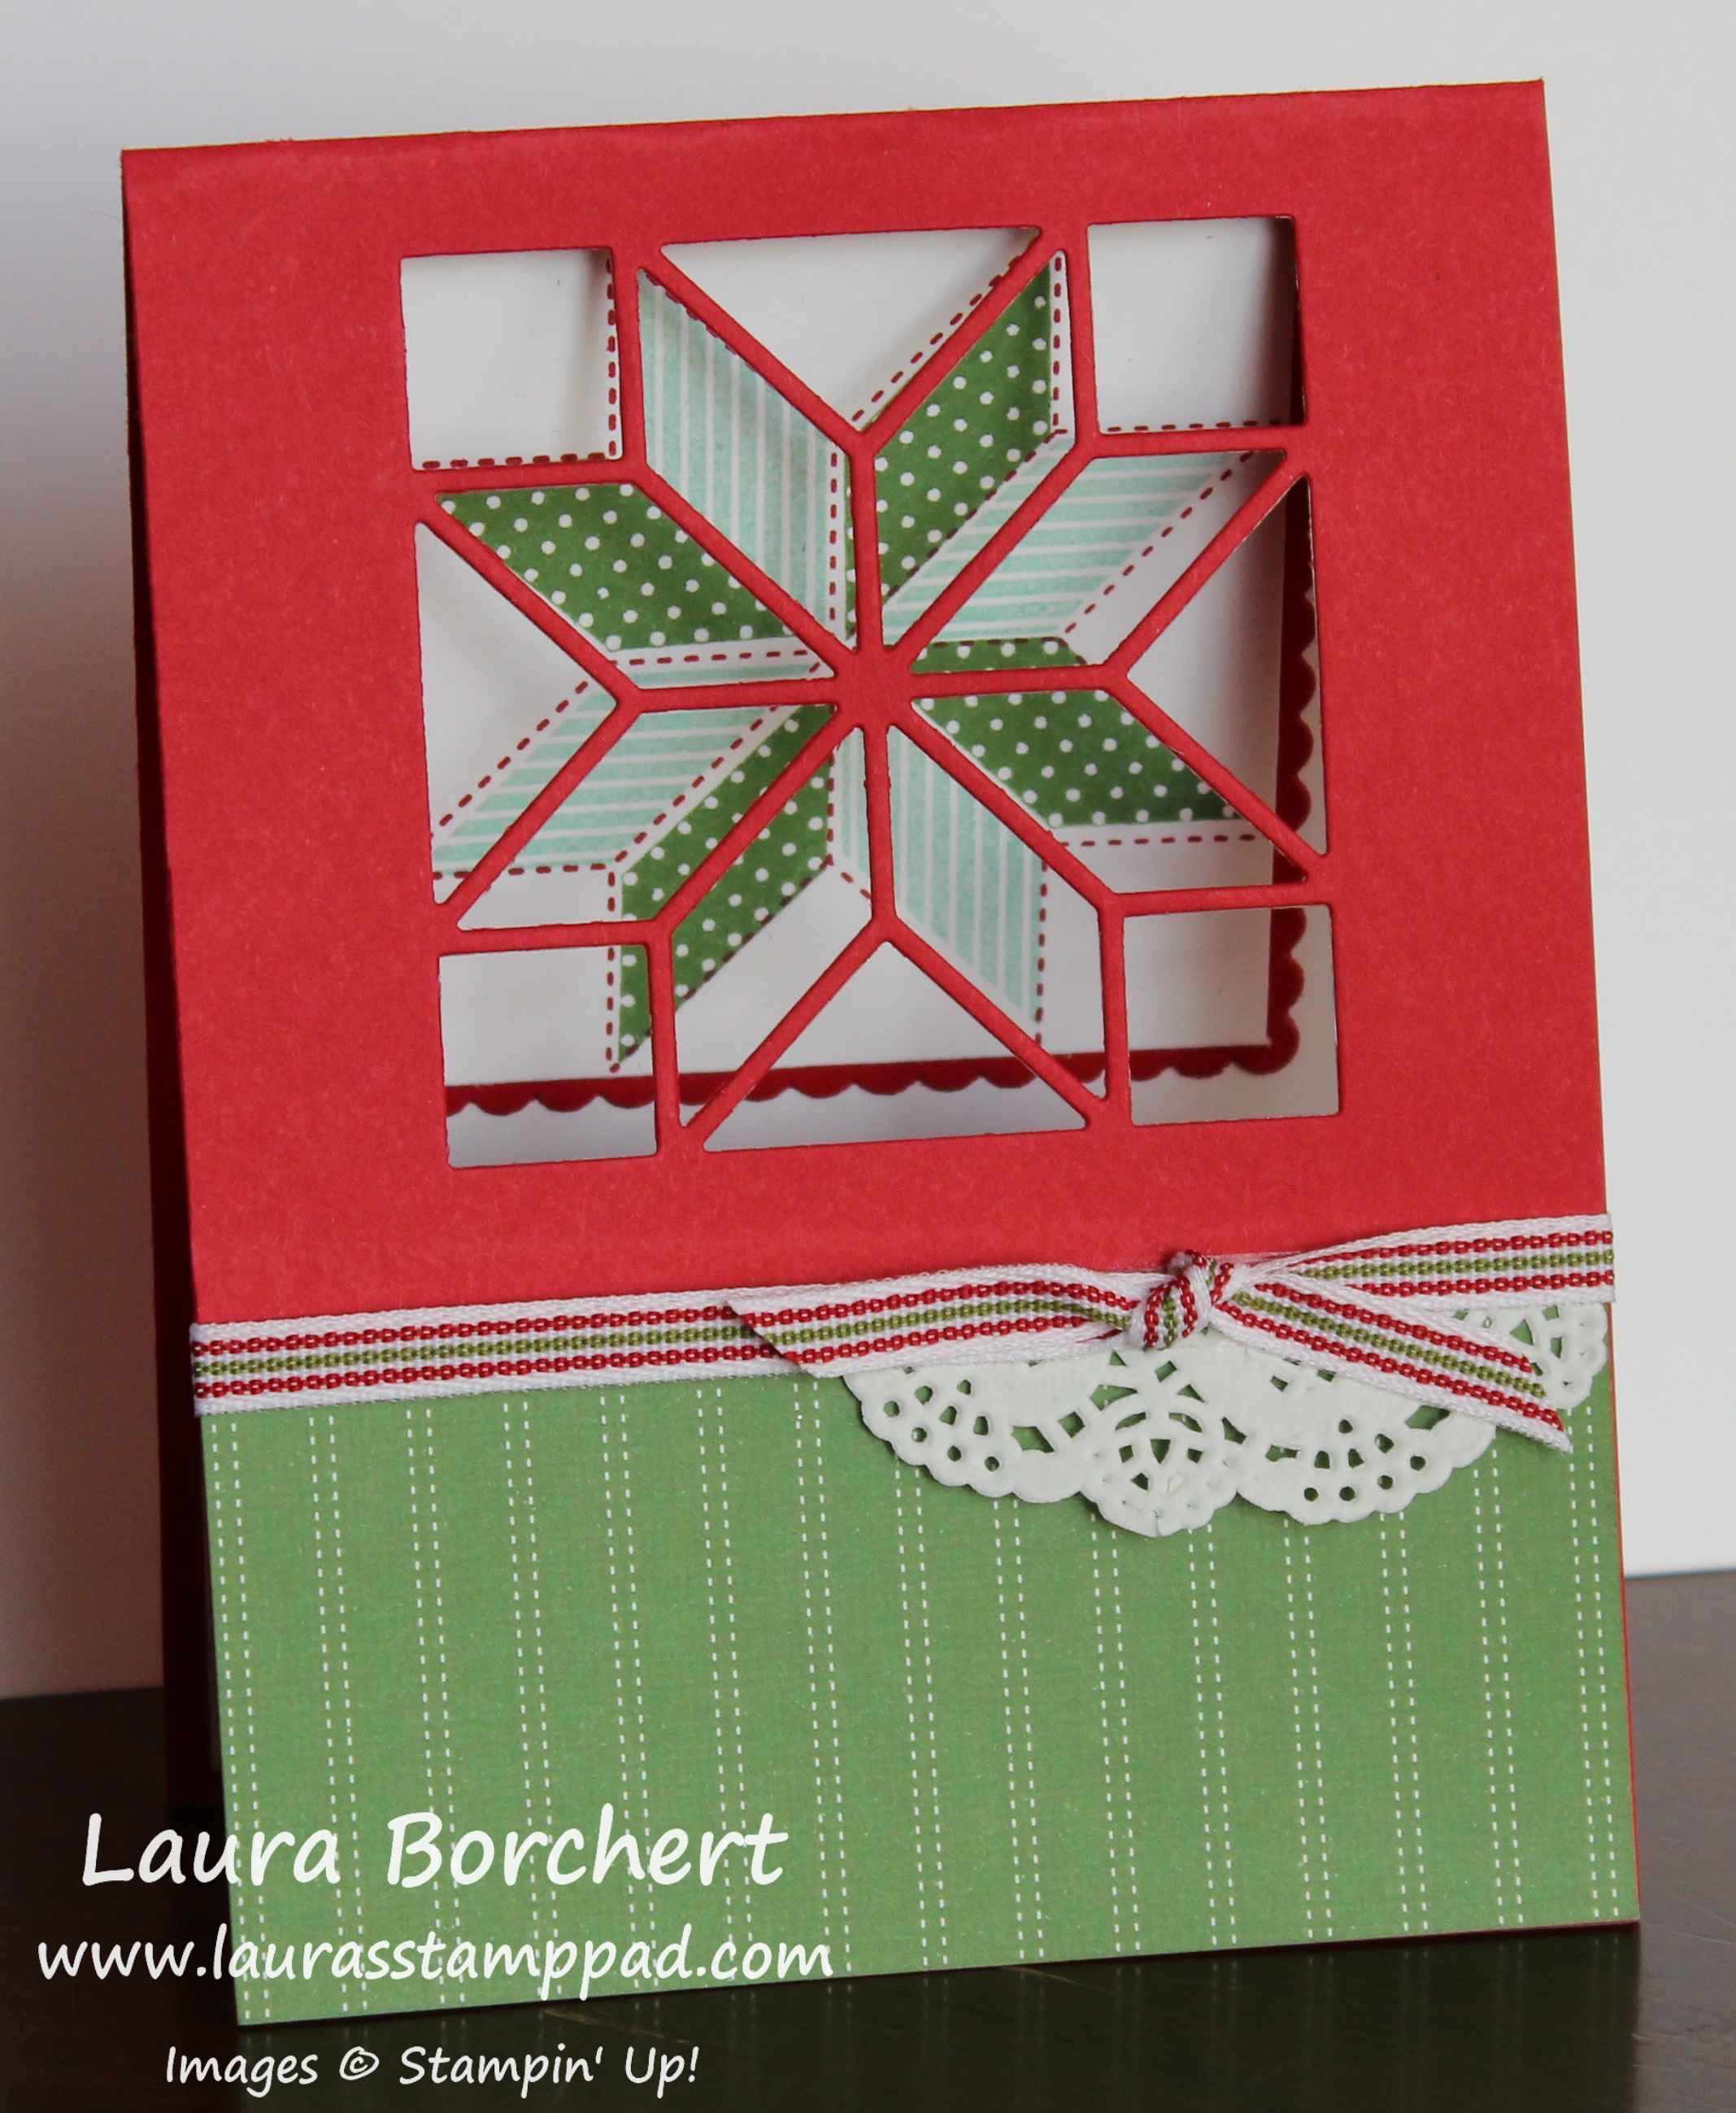
Happy Tuesday!!! That means I have a fabulous technique to share with you today! This Peek Through Quilt Card is super cute and perfect for Christmas. Change up the colors and it would be great for many other occasions too!
From the front, it just looks super cute but then when you open it, the real WOW factor is shown off!!!
I started with a Real Red card base measuring 11″ x 4-1/4″. After folding it in half for the card base, open it back up and place it in the Big Shot with the square quilt framelit on top. This is from the Quilt Builder Framelits. I eyeballed it for placement from the top and then used Post It Notes to hold the frame in place with markings on either side to center it. Check out the video below. I did this a few times and sometimes I just eyeballed the entire placement. It still works! Just go for it!
For the decorations on the front, I used a piece of the Quilted Christmas Designer Series Paper on the bottom. Next, I placed just a small piece of the Delicate White Doily on the right hand side. I was able to get 3-4 of these pieces from each doily depending on how I cut it. Simply add just a hint of adhesive at the top of the designer paper and press the doily into it. Then I tied some of the Quilted Christmas Ribbon around the card front and into a knot.
Now for the inside where all the magic is! I placed a piece of Whisper White in the center and stamped the greeting from the Christmas Quilt Stamp Set (Bundle & Save 10%) in Real Red Ink. Make sure the greeting is low enough that your greeting doesn’t get covered by the quilt square. For the quilt square, I used the Layering Squares Framelits. That scallop edge just adds even more to this warm and cozy sweet card. First, I stamped the dotted image in Real Red Ink. Then, I stamped the inserts in Pool Party and Garden Green Ink. After stamping, I added this piece to the scallop red square.
Now for the placement to the inside of the card and yet still making sure it peeks through correctly. I added adhesive to the back of the scallop and held it in front of the die cut window. Holding it there, all lined up, I shut the card and slowly pulled my fingers out. You will notice that the sample above is a hint tilted but I’m okay with that because it still lines up perfectly when closed.
If you would like to see this all in action, check out the Video Tutorial below or click here! Be sure to give the video a thumbs up if you liked it and don’t forget to subscribe if you are new. If you would like a notification when I post a new video, be sure to click the bell right next to the subscribe!!!
Happy Friday!!! Today I’m sharing a cute gift packaging with the Tiny Treat Boxes!!! You can add some chocolates or other candy in there and so much more! Cute little gift for a hostess or at each spot at a party!
Isn’t it adorable??? It’s super simple to create as well. Mix up the designer paper for any occasion too!
I started by popping up the Clear Tiny Treat Boxes. Next, I took a piece of the Be Merry Designer Series Paper (1-3/4″ x 10″) and wrapped it around the box. I started with the end in the middle of the bottom of the box. This makes the overlap on the bottom to seal it together. After wrapping it around, I slide it off and used my Bone Folder to create a strong crease on each edge. I prefer doing this over scoring it because I find it fits around the box better. When I score, sometimes it’s a little too big or a little too small. Be sure not to adhere the paper to the box or you won’t be able to open the box. If you adhere it around like a belly band, it just slides right off!
For the decoration, I used the 1-1/2″ Circle Punch to punch out Whisper White and stamp the To/From. I layered this one onto a Silver Foil Circle punched out with the 1-3/4″ Circle Punch! Using the Handheld Punch, I added a hole and tied on the box with some Silver Tinsel Ribbon. I finished it off with a little Season of Glitz Mini Gift Bow! These bows come in green, red, and white so there are lots of options to mix and match with other papers!
Don’t forget that the Basket of Wishes Stamp Set is the November Free Stamp Set from me for orders of $75 or more this month! Of course, all orders over $40, earn Laura’s Loyal Stampers Stickers!
Yesterday, Stampin’ Up opened up the reservations for the New Stamparatus and they were sold out in less than 20 minutes! I knew this item was HOT but I didn’t know it was going to go that fast. The next reservation date is December 5th!!! If you would like one, stay tuned and be ready on December 5th!
I hope you all have a fabulous weekend. See you back here on Monday! Happy Monday!
Happy Tuesday everyone! I hope you are having an amazing week! Today is Technique Tuesday which is super exciting! I’m sharing with you this quilted tree which is perfect for Christmas time and this winter season. Quilts just scream warm and cozy! My Grandmother and Mom have made so many so they also make me think of family and love! 🙂
I started with a Real Red card base. Next, I took a piece of Whisper White measuring 4″ x 5-1/4″ to use for the front. Using the Quilt Builder Framelits, I die cut a bunch of triangles from the Quilted Christmas Designer Series Paper Stack. The cool thing is that the paper is double sides so you have tons of options. Another bonus is that I was able to cut 2-3 layers of paper with every crank through the Big Shot. Woot Woot!!!
Starting with the middle on the top, I placed my first triangle (red). Next, I placed the green one directly under it. I did slide my triangles a bit under each other just for a nice clean covered look. I didn’t want them to pull apart when I ran it through the Big Shot with the embossing folder. After I placed the green one directly under, I added the red triangles to either side. For the third row, I added the red triangles directly under the red triangles and then filled in with the green ones! For the stump on the bottom, I placed a small rectangle of Early Espresso cardstock.
Using the Quilt Top Embossing Folder, I ran this entire piece through the Big Shot. I did it both ways – with the impression pressed out and pressed in. You can pick which one you prefer. I found that when I pressed the embossed image in, the triangles came up a bit on the tips where there wasn’t any adhesive. Of course, I didn’t cover the entire triangle with adhesive so the tips popped up. With the impression popped out like the sample above, it was nice and smooth! After adding this to the front of the card, I added some Whisper White Baker’s Twine to the inside of the card. The little silver star to the top from the Metallic Enamel Shapes added a little bling!
I added a piece of Whisper White to the inside and stamped the greeting from the coordinating Christmas Quilt Stamp Set (Bundle & Save 10%). It was stamped in Real Red!
If you would like to see this all in action, check out the Video Tutorial below or click here! Be sure to give the video a thumbs up if you liked it and don’t forget to subscribe if you are new. If you would like a notification when I post a new video, be sure to click the bell right next to the subscribe!!!
This Smitten Mittens card is perfect for Christmas, Winter, Valentine’s Day, or any occasion during this entire season! I just love the soft colors and hint of bling!
I started with a Whisper White card base. Next, I stamped the heart stitching at the top and bottom from the Smitten Mittens Stamp Set. I used Powder Pink Ink. Then, I started the layers with Powder Pink measuring 3-1/2″ x 4-1/2″. At the top, I layered on a piece of Champagne Foil measuring 3-1/4″ x 3-1/4″ and then Year of Cheer Specialty Designer Paper (3″ x 3″). Using a nice 3″ square for the Designer Paper makes perfect use of the 12″ x 12″ sheet! I love not having scraps left over because I’m not the best at using them up later.
For the greeting at the bottom, I took a piece of Whisper White measuring 1-1/4″ x 3-1/4″. Next, I stamped the mittens and greeting in Powder Pink. These are all from the Smitten Mittens Stamp Set. I’m not going to lie, it took me a few minutes to make sure I was stamping the mittens correctly and not backwards. 🙂 After stamping, I added this to the bottom portion of the Powder Pink. Using some Powder Pink Ribbon, I tied it around the spot where the 2 papers meet and into a knot. Then I added this piece to the card base with Stampin’ Dimensionals for a little texture!
I love the soft look of this. I think it would look stunning in Fresh Fig or Elegant Eggplant as well. It makes a great winter card for any occasion! What would you use this card for? Winter? Christmas? Valentine’s Day? Change the greeting to Birthday, etc? Let me know in the comments below!


 Designer Series Paper")
 Ribbon")


