Technique Tuesday – Ombre Butterfly!!!

Posted on

Happy Tuesday!!! You know what that means! I have a fabulous technique to share with you today. Creating an ombre butterfly, adding some splatters to your card and adding a hint of glitter with Wink of Stella! I love it all!!

Ombre Butterfly, www.LaurasStampPad.com

Isn’t this card just beautiful?!?!?! It is so much better in person so be sure to check out the video tutorial below to take it all in! Let’s get started on this amazing card!

SUPPLIES NEEDED: Butterflies Thinlits, Gold Metallic Thread, Wink of Stella, Aqua Painter

So remember last week when we die cut the white butterfly out for that beautiful card? Today we are using that white butterfly that was created with the Butterflies Thinlits! Using your Aqua Painter, you will color the butterfly with Watermelon Wonder. I started in the middle and worked my way to the tips of the wings. I got this amazing ombre look and LOVE IT!!! Just remember that each time you grab some ink, start in the middle and work your way out! Then I brushed the butterfly with the Wink Of Stella for that perfect shine! For the card, I used Tip Top Taupe for the base and added a layer of Mint Macaron (4″ x 5-1/4″). Then I took a piece of Whisper White (3-3/4″ x 5″) and added the splatter. I did this by squeezing the Aqua Painter a bit (just a bit) and picked up some Tip Top Taupe. I tapped the pen against my finger so it would splatter on the card. This is one of those techniques that isn’t going to be perfect. If you think you want a little more or some in a specific spot, don’t do it! 🙂 It might end up dripping too much water or just never hitting that spot. After all it is suppose to look messy! After your splatters, you are ready to add your washi tape. I used the It’s My Party Washi Tape and added some on the top left and bottom right. Then I stamped the greeting from the Greatest Greetings Stamp Set in Tip Top Taupe. Now you can add this piece to your card base. For the butterfly, I added Mini Glue Dots to the back down the middle. I wrapped some Gold Metallic Thread around 4 fingers about 10-15 times (up to you as to how much you want). I slide the thread off my fingers and twisted it in the middle into an 8 and then placed it on the Mini Glue Dots. You can add more Mini Glue Dots to the top of the thread if you need to or just add the butterfly like that to your card! LOVE IT!

Wink of Stella, www.LaurasStampPad.com

To see this all in action, check out the Video Tutorial below or click here! Be sure to give it a thumbs up if you liked it and don’t forget to subscribe if you are new!

Happy Stampin’

~Laura

Button Retire

TODAY IS THE LAST DAY!!! Click here to get those Retiring Items!


Memories In The Making!!!

Posted on

Awesome Emboss Resist, www.LaurasStampPad.com

The Memories In The Making Project Life Card Collection is one of the items that you can earn for FREE through Sale-A-Bration!!! I thought the cards were super fabulous because many of them are window sheets with frames and borders and amazing designs. There are a few that are gold on one side and silver on the other. WOOT WOOT! I love how there is something for everyone there. The other pieces have embossed prints on them so you can have fun and add color for an emboss resist technique. Love it!!!

The card above uses one of the embossed patterns and I brushed over it with an Elegant Eggplant Sponge Dauber to give it some color. Since the card is 4″ x 6″, I had to cut it down a bit (4″ x 5-1/4″). I added some Whisper White Cotton Ribbon. For the greeting, I used the Big News Stamp Set. I layered it onto Elegant Eggplant and added it to my card with Stampin’ Dimensionals. I thought it needed a little bling so I added some Dazzling Details to all of the little dots in the scroll. 🙂

Project Life Card Collection, www.LaurasStampPad.com

I didn’t want to waste that little strip that I cut off so I created this card. I took another Memories In The Making Card, stamped the greeting from the Tin Of Cards Stamp Set in Stazon Ink and added it to my card front once it dried. Be very careful when stamping on Window Sheet as it can be slick and want to slide all over. Straight up and down! This is one of those cards that the dotted wreath is gold on the back side. I’m a silver girl though! 🙂 Since you can see adhesive on Window Sheet, I just added it to the left hand side where the patterned paper is. It is held securely with Tear & Tape so I don’t have to worry about it coming off!

Awesome Ombre, www.LaurasStampPad.com

I wanted to do another one so I took another Card from the Collection that was embossed stripes. I used my Sponge Daubers to add color in this amazing ombre pattern. I used Bermuda Bay, Island Indigo, and Night of Navy. I loved how it turned out. I wrapped some Silver Metallic Thread around a few (hundred) times on the left hand side and tied a knot. I added it to a Bermuda Bay card base and did the awesome greeting again from the Big News Stamp Set. Perfect Man Card!!!

Memories In The Making, www.LaurasStampPad.com

Then with the little strip that I had to cut off, I created this card. Again I took one of the Window Sheet Cards and stamped in Craft White Ink with the Tin of Cards Stamp Set. I adhered it on with Tear & Tape under the strip of ombre! I love how these turned out!

You can use Project Life Card Collections for greeting cards and memory keeping. They are so much fun and so versatile. You can check out a few of my Project Life Album Pages here!

To see all of the cards from the Memories in the Making Card Collection, check out the Video Tutorial below or click here! Don’t forget to give it a thumbs up if you liked it.

Have you ever tried the Project Life Card Collection for memory keeping or card making? Let me know in the comments below!

Happy Stampin’

~Laura


Creating a Bling-y Background!!!

Posted on

Glitter Polka Dots, www.LaurasStampPad.com

Isn’t this card just fabulous??? That subtle bling is just perfect! It isn’t too much and you don’t have to worry about creating a huge glittery mess when you create this card! I used Dazzling Details, a Sponge Dauber and a Mask! How amazing!?!?!

I started with a Whisper White card base! I took a piece of Real Red measuring 4″ x 5-1/4″ and placed the Dots Decorative Mask over top of it! Then I squeezed some Dazzling Details into a old embellishment container (or any plastic surface) and using a Sponge Dauber, I pounced over the polka dots. You don’t want to add lots of glitter because it will take forever to dry and will bleed under the mask a little. Once you have filled all of the polka dots, pull off the mask and set it aside to dry. You can always use your Heat Tool to speed up the process a little!

Up Close, www.LaurasStampPad.com

Once it was dried, I added it to the card front. For the greeting, I used the Berry Merry Stamp Set and die cut it with the Lots of Labels Framelits! Super cute and fabulous for the Holiday Season!!!

Glitter Ombre Stripes, www.LaurasStampPad.com

This card I am in LOVE with and it was sort of a mistake. After playing with the glitter, I thought what about adding some Re-Inker to it for some color. I dripped 1 (ONE) drop of Night of Navy in there and HELLO COLOR! I was really surprised at how dark it was. I started playing the stripes on some Whisper White scrap paper. Slowly I was running out of glitter so I added some more Dazzling Details and of course this only lightened the blue more. As I went along I noticed this fabulous ombre affect happening and I was in love. I will say that when you add the re-inker it gets much runnier so it bleed under the mask and wasn’t as crisp. I still love it!!! I layered this onto some Night of Navy Cardstock and then Marina Mist. I put it all onto a Whisper White card base. For the greeting, I used the Tin of Cards Stamp Set and Decorative Label Punch!

I love the subtle glittery look and I love Dazzling Details in all of the colors – Silver, Gold, Red, and Dazzling! You can check out my Video Tutorial below of by clicking here! Don’t forget to give it a thumbs up if you liked it!!!

Happy Stampin’

~Laura


An Abundance of Thanks!!!

Posted on

Thank You Cards, www.LaurasStampPad.com

I create LOTS of Thank You cards because I send out a lot of thank you cards. There is just so much to be thankful for and I want people to know that I really appreciate them! I appreciate all of you for following my blog and my YouTube Channel. You are all so amazing and if I had all of your addresses I surely would send you a Thank You Note! I send thank you notes each month to those who have placed an order with me, when I receive a gift, when someone reaches out to help me and sometimes just because someone was there for me! 🙂

All of these Thank You notes were created for my Bridal Fairs!!! We all know that when planning a wedding, there are many times when you need a Thank You note so I pass these out with my contact information to all of the Brides! It is a Thank You for stopping by to see me and also a gift that they can use as well! Since I am making hundreds of these cards, I need them to be very quick and simple so here they are!!!

Ombre Thank You, www.LaurasStampPad.com

This is a simple Whisper White card base measuring 5-1/2″ x 8-1/2″ and I stamped the Work of Art image down the right hand side. I inked it up once and then just kept on stamping to achieve that Ombre look! The greeting was stamped in Black from the Tin of Cards Stamp Set!

Flourish Thank You, www.LaurasStampPad.com

This card base measures 4-1/4″ x 11″ (cut in half the other way) and I stamped the image from the Flowering Flourishes Stamp Set on opposing corners! Again, I used the greeting from the Tin of Cards Stamp Set!

Butterfly Thank You, www.LaurasStampPad.com

Okay, I will admit that this one wasn’t all that quick since it is a 5-step stamping routine for each butterfly but when making multiples it really did go fast and wasn’t all that bad! I used the butterfly from the Watercolor Wings Stamp Set and the greeting from the Tin of Cards Stamp Set! You can check out color combinations and some tips for stamping the perfect butterfly here!

Perpetual Birthday Calendar Background, www.LaurasStampPad.com

For these cards, I simply took an image from the Perpetual Birthday Calendar Stamp Set and stamped a strip! There are so many options with this one from leaves to flowers to dots and starbursts! Again, I used the Tin of Card Stamp Set for the greeting……okay I didn’t realize I used that one for each of these cards. I guess I was too lazy to dig out another set like One Big Meaning or the now retired Lots of Thanks which was used in some of the samples above! Also, in the samples above, I used strips of Washi Tape as another option! This is a great way to get rid of those styles or colors that you have just a little bit left on the roll or that you have an over abundance of! 🙂

I hope you enjoyed these quick and simple ideas for making Thank You cards. You could always change up the greeting for any occasion! Sometimes less is more and a card like this is really stunning! Next time you need lots of cards, look no further! Pin it to your Pinterest Board to save for later! Again, Thank YOU all for your love and support to me and my love for stamping! 🙂

Happy Stampin’

~Laura


Rainbows, Butterflies, & Sequins….Oh My!!

Posted on

Rainbow Butterflies, www.LaurasStampPad.com

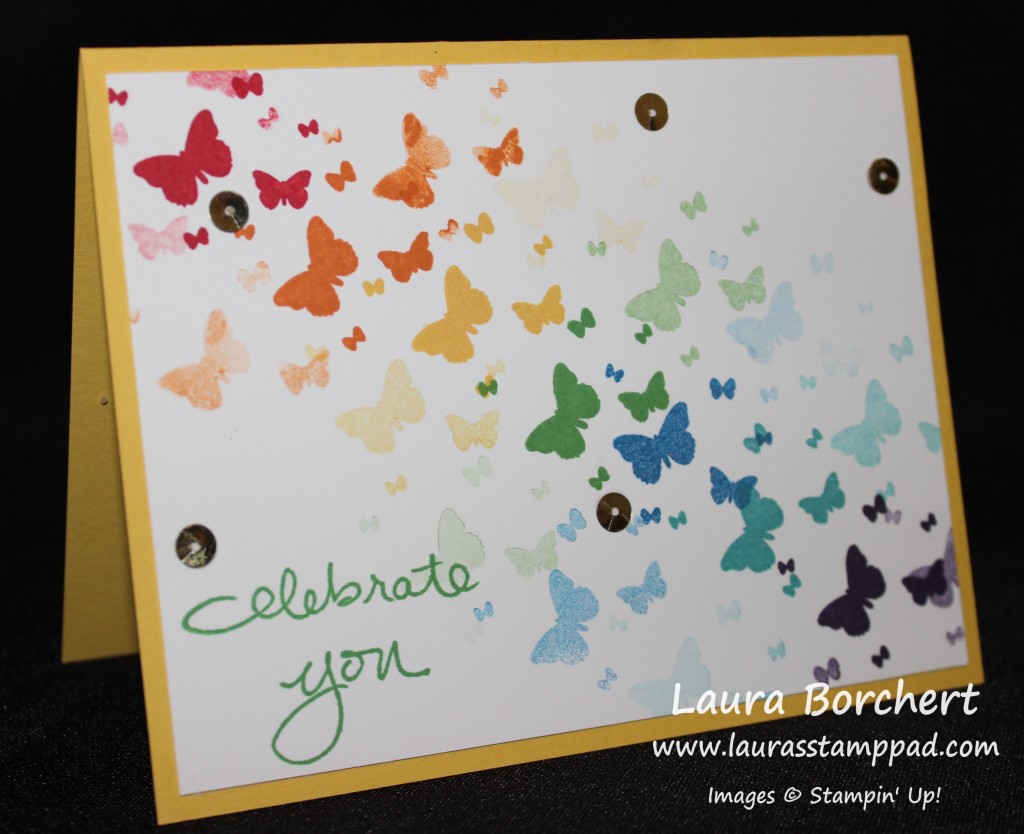
You all know how I love bright colors and butterflies!!! This card is all of that and a little bling!!! I got the inspiration for this card from the Home Decor Frame I created a long time ago! For this card, I started with a Daffodil Delight card base and then took a piece of Whisper White cardstock measuring 4″ x 5-1/4″. I used the butterflies from the Perpetual Birthday Calendar Stamp Set which are amazing for a background since they are in various sizes. Starting in the top corner and working your way down, I used the following colors: Real Red, Pumpkin Pie, Daffodil Delight, Cucumber Crush, Pacific Point, Bermuda Bay, and Elegant Eggplant. I inked up the butterflies and stamped them down and then stamped 1-2 more times without going back to the ink. That is how I got those various shades of color and I like how it adds depth to the card. I love it. So fun and colorful!! The greeting is from the Endless Birthday Wishes Stamp Set and stamped in Cucumber Crush!  I finished the card off with a little bling of Gold Sequins! TIP: I was always using Multi-Purpose Glue (green lid glue) for adding sequins but then too much would come out and it would squish out the middle of the sequin and sometimes (okay lots of times) make a mess. I started using the 2-Way Glue Pen and it works amazingly!!! Love it!!!

Do you love bright colorful things like me?? Let me know in the comments below!!

Happy Stampin’

~Laura


Polka Dot Perfection!!!

Posted on

Polka Dot Ombre Background, www.LaurasStampPad.com

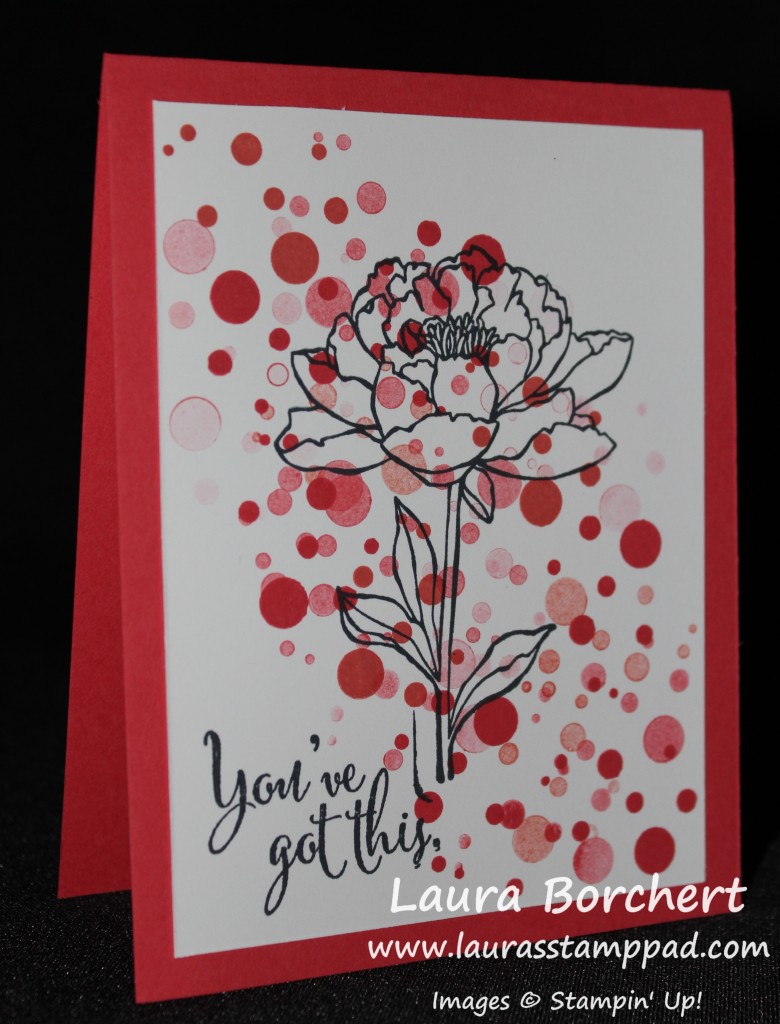
I love how this card uses a lot of my favorites – polka dots, ombre, pink, and flowers!!!! Woot Woot! I started with a card base of Watermelon Wonder and then cut a piece of Whisper White measuring 5″ x 3-3/4″. I stamped the dots from the Perpetual Birthday Calendar Stamp Set in Watermelon Wonder and Calypso Coral. I stamped 2-3 times before going back to the ink each time, this is how I got those various shades! I love it!!! Also, when it comes to the random background stamping be sure to fall off of your paper so it looks more like a background and not just in the middle of the paper. I stamped the flower and greeting in Memento Black Ink from the You’ve Got This Stamp Set!!! Love it!!! This would be a fabulous card to make multiples of and you could do it in so many colors!!!

What color would you like to use for your polka dots??? Let me know in the comments below!!!

Happy Stampin’

~Laura


Hey Dude!!!

Posted on

Hey Dude Paper Pumpkin Man Card, www.LaurasStampPad.com

I think I’m really starting to like Gray a little more lately! Do you ever have a color that you don’t use for awhile and then when you do, you find yourself reaching for it a lot??

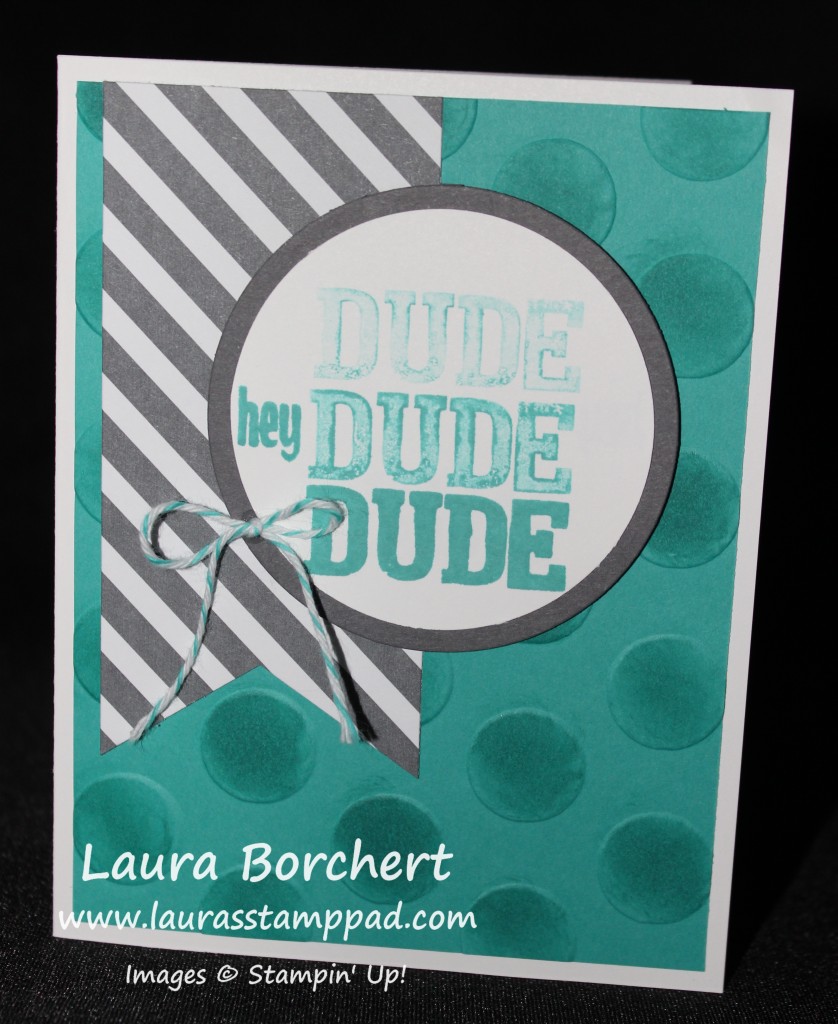
For this card, I used a Whisper White card base. I took a piece of Bermuda Bay and ran it through the Big Shot with the Polka Dot Embossing Folder. Then I took my Sponge Dauber and colored the raised dots a little for a darker look!!! I love sponge daubers! I added that to the card front. I used the Banner Triple Punch to create the banner tips in the gray striped paper from the Neutrals Designer Series Paper Stack!!! For the circles, I used the Circle Framelits which layer so perfectly together. I stamped the Dude greeting from the April Paper Pumpkin Kit in Bermuda Bay and then stamped it a second and third time without re-inking the stamp. I love the ombre look! After stamping the Dude, I added in the Hey! Of course the circles were added to the card with Stampin’ Dimensionals! I thought it needed a little something more so I added the little bow with some Basic Gray Baker’s Twine! Does this mean it isn’t manly anymore?? Let me know in the comments below!

Happy Stampin’

~Laura


Watercolor Wishes Card Kit!!!

Posted on

Okay everyone, you know I like to be honest with you on Stampin’ Up’s kits…..some are hard but still rewarding and some are not my style and some are amazing!!! PS: I still have the flower bouquet in my kitchen and I love it but memories of putting it together still haunt me. Oh my that was a long process! With the new Stampin’ Up Catalog came LOTS of kits and I couldn’t wait to try them all out!!! You can check out the Tin of Cards here which was lots of fun and the tin is adorable! Then there is the Sweet Stack Kit which I have assembled and will be posting about that next week but until then you can check out this video! Then there is the Watercolor Wishes Project Kit…….I LOVE this one for a couple of reasons. 1. It includes everything you need in the kit – stamps, embellishments, and ink!!!! 2. The Stamp Set is amazing. You know I’m a sucker for a scroll-y font!!! Then I made all 20 of the cards in 65 minutes and really fell in love!!! Here they are for you to check out and fall in love! Watercolor Wishes Card Kit, www.LaurasStampPad.com

I used the provided instructions a little bit but then added my own flare on a few of them. For example, I didn’t embellish that Hello card in the middle at all. Also, I LOVE ombre so I had to do that a few times as well! I think I mixed up almost all of the die-cut stickers as well because I didn’t like one of the color combinations and so that threw them all off.

Watercolor Cards, www.LaurasStampPad.com

Okay so looking back at that center card, I’m even more in love. It is just STUNNING in it’s simplicity and with a little bling from the sequins! Another card that I changed up was the one on the far left. I left off the heart wooden accents because I thought it looked like a great Man Card.

Wooden Accents, Butterflies and hearts, www.LaurasStampPad.com

Here is the final set of all 20 cards…..by the way did you notice that it is 20 different cards and not X number of X style. Yeah, twenty different styles. LOVE IT!!! I did time myself just to see how long it took to do this kit and at the hour mark I still had 2 more to go so it ended up taking 65 minutes. That isn’t bad at all. The other awesome thing is look at all of these leftovers!!!!

Card Kit Leftovers, www.LaurasStampPad.com

Stampin’ Up always provided so much product in each of the kits. I still have Stampin’ Dimensionals, flowers, stickers, tons of Washi Tape, wooden accents and sequins left. Also, don’t forget I still have a fabulous stamp set and 2 ink pads. LOVE IT! To see all of the goodies in this kit, you can check out my Unboxing and Reveal Video here!!!! (Be sure to subscribe to my YouTube Channel because I’m almost at 1,000 and I will be doing a fabulous give-away when that happens)

Have you tried any of the kits? Which one is your favorite and why??? Let me know in the comments below!

Happy Stampin’

~Laura


Shades of Green!!!

Posted on

Ombre Lovely As A Tree, www.LaurasStampPad.com

Happy July!!! I can’t believe it is July already….where does time go??

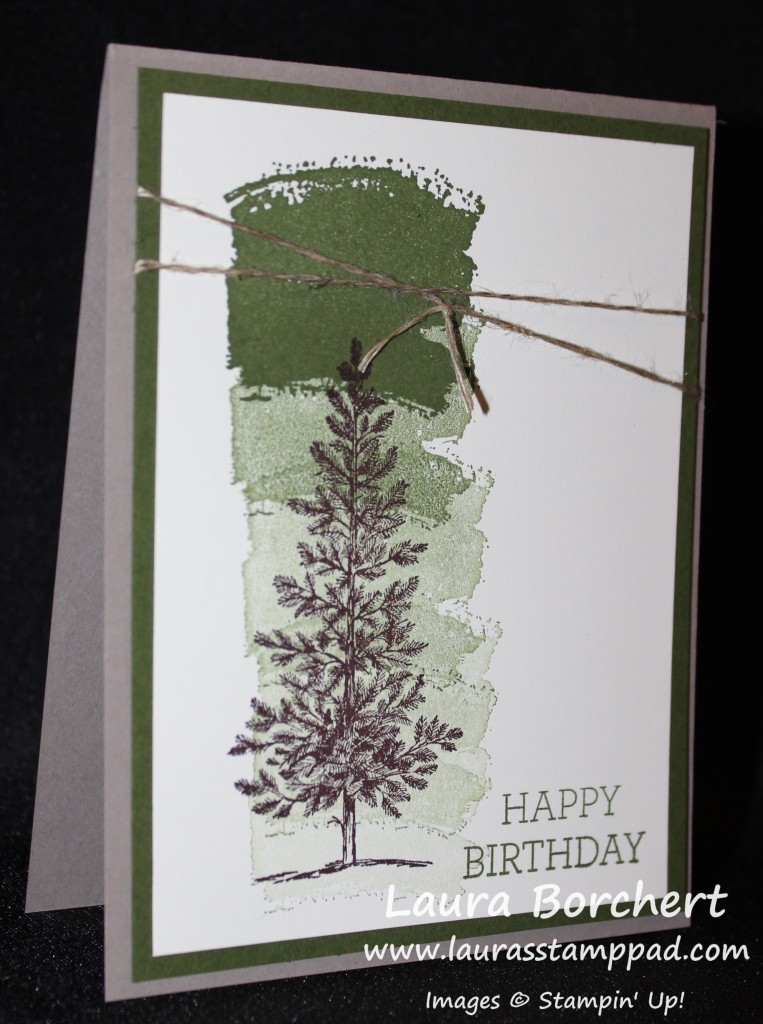
Today I’m sharing one of my “Man Cards” with you! This one is basic and could be used for any occasion for a guy! I started with a Crumb Cake base and then added a piece of Mossy Meadow cardstock measuring 4″ x 5-1/4″. Then I took a piece of Very Vanilla cardstock (3-3/4″ x 5″) and stamped on it. For the ombre look, I used the image from the Work of Art Stamp Set and inked it up in Mossy Meadow. Starting at the top, I stamped it and then continued to move down and stamp again without ever returning to the ink pad. So simple and yet super amazing looking!! I also stamped the greeting in Mossy Meadow. It is from the Crazy About You Stamp Set. The tree from Lovely As A Tree was stamped in Chocolate Chip! I added the stamped piece to the Mossy Meadow and wrapped some Linen Thread around it twice and tied a knot (not a bow, since it’s a man card). I added this to my card base with Stampin’ Dimensionals!!! Simple and yet fabulous and not flowers, pink or girlie!!! Love it!!!

Happy Stampin’

~Laura


Ways to Use Your Blendabilities!!!

Posted on

I am loving my Blendabilities Markers! They make coloring so much fun and there are so many ways to use them!!!

Blendabilities Flower Shop, www.LaurasStampPad.com

How many ways did I use my Blendabilities on the card above? If you guessed 4 then you are correct! I colored my ribbon, my rhinestones, my flower and created the polka dots! How fabulous is that!

For the Ribbon, I started with a piece of Whisper White Organza Ribbon and the lightest Rich Razzleberry Marker. Start coloring on the right side to about half way in, then take the darkest marker and start on the left and color to the middle where it meets the lightest color. Now take your medium marker and color the middle section overlapping over both the dark and light shades. This gives a fabulous ombre look to your ribbon! You know how I love me some ombre! 🙂

For the Rhinestones, just color one rhinestone with each of the 3 markers! It is as easy as that!

For the Flower, I stamped this one from the Flower Shop Stamp Set with my Memento Pad. Then starting with the darkest color, I started coloring the tips of all of the petals, then I grabbed the lightest color and colored the center of the flower and a little out. Finally, take your medium marker and color the middle, overlapping both the dark and lightest colors. I have also done it where I color with the darkest and lightest marker only and use the lines in the flower to color one section light, the next dark. Once I was done coloring, I took the Color Lifter and ran it along those tight lines. The Color Lifter sorta bleaches out the area so this gave a lighter look in those areas! Of course after coloring the flower, I used my Pansy Punch to punch it out!

For the Polka Dots, I adhered my flower to the Whisper White square with Stampin’ Dimensionals. Then using the lightest marker start dotting all around the flower with a few farther out. Then take your medium marker and dot around the light dots and a few father out. With the darkest marker, dot randomly farther out. This will give the look that the dots fade out. I’m not the best with random so mine doesn’t really give that illusion but some come out better than others! 🙂

I put it all together with some Melon Mambo and Rich Razzleberry cardstock with a layer of Sweet Taffy Designer Series Paper in there! I love the bright colors and the way the flower pops! So cute! What is your favorite way to color with your Blendabilities? Leave me a comment down below!

Happy Stampin’

~Laura