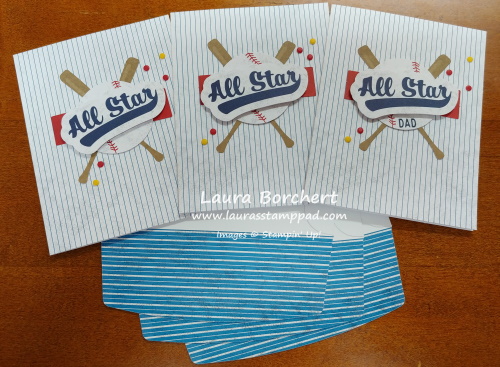
Create Fall Colors!

Posted on

Happy Tuesday……Technique Tuesday at that!!! Fall is in full swing and one of the amazing things about it is all of the beautiful colors! Today, I’m going to show you how to create Fall colors in your stamping projects too!!!

Create Fall Colors, www.LaurasStampPad.com

This card uses the Rooted in Nature Stamp Set but really any stamp with leaves, trees, or any Fall image would work!! The technique is super fun and simple but note that each time it will come out differently….kind of like watercoloring! That part sometimes drives me nuts as I love the look and want to do it again but it comes out a bit different!

To get started you need to place your image on the table face up! Next, pick out your favorite Fall colors. I used Crushed Curry, Cajun Craze, Pumpkin Pie, Cherry Cobbler, and Early Espresso. I found that inking up the entire image in the lightest color (Crushed Curry) helped give the stamp a nice all over coverage and you didn’t have to worry about missing a spot. Then, using a Sponge Dauber, I lightly dabbed ink in each of the other colors randomly on the stamp. Starting with Early Espresso on the tree trunk as well as 2 little spots with branches up in the tree. This kind of gave a green look on the stamped image but that still works!

Continuing on with each of the other colors, dab a little bit of ink all around. I did find that I needed to really focus on where I was dabbing each time so I didn’t always hit the same spot. This is what happens when you talk while stamping or try to multi-task. LOL Once you have all of your colors on, it’s time to stamp it down onto the cardstock.

Fall Colors, www.LaurasStampPad.com

Like I mentioned before, each time you stamp it will come out differently! Also, be sure to clean the stamp after each time since you won’t want to contaminate your Crushed Curry Ink Pad. The card below was actually stamped quickly a second time which resulted in a fabulous look just a bit lighter. This made all the hard work I did for the one image work for me again! 🙂

Fall Card Creations, www.LaurasStampPad.com

I used greetings from the same Rooted in Nature Stamp Set and layered this piece on Cajun Craze or Cherry Cobbler! The card bases are all Crumb Cake! To add some texture to the cards, I used some of the Early Espresso Faux Suede Ribbon and some of that soft cheesecloth type ribbon from the Forever Greenery Ribbon Pack. I love them all even though there is just a bit of difference in each!

I hope you try out this fun technique to create Fall colors on your next project! If you would like to see the list of supplies I used, check that out below!

Happy Stampin’

~Laura

Product List

You’re a Classic!!!

Posted on

Father’s Day is around the corner and this card would be perfect!!! It also makes a great birthday card too!!!

You're a Classic, www.LaurasStampPad.com

This is a fun and simple card that could be done in various color combinations! I did use one of the retiring color – Lemon Lime Twist!!

I started with a Lemon Lime Twist card base measuring 11″ x 4-1/4″. Next, I took a piece of Whisper White (3-1/2″ x 5-1/2″) and adhered it down the center. Using a piece of the Graceful Glass Designer Vellum, I sponged Blueberry Bushel Ink onto the back for some color. Be sure to allow it to dry a bit or you can use the Heat Tool to set the ink. Once it was ready, I adhered it to the left side!

For the focal point, I stamped the car and greeting onto a Whisper White rectangle measuring 3-1/4″ x 2-1/4″. These were stamped in Blueberry Bushel Ink. They are from the Geared Up Garage Stamp Set!! Next, I layered them onto a piece of Lemon Lime Twist measuring 3-1/2″ x 2-1/2″. This layer was added to the card front with Stampin’ Dimensionals for some texture!!!

Click the supplies listed below to make this You’re A Classic card!!! Some of these items are retiring so get them before they are gone! What color combinations would you use?

Happy Stampin’

~Laura

Product List

Technique Tuesday – Banner Front Card!!!

Posted on

Happy Tuesday!!! I have a fabulous technique to share with you today! This banner front card is fun and different from just a regular card! It’s also a fabulous masculine card which I struggle with! Luckily it works for Valentine’s Day, Father’s Day, and even Birthdays and Graduation. Just mix up the greeting!!! Also, a shout out to Karla Endris for the inspiration on this card!

Banner Front Card, www.LaurasStampPad.com

Which one do you like best?? Let me know in the comments below! Not only is the greeting different but I have a different color banner for each. On the Smoky Slate banner card, I stamped off once with the grease spots. For the Basic Gray banner, I stamped in full strength Smoky Slate!!!

I started with a 7-3/4″ X 4-1/4″ card base and scored it at 5-1/2″ (or 2-1/4″) depending on which way you prefer to measure). This allows for just a small flap for the card front. Next, I layered on a piece of the Classic Garage Designer Series Paper measuring 2″ x 4″. With this size, you can get 4 pieces from one sheet of 6″ x 6″. Then I die cut the gears from the Garage Gears Framelits in Real Red cardstock. Using the Fine Tip Glue Pen, I added the gears to the card front!

Geared Up Garage, www.LaurasStampPad.com

Using the grease spot stamp from the Geared Up Garage Stamp Set, I stamped it along the right inside edge in Smoky Slate. You can either go full strength or stamped off once or a little bit of both! For the banner, I cut a piece of Basic Gray (or Smoky Slate) measuring 2″ x 5-3/4″. Using the Banner Triple Punch, I punched the banner tips and then placed it inside the card. I closed that front flap and placed my finger along the edge as a guide. Then I added adhesive up to that edge where my finger was. This is to make sure I don’t have too much adhesive that it peaks out of the flap. Then simply close the flap over the banner with adhesive to adhere it. Using the coordinating Garage Gears Framelits, I die cut the greeting pieces and stamped it. Of course, I added it to the card front with Stampin’ Dimensionals for some texture.

All Geared Up To Celebrate, www.LaurasStampPad.com

For this version of the card, I stamped the greeting on a banner that is 1″ wide and used the Banner Triple Punch. Adhere the two banners together before adhering it to the card base.

If you would like to see this all in action, check out the video below or click here! Be sure to give the video a thumbs up if you liked it and don’t forget to subscribe if you are new. If you would like a notification when I post a new video, be sure to click the bell right next to the subscribe!!!

Happy Stampin’

~Laura

Product List


I Made This!!!

Posted on

Happy Monday!!! I hope you all had a wonderful weekend! I’m so excited to share this card because I made this one and I super struggle with Man Cards!

I made this, www.LaurasStampPad.com

This card is quick and simple and simple and masculine. I just love bling, ribbons, and pinks so much that I struggle with masculine cards a lot. When I create a good one, I tend to make LOTS to use all year long.

I started with a Mossy Meadow card base. Next, I took a piece of the Wood Textures Designer Paper (3″ x 4″) and stamped the tree from the Rooted In Nature Stamp Set. I used Mossy Meadow Ink for all of the images on this card. Then, I placed (NOT adhered…yet) this onto a piece of Crumb Cake measuring 4″ x 4″. I stamped the greeting from Picture Perfect Birthday along the top and bottom. I really really wanted my Stamparatus to work for the greeting and just notch the platform down for each greeting but the greeting was too long and the spacing was odd. Soooooo I just thought I would wing it and it was fabulous but this is also why I suggest not adhering it till after your greeting is stamped. Simply place the stamped designer paper on it so you can line things up. Then hold your breath and stamp. Just kidding it’s only 3 times and it’s okay if they aren’t perfectly straight across or evenly spaced. Mine sure aren’t and it’s still fabulous! Also, always remember there are 2 sides to every piece of paper! 😉

After stamping the greeting, added the stamped designer paper and adhere it to the card front! For the finishing touch, I tied some Linen Thread along the spine of the card, looping around 3 times. Since linen thread  is so thin, I always double knot it before tying the bow! This way it is nice and tight around the card and if you think bows are not masculine, you can leave it as a knot.

Check out the supply list below to recreate this card for all of the men in your life! Also, if you purchase all the supplies to make this card, you will earn a FREE Sale-A-Bration item! Woot Woot!!!

Happy Stampin’

~Laura

Product List


Birthday Star!!!

Posted on

Happy Monday!!! The Frosted Floral Designer Series Paper may look all pretty, floral, and feminine but check out this fun Birthday Star card that is rather masculine.

Birthday Star, www.LaurasStampPad.com

I started with a Whisper White card base. Next, I took a piece of Mossy Meadow measuring 4-1/4″ x 3-1/4″ and layered on a piece of the Frosted Floral Designer Paper. This paper is beautiful because it is printed on shimmery paper. I love it!!! The Designer Paper measures 4″ x 3″ which is perfect for using up every inch of the 12″ x 12″ sheet. I love when I don’t have to waste any of it!

For the greeting, I cut a piece of Mossy Meadow measuring 2″ x 3″ and layered on a piece of Whisper White measuring 1-3/4″ x 2-3/4″. The greeting was stamped from the Special Celebrations Stamp Set in Soft Suede Ink. This stamp set has greetings for every occasion and a coordinating greeting for the inside. For a little decoration, I added a strip of Burlap Ribbon to the left hand side. On the top, I folded the ribbon to the back side and secured it with Stampin’ Dimensionals. Then placed some Tear And Tape down and pressed the burlap into it. Using the All Is Bright Paperclips, I added the little star which also secured the ribbon. The greeting was then added to the card front with Stampin’ Dimensionals.

Do you think this card looks masculine? Let me know in the comments below! You could also recreate this card with a more floral piece from the same pack of paper for a feminine look or even a different occasion than birthdays!

Happy Stampin’

~Laura

Product List


Trees & Leaves for Any Occasion!!!

Posted on

Happy Monday!!! I hope you all had a wonderful weekend!!! Today, I wanted to share with you this simple card that can be used for so many different occasions with just a switch of the greeting!!! These trees & leaves for any occasion make the Rooted in Nature Stamp Set so versatile.

Trees & Leaves for Any Occasion, www.LaurasStampPad.com

This card was not my original idea. I got this from the talented, Cindy Murphy and just fell in love and had to recreate it. Thank you so much for the amazing idea!

I started with a Crumb Cake card base. Next, I layered on a piece of Tranquil Tide measuring 4″ x 5-1/4″. Then I took a piece of Whisper White (3-3/4″ x 5″) and stamped the leaves from the Rooted in Nature Stamp Set. The large leaf was stamped in Mint Macaron and the 3 leaf set was stamped in Tranquil Tide. The other leaf was stamped in Soft Suede and I did it a few times to get various shades of that leaf and not have all of them so dark. After adding this to the card front, I ran a little strip of Snail Adhesive down the center and stuck the Burlap Ribbon over top. Don’t worry if it’s not super stuck on there because the focal point will also hold it on.

Textured Leaves, www.LaurasStampPad.com

Now for the focal point, I die cut out a Soft Suede circle using the Layering Circles Framelits and added it to the card front with Stampin’ Dimensionals. I made sure they went over the ribbon to hold it in place as well. Next, I stamped the tree stump from the Rooted in Nature Stamp Set in Crumb Cake ink onto scrap white and fussy cut it out. It was really easy to cut out since it’s fairly round but not perfectly so no worries if you are a bit off. I stamped the greeting in Tranquil Tide Ink.

Before adding this piece to the card front, I die cut and embossed the leaves using the coordinating Nature’s Root Framelits. These are super cool because you can get so much out of this set. First, I die cut the leaves with the outline image in Tranquil Tide and Crumb Cake. Then I laid the coordinating embossing piece over the leaf and ran it back through the Big Shot to emboss it. To make sure it doesn’t move on you, simply place a Post It Note over the top or a piece of Washi Tape. Simple and fabulous for adding texture to your project. I added those to the lower left of the circle and then placed the greeting on top!

What would you use this card for – birthday, thinking of you, thank you??? It does make a fabulous man card which I really struggle with so I might make up some more for birthday cards!! Let me know what you think in the comments below!!!

Happy Stampin’

~Laura

Product List


Words Are Never Enough!!!

Posted on

I think this is why I’m a hugger….words are never enough. 🙂 Hand shakes are weird for me. I just prefer to hug! Also, there is nothing better than a hug to warm your heart and make you smile. That is unless it’s from a complete stranger or lasts too long and then it can get a bit awkward. We have all been there!

Words are never enough, www.LaurasStampPad.com

This card is perfect for when you want someone to know you care but you just don’t know what to say. Change up the greeting and it would make a great man card too. I love the simplicity of the trees and twine.

I started with a Crumb Cake card base measuring 4-1/4″ x 11″. Next, I took a piece of Whisper White (4″ x 5-1/4″) and started stamping the trees from the Rooted In Nature Stamp Set. I started at the top with stamped off once Mint Macaron and did 5 across. Be sure to stagger the trees so it looks more random and like a forest. Then I did full strength Mint Macaron. After that I did the same with Tranquil Tide – stamped off once first and then full strength. You could always stop there and add a greeting. I wanted a little bit of texture on the card so I popped a few trees up. Simply stamp a few on scrap cardstock and die cut them out. I used the coordinating Nature’s Roots Framelits (Bundle & Save 10%). I popped these up with Stampin’ Dimensionals.

Thinking of You, www.LaurasStampPad.com

For the greetings, I stamped them in Early Espresso Ink. Both the front greeting and inside greeting came from the Rooted In Nature Stamp Set. I thought a few trees on the inside of the card would look cute too! After adding the Whisper White piece to the front of the card, I tied some Linen Thread around the card and into a bow. I love the rustic look of this thread and it passes for masculine cards. My husband says foo foo ribbon and bows is not considered masculine. Sometimes I still sneak it in with navy or green colors otherwise I stick to Linen Thread.

If you would like to purchase any of the items used in this card, click the items listed below!

Happy Stampin’

~Laura

Product List


May 2018 Paper Pumpkin Kit!!!

Posted on

Happy Monday!!! Today, I thought I would share the amazing May 2018 Paper Pumpkin Kit – Manly Moments! This kit has me covered for Father’s Day! Thank you, Paper Pumpkin!!!! I was wondering what I could whip up quickly before Ziggy arrived and this came in the mail in May at the perfect time!

May 2018 Paper Pumpkin Kit, www.LaurasStampPad.com

These cards are very basic and were easy to assemble. I love the fun fold with it. They aren’t just a regular card but instead the plaid part folds down and then top part folds up. That’s super fun and makes them different. I found that I really liked the starburst image below the greeting. It really makes it stand out and look cool. Do you prefer that or putting “To You” or another greeting like Dad, Son, Brother?? Let me know in the comments below!

Birthday Badge, www.LaurasStampPad.com

Here is an up closer photo of this style. I placed the banner across the badge for stamping placement. I felt this was better than winging it and hoping I got it in the right spot. Some of the bursts are up higher than others but that’s okay! 🙂 Also, I added Stampin’ Dimensionals to the entire back of the badge and added the banner to the badge with just Snail Adhesive in the middle. The instructions said to put the banner on with dimensionals as well. I thought that might be too high and this way the swag of the banner falls on either side with that dimensional holding it up.

Mountain Masculine Cards, www.LaurasStampPad.com

These are my absolute favorite. I love that mountain scene and those trees. I will say the bottom of the card is rather thick with all of the layers but it’s amazing! Super easy to assemble since those pieces were all stickers. I did the greetings the same as the cards above!

Happy Father's Day, www.LaurasStampPad.com

Isn’t that texture and dimension of the card just amazing? I love it!!!! Now I am all set for Father’s Day and don’t have to scramble! I love Paper Pumpkin for that. It always sets you up for future holidays/events!

If you would like to try out Paper Pumpkin, click here to sign up for the June Kit before the 10th! You can try it for a month and cancel or enjoy it for many months. It’s all up to you. Either way, I think $20 for stamps, ink, supplies, and a clear block is TOTALLY worth a try! Also, the June Kit will coordinate with the Broadway Bound Suite in the New Catalog so that’s even more fun!!! Who doesn’t love black and white with a pop of color?!?!?!

Happy Stampin’

~Laura


Birthday Bows!!!

Posted on

Doesn’t these birthday bows look so real?? I am still loving the Picture Perfect Birthday Stamp Set and using it for so many different occasions!! Check out this beauty!

Birthday Bows, www.LaurasStampPad.com

This card can be created in so many different color combinations for a masculine card, feminine card, or even matching school colors for a graduation! Don’t be scared about the 2 step stamping with the bow though! I have some create tips!

I started with a Bermuda Bay card base! Next, I took a piece of Whisper White measuring 4″ x 5-1/4″. Then I stamped the bow from the Picture Perfect Birthday Stamp Set all over for a background in Peekaboo Peach Ink! A few tips that I have for the bows are to stamp the smaller dark (full strength) image first and then stamp the larger, lighter (stamped off once) image second. This helps with lining up because you can see through the stamped off image easier than the full strength one. I will say try it both ways on which one is stamped first to see what works best for you! Another tip is to place the images on your clear blocks in the same direction. I like to do it where the engraved Stampin’ Up is on the top side on both images and that helps me not have to rotate it around and around each time! Also, I think the bow looks pretty fabulous without the second stamp too so that’s an option too!

Fabulous You, www.LaurasStampPad.com

After stamping the background,  I added this piece to the card front and tied some Lemon Lime Mini Striped Ribbon around and into a knot. For the greeting, I die cut a Whisper White piece with the Stitched Shapes Framelits and a Lemon Lime Twist piece with the Layering Ovals Framelits! Then, I stamped the greeting in the center and layered them together. I added the greeting to the front of the card with Stampin’ Dimensionals! To finish it off, I added a few Bermuda Bay Enamel Shapes!!!

What color combinations would you use for this card?? I’m always up for trying new combinations and would love to hear your favorites. Let me know in the comments below!

Happy Stampin’

~Laura

Product List


Technique Tuesday – Candle Creations!!!

Posted on

Happy Tuesday!!! That means I have a fabulous technique to share with you today! This one is rather simple and super fun! I’m sharing some candle creations using the Picture Perfect Birthday Stamp Set from the Occasions Mini Catalog. This Suite is my favorite by far and I just can’t put it down!

Candle Creations, www.LaurasStampPad.com

This quick and simple card is perfect for a Man Card but stay tuned to the card I’m going to show tomorrow which is more feminine and changed up a little! Both of these styles of cards are great for making multiples to have on hand all year long!!!

I started with a Lemon Lime Twist card base. Next, I stamped the greeting all along the top and bottom in Bermuda Bay Ink using the Picture Perfect Birthday Stamp Set! Be sure to start stamping on the edge with the greeting hanging off some so that it looks like the greeting continues on and on! Then, I added a piece of the Picture Perfect Party Designer Series Paper (5-1/4″ x 3″) in the center.

Boy Candles, www.LaurasStampPad.com

Then I took a piece of Whisper White cardstock (2-1/2″ x 4-3/4″) and stamped the candles. There are 3 styles of candles in the set – solid, dots, and stripes. So while each candle can be stamped alone, there are also combinations that can be created. Simply stamp the solid image off once onto scrap paper and then onto your project. Then stamp the patterned candle in full strength! Be sure to check out the video tutorial below to see these fun combinations! I stamped the center candle first and then worked my way out from either side. I found that this helped me with my spacing. Another tip was that I stamped them a little angled on purpose because I knew I wouldn’t be able to get them perfectly lined up straight and even! After stamping the candles in Bermuda Bay and Lemon Lime Twist Ink, I stamped the flames in Crushed Curry Ink. Once I was finished stamping, I added this to the card front! Check back tomorrow to see a few ways I stepped up this card with some variations! You can even join my mailing list here so you don’t miss out!

If you would like to see this all in action, check out the Video Tutorial below or click here! Be sure to give the video a thumbs up if you liked it and don’t forget to subscribe if you are new. If you would like a notification when I post a new video, be sure to click the bell right next to the subscribe!!!

Happy Stampin’

~Laura

Product List