Deer In the Forest!!!

Posted on

One last Christmas card that I never got a chance to share. This deer in the forest card could be used for a great man card. Just change up the greeting and you are all set!


Deer In the Forest, www.LaurasStampPad.com

I started with a piece of Whisper White measuring 4-1/4″ x 11″ for the card base. Next, I layered on a piece of the Tranquil Tide from the Fresh Florals Designer Series Paper to the bottom portion. The trees and deer use the Carols of Christmas Bundle (Bundle & Save 10%). Be sure to stamp the deer before die cutting it with the Card Front Builder Framelits. It is always easier to line up the framelit rather than stamp in such a small area! The deer was stamped in Chocolate Chip and the trees were cut in Tranquil Tide.

Stitched Shapes, www.LaurasStampPad.com

Next, I added the double trees to the card right above the designer paper. The single tree off to the right was placed up higher so it wasn’t all covered by the greeting. Next, I layered on a small strip of Gold Glimmer Paper. This is a great chance to use up some scraps. Feel free to put a piece that is thin or rather wide. It’s all up to you! Then I tied some Whisper White Baker’s Twine around to the inside of the card. I added the little deer just above the glimmer paper. For the greeting, I die cut a circle with the Stitched Shapes Framelits and stamped the greeting in Fresh Fig Ink. I added the greeting to the card front with Stampin’ Dimensionals!

Just change up the greeting to Happy Birthday for a great man card. If the gold glimmer is too much, Foil Paper would work too! Let me know if you would use this as a man card in the comments below! If you would change it up, let me know the changes as well!

Happy Stampin’

~Laura

Product List


Color Me Happy Project Kit!!!

Posted on

The Color Me Happy Project Kit just became available on November 1st. It is super fun and fabulous. This kit uses the NEW Stampin’ Blends alcohol markers!!

Color Me Happy Project Kit, www.LaurasStampPad.com

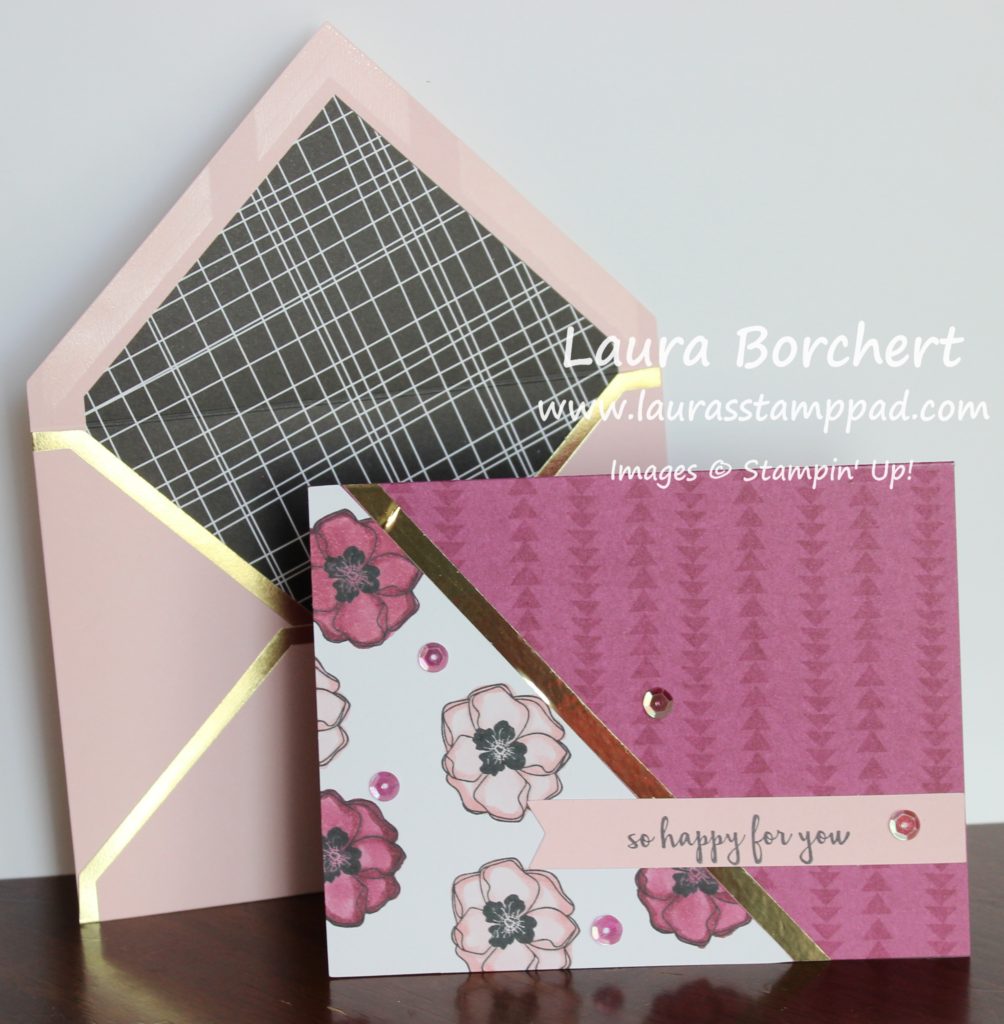
These cards are super cute and a great way to get started with Stampin’ Blends. I love how the images help me with shading and coloring. Also, I have to say that the envelopes in this kit are like beyond amazing. They are colorful and gold trimmed! Amazing!!!

Purple & Pink Flowers, www.LaurasStampPad.com

Okay, so of course this is my favorite because it has flowers. I colored some Rich Razzleberry and some in Pink Pirouette. I simply colored all around the borders of the petal with the dark marker and then blended and filled in with the light color. That gold trim has a sticky back which makes it super easy to use but be careful with wrinkles!

Paper Lanterns, www.LaurasStampPad.com

This card is my second favorite because I think it looks like a great Man Card and I love those colors! The paper lanterns were super fun and easy to color. TIP: Be sure to stamp a lantern in the place of the popped up lantern so you still have the string and tail. (opps on my first one!) Another tip would be to stamp rather high up so that your string hits the string going side to side. Of course, if you are a bit off, you can always draw it in with a marker! 🙂

Party Line of Lanterns, www.LaurasStampPad.com

Again with these lanterns, I simply colored the outer edge with the darker color and then blended and filled in with the lighter color!

Color Me Happy Stamp Set, www.LaurasStampPad.com

This card I super love because that greeting is fabulous and scroll-y and has a drop shadow. There are so many coloring options for that. You could color it the same color in light and dark or mix and match. Eeeee So much fun and you all know I send lots of thank you cards each month. (Anyone who orders from me each month receives a card from me.)

Thank you, www.LaurasStampPad.com

That gold trim around the greeting is so fabulous and the color combination for this card is just amazing!

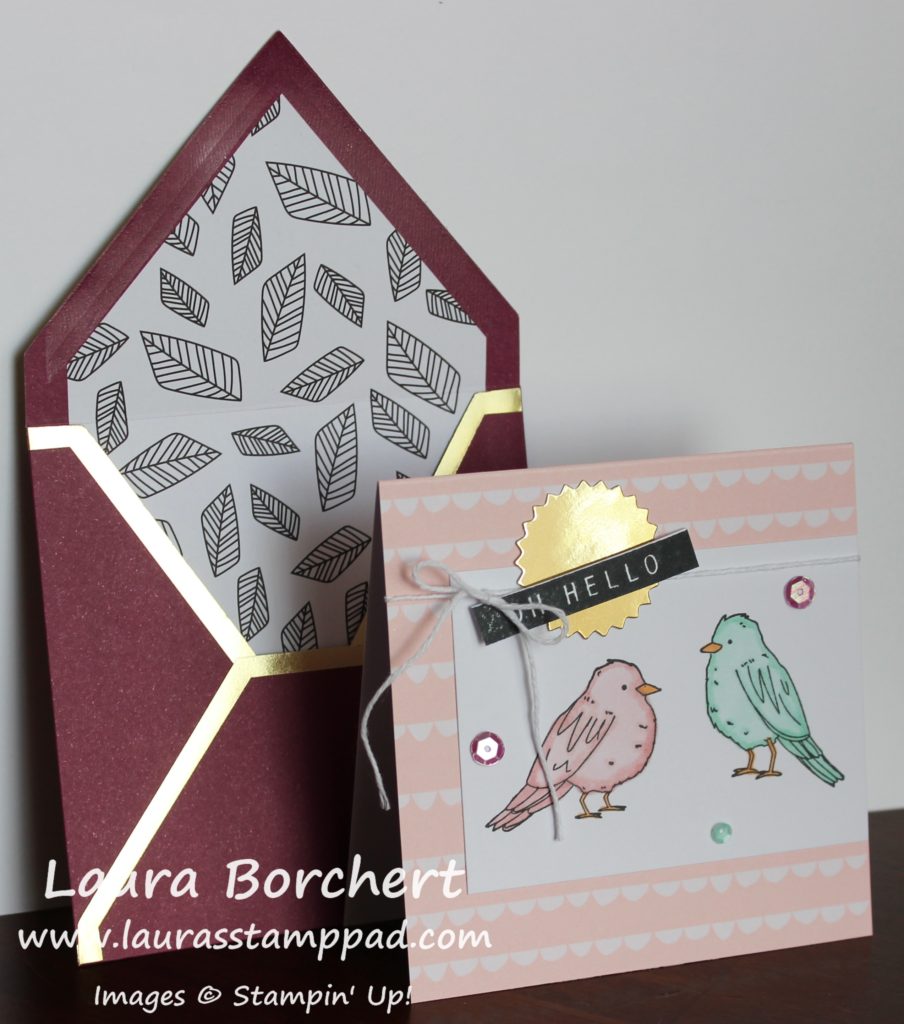
Little Birdies, www.LaurasStampPad.com

I love this little birdies on this card but that greeting was a pain in the rear. Thank goodness, Stampin’ Up gives you extra labels. Since it is a solid image, be sure to ink it up really well and stamp on a piece of scrap a few times. This helps rough up the stamp and allow for the ink to cover the stamp much better.

Colored in Birdies, www.LaurasStampPad.com

For the birdies, I colored in dark all around the edge and on each dark mark. Also, I colored in the tail with the dark. Then I took the light marker and colored in the center and blended it all together. These birdies are just beautiful and would make a fun love birds card for a wedding, anniversary, engagement, etc.

Which one is your favorite? Let me know in the comments below!

If you would like to see the unboxing and reveal of this kit, check out the Video Tutorial below or click here! Be sure to give the video a thumbs up if you liked it and don’t forget to subscribe if you are new. If you would like a notification when I post a new video, be sure to click the bell right next to the subscribe!!! Stay tuned for more videos on Stampin’ Blends!!!

Happy Stampin’

~Laura

Product List


Hooray Happy Birthday!!!

Posted on

Happy Monday, everyone!!! I’m super excited today because this card is quick, simple, and masculine! I really struggle with man cards because I love flowers and bling but Hooray Happy Birthday! I nailed it!!!

Hooray Happy Birthday, www.LaurasStampPad.com

Not only does this card fit the perfect man card look, I also used up a lot of scraps of the Color Theory Designer Series Paper! Double win!!

I started with an Island Indigo card base. Then I took a piece of Whisper White (4″ x 5-1/4″) and added a strip of the Color Theory Designer Series Paper to the left side. This designer paper is 6″ x 6″ and I cut a 4″ x 5-1/4″ for this card and was left with a 2″ x 6″ strip which I cut for this card to 2″ x 5-1/4″. I love using up scraps. Next, I added this to the card front.

For the greeting, I cut a piece of Whisper White (2-1/2″ x 3-1/2″). Using the Happy Birthday Gorgeous Stamp Set, I stamped the speckled balloon in Island Indigo Ink. Then I stamped the Hooray Balloon in Old Olive Ink and punched it out with the Balloon Bouquet Punch. I added that balloon with Stampin’ Dimensionals for a little texture. Then I stamped the greeting in Old Olive. Finally, I layered this piece onto a piece of Old Olive (2-3/4″ x 3-3/4″) and added it to the card front with Stampin’ Dimensionals. To finish it off, I added a few Enamel Shapes all around. I love how it turned out!

Don’t forget that the Color Theory Designer Paper is part of the Buy 3, Get 1 Free Designer Series Paper Special this month. Click here to see all of the papers! Spend $75 or more and you will earn the Free Stamp Set of the Month from me. This month you get to pick from the Daisy Delight Stamp Set or the Graceful Garden Stamp Set! Message me with your preference after placing your order!

Happy Stampin’

~Laura


Technique Tuesday – Creating an Ombre Textured Background!!!

Posted on

Happy Tuesday!!! You know what that means….I have a fabulous technique to share with you today!!! Creating this ombre textured background is perfect for any card style and the best part is that it uses up all of those scraps we tend to save!

Ombre Textured Background, www.LaurasStampPad.com

The texture and those masculine colors are just so fabulous! I really struggle with man cards so I love how this one turned out!!!

I started with a Chocolate Chip card base and layered on a piece of Crumb Cake measuring 4″ x 5-1/4″. Then using scraps of various shades of greens and blue, I cut the following pieces.

1-3/4″ x 3-3/4″ – Emerald Envy

1-1/2″ x 3-3/4″ – Tranquil Tide

1″ x 3-3/4″ – Bermuda Bay

3/4″ x 3-3/4″ – Pool Party

Next, I took a scrap piece of white….just any long and skinny leftover piece and added adhesive all the way down it. I placed each of the pieces listed above along the white, butt up to each other. The white is to hold them all together as one. Then I placed this into the Seaside Embossing Folder. TIP: If you place it in going up and down like the sample above, it will come out as shown. Place it in sideways (the other way) and it pulls each of the pieces apart a bit. That’s great if you like this look. If you did this on accident, you can always snip each of them apart and then glue them on your card base individually. Finally, I added this piece to the card front and tied some Linen Thread around the top.

For the focal point, I used the Coffee Cafe Stamp Set and coordinating Coffee Cups Framelits (Bundle & Save 10%)! I stamped the cup in Chocolate Chip Ink onto Whisper White. The coffee collar was die cut in Chocolate Chip as well. The lid was stamped in Chocolate Chip onto Chocolate Chip and die cut. The greeting was stamped in Bermuda Bay Ink and the little heart for the stir stick was stamped in Emerald Envy Ink. I added the cup to the card front with Stampin’ Dimensionals. To get the lid connected to the cup, I simply placed it on top and added Stampin’ Dimensionals along the seam to hold them together!

If you would like to see this in action, check out the Video Tutorial below or click here! Be sure to give the video a thumbs up if you liked it and don’t forget to subscribe if you are new. If you would like a notification when I post a new video, be sure to click the bell right next to the subscribe!!!

Happy Stampin’

~Laura

Product List


All the Details for Your Birthday!!!

Posted on

It’s all in the details for your birthday that make it super special. That is exactly what makes this card special too…..the details!!!

Details for Your Birthday, www.LaurasStampPad.com

I love how this card turned out but I do have to admit that there are lots of details and steps for this beauty! Let’s get started!

I started with a Crumb Cake card base. Next, I took a piece of Whisper White (2″ x 4-1/4″) and stamped the greeting from the Happy Birthday Gorgeous Stamp Set. If you look really close, you will notice I stamped it twice in different colors. First, I used Tangerine Tango Ink and then I did a drop shadow in Soft Sky Ink. For the punched out greeting, I used the border and greeting from the same stamp set and punched it out with the Classic Label Punch. I added this below the birthday greeting with Mini Stampin’ Dimensionals.

Now that the greeting part is done, let’s move up the card. I took a piece of Soft Sky (1″ x 4-1/4″) and stamped the squiggle in Soft Sky Ink all along it. To me, this was the hardest part because it was so repetitive. 🙂 I flipped the image so it didn’t look exactly the same each time. Now to assemble all of this. I placed the blue and white pieces together and placed the Lemon Lime Twist Ribbon over the top. I wrapped the ends around to the back side and added this entire piece to the bottom of the card front!

For the balloons, I stamped the hooray in Tangerine Tango onto the same cardstock. I stamped the dotted balloons in Soft Sky and Lemon Lime Twist. Using the Balloon Bouquet Punch. To add the strings, I placed a piece of Whisper White Baker’s Twine on the back and set a Stampin’ Dimensional on top to secure it. I added one more dimensionals on the top side of the balloon so it was smooth on the card. So there are 2 dimensionals on the back, one down low holding the twine and one up top, both in the center. I placed the greeting balloon in the middle and then placed the other 2 on either side. Since the dimensionals are in the middle on the back, it allow me to overlap the balloons a bit. To finish it off, I tied a little knot around the ends of all three strings. This can either be left flopping around or it can be secured with a Mini Glue Dot right on that knot.

There are lots of steps to this card but it really comes together so well. This card is perfect for everyone with a few color changes so be sure to save this style. If you would like to see other samples using the Happy Birthday Gorgeous Stamp Set, check them out here and here!

Happy Stampin’

~Laura


Celebrating with Tons of Birthday Balloons!!!

Posted on

For your birthday, you should always be celebrating with tons of birthday balloons…..or at least this amazing card!!!

Celebrating with Tons of Birthday Balloons, www.LaurasStampPad.com

This card is perfect for anyone who is young….or still young. 😉 This card is great for boys and girls in any color combination too!!!

I started with a Tangerine Tango card base. Next, I took a piece of Basic Black cardstock and ran it through the Big Shot with the Happy Birthday Thinlit Die. I adhered that to a piece of Whisper White (4″ x 5-1/4″) with the Fine Tip Glue Pen. Be sure to do this step before the balloons so you have enough space.

Then I started stamping the balloons all over the cardstock, falling off to really make it look full. I used the solid balloon image from the Balloon Celebrations Stamp Set, stamping off once for that lighter shade. Then I stamped full strength with the doted balloon from the Happy Birthday Gorgeous Stamp Set. The colors I used were Pacific Point, Tangerine Tango, Daffodil Delight, and Lemon Lime Twist. For the yellow balloons, I stamped them on scrap white and punched them out with the Balloon Bouquet Punch. I added those to the card with Stampin’ Dimensionals for a little texture. I added the balloon tails in Basic Black Ink. For the balloons overlapping, I punched out a balloon to use as a mask so I wasn’t stamping the tail on top of it.

Birthday Balloons, www.LaurasStampPad.com

If you want to see more samples using the Happy Birthday Gorgeous Stamp Set and coordinating Happy Birthday Thinlit (Bundle & Save 10%), click here and here!

Happy Stampin’

~Laura

Bonus Days, www.LaurasStampPad.com

Don’t forget Bonus Days the entire month of July!!! Every $50 spent, earns you $5 to spend in August!!! Click here to start shopping! You will also be earning Laura’s Loyal Stampers Stickers which is just a way for me to spoil my customers!!! 🙂


Technique Tuesday – Creating a Drop Shadow Greeting!!!

Posted on

Happy Tuesday!!! You know that means I have a fabulous technique for you today and that is creating a drop shadow greeting!!! There are so many color combinations that you could do for this card. I love it!!!

Creating a Drop Shadow Greeting, www.LaurasStampPad.com

This is a perfect Man Card and we all know I struggle with those since I love PINK! I am also loving this Night of Navy and Lemon Lime Twist color combination too! Perfect!!!

I started with a Lemon Lime Twist card base. Then I took a piece of Whisper White measuring 4″ x 4-1/4″ to use for the greeting. Using the Happy Birthday Framelit, I die cut the greeting in Night of Navy and Lemon Lime Twist. For adhering them onto the Whisper White, there is always the Fine Tip Glue Pen! If you find that hard to use, try out this technique. I use a Silicone Craft Mat, Sponge, and Multi Purpose Liquid Glue. Just pounce in the glue a bit and then all over the die cut image. This gives the perfect amount and nice even coverage. First, I laid down the Lemon Lime Twist greeting. Second, I added the Night of Navy greeting just a smidge down and over from the other one. This gives that drop shadow look! Be sure your greeting is up high on the cardstock so that the rest of the design doesn’t cover it.

Layered Birthday, www.LaurasStampPad.com

Now to assemble the card! I took a piece of Night of Navy (2″ x 4″) and ran it through the Big Shot in the Oh My Stars Embossing Folder. Next, I adhered this to the lower portion of the white piece, making sure it was the correct size for my card front. Then I placed a strip of Finely Woven Ribbon in Lemon Lime Twist across the cardstock where they meet together. I added this piece to the card base with Stampin’ Dimensionals! For the mini greeting, I used the Happy Birthday Gorgeous Stamp Set (Bundle & Save 10%). I punched the greeting out with the Classic Label Punch and added it to the card with Mini Stampin Dimensionals! I just love it!

If you would like to see this all in action, check out the Video Tutorial below or click here! It’s great to know what all of the pieces of each flower are for! Be sure to give the video a thumbs up if you liked it and don’t forget to subscribe if you are new. If you would like a notification when I post a new video, be sure to click the bell right next to the subscribe!!!

Happy Stampin’

~Laura


Masculine Card Using Eastern Beauty Stamp Set!!!

Posted on

I feel like saying I made a masculine card using the Eastern Beauty Stamp Set is like an oxymoron. This card is super fabulous and that set is so much fun and versatile! Check out other samples using this set here, here, and here!Masculine Card Using Eastern Beauty, www.LaurasStampPad.com

Man cards are fun to make using Tranquil Tide and Dapper Denim Ink! I am loving this look!

I started with a Crumb Cake card base measuring 11″ x 4-1/4″. Next I took a piece of Very Vanilla (4″ x 5-1/4″) and added a strip of Eastern Palace Designer Series Paper (2″ x 4″). This is a great measurement because it uses up an entire sheet of 12″ x 12″ Paper. You can make 18 of these cards with 1 sheet! Now for adding the Linen Thread, I wrapped it around three times and tied it into a knot. If you would like to do a bow, you can or you can place the knot under the greeting so it looks more seamless. I stamped a few of the diamond images from the Eastern Beauty Stamp Set in Tranquil Tide Ink. Then I added this piece of the card base!

For the greeting, I stamped the circle in in Dapper Denim Ink and the greeting in Tranquil Tide Ink onto Very Vanilla cardstock. All of these are from the Eastern Beauty Stamp Set! Using the Layering Circles Framelits, I die cut out the greeting and die cut a scallop circle in Tranquil Tide. Next, I layered the two together and added them to the card from with Stampin’ Dimensionals. This adds some texture and since it’s over the top of the thread it lays flatter. All done!

I really struggle with Man cards because I love flowers and pink and bling. I get super excited when I come up with an awesome man card style! This card will be easy to make multiples of quickly!!!

Happy Stampin’

~Laura


Loving the Soft Saying All Inclusive Card Kit!!!

Posted on

Stampin’ Up! has a NEW All Inclusive Card Kit called Soft Saying and it’s fabulous!!! The thing I love the most is that it’s perfect for the beginner because it includes everything. It’s perfect for the seasoned stamper because it’s so beautiful and fun!

Loving Soft Saying Inclusive Card Kit, www.LaurasStampPad.com

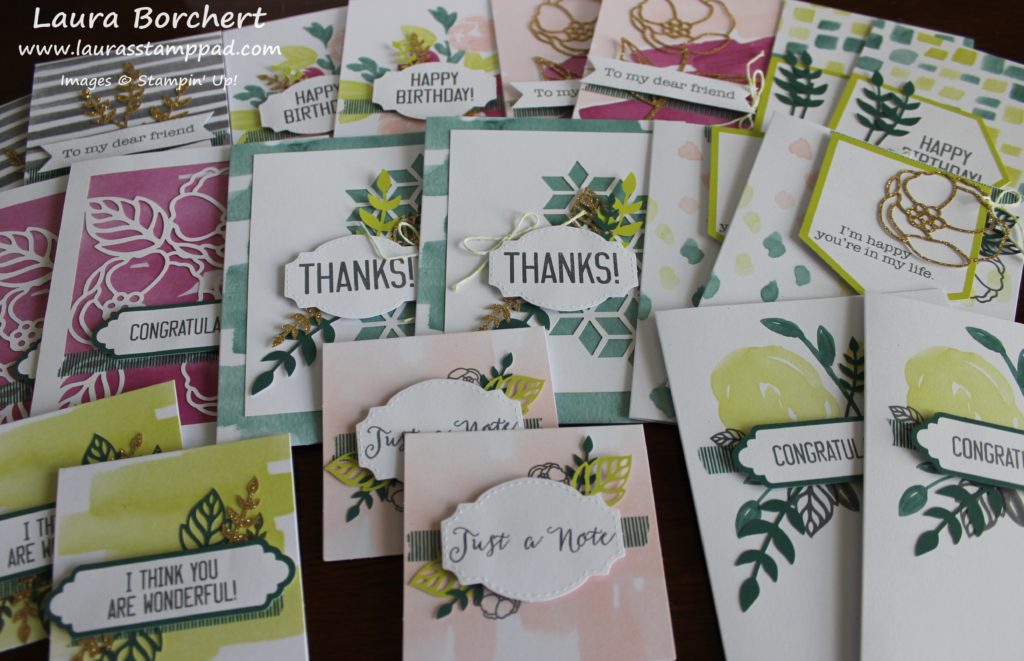
Look at all of these beautiful cards! The color scheme isn’t one that I would pick on my own but I do love it. Of course there are flowers in there so I’m happy! There are 20 total cards in this kit with envelopes. The stamp set is perfect for all occasions and it’s always great to have another clear block and Basic Gray Ink!

Mini Cards, www.LaurasStampPad.com

Here are the 2 sets of mini cards in the kit for a total of 4 cards! These cards are 3″ squares. The card bases came printed with that watercolor wash. I added the Washi Tape and stamped the greetings and some leaves/flowers! Next, I added the die cut leaves with a little bit of Fine Tip Glue Pen. Many times though, I just placed a Stampin’ Dimensional over the ends to secure it and placed the greeting on top.

Note Cards, www.LaurasStampPad.com

These are the note card size and there are 8 total in this size! I love the colors of the flowers and gold but also the simple more masculine cards as well! Again, you can see that I used the Washi Tape to secure the die cuts and used very little Fine Tip Glue Pen. It made putting these cards together very quickly!!! My favorites here are the gold rose in the upper left corner and the gray strips in the lower left corner!

Large Cards, www.LaurasStampPad.com

These are the large cards and there are 8 total! Of course, my favorite is the floral die cut and pin in the upper left corner. I loved that the floral die cut had a large enough border that I could put the adhesive there. It was super simple! The greetings are amazing and my favorite is “I’m happy you’re in my life.” I will say there was Lemon Lime Twist Baker’s Twine in the kit and I just didn’t care to use it. I did add it here and there following the instructions in the kit but there are a few I didn’t use it. It’s all about adding in your own flare and I know I’ll use that twine in other projects!

Leftovers, www.LaurasStampPad.com

Next up I wanted to show off all the leftover pieces that can be used on future projects! I have leftover labels (or extras if you make a mistake), twine, and washi tape. Then there are the non-consumables – stamps, ink, and clear block that can be used many many times over! I love it! There is also a Refill Kit that you can purchase to make even more cards! The refill kit comes with all of the supplies in the full kit minus the stamps, ink, clear block, and striped box.

If you would like to see the complete unboxing and reveal of this kit, check out my Video Tutorial below or click here! Don’t forget to give it a thumbs up if you liked it and be sure to subscribe if you are new!

Happy Stampin’

~Laura


Doing the Graduation Polka-Dots!!!

Posted on

Tis the season of Graduation and for many they are doing the Graduation Polka…..Dots!!! Teeeheehee! I know when I graduated….10 years ago!….I was doing all the dances. You couldn’t pay me to go back to school so graduation was a big celebration!!! As it should be!

Graduation Polka-Dots, www.LaurasStampPad.com

This card is perfect to have on hand for any occasion even Graduation!!! I have done this card in boy colors like this and in girly colors like this sample! Not let’s get started on this fun debossed card!

I started with a Pacific Point card base. Then I took a piece of Whisper White (3-3/4″ x 5″) and ran it through the Big Shot with the Celebrations Duo Embossing Folder in the middle. I have found that stamping over the top of the de-bossed image turns out the best when you stamp on top of the Stampin’ Pierce Mat. This mat has some give for the cardstock to press into rather than a hard surface like the table. I used the Happy Celebrations Stamp Set to stamp the polka dots all over and make the greeting pop! I went with Pacific Point Ink and Cucumber Crush Ink. I stamped the dots all over the cardstock, some in full strength and some as the stamped off shade of ink.

For this card, I highly recommend going back to the ink pad each time and if you want the lighter shade, then stamp off onto a scrap piece of paper rather than on the card. The reason for this is because if you fall half off the cardstock, it makes the second stamp image have a line on it. Also, if you stamp over the celebrate greeting, the second stamp will have the letters in a darker ink so to avoid this, just go to the ink pad each time! 🙂 My favorite part of stamping with photopolymer, is that you can see the ink and paper touch! It’s so cool! Be sure to stamp the dots with firm even pressure so that your ink hit the cardstock around each piece!

Now that the focal point is complete, I wrapped some Silver Metallic Thread around it and secured the ends to the back with Stampin’ Dimensionals. Since it is a Man Card, I didn’t want to go all out with ribbons and bows but a little thread is perfect! I added  more Stampin’ Dimensionals all over to raise this layer up from the Cucumber Crush layer (4″ x 5-1/4″). Finally, I added this piece to the card base! Perfect!

I love Graduations but they always make me cry. Just that amazing accomplishment and moving on to the next step in life is so fabulous and makes me emotional! It’s still crazy to think I graduated 10 years ago! How many years since your last graduation? Let me know in the comments below!!!

Happy Stampin’

~Laura