Inside the Lines Designer Series Paper!!!

Posted on

Inside the Lines, www.LaurasStampPad.com

When I first saw the Inside the Lines Sale-A-Bration Designer Series Paper, I thought it looked beautiful but a little intimidating! That is a lot of coloring…..and time consuming….at least for me who isn’t a big fan of coloring. I enjoy coloring a little bit but only to make 1 card or only a small amount. Then I got this idea from Stampin’ Up back in November when I attended the OnStage Event. You only have to color one small square and it looks AMAZING!!!

~Card Instructions~

I started with a Calypso Coral card base and stamped the greeting from the Avant Garden Sale-A-Bration Stamp Set in Calypso Coral Ink all over the background. I stamped a few times to get those various shades. It is super fun that you can read some and others are falling off. It is a super cool look and adds more meaning to the card!

Next, I took a piece of the Inside the Lines Designer Series Paper measuring 2-3/4″ x 3-1/2″. You will want to cut a 1″ strip from the left side (or right, it doesn’t matter either way). With the leftover piece, I cut it in half creating two 1-3/4″ squares. Now it’s time to color and you can pick whichever section you would like. I colored mine with the Watercolor Pencils and Blender Pens. I adhered the designer paper to the middle of the card and added some Basic Black Baker’s Twine to the left hand side, tied into a bow. For the greeting, I die cut the circle from the Stitched Shapes Framelits (smallest one) and stamped the greeting from the Avant Garden Stamp Set. I added the greeting to the card front with Stampin’ Dimensionals. Love it!!!

To A Wonderful Friend, www.LaurasStampPad.com

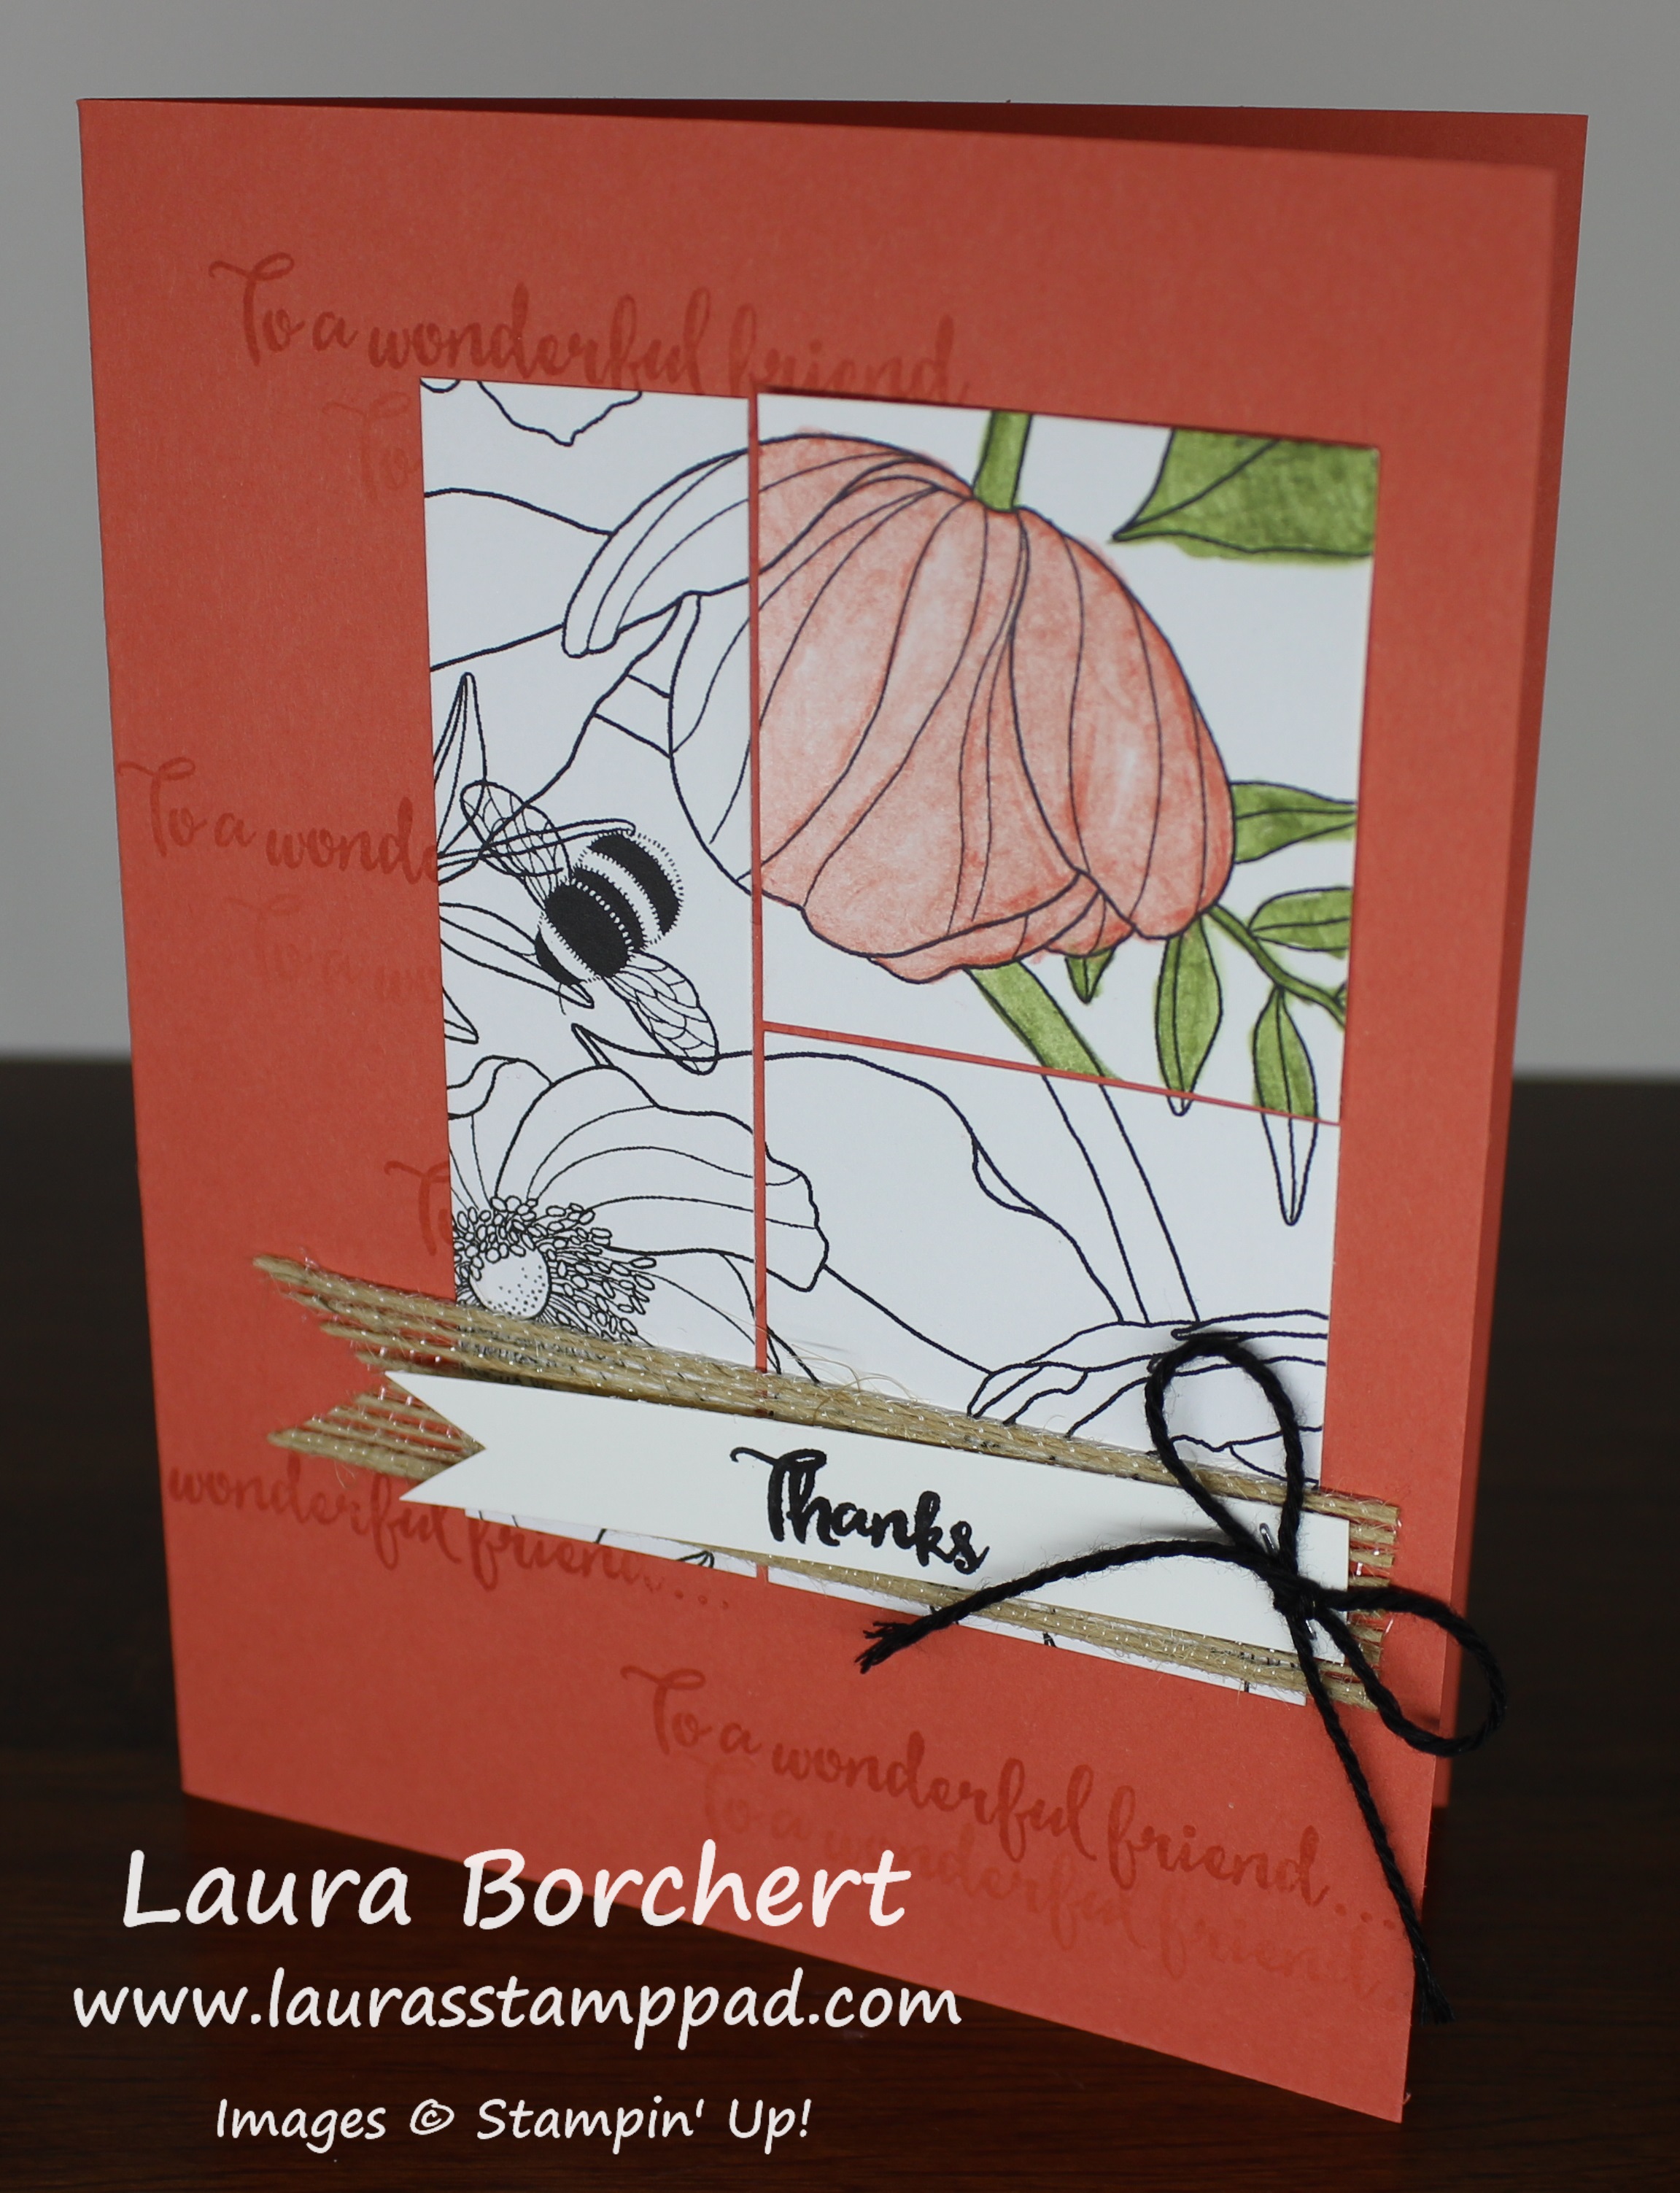
This is the card I created at the Stampin’ Up! OnStage Event. We did the greeting a little differently with some of the Burlap Ribbon and banner tips! I just decided to mix it up and go with my own take on it! Both are super fabulous and have the same concept!

Which one is your favorite??? Let me know in the comments below – stitched shape greeting or burlap banner greeting!!! Don’t forget that you can get the Inside the Lines Designer Paper for FREE through the end of March as your Sale-A-Bration item! Every $50 order, earns you a Free item from the brochure. Remember that there are 3 new items that were released at the end of February! You can check those out here! Click here to start shopping!

Happy Stampin’

~Laura


Technique Tuesday – Creating a Marbled Background!!!

Posted on

Happy Tuesday!!! You all know what that means!!! I have a super fun technique to share with you – creating a marbled background!!! Check this out!!

Best.Guy.Ever., www.LaurasStampPad.com

Isn’t the background super cool?? It is super easy as well. All you need are ink pads and baby wipes!!! I got this technique from fellow demonstrator, Sandy Jacobson! I love sharing ideas!!!

SUPPLIES NEEDED: Ink Pads, Baby Wipes

For creating the marbled background, I started with a piece of Shimmery White cardstock measuring 4″ x 5-1/4″. You can use regular Whisper White or Very Vanilla cardstock if you wish! It works the same with all but I liked the little hint of shimmer! Next, I took a wet baby wipe and balled it up and very lightly tapped it into an ink pad and then pounced all over the cardstock. I used Bermuda Bay Ink, Cucumber Crush Ink, and Pumpkin Pie Ink. You can pounce with each color as little or as much as you wish. It’s as simple as that! Super fun and comes out different each time. You can mix and match any color combination!

To finished the above card off, I placed it onto a Bermuda Bay card base. I stamped the birthday greeting in the lower right corner from the Balloon Adventures Stamp Set. The die cuts came from the Stitched Shapes Framelits in Cucumber Crush and a t-shirt from the T-Shirt Builder Framelits in Bermuda Bay. I stamped the front of the shirt with the Suite Sentiments Stamp Set. Next, I added the t-shirt to the square with Stampin’ Dimensionals to make it look a little more 3D. I added loops of Whisper White Baker’s Twine to the back of the square, securing it with Stampin’ Dimensionals and then adding it to the card front! Perfect Man Card!

Razzleberry Dress, www.LaurasStampPad.com

I used Wisteria Wonder Ink and Rich Razzleberry Ink for this one. For the decoration, I stamped the lady from the Beautiful You Stamp Set in Basic Black and her dress in Rich Razzleberry. The greeting was done in Wisteria Wonder. I went over her dress with a Wink of Stella Pen which added a little shine and blended it together a bit. I used the leftover bit of ink on the tip to color in her hat. Then, I layered this piece onto Silver Foil Paper and added it to the card front. To finish it off, I added a few White Perfect Accents. Love it!

If you would like to see this all in action, check out the Video Tutorial below or click here! Don’t forget to give it a thumbs up if you liked it and be sure to subscribe if you are new! I post every Tuesday and Thursday!

Have fun trying this out yourself! What color combination will you use? Let me know in the comments below!

Happy Stampin’

~Laura


Love Is In The Air!!!

Posted on
Love Is In The Air, www.LaurasStampPad.com

Ahhh, the weather has been warm and I’m loving every minute of it! Some say Spring is in the air but I say Love is in the Air!!! Spring is my favorite season. I love the new life of flowers, plants, and animals, that warm sun and cool breeze and all the bright colors!!! I can’t wait!!!

Card Instructions

For this card, I used a Calypso Coral card base. Then I took a piece of Whisper White (4″ x 5-1/4″) and stamped the 3 different clouds all over the background from the Lift Me Up Stamp Set. Marina Mist is the perfect blue for clouds! For the hot air balloon, I used the coordinating Up & Away Thinlits Dies to die cut out the pieces with the Big Shot! You can Bundle & Save 10% when you purchase these 2 together as a bundle. I did the detailed balloon in Calypso Coral. For the strips behind it, I did Marina Mist and Mint Macaron. I am loving this color combination. It is the perfect pastel collection. I used the Fine Tip Glue Pen to adhere the pieces to the back of the detailed balloon piece. You can also use a sponge and lightly pounce some glue from the Multi-Purpose Glue Pen onto the back. I added the hot air balloon to the card front with Stampin’ Dimensionals to give a little texture and 3D look to the balloon!

For the greeting, I added a piece of Marina Mist measuring 1/2″ x 4″ along the bottom. I stamped the greeting from the Lift Me Up Stamp Set onto a scrap piece of Whisper White. Using the Classic Label Punch, I punched it out and then added it to the card with Stampin’ Dimensionals. I used some of the skinny edge pieces. I just trimmed it to the correct length and it was perfect! To finish off the card, I added a few Enamel Shapes!! It is just perfect!!!

You can purchase the Lift Me Up Bundle in Clear and add on some Enamel Shapes or pack of Cardstock to get to the $50 order! Then you can pick out a FREE Sale-A-Bration item!!! If you purchase the Lift Me Up Bundle in Wood, you already have earned a Free Sale-A-Bration item!!! Now is the perfect time to get those favorites on your Wish List or stock up on items because every $50 order, earns you a Free Sale-A-Bration Item! Who doesn’t love FREE STUFF!?!?!? Click here to start shopping!!

If you would like to see more samples like this Love Is In The Air Card using the Lift Me Up Bundle, click here and here!

Happy Stampin’

~Laura


Succulent Gardens!!!

Posted on
Succulent Gardens, www.LaurasStampPad.com

Succulent Gardens are all the rage right now and I am on that same train!!! Woot Woot!!! You all know I love flowers as it is but succulents are these cute little things that are just so precious! My Mom got me one for Christmas and so far it is still alive and cute as ever! Here’s hoping I can continue to keep it alive! 🙂

Now let’s get started on this beautiful card! You may have noticed that you can’t see the Old Olive on the front panel! I created this card in a fun way! I started with an Old Olive base measuring 4-1/4″ x 5-1/2″. Then I took a piece of Sweet Sugarplum measuring 4″ x 10-1/2″ and folded it in half like a card. I adhered this to the middle of the Old Olive base. This gives a fabulous little backing but a fun card base. You could always do this with a black base but a white card that you can write inside! You could do this with any card!

Now to decorate it, I used the Succulent Garden Designer Series Paper. I put a strip along the left side measuring 1-3/4″ x 5-1/4″. Then I layered another piece measuring 2-1/2″ x 3″. For the main point, I took a piece of Tip Top Taupe measuring 3-3/4″ x 2-1/4 and layered on a piece of Whisper White measuring 3-1/2″ x 2″. Before adhering it to the taupe, be sure to stamp the greeting from the Oh So Succulent Stamp Set in Tip Top Taupe Ink. It’s always best to stamp before assembling so you can flip it over if you make a mistake. I love that there are 2 sides to every piece of cardstock! 🙂

Next, I tied some of the Succulent Garden Ribbon Combo Pack around the cardstock. This ribbon is like soft and fuzzy. It’s a fun texture! For the flowers, I stamped them from the Oh So Succulent Stamp Set and die cut them out with the coordinating Succulent Framelits. You can bundle and save 10% when you purchase these two products together – click here to get the bundle! I did the large flower in Sweet Sugarplum and the small flower in Mint Macaron. The greenery pieces were done in Old Olive. I added the greenery flat to the cardstock and popped up the flowers with Stampin’ Dimensionals. Love it!!!

It was super easy to create this card and pick the colors because I just used the ones listed in the designer paper! The entire Succulent Suite is beautiful and goes together so well! You can see another sample here! When you purchase the bundle and save 10% as well as the coordinating Succulent Gardens Designer Paper, you can pick out a FREE Sale-A-Bration item!! Saving 10% and getting a free item is super fabulous! I love Sale-A-Bration time!!! Stock up on your favorite goodies before it ends on March 31st!!

Happy Stampin’

~Laura


Technique Tuesday – Poppin’ Pink!!!

Posted on
Celebrations Duo Embossing Folder, www.LaurasStampPad.com

Happy Tuesday and Happy Valentine’s Day!!! Today I’m going to share a fabulous technique in my favorite color! After all I LOVE Pink and today is all about love, right??

How amazing is this card?!?!?! All that Pink! That amazing background! I am in love although I probably won’t be making a ton of cards exactly like this…..that background was crazy! It’s always cool and fun to do something at least once though!!! Let’s get started!

SUPPLIES NEEDED: Celebrations Duo Embossing Folder, Big Shot, Happy Celebrations Stamp Set, Stampin’ Pierce Mat

I started with a Basic Black card base. Then I took a piece of Whisper White (4″ x 5-1/4″) and stamped the “Birthday To You” from the Happy Celebrations Stamp Set all over in Melon Mambo Ink. I just love black and white with a pop of pink! To get those various shades of pink on the greeting, I stamped a few times before going back to the ink. I would ink it up and then stamp in a random place, then move down and over and stamp again. Repeat this once more. Then I would go back to the ink and stamp the same but in reverse so that the darkest was now next to the lightest. Just keep filling in until it is all covered. Don’t worry about your spacing or being straight. It is made with love, not perfection and a lot of it is covered up so you can’t see the entire piece!

Once I was finished with this piece, I adhered it to the card front! Now for the Happy greeting!!! I took a piece of Whisper White (4-1/2″ x 2-1/4″) and ran it through the Big Shot in the Celebrations Duo Embossing Folder. This will give you that fabulous de-bossed Happy image. Now it’s time to add some color! I found that stamping with the piece on the Stampin’ Pierce Mat works best because then there is some give for the debossed image and you aren’t smashing it all. It gives a nice stamped image as well. Place the debossed image on the Stampin’ Pierce Mat and using the image from the Happy Celebrations Stamp Set, stamp over each letter with Melon Mambo Ink! When you stamp, you can see the ink touch the paper. Sometimes you will need to press a little more in certain spots to make sure the stamp touches the paper.

Double Happy, www.LaurasStampPad.com

There other super cool thing is how you can create 2 projects from this technique. Once you stamp on the de-bossed image, you will notice the letter in your stamp because the ink is still there where the letter is de-bossed. You can then stamp that onto another piece of paper to get the cool look of the Happy in the photo above (bottom greeting). How cool is that??

Once I finished the de-bossed image, I layered it onto Basic Black measuring 2-3/4″ x 4-3/4″ with Stampin’ Dimensionals. I like using Dimensional when working with embossed images so it lays flat and adheres well…..and because I love them so much! Then I added this to my card front and finished it off with a few Rhinestones. Got to have some bling! I added a piece of Whisper White (4″ x 5-1/4″) to the inside of the card as well since it is hard to write on black cardstock! Love it!!!

If you would like to see this all in action, check out the Video Tutorial below or click here! Be sure to give it a thumbs up if you liked it and don’t forget to subscribe if you are new! I post a video every Tuesday and Thursday! You can also check out another sample I created with these folders here!

What color would you use to create this card?? Let me know in the comments below! I’m thinking I need to try Bermuda Bay or Cucumber Crush for a boy card!!!

Happy Stampin’

~Laura


Birthday Present!!!

Posted on

Birthday Present, www.LaurasStampPad.com

This card is super adorable and can be changed up with any of your favorite Designer Series Paper. When you use Designer Paper in the same pack, then the colors always coordinate so that makes it super easy and fun to mix and match!!! I love it!!!

I started with a Whisper White card base and layered on a piece of Party Animal Designer Series Paper measuring 3-3/4″ x 5″! Then I took another piece of Party Animal Designer Paper (4″ x 3″) and added it to the card front with Stampin’ Dimensionals so that the present looks more 3D. I added a strip of Pacific Point (1/4″ x 4″) down the center of the card to look like ribbon. I used the Fine Tip Glue Pen since it is so little. I die cut the bow at the top from the Balloon Pop-Up Thinlit Dies in Pacific Point as well! I put a little piece of a Stampin’ Dimensional on the center of the bow and added it to the top of the present! I love it!! For the greeting, I stamped it from the Balloon Adventures Stamp Set in Tangerine Tango. The greeting was stamped onto Whisper White measuring 1″ x 3″. I punched the banner tips out with the Triple Banner Punch. I added the greeting to the present with Snail Adhesive but I lined up the edge of it with the edge of the background designer paper. Simple and fabulous!!!

You can Bundle & Save 10% when you order the Stamp Set and Thinlits together!!! You also get to pick out a Sale-A-Bration item for FREE when you order before March 31st! How amazing is that?!?!?! I love Sale-A-Bration because I love getting bonus freebies for every $50 I order! Click here to start shopping and earning your Sale-A-Bration items!

Happy Stampin’

~Laura


Designer Paper Block Card!!!

Posted on

Sending Love Designer Paper, www.LaurasStampPad.com

I love Valentine’s Day because I love showing my love to those around me…including all of you! I hope that you know I truly care about all of you and I greatly appreciate you reading my blog, commenting, and sharing! Thank you all!!! I wish I could send you all a card but I would need all of your addresses! 🙂 So please know I love you all and wish you all the happiness!

For this card, I actually made it into a square but it still fits into a regular Whisper White Medium Envelope! For the card base, I cut a 4-1/4″ x 8-1/2″ which makes a 4-1/4″ square! Then I cut some pieces of the Sending Love Designer Series Paper into 2″ squares! The awesome thing about this is that it uses up every bit of the piece of paper because it is a 6″ Paper Stack! You can get 9 squares from each sheet! For the card above, I used the same sheet of paper front and back!

Happy Valentine's Day, www.LaurasStampPad.com

For this card, I used 2 different pieces of paper and used both front and back. I really struggled with how to do this one above because I didn’t know if it should be red and red and white and white or flip flopped. I think either way it would have turned out about the same but I sure struggled. 🙂 For the greeting, I stamped it in Real Red Ink from the Sealed with Love Stamp Set onto Whisper White. Then I die cut the circle and scallop circle out with the Layering Circle Framelits! I added the greeting to the card front with Stampin’ Dimensionals right in the middle. I love it!!!

If you would like to see this in action as well as another sample using the Sealed with Love Stamp Set and coordinating Sending Love Designer Paper, check out the Video Tutorial below or click here! Be sure to give it a thumbs up if you liked it and don’t forget to subscribe if you are new! I post every Tuesday and Thursday.

Happy Stampin’

~Laura


Hello Love!!!

Posted on

Hello Love, www.LaurasStampPad.com

When I attended Stampin’ Up! OnStage in November, we got to play with lots of new product and these 3 little Valentine’s cards were just a few of the projects we got to create!!! These are simple, adorable and just perfect for sharing a little love note!!! The base of each of the cards is a 3″ x 6″ piece of Sending Love Designer Series Paper! The card above has a little 2-3/4″ square of Whisper White with the stamped greeting from the Sealed with Love Stamp Set in Mint Macaron Ink. The adorable little arrow was die cut in Real Red cardstock using the coordinating Love Notes Framelits (Bundle & Save 10%)! Then with a little bit of Emerald Envy Baker’s Twine, I tied a bow and added it to the arrow with a Mini Glue Dot!

I love you, www.LaurasStampPad.com

This one is super fabulous especially with that extra little wooden heart from the Sending Love Embellishments! I stamped the little watercolor wash image from the Sealed with Love Stamp Set in Mint Macaron Ink. The greeting was stamped in Real Red Ink. The heart and arrow were die cut from the Love Notes Framelits. I used the Fine Tip Glue Pen to adhere them to the card. That glue is amazing for little things like this.

Teeny Tiny Note, www.LaurasStampPad.com

How adorable is that mini envelope??? That was created with the Love Notes Framelits and Sending Love Glassine Sheets! Just precious!!! The little note inside was created with the framelits and coordinating Sealed with Love Stamp Set to get those little hearts along the top! I added a little Emerald Envy Baker’s Twine around the envelope and tied it into a bow!

I hope these little love notes gave you inspiration for Valentine’s Day or just to have on hand to share with those you love all year long! Also, today I’m sharing with you my Unboxing and Reveal of my New Big Shot!!!! I am super excited to have a 2nd Big Shot to use for myself and at my events! This Big Shot also has the new Multi-Purpose Platform! Check out my excitement in the video below or click here! Be sure to give it a thumbs up if you liked it and don’t forget to subscribe if you are new!! I post videos every Tuesday and Thursday!!!

Happy Stampin’

~Laura


All the Pink Balloons!!!

Posted on

Pink Glitter Balloons, www.LaurasStampPad.com

You all know my love for Pink and Bling!!!! I love this card that was created with the Balloon Adventures Bundle!!! You can see more samples using this bundle here, here, here, and here!!!

I started with a Whisper White card base. Then I took a piece of Blushing Bride measuring 3-3/4″ x 5″ and added it to the card front! Now for the main focus of fabulous-ness!!! I took a piece of Melon Mambo cardstock measuring 3-1/2″ x 4-3/4″ and placed the Balloon Pop-Up Thinlits die over the top of it. I ran it through The Big Shot and popped it out with the Big Shot Die Brush! I love how you can use this this die to a pop-up insert in your card or a beautiful front like this one! I stamped the banner and greeting in Basic Black from the Balloon Adventures Stamp Set. For the balloons, I used the dies from the set to cut out Blushing Bride Glimmer Paper. I added the pieces to the balloons with the Fine Tip Glue Pen. I saved the dots from the one balloon and used them to dot the last balloon. You could always use the stripes for the third balloon too! Simple and fabulous!!! I love the layers and texture from this card!

What color scheme would you use for this – pinks? blues? black and gold?? Let me know in the comments below!

Happy Stampin’

~Laura


Technique Tuesday – Balloon Pop Out Card!!!

Posted on

Happy Tuesday!!! That means I have a fabulous technique to share with you today. The cool thing about this technique is the Balloon Pop-Up Thinlits do all the hard work and you just get to enjoy the POP UP!!!!Birthday Pop Out Card, www.LaurasStampPad.com

This card looks fairly basic on the front but it’s the inside that has the MAJOR WOW factor! I love it! Also, check out that adorable little charm!!! Let’s get started!

I started with a Crushed Curry card base!!! For the front, I cut a piece of the Party Animal Designer Series Paper (4-3/4″ x 3-3/4″) and tied some Emerald Envy Taffeta Ribbon around it and into a bow! Then I took a piece of Whisper White (3″ x 2″) and stamped the confetti from the Balloon Adventures Stamp Set in Crushed Curry. I stamped the greeting in Pacific Point Ink. I added the greeting to the card front. For the Party Animal Charm, I attached it with some Crushed Curry Baker’s Twine! Now for the inside, I cut a piece of Whisper White measuring 5″ x 7-1/2″ and scored it in the middle at 3-3/4″. Then take the Balloon Pop Out Thinlits (Bundle & Save 10%) and line up the center with the center score line of the thinlit. This is super simple since the thinlit has a distinct center and the little triangle on the bottom to help find the center. Run it thought the Big Shot and it creates the perfect Pop Out! Before folding the score line, you will want to do all of the stamping. Give firm even pressure on the stamping so it comes out clean even with the score lines.

Inside Balloon Pop Out, www.LaurasStampPad.com

I stamped the 3 styles of balloons from the Balloon Adventures Stamp Set in Crushed Curry, Tangerine Tango, and Emerald Envy. The greeting was stamped in Pacific Point Ink. Once you are done stamping, you can fold on the score lines in mountain/valley fold. I added Snail Adhesive on the far outside panels. With the card all the way open, I place the right side down. Then I folded the mountain/valley all the way down and closed the card on top of it. I always find it best to close the card to seal the second side rather than just laying it flat. This way there isn’t an uneven pop out and it will close smoothly!! I added the little decoration on the ends by cutting pieces of the Party Animal Designer Series Paper measuring 1/2″ x 4-1/2″ and adhering them down. The pop out is so much fun but these pictures don’t do it justice at all.

You can see this all in action n the Video Tutorial below or click here! If you liked the video, be sure to give it a thumbs up! Don’t forget to subscribe if you are new. I post videos every Tuesday and Thursday!!!

If you would like to see more samples using the Balloon Adventures Bundle, check them out here, here, and here! The best part is when you purchase this bundle, you get to pick out a FREE Sale-A-Bration item!!!

Happy Stampin’

~Laura