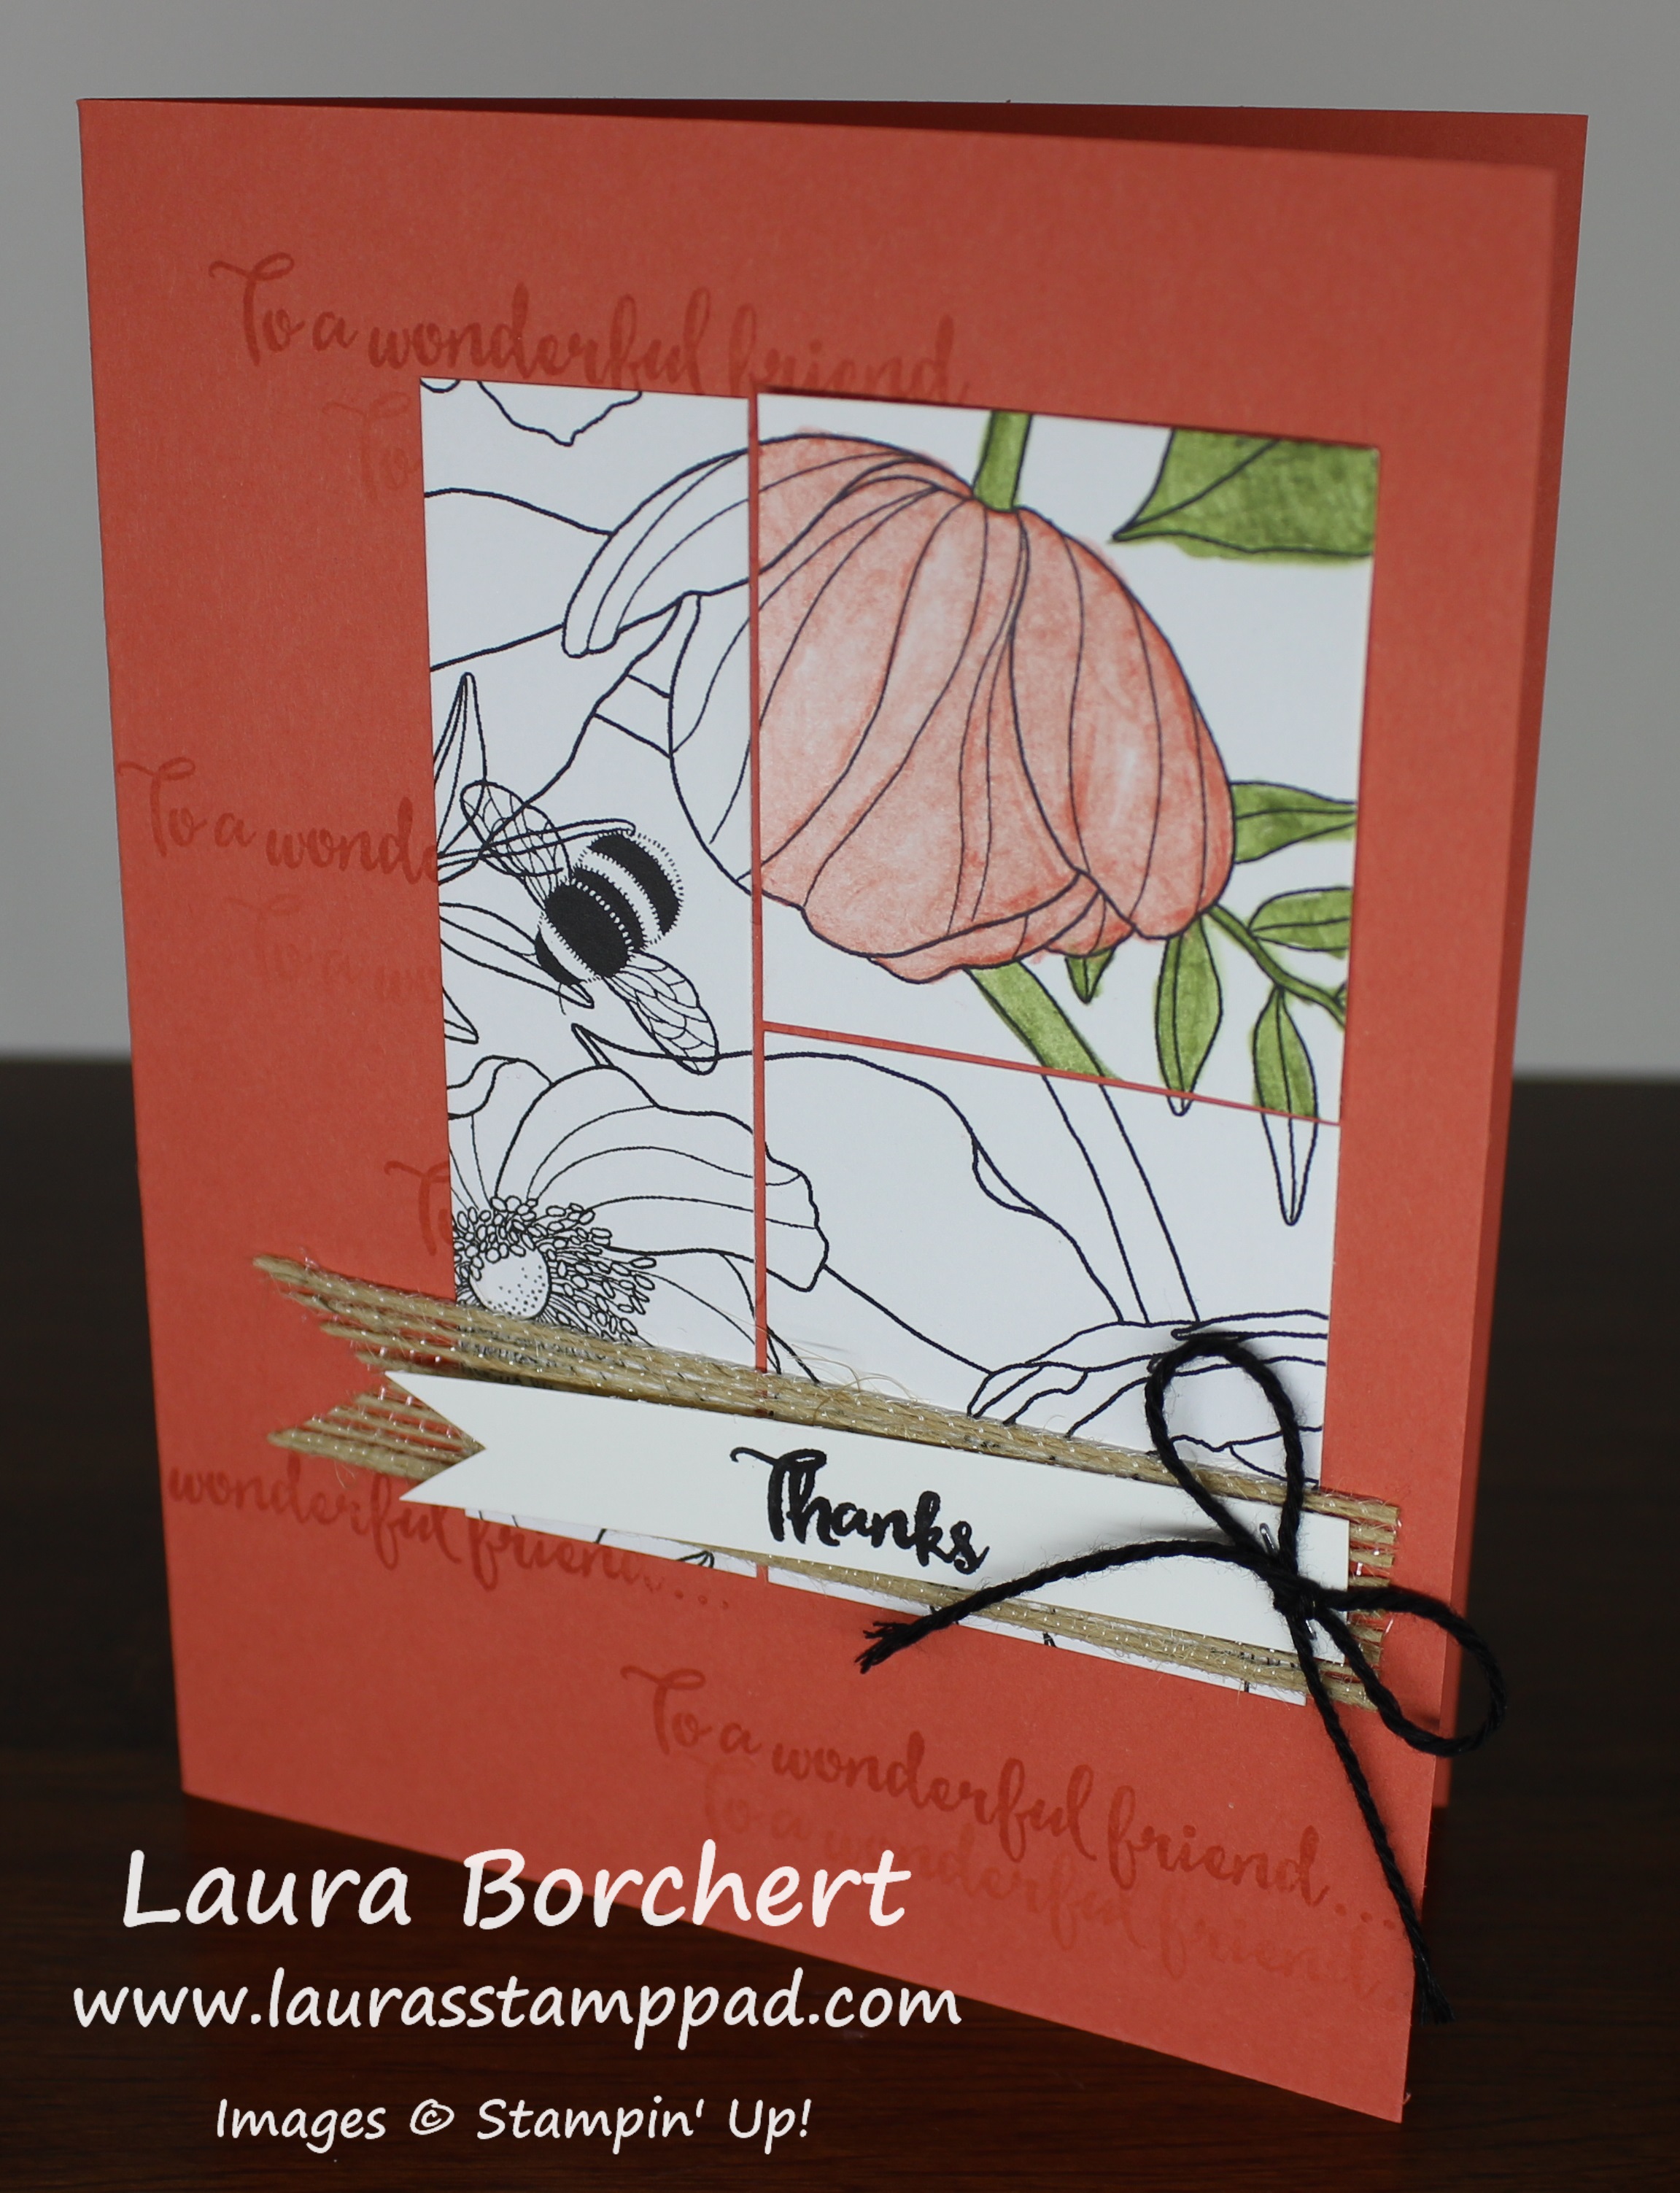
You’re Sublime!!!

Posted on

You're Sublime, www.LaurasStampPad.com

How adorable is this?!?!?! This cute card is perfect for Valentine’s Day and it uses a non-Valentine’s Day stamp set – You’re Sublime! It is such an adorable stamp set!!!

I started with a Peek-A-Boo Peach card base! Then I took a piece of Whisper White (4-1/2″ x 3″) and stamped the little submarine from the You’re Sublime Stamp Set in Basic Gray Ink. You will need to use a Stazon or Archival Ink since I did watercoloring and you won’t want it to bleed! I prefer Basic Gray because I like the softer look rather than Basic Black. I hadn’t received my Watercolor Pencils order at the time of making this so I used an Aqua Painter and ink. You can see a complete tutorial on watercoloring like this HERE! I used Dapper Denim Ink and Peek-A-Boo Peach Ink. I layered this onto Dapper Denim measuring 5″ x 3-1/2″ and tied some Dapper Denim Ruched Ribbon around it on the bottom. I added this piece to the card front with Stampin’ Dimensionals!

Froggy Card, www.LaurasStampPad.com

When we did this card in class, I let the stampers pick any of the images from the You’re Sublime card and here is one of the fabulous creations! Sondra went with the froggy and she used the Watercolor Pencils and Blender Pen to color him in. The ribbon covered up the greeting so we went with a Birthday greeting from the Balloon Adventures Stamp Set! It is sooo adorable! I love when my stampers change up my cards with their own creativity! It gives me great ideas too! 🙂

Stamping is always fun with you do it with others! Sharing creativity, conversations, and laughs is what I love the most about being a Stampin’ Up! Demonstrator! 🙂

Have a wonderful weekend!!! Happy Stampin’

~Laura


Tasty Trucks & Cupcake Exhaust!!!

Posted on

Cupcake Exhaust, www.LaurasStampPad.com

The Tasty Trucks Stamp Set from the Sale-A-Bration Promotion is super cute and can be turned into so many different looks – sweets, tacos, hot dogs, and any other type of delivery. Super cute! I got this idea of cupcake exhaust from a fabulous stamper friend, Mary Ellen Stites! I would follow this truck all over town! I love cupcakes!!!

For this card, I started with a Smokey Slate card base which is perfect because then you can use any colors for your truck! Then I took a piece of Whisper White (4″ x 5-1/4″) and stamped everything from the Tasty Trucks Stamp Set in Basic Gray Archival Ink! I like using gray over black because it is a softer look! I colored in everything with the Watercolor Pencils and Blender Pens!

Watercolor Tutorial, www.LaurasStampPad.com

I love the Watercolor Pencils because you can just outline or color in a bit and then take the Blender Pen and even out the color! I like to go in a circular motion and just swirl around till everything is colored in. If you would like certain spots to be darker, just go back in with pencil and add more color! I love it!! After coloring everything in, I tied some Silver Metallic Ribbon (Sale-A-Bration) around it. That ribbon is super fabulous and a little bling-y! Then I added the piece to the card front! Love it!!

Sweetest Ever, www.LaurasStampPad.com

I couldn’t stop with just one truck so here is another!!! I tied the ribbon into bow on this one and went up and down! Super fun!!

3 Ways to Use Watercolor Pencils, www.LaurasStampPad.com

 Here I colored with the Watercolor Pencils in 3 different ways – colored in (Coral), with the Blender Pens (Purple), and with an Aqua Painter (Blue). They are super easy to use and I have found that the color looks so even. Sometimes when using ink or markers with the Blender Pen or Aqua Painter, there can be streaks and lines on your project. With the pencils, there are no lines or streaks. It is just pure, rich color. You can always add in more details with the pencil after blending it together. You can even add more color by touching the Blender Pen or Aqua Painter to the tip of the pencil to pick up some color. There are so many fun ways to color with these! There are 13 pencils in the pack for just $16.00! That is a steal for so many colors, I think!

If you would like to see an up close and personal on the Watercolor Pencils, check out the Video Tutorial below or click here! Don’t forget to give this video a thumbs up if you liked it and be sure to subscribe if you are new! I post a video every Tuesday and Thursday!

Do you like Watercolor Pencils, Markers, or Ink Pads for coloring in with Blender Pens and Aqua Painters? Let me know in the comments below!!!

Happy Stampin’

~Laura


Avant Garden!!!

Posted on

Avant Garden, www.LaurasStampPad.com

You all know how much I love flowers so of course the Avant Garden Sale-A-Bration Stamp Set caught my attention right away! Free flower stamps are always the best!!!! You can get this set or one of the other Sale-A-Bration items for Free with every $50.00 order.

I started with a Calypso Coral card base. This measures 4-1/4″ x 11″ and I folded it in half so the crease is on the left side. Then I took a piece of Whisper White (4″ x 5-1/4″) and stamped the flower from the Avant Garden Stamp Set in Calypso Coral Ink. I stamped a few of the flowers in full strength ink and a few stamped off. I stamped the flowers just a bit in from the left side. I added some leaves in Wild Wasabi Ink, again stamping twice before going back to the ink! I also stamped the greeting from the same stamp set in Wild Wasabi! Then I took a piece of Whisper White Organza Ribbon and placed it on the left side of the cardstock and adhered the ends to the back side. I added this piece to the card base and finished it off with a Rhinestone in the center of each flower! I just had to add a little bling! This card could be created in any color of your choice! What color would you use? Let me know in the comments below!

Happy Stampin’

~Laura


Technique Tuesday – Golden Letters!!!

Posted on

Happy Tuesday!!! I am super excited to share this amazing technique with you today! It is super fabulous and I’m in love! Check out this beauty!!!

Golden Congrats, www.LaurasStampPad.com

Isn’t this card stunning?? The beautiful navy and white with a splash of gold and those letters! LOVE!

SUPPLIES NEEDED: Greeting Stamp Set, VersaMark Ink, Gold Embossing Powder, Heat Tool, Sponge Dauber

I started with a piece of Whisper White (4-1/2″ x 1-1/2″) and stamped the fabulous large greeting from the Double Take Stamp Set that is in the Occasions Mini Catalog! I stamped the congrats in Night of Navy Ink and then cleaned off the stamp. Then you will want to dry the image by going over it a bit with the Heat Tool just to make sure it is completely dry. Then I pounced over the image with the Embossing Buddy to reduce static. I took a Sponge Dauber and pounced in the VersaMark Ink and then onto the lower half of the greeting stamp. Once I added VersaMark to the bottom half, I stamped it over the greeting! It is pretty easy to line up the greeting to stamp again since it is a Photopolymer Stamp Set but if you aren’t sure of yourself, you can always use the Stamp-A-Ma-Jig. Once I stamped the greeting, I poured some Gold Embossing Powder over the greeting. If there is some powder higher on the letters than you wish, you can always push some of the powder off with your finger. Next, I set the powder with the Heat Tool. If you would like a basic heat embossing video tutorial, check that out here! Then I layered the greeting onto a piece of Night of Navy cardstock (4-3/4″ x 1-3/4″). I used a Whisper White card base and added some Floral Boutique Designer Paper (4″ x 5-1/4″). I placed a Gold Metallic Foil Doily in the center and then added the greeting with Stampin’ Dimensionals. I love this card so much and then had fun making this one too!!

LOVE, www.LaurasStampPad.com

For this card, I used the love from the Double Take Stamp Set and the Sending Love Designer Series Paper! I rounded the corners to soften the look with the Corner Rounder Punch. I also added a little gold heart from the Metallic Enamel Shapes. I thought this would be perfect to give my husband for Valentine’s Day but it is a little more lovey dovey and I tend to make a more cutesy card! We shall see! Maybe I’ll make 2!

If you would like to see this all in action, check out the Video Tutorial below or click here! Don’t forget to give it a thumbs up if you liked it and be sure to subscribe if you are new! I post a video every Tuesday and Thursday!

Which do you prefer – the Congrats Card or the Love Card? Let me know in the comments below!

Happy Stampin’

~Laura


Valentine Treat Boxes!!!

Posted on

Clear Treat Box, www.LaurasStampPad.com

Valentine’s Day is a little over a week away so it is time to start getting those treat ready and cards created! You can see some samples of cards here and here! I did another Treat Package that is fabulous here! Today, we are creating these little treat boxes!!! Precious and super sweet….hehe get it…..chocolate is sweet! 🙂

The base for this box is Clear Tiny Treat Boxes which come with 16 in the pack! For the inside decoration, I used some of the Sending Love Designer Series Paper. I cut it into a 2″ x 6″ piece and scored it just a smidge over 2″ and then from that score line a smidge less than 2″. The reason for this is because the box is 2″ so when you score at exactly 2″ it is kind of tight in the box. I placed the paper into the box and added the chocolate treats. Yum!!!

Valentine's Day, www.LaurasStampPad.com

I added some ribbon around the box and tied it into a box using the Sending Love Designer Ribbon which comes with both white and red ribbon. This is perfect because then you can really mix and match with the different designer paper patterns! I left mine without a tag because I will be passing them out to various people – friends, family, and people I see all week this week at the grocery store, Post Office, etc. You could always add a tag using your favorite stamp set that has hearts or a To:/From: or you can use the fabulous Sealed with Love Stamp Set!

Do you make Valentine’s Treats for your kid’s classroom, friends, family, or strangers?? Let me know in the comments below!

Happy Stampin’

~Laura


Sending Love!!!

Posted on

Sending Love, www.LaurasStampPad.com

Valentine’s Day is around the corner and this card is perfect! It isn’t specific lovely Valentine’s Day but yet still a warm thought of sharing your love with someone!!! I love it!!!

I started with a Whisper White card base. I took the 4 heart image from the Sealed with Love Stamp Set from the Occasions Mini Catalog and stamped it in Night of Navy Ink along the top and bottom of the card front. It is really easy to line up the hearts because it is a photopolymer stamp set and you can see through the stamp. Then I added a piece of Sending Love Designer Series Paper to the middle of the card (2″ x 5-1/2″). You can get 3 of these cards from 1 sheet in the Designer Series Paper Stack. I have done lots of these cards but with different patterns and each one looks just as fabulous! For the greeting, I took a piece of Whisper White measuring 1″ x 5-1/2″ and punched the ends with the Banner Triple Punch! You want to punch before you stamp so that you aren’t punching off part of your stamped image. I stamped the hearts in Navy and the greeting in Real Red Ink. Some of the cards, I stamped one greeting and 2 hearts and some I did 2 greetings and 3 hearts. I added the greeting banner to the card front with Stampin’ Dimensionals for a little texture! I love it because it’s quick, simple, and yet created with so much love!

I did another Valentine’s Day card yesterday and did a Video Tutorial on both of these. You can check that out here! Do love Valentine’s Day as much as me? Do you send cards for the holiday? Let me know in the comments below!

Happy Stampin’

~Laura


Designer Paper Block Card!!!

Posted on

Sending Love Designer Paper, www.LaurasStampPad.com

I love Valentine’s Day because I love showing my love to those around me…including all of you! I hope that you know I truly care about all of you and I greatly appreciate you reading my blog, commenting, and sharing! Thank you all!!! I wish I could send you all a card but I would need all of your addresses! 🙂 So please know I love you all and wish you all the happiness!

For this card, I actually made it into a square but it still fits into a regular Whisper White Medium Envelope! For the card base, I cut a 4-1/4″ x 8-1/2″ which makes a 4-1/4″ square! Then I cut some pieces of the Sending Love Designer Series Paper into 2″ squares! The awesome thing about this is that it uses up every bit of the piece of paper because it is a 6″ Paper Stack! You can get 9 squares from each sheet! For the card above, I used the same sheet of paper front and back!

Happy Valentine's Day, www.LaurasStampPad.com

For this card, I used 2 different pieces of paper and used both front and back. I really struggled with how to do this one above because I didn’t know if it should be red and red and white and white or flip flopped. I think either way it would have turned out about the same but I sure struggled. 🙂 For the greeting, I stamped it in Real Red Ink from the Sealed with Love Stamp Set onto Whisper White. Then I die cut the circle and scallop circle out with the Layering Circle Framelits! I added the greeting to the card front with Stampin’ Dimensionals right in the middle. I love it!!!

If you would like to see this in action as well as another sample using the Sealed with Love Stamp Set and coordinating Sending Love Designer Paper, check out the Video Tutorial below or click here! Be sure to give it a thumbs up if you liked it and don’t forget to subscribe if you are new! I post every Tuesday and Thursday.

Happy Stampin’

~Laura


January 2017 Paper Pumpkin – Adoring Arrows!!!

Posted on

Valentine's Treats Paper Pumpkin, www.LaurasStampPad.com

I always get excited for the January Paper Pumpkin kit because it is almost always Valentine’s Day treats!!! I love Valentine’s Day because it is the perfect day to show your love to everyone around you!!! I love passing out treats to family, friends and even those I see while running my weekly errands like those at the Bank, Post Office, and Grocery Store. This kit comes with 24 little treat bags so I’ll have tons to share with everyone!!!! Eeeee Super excited!!! You can see the reveal of this kit in this video!!!

Paper Pumpkin Hearts, www.LaurasStampPad.com

The stamps are precious and fun greetings for all occasions! TIP: Leave the hearts on the sheet to stamp and then pop them out! This way they stay still and are easier to line up!! Tip #2 make sure the heart is right side up! lol Yeah, the first heart I stamped was upside down. Ops!!! 🙂

Hearts & Arrows, www.LaurasStampPad.com

For the little arrows, you will place the hearts on the pointed tip end and the feathers on the opposite end. Be sure to press hard on both sides of the stick to really make it stick tight!

Shooting Arrow, www.LaurasStampPad.com

I used the little glue dots provided in the kit to help with closing the top flap since the little gold heart wasn’t enough. I placed 1 glue got to hold the top closed and then I put one on each side of the flap and folded it over. These 3 dots and the gold heart seem to work perfectly!!! If you forget to place the arrow under the flap, you can always add it to the front above the heart! Love them!!! I put 2 Hershey bars or a few kisses in each one! Yum!!!

I can’t wait to see the February Kit because it will be a super surprise since there isn’t any holidays coming up! If you would like to get the February Kit, be sure to sign up before the 10th of the month!!! Click here to get your kit! Want a steal?? You can get a 3 Month Paper Pumpkin Subscription for $4.00 off AND a Free Sale-A-Bration item!!! That means you get a clear block, at least 3 ink spots, 3 kits with all the goodies and instructions, and a Sale-A-Bration item of your choice!! Join in the fun!!!

Happy Stampin’

~Laura


Technique Tuesday – Debossed Dots!!!

Posted on

Happy Tuesday!!! You all know what that means!!! I have a fabulous technique to share with you today – de-bossing and polka dots!!!! Super fabulous and fun for any occasion!!!

debossed polka dots, www.LaurasStampPad.com

Isn’t this card amazing? I love polka dots! You could change up the colors for a more masculine card! Let’s get started!!!

SUPPLIES: Celebrations Duo Embossing Folder, Big Shot, Happy Celebrations Stamp Set, Stampin’ Pierce Mat

I started with a Watermelon Wonder card base. Then I took a piece of Whisper White (4″ x 5-1/4″) and ran it through the Big Shot with the Celebrations Duo Embossing Folder in the middle. The Celebrate and Happy both de-boss the cardstock and then when you stamp over the top, the greeting will POP! I love it!! I have found that stamping over the top of the de-bossed image turns out the best when you stamp on top of the Stampin’ Pierce Mat. This mat has some gives for the cardstock to press into rather than a hard surface. I used the Happy Celebrations Stamp Set to stamp the polka dots all over and make the greeting pop! I went with Watermelon Wonder Ink, Tangerine Tango Ink, and Daffodil Delight Ink. I stamped the dots all over the cardstock, some in full strength and some as the stamped off shade of ink. For this card, I highly recommend going back to the ink pad each time and if you want the lighter shade, then stamp off onto a scrap piece of paper rather than on the card. The reason for this is because if you fall half off the cardstock, it makes the second stamp image have a line on it. Also, if you stamp over the celebrate greeting, the second stamp will have the letters in a darker ink so to avoid this, just go to the ink pad each time! 🙂 Be sure to stamp the dots with firm even pressure. Since the stamps are photopolymer, you can see when the paper and ink touch so sometimes you need to rock it a bit gently!

Celebrate Mistakes, www.LaurasStampPad.com

After all of the dots were complete, I wrapped some Gold Metallic Thread around the card a few times and tied a knot on the backside. I added this piece to the card base with Stampin’ Dimensionals! Then for the little greeting of “Your Day”, I stamped it in Tangerine Tango Ink onto Whisper White and layered it onto Tangerine Tango! I used the Banner Triple Punch to add the banner tips. I added the greeting to the card front with Stampin’ Dimensionals. I love it and think I should do some blues and greens next!!! What colors would you use for this card? Let me know in the comments below!

If you would like to see all of this in action, check out the Video Tutorial below or click here! Be sure to give it a thumbs up if you liked it and subscribe if you are new!! I post a video every Tuesday and Thursday!

Happy Stampin’

~Laura


My Mom’s Frog Birthday Card!!!

Posted on

Mom's Birthday Card, www.LaurasStampPad.com

My Mom’s Birthday was earlier this month and this is the card I created for her! She actually fell in love with this stamp set and bought it for me so we could make cards with it. (Note to self: we still need to do that!) 🙂 I started playing with this set and the New Watercolor Pencils and knew this was the perfect set for her card!

I started with a Crumb Cake card base and then I layered a piece of Old Olive cardstock (4″ x 5-1/4″) on top. I took a piece of Whisper White (3-3/4″ x 5″) and lightly brushed over it with a Sponge Dauber. I did Old Olive Ink on the bottom 1/3 and Pool Party Ink on the upper 2/3. I added a strip of Pool Party Stitched Satin Ribbon across the top and then added it to the card base. For the frog and the wheelbarrow, I stamped them from the You’re Sublime Stamp Set in Basic Gray onto scrap Whisper White.

Wheelbarrow, www.LaurasStampPad.com

I used the Watercolor Pencils to color in a bit and then I took a Blender Pen and swirled around to move the color and fill in! Once it was all colored, I fussy cut out both images and adhered them to the card base with Stampin’ Dimensionals.

Lil Froggy, www.LaurasStampPad.com

For the greeting, I stamped it from the Number of Years Stamp Set in Old Olive Ink. I punched out the greeting with the Decorative Label Punch. Then I sponged the edges with Pool Party and added it to the card front with Stampin’ Dimensionals too! I love it! I think it turned out perfectly. My Mom loves nature and has a huge garden. This was fabulous!

Do you like making cards specifically for a special someone or do you just make general cards for everyone?? Let me know in the comments below!

Happy Stampin’

~Laura