Pineapples = Friendship!!!

Posted on

Pineapple, www.LaurasStampPad.com

The Pineapple….many see it as a fruit, some see it as tropical, and others see it as a sign of hospitality and friendship. Did you know that the pineapple is a symbol of warmth, welcome, friendship and hospitality?? It makes it even more fabulous for a hand-stamped card or any home decor piece!

For this card, I started with a Whisper White card base and added a of Pop of Pink Designer Paper to the top (4-1/4″ x 1-1/2″) and bottom (4-1/4″ x 2″). By splitting it up, you don’t have to waste Designer Paper on your card when it will be covered! Then I took a piece of Whisper White measuring 4-1/4″ x 2-1/4″ and stamped the pineapple from the Pop of Paradise Stamp Set in Melon Mambo (center) and then in Pink Pirouette on either side. I added Snail Adhesive along the top and bottom of this piece and placed a small piece of Gold Foil Paper on the top and bottom. This is a great way to use your scraps or just a smaller piece. My Gold Foil pieces are only 3/4″ wide rather than 2-3/4″ if I did the entire back of the Whisper White piece. I placed this piece onto my card front between the two pieces of Designer Paper (filling that gap)! I stamped the Thank You greeting from the Pop of Paradise Stamp Set onto scrap white paper in Basic Black….then I fussy cut it out! It wasn’t the most fun thing to cut out but it was small and quick! 🙂 I added it to the card with Stampin’ Dimensionals! To finish off the card, I ripped a little bit of the Pop of Pink Designer Washi Tape and added it above the pineapples. I love the little gold bling and added texture!

I love the Pop of Pink Suite and those little pineapples are so fitting for a thank you card! I love it! Are you loving the Pop of Pink Suite or do you prefer one of the other suites? Let me know your favorite in the comments below!

Happy Stampin’

~Laura

Click here to start shopping and earning Bonus Bucks!!!

Bonus Days


Washi Tape Background!!!

Posted on

Thinking of You, www.LaurasStampPad.com

I am loving the Pop of Pink Suite and this card is just amazing!!! It is fairly simple to create as well since the background is just strips of Washi Tape. It rips with your fingers so no tools necessary. The hardest part was the gold embossed greeting!

I started with a Melon Mambo card base! Then I took a piece of Whisper White (4″ x 5-1/4″) and the Pop of Pink Designer Washi Tape to create the background. You will want to start in the middle or close to it, not the farthest edge. When you start on the edge it is hard to see a pattern and follow it. For the card above, I started with the black with gold confetti strip (3rd from the bottom). Just place it down at any angle and that is your template. Then you will take another color/pattern and place it above or below at the same angle and spaced as far apart as you wish. Keep working your way out till the entire piece is covered. There are 5 different rolls of washi tape in the pack so you get lots of patterns. You can work with just 1 or 2 or use all of them like mine. For the greeting, I used the Pop of Paradise Stamp Set. I inked it in VersaMark and stamped it onto a scrap piece of Whisper White. I poured some Gold Embossing Powder of the top and set it with the Heat Tool. This heart coordinates with the Sweet & Sassy Framelits but you can also fussy cut it by hand! For the loops, I used Metallic Gold Thread and Melon Mambo Thick Baker’s Twine. I wrapped the thread around 4 fingers (2 loops for pink, lots of loops for gold). Then you will slide the loops off your fingers and then twist into a figure 8 and place on the back of the heart greeting. Using Stampin’ Dimensionals, you will place them on top of the ribbon (especially the ends) to hold it down and also adhere this piece to your card. Love it!!!

If you would like to see this all in action, check out my Video Tutorial below or click here. Don’t forget to give it a thumbs up if you liked it and be sure to subscribe if you’re new! I post every Tuesday and Thursday!

How do you like to use your Washi Tape? Let me know in the comments below. I love the background style the best!

Happy Stampin’

~Laura


I Am Much More Me…

Posted on

So Much More with You, www.LaurasStampPad.com

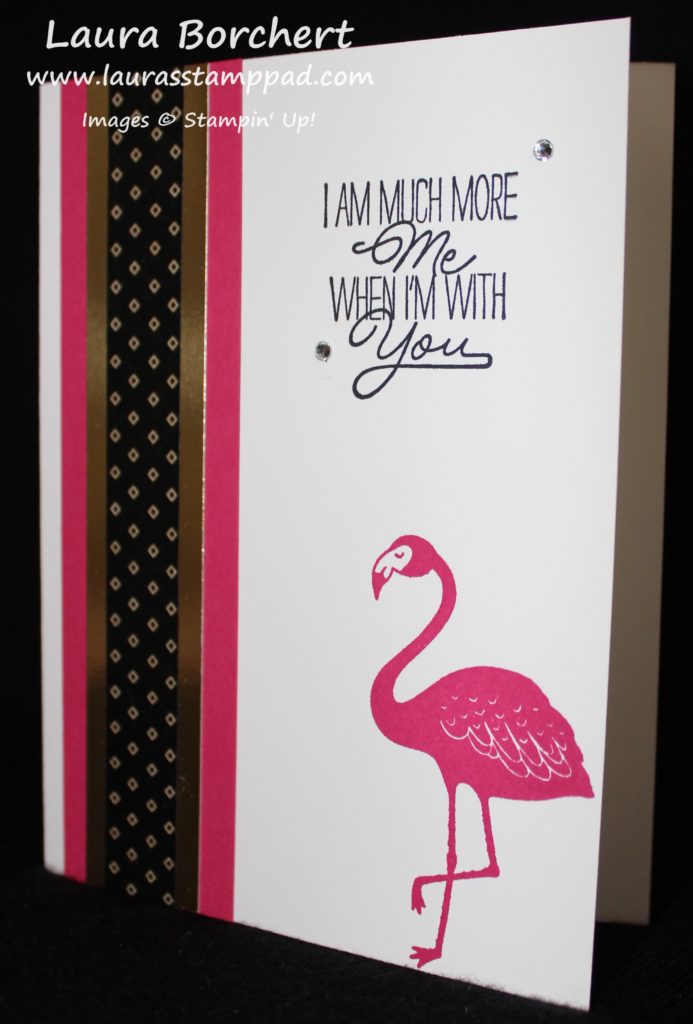
This card is just amazing! The greeting is so sweet, the colors are bright and that washi tape is fabulous! I love it! BONUS: It’s quick and simple!

I started with a Whisper White card base and stamped the flamingo from the Pop of Paradise Stamp Set in Melon Mambo. I stamped the greeting in Basic Black from the Layering Love Stamp Set. For the side panel, I took a piece of scrap Melon Mambo measuring 1-1/2″ x 5-1/2″ and adhered it to the left side of the card! I took a scrap piece of Gold Foil Paper (see, keep those scraps) measuring 1″ x 5-1/2″ and I placed a strip of the Pop of Pink Washi Tape down the middle. I used the black one with the diamond image. That diamond image is like clear/white so you can see the gold pop though. It is super fabulous and a great way to add another lay of color without another layer of cardstock. It is a great way to use your washi tape! I then attached this piece to the card front over the Melon Mambo strip. I finished off the card by adding a few Rhinestones around the greeting. Honestly…..I made a stamp boo boo and needed to cover it up! 🙂 See, we all do it! Simple, quick, and truly a WOW card!!!

I sure hope you all love PINK like me because there are lots of cards I will be sharing with the Pop of Pink Suite! I just love it so much! 🙂

Happy Stampin’

~Laura


Technique Tuesday – Ombre Butterfly!!!

Posted on

Happy Tuesday!!! You know what that means! I have a fabulous technique to share with you today. Creating an ombre butterfly, adding some splatters to your card and adding a hint of glitter with Wink of Stella! I love it all!!

Ombre Butterfly, www.LaurasStampPad.com

Isn’t this card just beautiful?!?!?! It is so much better in person so be sure to check out the video tutorial below to take it all in! Let’s get started on this amazing card!

SUPPLIES NEEDED: Butterflies Thinlits, Gold Metallic Thread, Wink of Stella, Aqua Painter

So remember last week when we die cut the white butterfly out for that beautiful card? Today we are using that white butterfly that was created with the Butterflies Thinlits! Using your Aqua Painter, you will color the butterfly with Watermelon Wonder. I started in the middle and worked my way to the tips of the wings. I got this amazing ombre look and LOVE IT!!! Just remember that each time you grab some ink, start in the middle and work your way out! Then I brushed the butterfly with the Wink Of Stella for that perfect shine! For the card, I used Tip Top Taupe for the base and added a layer of Mint Macaron (4″ x 5-1/4″). Then I took a piece of Whisper White (3-3/4″ x 5″) and added the splatter. I did this by squeezing the Aqua Painter a bit (just a bit) and picked up some Tip Top Taupe. I tapped the pen against my finger so it would splatter on the card. This is one of those techniques that isn’t going to be perfect. If you think you want a little more or some in a specific spot, don’t do it! 🙂 It might end up dripping too much water or just never hitting that spot. After all it is suppose to look messy! After your splatters, you are ready to add your washi tape. I used the It’s My Party Washi Tape and added some on the top left and bottom right. Then I stamped the greeting from the Greatest Greetings Stamp Set in Tip Top Taupe. Now you can add this piece to your card base. For the butterfly, I added Mini Glue Dots to the back down the middle. I wrapped some Gold Metallic Thread around 4 fingers about 10-15 times (up to you as to how much you want). I slide the thread off my fingers and twisted it in the middle into an 8 and then placed it on the Mini Glue Dots. You can add more Mini Glue Dots to the top of the thread if you need to or just add the butterfly like that to your card! LOVE IT!

Wink of Stella, www.LaurasStampPad.com

To see this all in action, check out the Video Tutorial below or click here! Be sure to give it a thumbs up if you liked it and don’t forget to subscribe if you are new!

Happy Stampin’

~Laura

Button Retire

TODAY IS THE LAST DAY!!! Click here to get those Retiring Items!


You are Tea-Riffic!!!

Posted on

Tea-riffic Time, www. LaurasStampPad.com

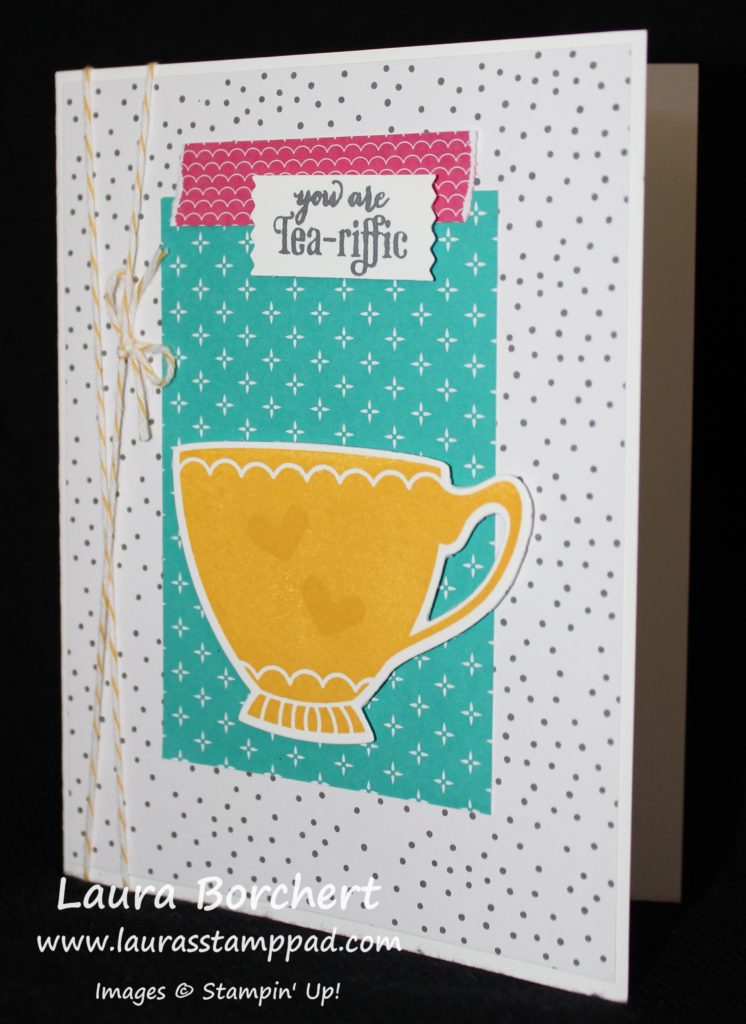
I love the colors in this card and the adorable greeting! I am really loving the patterns in the Have a Cuppa Designer Series Paper Stack! The colors are fun and the patterns are subtle enough that you can layer them and use them as a great background!

I started with a Whisper White card base and added a piece of the Have a Cuppa Designer Series Paper measuring 4″ x 5-1/4″. Then I wrapped some Crushed Curry Baker’s Twine around twice and tied it into a bow. I always double knot it before creating the bow so that it is nice and tight on my card! I stamped the cup from the A Nice Cuppa Stamp Set in Crushed Curry onto Whisper White and die cut it with the coordinating framelits that are no longer available. Have no fear, the lines are pretty easy and fussy cutting won’t kill you! 🙂 After cutting it out, I stamped the little heart from the same set twice on the cup to add a little subtle design since it is Crushed Curry on Crushed Curry.

A Nice Cuppa Paper, www.LaurasStampPad.com

I added another piece of the Designer Series Paper measuring 2-1/2″ x 3-3/4″ to the card front and then placed the cup on top with Stampin’ Dimensionals! Then I took a scrap piece of the Designer Series Paper that is 1/2″ wide and I ripped both ends to make it look like Washi Tape! How cute is that? It is a great way to use up little scraps of Designer Series Paper. Love it! For the greeting, I stamped it from the A Nice Cuppa Stamp Set in Basic Gray. I cut it with the Washi Label Punch (sold out as well). Once you punch it out on one end, you can slide it back in the punch to make the image shorter. How cool is that? I added the greeting to the card with Stampin’ Dimensionals as well! Simple, fabulous, and a great way to use lots of Designer Series Paper!

Happy Stampin’

~Laura

Project Life Retire

Be sure to check out the Retiring Items before they are gone at the end of May!


Birthday Boy!!!

Posted on

Birthday Boy, www.LaurasStampPad.com

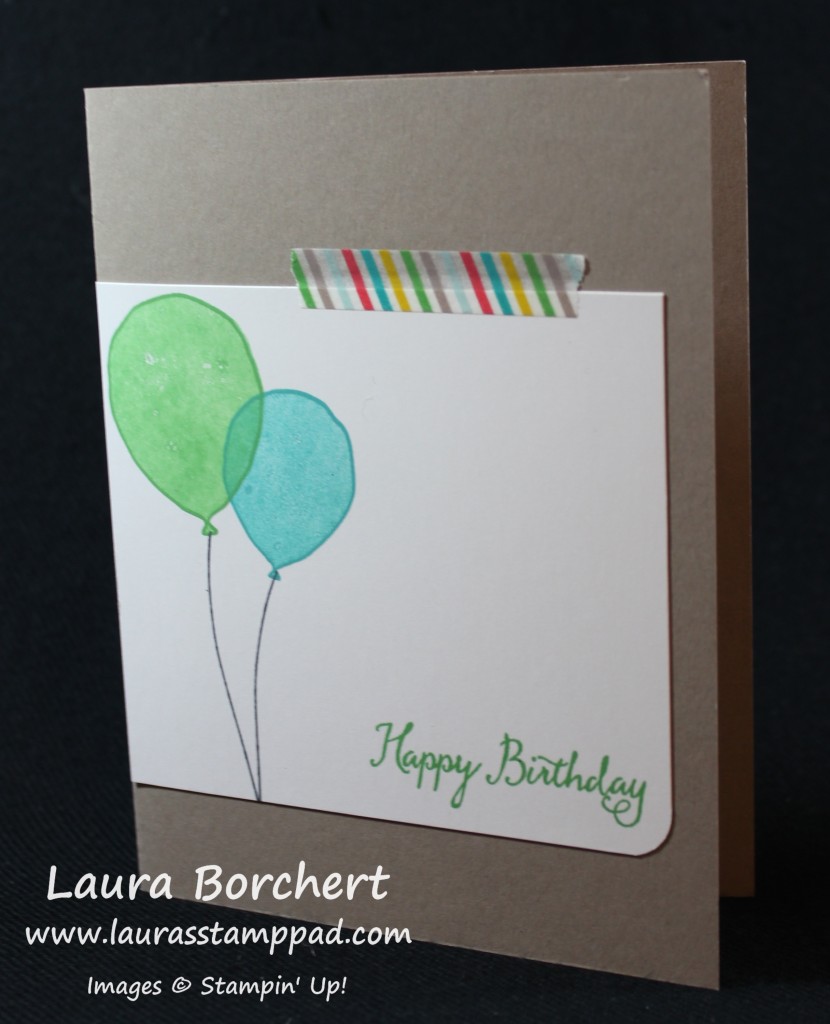
This card is very simple, quick, and could be modified for anyone!!!! I think this card screams Birthday Boy but you could change the colors to pink and yellow for a girl. Really you could do any color combination for anyone! My favorite color growing up was blue until about high school and then I went crazy over PINK!!!! A few years ago it was purple and green but still pink. Now it is Bermuda Bay and still Pink!

For this card, I used a Tip Top Taupe card base. I took a piece of Very Vanilla measuring 4″ x 3-1/2″ and used the Corner Rounder Punch on the bottom right corner. I stamped the greeting in Cucumber Crush from the Balloon Celebrations Stamp Set. For the balloons, I used Cucumber Crush and Bermuda Bay. I stamped the outline in full strength and the solid balloon fill I stamped off once. I used Basic Black for the string. I adhered this to my card front and added a little piece of Cherry on Top Washi Tape! I love how quick and simple it is and you could really use this card for lots of occasions if you switched up the greeting! I just might be making lots of these with different color combinations. Believe it or not I am low on cards right now!!! Time to bulk up!

Happy Stampin’

~Laura


It’s My Party Birthday Card!!!

Posted on

Birthday Washi Card, www.LaurasStampPad.com

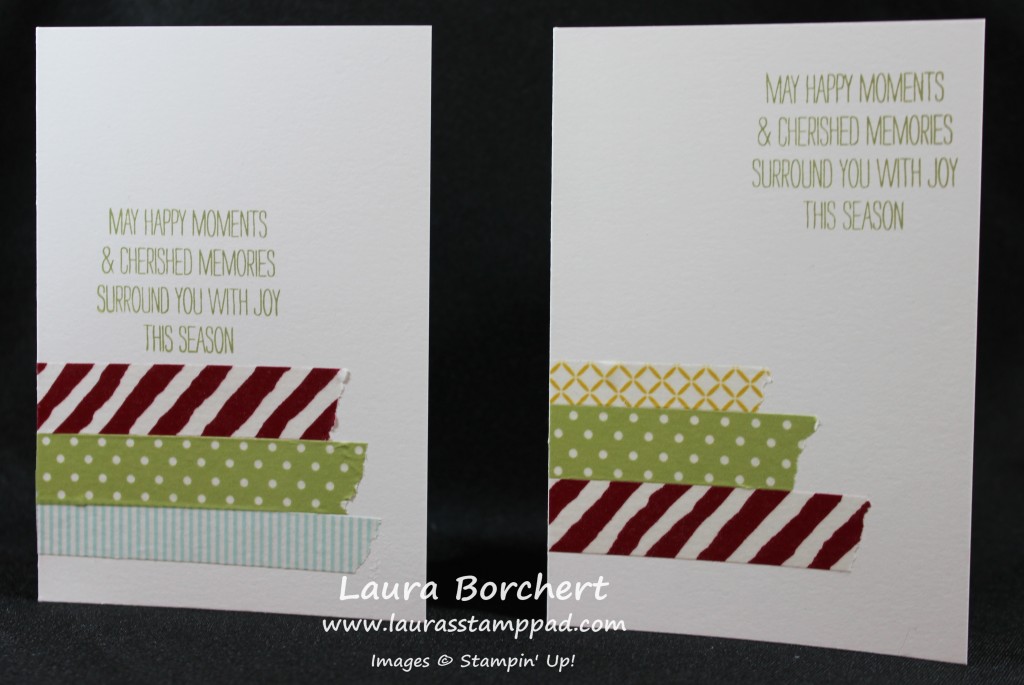
We all love the layered, embellished, and detailed cards but every once in awhile the quick and simple ones look just as fabulous!!! I love creating this quick and simple Washi Tape cards and make lots of them! I use this same style for making Thank You cards to pass out at Bridal Fairs with my contact information on them! Love it!!!

TIP: Start with a full piece of 8-1/2″ x 11″ cardstock and place the two stripes of washi tape across the bottom 1/3 of the cardstock along the 8-1/2″ side. Once the washi tape is down, then cut the cardstock in half at 4-1/4″! By doing this, you are eliminating extra cuts of the washi tape! I used the It’s My Party Washi Tape for this card. After cutting it into a card, I folded it and used my Bone Folder for that nice strong crease. For the greeting, I used the Happy Birthday Everyone Hostess Stamp Set in Melon Mambo ink! You can create multiples of these in no time at all.

Check out my video tutorial, below or here, on this card and see how quick and simple it is! Be sure to give it a thumbs up if you liked it. Don’t forget to subscribe to my Channel – Laura’s Stamp Pad so you don’t miss out on any of my video tutorials.

Do you love Washi Tape? What are your favorite ways to use it? Let me know in the comments below!

Happy Stampin’

~Laura


Rainbow of Balloons!!!

Posted on

Rainbow of Balloons, www.laurasstamppad.com

You know how I love bright colors and I just can’t help but create a rainbow of balloons!!! I LOVE IT!!! I used the balloons from the Party Wishes Stamp Set and punched out a few with the coordinating Party Punch Pack (Bundle & Save 15%). I love this set. You can see a few more samples using this set here and here!

I started with a Bermuda Bay card base. Then I took a piece of Whisper White measuring 4″ x 5-1/4″ and added some It’s My Party Washi Tape on the top and bottom. Can’t go wrong with some black and white and bright colors!!! For this sample, I actually stamped the greetings at the end but you can do it now if you would like. I made another one and my balloons were up to high that I could only stamp the greeting down low. It’s all up to you. The greeting is from the Greatest Greeting Stamp Set! Now for the balloons…..it is all up to you. For this sample, I stamped a string and then added the balloon, stamped another string and on and on. You can also stamp all 7 of the strings and then add in the balloons. Every other balloon was stamped on scrap paper and then punched out with the Party Punch Pack and attached with a Stampin’ Dimensional! I used Real Red, Pumpkin Pie, Daffodil Delight, Cucumber Crush, Pacific Point, Bermuda Bay, and Elegant Eggplant (ROY G BIV)!

Balloons, www.LaurasStampPad.com

You could use this card for all types of Occasions – Graduation, Birthday, a Promotion, Engagement and so much more! Do you love bright colors and rainbows of color like me? Let me know your favorites in the comments below!

Happy Stampin’

~Laura


What I Love!!!

Posted on

3 Step Flower Stamp, www.LaurasStampPad.com

You all know how I love flowers and look at these beauties!!! I’m truly in love! This is a Sale-A-Bration Stamp Set that you can earn for FREE!!! It is also a 3 Step Stamping Set so you can really get those layers and colors to look amazing! For this card, I used the What I Love Sale-A-Bration Stamp Set.

I started wit ha Elegant Eggplant card base. On a piece of Whisper White cardstock measuring 3-3/4″ x 5″, I stamped the flowers all over. For the 3 steps of the flower, I used Wisteria Wonder, Perfect Plum and Elegant Eggplant. You will notice that some of the flowers are darker and some are lighter. For a few of them, I stamped the Perfect Plum off before stamping it on the cardstock. This created a lighter flower. For the leaves, I used Pear Pizzazz and stamped off Pear Pizzazz. I added a strip of Washi Tape from the It’s My Party Washi Tape Pack. I ripped the one end and folded the other end behind the cardstock. Then I adhered this piece to my card base. For the greeting, I used the What I Love Stamp Set and some Elegant Eggplant Ink. I cut banner tips on the right end. Since this is really small, I didn’t use the Banner Triple Punch. Instead, I cut down the middle of the end and then cut diagonal from the corner to that center cut. I used Stampin’ Dimensionals to add the greeting to the card! I love it and want to make this card in every color!

Which color would you use to create this card? Let me know in the comments below!

Happy Stampin’

~Laura


Quick & Affordable Holiday Cards!!!

Posted on

Affordable Washi Tape Cards, www.LaurasStampPad.comI know that the Holidays can be hectic and expensive when you are running around from party to party, buying gifts for lots of people, and traveling around! Well I have created and quick and affordable card for you to create anywhere, anytime and it won’t break the bank! I used Note Cards and Envelopes which come 20 to a pack and they are pre-scored and ready to go! I used the Season of Cheer Washi Tape from the Holiday Mini Catalog! You don’t even need scissors for this – just rip it with your fingers. I actually did use scissors on the left hand side but you could rip it and wrap it to the backside! There are 5 styles of Washi Tape and 5 yards of on each roll! That is a lot of Washi Tape and gives you many different looks when you mix and match! You can use any greeting that you have on hand to stamp on the card. I used Pear Pizzazz Ink and the greeting is from the Wondrous Wreath Stamp Set! You could create this card while traveling or in between putting cookies in the oven! Love it!

If you would like to see this in action and see how quick it took me to create it…..1 minute 45 seconds! Check out the video below or click here!!! Don’t forget to give it a thumbs up if you liked it!

Happy Stampin’

~Laura