Technique Tuesday – Coloring & Embossing!!!

Posted on

Happy Tuesday!!! You know what that means…..I have a fabulous technique to share with you today!!! Today I am showing you a little watercoloring, a little heat embossing and a lot of FUN!!! A shout out to Mary Ellen who gave me the inspiration and idea for this card!!! Thank you so much! I loved your sample and couldn’t wait to try it out!

#UROCK, www.LaurasStampPad.com

See how fun this card is!!!! It is so colorful and bright and makes me smile every time I look at it. So let us dive in and get started!

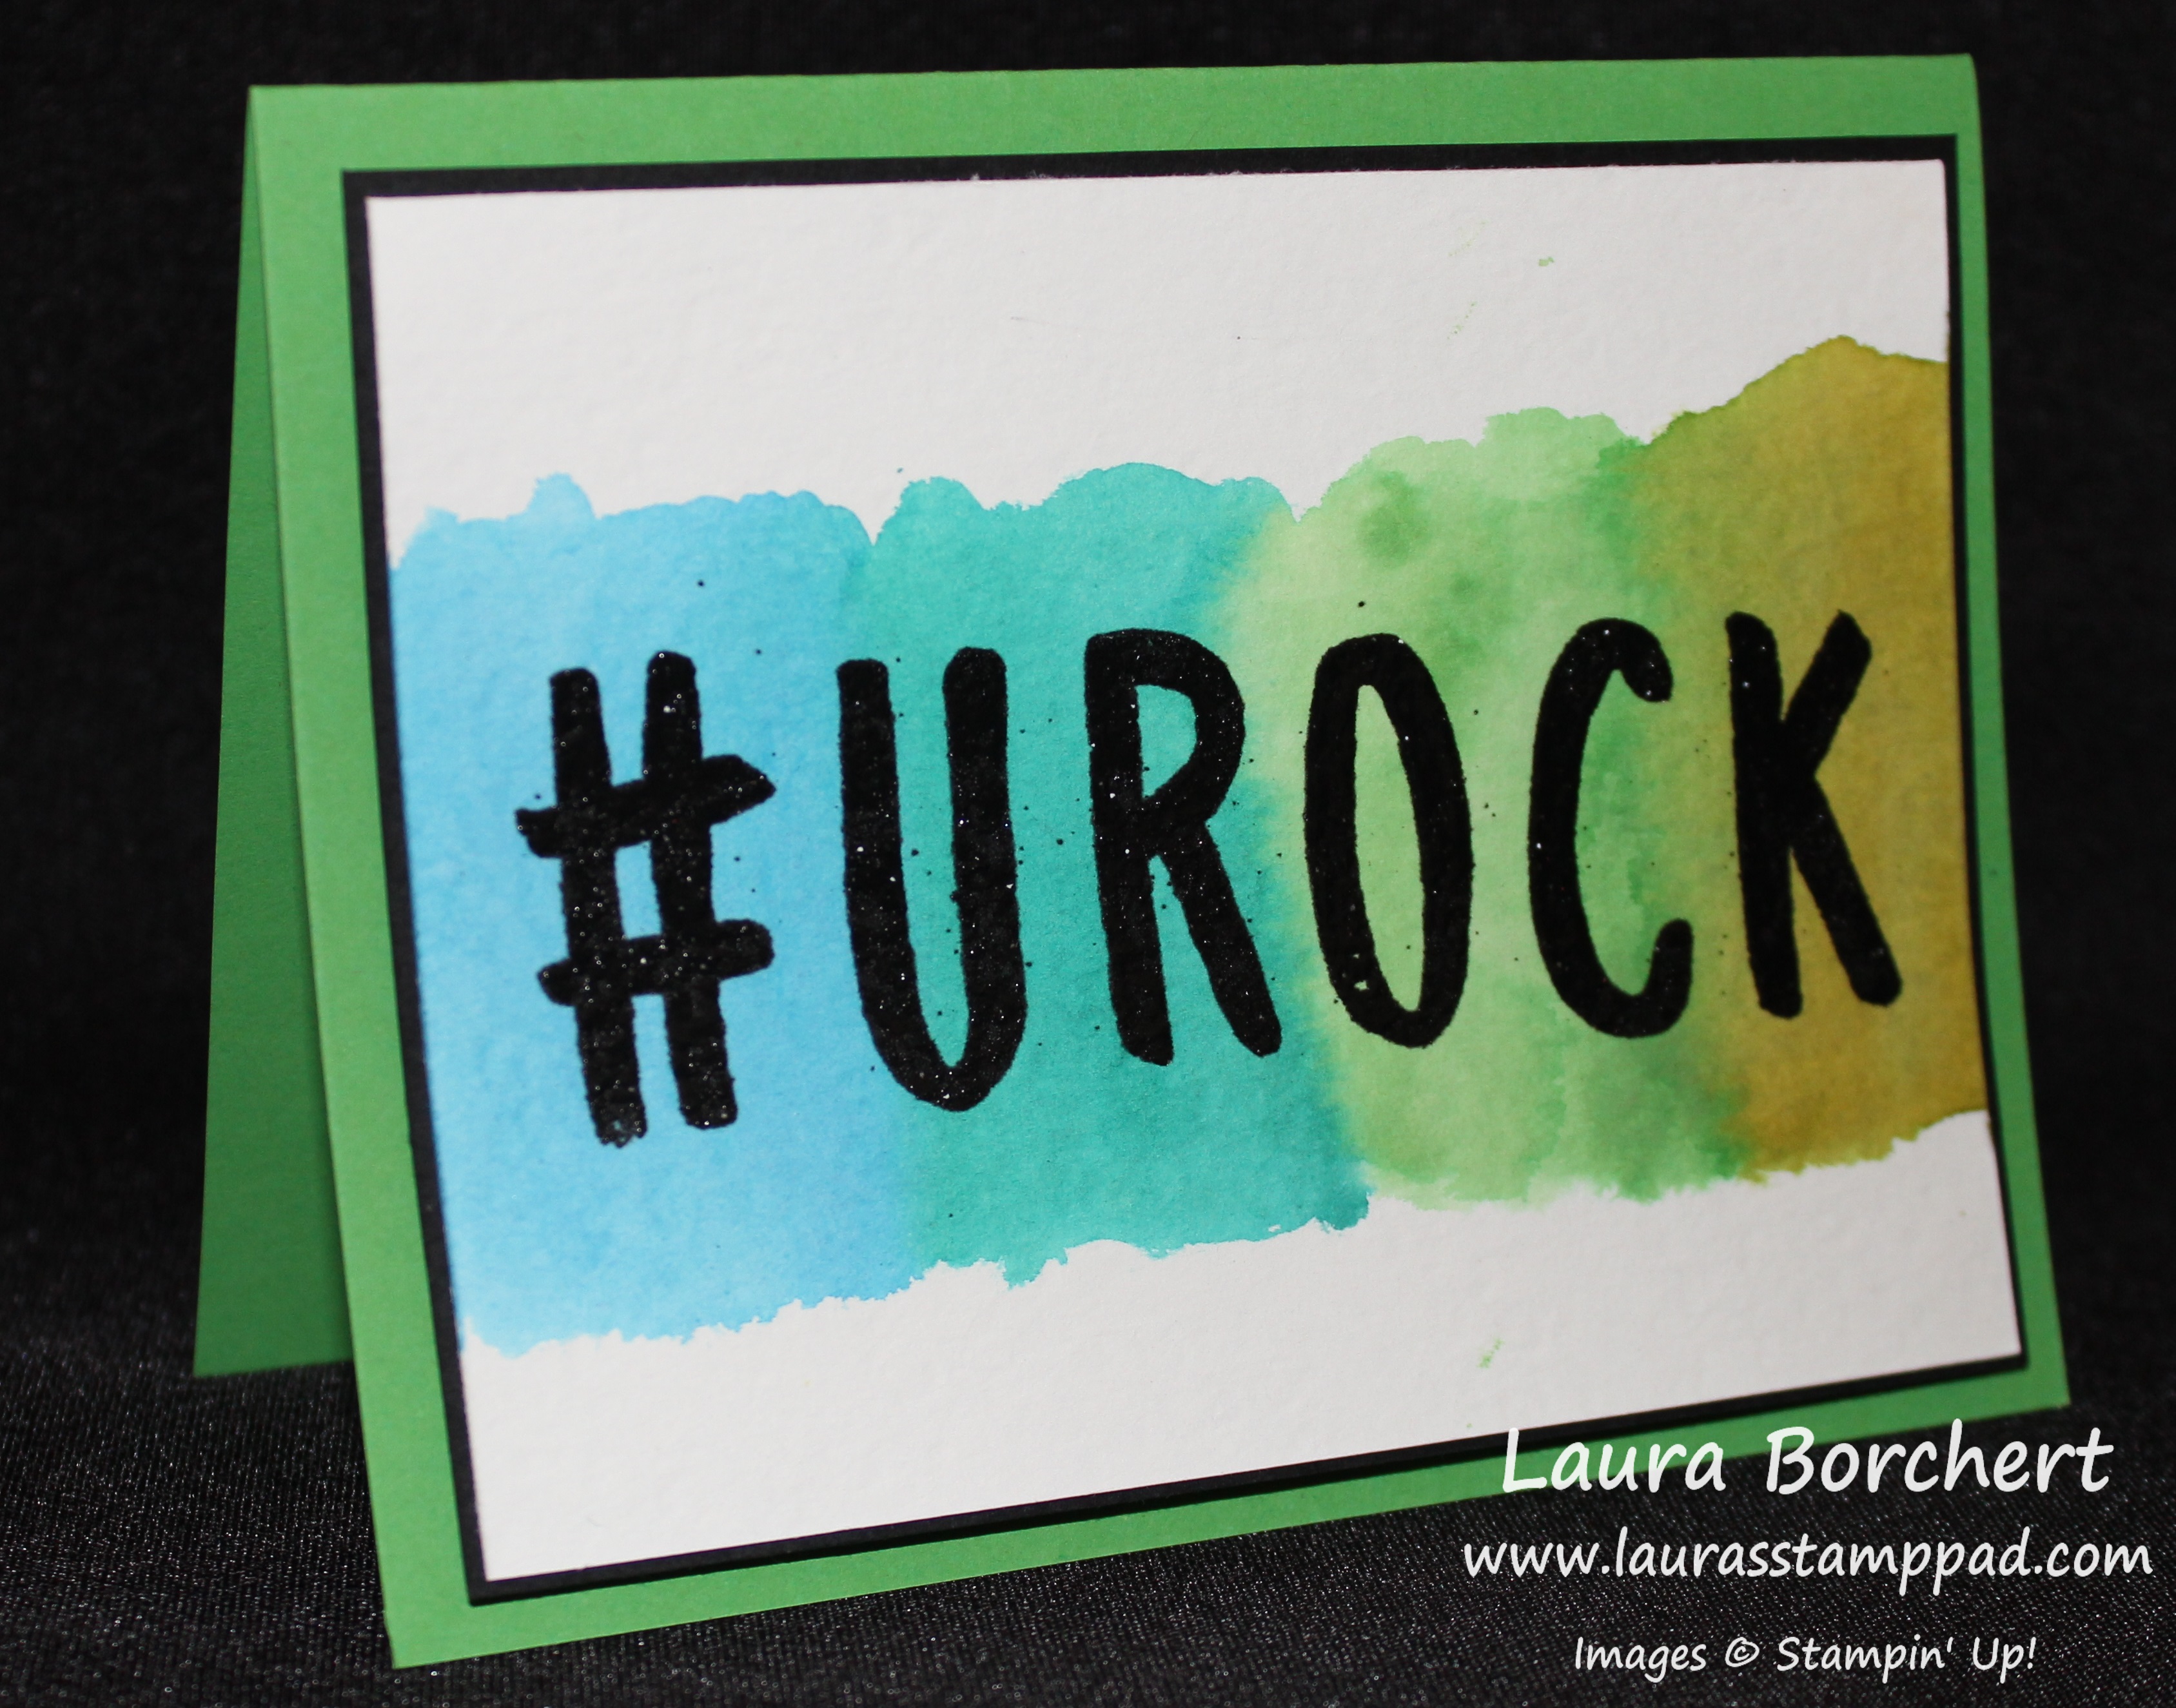
SUPPLIES NEEDED: Watercolor Paper, Aqua Painter, Ink Pads, VersaMark, Alphabet Stamp Set, Embossing Powder, and Heat Tool

You will start off with a piece of Watercolor Paper measuring 3-3/4″ x 5″ and lightly wet the entire piece with the Aqua Painter. It should not be dripping wet but lightly glistening. This will allow the color to soak in and the colors to bleed better! Now you can pick your colors and using your Aqua Painter paint on a swish of color. In the sample above, I used Pumpkin Pie, Daffodil Delight, Melon Mambo, Elegant Eggplant, Cucumber Crush and Tempting Turquoise! Once you are done with one color, just run the Aqua Painter clean on a paper towel and move to the next color. Be sure not to squeeze the Aqua Painter because then you will have too much water and your colors will come out super light. Once all of your colors are on, you can go back and add a little more in spots if you wish. Now you need to set it aside to dry completely or you can use your Heat Tool to speed up the process!!!

Silver Heat Embossing, www.LaurasStampPad.com

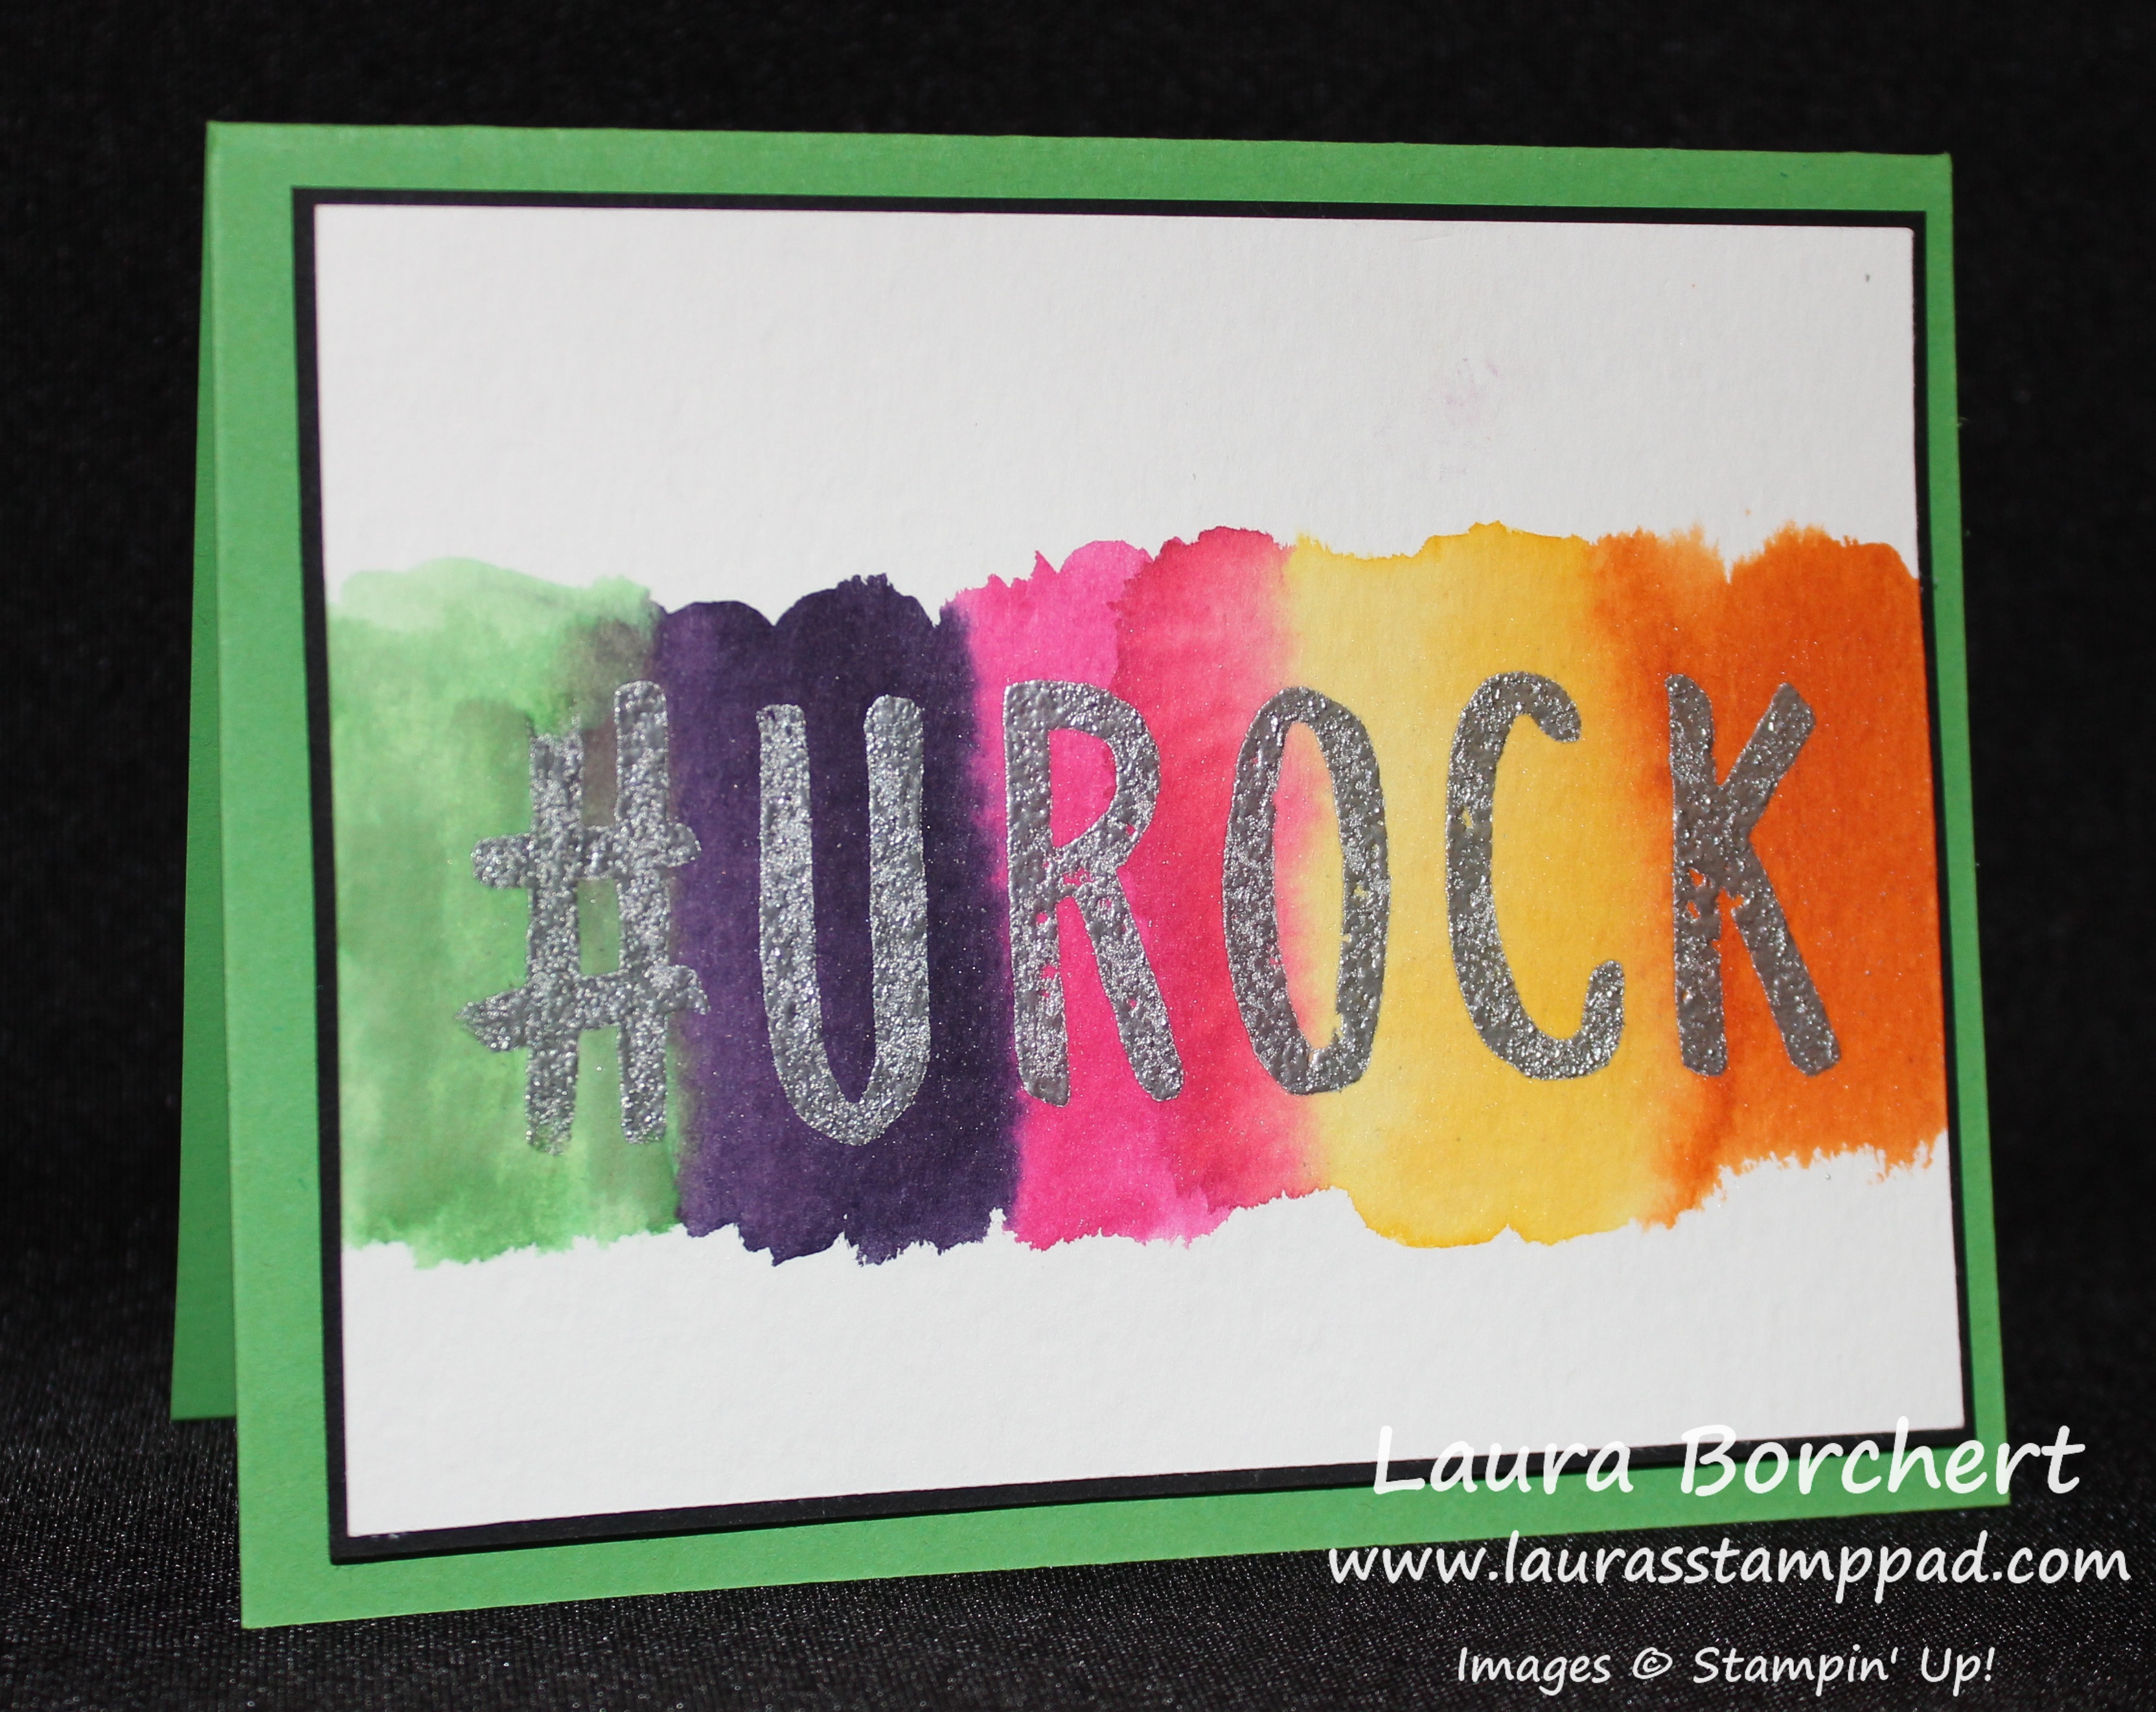
Once it is dry, you can stamp your letters on with VersaMark Ink. TIP: Be sure that your VersaMark Pad is inked very well because you want to make sure you have plenty on the stamp so it gets into the rough surface of the Watercolor Paper. I used the Layered Letters Alphabet Stamp Set which I am loving right now. The images and font are perfect!!! Once you have your letters stamped, you can pour on the embossing powder of your choice. I used Black Embossing Powder for the sample at the top and Silver for the one above! Now you will heat with your Heat Tool until it is set. TIP: Don’t wave the heat tool around. Point it in one spot until it heats up and starts to melt, then move it along until it is all melted. If you swing it around, it won’t heat evenly or as quickly. Now you are ready to assemble to your card. I layered mine onto Basic Black and then a Cucumber Crush card base! I love how the black really makes it pop!!!!

Watercoloring & Embossing, www.LaurasStampPad.com

If you would like to see this in action, check out my Video Tutorial below!! Be sure to give it a thumbs up if you liked it!!!

What would you spell out on your card?? A Name? #???? Let me know in the comments below!!

Happy Stampin’

~Laura


Wonderful Watercolor Wings!!!

Posted on

Watercolor Wings, www.LaurasStampPad.com

I am having so much fun making all kinds of butterflies! The Watercolor Wings Stamp Set is so amazing. It is a 3-Step Stamping Set so you can create amazing colors and a true masterpiece!!! I LOVE IT!!! All of these samples I’m showing today use all Whisper White cardstock – base, front piece and scraps for the butterfly. I embossed the front of the card base above with the Zig Zag Texture Embossing Folder. I stamped the butterfly in Daffodil Delight, Crushed Curry, and Tangelo Twist! I stamped the greeting from the Watercolor Wings Stamp Set in Tangelo Twist and I brushed the edges with Crushed Curry and a Sponge Dauber!!! I added the butterfly and the greeting piece to the base with Stampin’ Dimensionals!!! For the antenna, I stamped that in Basic Black onto the greeting piece and then placed the butterfly over it! Also, no fussy cutting necessary as there is a great Framelit Set to match – Bold Butterfly (Bundle & Save)!!!

Purple Butterfly, www.LaurasStampPad.com

I love these shades of purple!!! I used Wisteria Wonder, Perfect Plum, and Elegant Eggplant for this butterfly!! For the dots behind the butterfly, I used the image from the Watercolor Wings Stamp Set and stamped halfway from the left and halfway from the right. This way the meeting of the two images is hidden behind the butterfly. I used the Lovely Lace Embossing Folder for the card front and the greeting is from the Thoughts & Prayers Stamp Set. Butterflies are the perfect image for any occasion – sympathy, baby, wedding, anniversary, thinking of you, birthday and everything in between!

Butterfly on Bricks, www.LaurasStampPad.com

There is something about that Brick Embossed background that makes me LOVE this card. That and how the greeting fits so perfectly in that brick. Ahhh I just love it!!! The colors used on this butterfly are Pool Party, Lost Lagoon, and Island Indigo! The greeting is from the Watercolor Wings Stamp Set as well!

Butterfly Cards, www.LaurasStampPad.com

Here are three more cards in a similar pattern as the ones above. The far left one uses Mint Macaron, Cucumber Crush, and Basic Gray and the far right one uses Soft Sky, Marina Mist and Night of Navy. The middle one is the same as the first card up top. I used the Happy Together greeting from A Dozen Thoughts Stamps Set. Can you tell I had tons of fun making all kinds of cards with this set???

Butterfly Color Template, www.LaurasStampPad.com

Here is a color chart of the colors I found to be super fabulous!!!!

Bad Colors

Here are the color combinations I did not like!!!!

And of course I had to do a Video Tutorial on this stamp set and show you all the fun and excitement I am having so check that out here!!! Let me know your favorite color combination in the comments below!!!

Don’t forget to subscribe to My Channel so you don’t miss any videos!!! They are lots of fun!!!

Happy Stampin’

~Laura


Technique Tuesday – Simple Yet Fabulous!!!

Posted on

Happy Tuesday everyone!!!! I have two great little techniques to share with you today that are simple and yet super cool!!! You may have seen them before but if not you will be blown away!!!

Double Polka Dot Emboss, www.LaurasStampPad.com

I love so many things about this card – the colors (Navy and Coral), that bow, the greeting, and the double embossing!!!!

Supplies Needed: Polka Dot Embossing Folder, Decorative Label Punch, greeting stamp set of your choice and ribbon of your choice

I started with a piece of Whisper White measuring 4″ x 5-1/4″ and I ran it through the Big Shot in the Polka Dot Embossing Folder. I then shifted it over a bit and ran it through again to get those second dots. You can also flip it over and off set it to get a cool look. Who knew you could double emboss and get such a cool look? LOVE IT! Then I wrapped the Calypso Coral Seam Binding around it and decided I wanted a bow rather than a knot. At first I didn’t like that it came out sideways but now I love it. Every bow doesn’t come out perfect but they all look amazing!!! Then for the greeting, I stamped the birthday greeting from the Tin of Cards Stamp Set (love that font) in Night of Navy on a scrap of Whisper White. I punched it out with the Decorative Label Punch and then I punched another one in Night of Navy to layer it. Of course both punched pieces are exactly the same size so I cut the navy one in half long ways. Then I add adhesive to the stamped greeting on the top and bottom and attach one of the navy pieces to the top and one to the bottom. You can have a little bit showing or a lot; it’s all up to you! This works with lots of different punches for that perfect layering effect and pop of color!!! (For a long time, I punched 2 to get the same look but it was so bulky on the backside, then I saw this and use it all the time!!!) Of course I added the greeting to the card with Stampin’ Dimensionals!!!!

I know I am not the best with typing out instructions so I did a Video Tutorial for you!!! I show a few different ways to layer these and another fabulous tip with punches!!! Check it out below or click here!!!

Over the weekend I passed 1,000 Subscribers on my Laura’s Stamp Pad Channel! That is super exciting!!! Thank you to all of the subscribers and if you aren’t one of them, what are you waiting for???

Happy Stampin’

~Laura


Woodgrain Wonder!!!

Posted on

Woodgrain Emboss Resist, www.LaurasStampPad.com

Are you wondering how I created this awesome woodgrain look??? I used the New Color Me Irresistible Specialty Designer Series Paper!!! This piece is the Tip Top Taupe woodgrain embossed piece. I used my Chocolate Chip Sponge Dauber to color the cardstock. This is how I got the two shades of brown. I love it!!! I just cut these stripes and added it to a piece of Mossy Meadow measuring 4″ x 5-1/4″. I added this to a card base of Tip Top Taupe!! For the greeting, I used the Tin of Cards Stamp Set which is fabulous! I love a good scroll-y font!!! It is stamped in Mossy Meadow and then punched out with the Decorative Label Punch! I punched a piece of Chocolate Chip as well to layer it. I cut the chocolate chip one in half. Then add adhesive to the back of the white greeting piece and add one of the chocolate chip pieces to the top and the other to the bottom. Then you can adhere it to your card with Stampin’ Dimensionals!!! It is as simple as that!! The woodgrain makes a wonderful man card, fence, furniture and so many other great looks on a card or box!!!!

If you would like to see all of the paper in the Color Me Irresistible Designer Series Paper Pack and adding color to the paper, check out the video below! Be sure to give it a thumbs up if you liked it!!! You can also see some more cards created with this paper here!!

Happy Stampin’

~Laura


Technique Tuesday – Precious Little Purse!!!

Posted on

Happy Tuesday!!! You know what that means…..I have a fabulous technique to share with you today!!! These little purses are just so precious! They are little and perfect for adding some hand-stamped cards, candle, candy, lotion, nail polish, cookies, or just about any little gift item!!!

Mini handmade bag, www.LaurasStampPad.com

Isn’t it adorable??? I love this one the best with the Bermuda Bay accents!!! I created a few of these and have made a few of my own modifications. I got the idea from Dawn. You can check it out here as well as a video tutorial! Thank you Dawn for the inspiration!

SUPPLIES NEEDED: Cardstock, Designer Series Paper, Fast Fuse or Tear and Tape, Brads, and 1/16″ Handheld Punch

You will need the following pieces for your Purse:

For the Designer Series Paper, cut 2 pieces measuring 6 1/4″ x 3 1/2″

For the solid color accents, you will need the following:

~1 Piece measuring 2 1/2″ x 5 1/4″ (score at 1/2″ all (4) sides) for the bottom

~2 Pieces measuring 1/2″ x 8 1/2″ for the handles

~4 Pieces measuring 1/2″ x 6 1/4″ for the trim

I used the Bohemian Designer Series Paper for my purse! You can always modify to make a taller purse by changing the dimension of the Designer Series Paper (DSP) (adding inches to the 3-1/2″ number). You will start off by adhering your DSP together along the 3-1/2″ side to make. This will make a 3-1/2″ x ~12-1/4″ strip of paper. Then take the bottom piece of cardstock and cut one of the little corner pieces to create tabs so you can fold them in and make a little box bottom! Now you will take your DSP and wrap it around the little box bottom on the outside. The more I played with this, I prefer to start in the middle on the short side so that my seams are on the sides rather than in the middle/front. Now you can add Tear and Tape to all four of the 1/2″ x 6-1/4″ pieces and then use 2 for the bottom trim and 2 for the top trim!

Mini Purse made of Paper, www.LaurasStampPad.com

The last two stripes (1/2″ x 8 1/2″) are the handles! Gently run them over your Bone Folder like you are curling ribbon to help with the curvature of the handles. Also, on each of the four ends of the strips, add a little score like 1/2″ up. This will help you determine how deep to place the handles in the purse and each one will be even because you will go down to that score line!!! You can jsut adhere the handles on and you are done or you can use your 1/16″ Handheld Punch to create little holes and add brads. I used the Antique Brads in the purse above and Silver Mini Brads for the purse up top!

Bohemian Purse, www.LaurasStampPad.com

You are all done now! You can always add some embellishments like a flower using the Spiral Flower Die like this or any other fun foo foo!!! I have so many fabulous little purses in mind to create for lots of occasions! With the Holidays around the corner, these would make adorable Halloween Treat Bags or Christmas gifts or neighbor treats! Oh the possibilities!!!

What colors or Designer Series Paper would you use for your Purse??? Leave me a comment down below!

Happy Stampin’

~Laura


Center Pop Up Easel Card!!!!

Posted on

I have done a few different pop up cards. You can check those out here and here! I just think a card that pops up or out is super fun because it is different than a typical card. I also love it when the card looks great on display because I always love displaying my cards for a while to enjoy whether it be on the fridge, on the kitchen table, or near my stamp desk!!! Check out this new POP up card!!!

Pop Up Center Easel Card, www.LaurasStampPad.com

How cute?!?!?! Love it and those gold sequins are so fabulous! I really think I am going to start using them more because they really finish a card off well!!! Let’s get started on how to make this card!!!

Starting with a 8-1/2” x 5-1/2” piece of Rich Razzleberry cardstock, you will fold your card in half like you did to create a typical card base. Now place it in your Stampin’ Trimmer with the 5-1/2” along the bottom. You will now cut at 1-1/4” from the bottom up to the center score line (4-1/4”). Slide it along and cut at 4” up to the score line (4-1/4”).

You will need a Very Vanilla piece measuring 3” x 4-1/4” and place that in the center of your card (on the inside). Now you can glue down the left and right sides and add your Bohemian Designer Series Paper to each panel. The Designer Series Paper side panels measure 1-1/4” x 4” each. You will also need 2 Bohemian Designer Series pieces measuring 2-1/4” x 1-7/8” for the center piece. Before adhering them on, fold the center flap in half.

Center Easel Card, www.LaurasStampPad.com

Now you can decorate. Be sure to add a greeting or embellishment to the inside with Stampin’ Dimensionals so it can hold your easel up! I stamped the greeting from the Petite Pairs Stamp Set on a scrap piece of Very Vanilla and layered it onto a piece of Bermuda Bay which I punched the ends with the Triple Banner Punch!! Both the greeting and then banner are adhered with Stampin’ Dimensionals. I wanted this part to be popped up well so it would hold the easel up!! For the greeting on the front, I stamped it in Rich Razzleberry and punched it out with the 1-1/2″ Circle Punch. That is layered on a Bermuda Bay 1-3/4″ Scallop Circle Punch and then a 2″ Circle Punch! All of these pieces are layered with Snail Adhesive. I adhered it to the card with Stampin’ Dimensionals though. Be sure to adhere only on the bottom half so that it pops up!!! To finish it off, I added some Gold Sequins. I have been using Multi-Purpose Glue but I have found that Two-Way Glue works really well and doesn’t bubble up in the middle hole!!! Super cute! Love it!

Flat Center Easel Card, www.LaurasStamPPad.com

The other bonus is that this card still fit in a Regular Medium Envelope! Woot Woot!

Open Pop Up Card, www.LaurasStampPad.com

Here is the card open showing that you can still write on the inside vanilla piece or even up on the easel portion!

I got this idea from Dawn and you can check out her samples as well as a video tutorial here! I hope you try this card out! Leave me a comment down below what Designer Paper or design you use for your card!!!

Happy Stampin’

~Laura


Technique Tuesday – Coloring with Aqua Painters!!!

Posted on

Happy Tuesday everyone!!! Today I have a fabulous technique to share with you!!! Every once in awhile I pulling out my Aqua Painter Marker and enjoy coloring…..usually flowers!!! Check out this beauty!!!

Aqua Painter Coloring, www.LaurasStampPad.com

I love Black and White with a POP of color….any color!!! Isn’t this card just amazing??? Now let’s get started!

SUPPLIES NEEDED: Whisper White Cardstock, flower or other line image stamp, Ink Pads, Aqua Painter, Stazon Ink

For this card, I did not use Watercolor Paper. I used regular Whisper White cardstock! I inked up the flower from the You’ve Got This Stamp Set in Stazon Black and stamped it onto a piece of scrap Whisper White cardstock! Then I used Tangelo Twist and Cucumber Crush Ink Pads to color the flower in. To keep my ink pads clean, I just take a clear block and stamp it into the ink pad and use that as my color palette. When using the Aqua Painter, be sure not to squeeze the barrel of the pen because that makes lots of water come out and you get a puddle on your project. Lightly swipe some ink from clear block color palette and then start coloring your image. The more you use it, the more the ink starts to get lighter and lighter, because of this you can start on the edges of your image and when the color is lighter, move into the middle. This will give more of a watercolor look. Once you are done with one color, just squeeze the barrel to allow more water to come out and wipe it into a paper towel. Then move to your next color. For the yellow center, I used a Crushed Curry Marker. I like a nice bold yellow color so I prefer to use the marker. You can set this aside to dry while you prepare your card. The card base if Tangelo Twist and then I layered a piece of Basic Black (4″ x 5-1/4″) on top with Stampin’ Dimensionals. Then with a piece of Whisper White (3-3/4″ x 5″), stamp the same flower image from the You’ve Got This Stamp Set along the left side and top. Be sure to angle the flowers around for a slightly different look. I found that the more I overlapped the flower, the more of a mess it looked but that’s all up to you! The greeting is from the Happy Birthday Everyone Hostess Stamp Set. Oh how I love that large scroll-y font! Now for the “fun” part……fussy cutting that beautiful flower you colored!!! Once you are done cutting it out, you can add it to your card with Stampin’ Dimensionals! TIP: Cut some of the dimensional edge for those little leaves and tiny areas!!! Love it!!! I could create this card in every color!!!

Purple Watercolor Flower, www.LaurasStampPad.com

To see this in action, check out the Video Tutorial here!!! Don’t forget to give it a thumbs up if you liked it and be sure to Subscribe to My Channel so you don’t miss any other videos!!!

Happy Colorin’

~Laura


Sweet Stack Project Kit!!!

Posted on

The Sweet Stack Project Kit is adorable! Who wouldn’t love to walk into a party and see this amazing cake sitting there and then find out you get to take a slice of cake home with you?!?!?! How fabulous? Thank goodness there is a kit for this because I don’t think I could have created something this amazing on my own!!! This kit is great for parties and events to put treats, gifts, favors, and so much more in. You could always decorate it specifically to your party theme as well!!!

Sweet Stack Kit, www.LaurasStampPad.com

See how pretty this is!!!! It wasn’t until I looked at these photos that I realized how off center my “cake” is on that pedestal. 🙂 This kit is super fun but I will admit there was a lot of repetitive stamping which seemed to last forever……especially those dots on the side of all 10 big slices!!! Otherwise this kit was fairly easy to put together!!!

The cake stand is really easy to assemble. I haven’t glued mine yet to the pedestal but you will for sure want to do that when you use this kit because I have knocked mine over a few times just having it in my craft room. (Although my husband said he wasn’t surprised so maybe I’m just clumsy!) The scallop border already has adhesive on the back so that was really simple to apply. You can have yours hanging off a bit like mine or all the way up. If it is hanging off a bit, be sure to store the box upside down as to not bend those scallops!

Cake Stand, www.LaurasStampPad.com

The cake slices are easy to assemble once the stamping is done. I found the stamping to take the longest. The instructions showed you where to stamp your top image for the top of the slice of cake and I didn’t like that. If you go by the instructions, your seam for assembling the cake is at the top and I wanted mine to be at the bottom (more hidden) in case I didn’t get it perfectly lined up. So I used the triangle in the middle as my top of the slice. Be sure to stamp your “cake layer” hearts from the Sweet Stack Stamp Set right side up on either side of the cake. For the greeting on the top, you can leave it blank or pick from a few different greetings from the Sweet Stack Stamp Set. I did mine all the same and like the photo on the instructions. I do like the way the candle sits right in the middle of it!! Also, for the “icing flap” I only used adhesive on the top so that I could still get into my box without ripping into it. You could always add a little more adhesive once you have stuffed the boxes and it is go time!!

Paper Cake Slice, www.LaurasStampPad.com

Paper Cake Slice, www.LaurasStampPad.com

For the candles, I was really impressed with this. I really wondered how you get the candle to stand up so well and Stampin’ Up really nailed it!!! It is super simple but I did a little modification. I took a 3/4″ Circle Punch and some scrap paper and stuck the candle to that circle for some added strength. This helped secure the bottoms and hold them up super easy!!

Glitter Candles, www.LaurasStampPad.com

Candle, www.LaurasStampPad.com

The banner came with tons of little banner so you could easily do a few different ones. I thought about doing Celebrate but I was short one “E” so I went with Congrats. I figured that would work for any occasion! I adhered my banners with a Stampin’ Dimensional and looped the twine through the top (not stuck on the Dimensional). This allows me to move my banners along the twine and even remove them and add more later if I wish! Love it!

You can see the Unboxing and Reveal of this kit in this video here! Then by request, I did another video showing the assembly of the kit here!!! Be sure to give it a thumbs up if you liked it and don’t forget to subscribe!!!!

If you would like to check out some of the other New Kits from the Catalog, I have enjoyed lots of them – Tin of Cards and Watercolor Wishes!!!

Happy Stampin’

~Laura


Technique Tuesday – Masking!

Posted on

Happy Tuesday everyone!!! You know what that means…..I have a technique to share with you today! This one is fun….minus the fussy cutting……and super amazing!!! NOTE: Save the cut out flower in the stamp case for future use!!!!!

Flower Masking, www.LaurasStampPad.com

Isn’t this card stunning in it’s simplicity? You could use this technique for some many different styles of cards as well! Let’s get started on this masking fun!!!!

SUPPLIES NEEDED: Scrap Paper, Stamps, Ink

The supplies this week are super simple. All you have to do is stamp your image onto a piece of scrap paper. I used the flower from the You’ve Got This Stamp Set! You don’t need to cut it out perfectly or even exactly on the lines. You can do a general cutting around the edges cut. This is the hardest part……boo for fussy cutting! 🙂 Now this part you can do 2 different ways depending on your preference! I did the next step by placing the mask on my Whisper White cardstock and stamping the background image from the You’ve Got This Stamp Set over top. Your mask leaves an open spot for you to stamp the flower next without having the background image behind it! I had a stamper at class ask me how you would do it if you have the Wood Block You’ve Got This Stamp Set. For that, you would stamp your flower, lay the mask on top, and then stamp your background. This way you don’t have to worry about exact placement when stamping the flower. Now you are all set. Layer that onto a piece of Crumb Cake and then onto your Pool Party card base with Stampin’ Dimensionals! I thought the sides needed a little something so I finished the card off with a few pearls on each side!!! You could also rotate your flower the other way, adhere it higher on the card and stamp a greeting of your choice on the bottom!!! This card is perfect for lots of different occasions!!!

You could also do this technique and color in the flower or use a greeting in the middle rather than a flower. So many fun ways using the masking technique!!! If you would like to see this in action, check out my Video Tutorial below! Don’t forget to give it a thumbs up if you liked it!!!

Happy Maskin’

~Laura


Watercolor Wishes Card Kit!!!

Posted on

Okay everyone, you know I like to be honest with you on Stampin’ Up’s kits…..some are hard but still rewarding and some are not my style and some are amazing!!! PS: I still have the flower bouquet in my kitchen and I love it but memories of putting it together still haunt me. Oh my that was a long process! With the new Stampin’ Up Catalog came LOTS of kits and I couldn’t wait to try them all out!!! You can check out the Tin of Cards here which was lots of fun and the tin is adorable! Then there is the Sweet Stack Kit which I have assembled and will be posting about that next week but until then you can check out this video! Then there is the Watercolor Wishes Project Kit…….I LOVE this one for a couple of reasons. 1. It includes everything you need in the kit – stamps, embellishments, and ink!!!! 2. The Stamp Set is amazing. You know I’m a sucker for a scroll-y font!!! Then I made all 20 of the cards in 65 minutes and really fell in love!!! Here they are for you to check out and fall in love! Watercolor Wishes Card Kit, www.LaurasStampPad.com

I used the provided instructions a little bit but then added my own flare on a few of them. For example, I didn’t embellish that Hello card in the middle at all. Also, I LOVE ombre so I had to do that a few times as well! I think I mixed up almost all of the die-cut stickers as well because I didn’t like one of the color combinations and so that threw them all off.

Watercolor Cards, www.LaurasStampPad.com

Okay so looking back at that center card, I’m even more in love. It is just STUNNING in it’s simplicity and with a little bling from the sequins! Another card that I changed up was the one on the far left. I left off the heart wooden accents because I thought it looked like a great Man Card.

Wooden Accents, Butterflies and hearts, www.LaurasStampPad.com

Here is the final set of all 20 cards…..by the way did you notice that it is 20 different cards and not X number of X style. Yeah, twenty different styles. LOVE IT!!! I did time myself just to see how long it took to do this kit and at the hour mark I still had 2 more to go so it ended up taking 65 minutes. That isn’t bad at all. The other awesome thing is look at all of these leftovers!!!!

Card Kit Leftovers, www.LaurasStampPad.com

Stampin’ Up always provided so much product in each of the kits. I still have Stampin’ Dimensionals, flowers, stickers, tons of Washi Tape, wooden accents and sequins left. Also, don’t forget I still have a fabulous stamp set and 2 ink pads. LOVE IT! To see all of the goodies in this kit, you can check out my Unboxing and Reveal Video here!!!! (Be sure to subscribe to my YouTube Channel because I’m almost at 1,000 and I will be doing a fabulous give-away when that happens)

Have you tried any of the kits? Which one is your favorite and why??? Let me know in the comments below!

Happy Stampin’

~Laura