Pink Perfection!!!

Posted on

Pink Butterfly, www.LaurasStampPad.com

I found another sample using the Watercolor Wings Stamp Set that I haven’t shared yet!!! You all know how much I love this one because it is so many fabulous shades of Pink!! (Don’t forget that Paper Pumpkin is going Pink this month!)

I started with a Pink Pirouette card base and then I took a piece of Rose Red and stamped the greeting from the Thoughts & Prayers Stamp Set! Then I took a White Tea Lace Doily and cut it in half and added adhesive to the center half circle and placed it on the top of the Rose Red. I didn’t like the edge of the Doily showing so I added a strip of Whisper White Organza Ribbon and adhered the ends to the back. Now you can place this onto your card front! For the butterfly, I took a piece of scrap Whisper White and used the Watercolor Wings Stamp Set! I used Pink Pirouette for the base, Rose Red for the second one (sides), and Melon Mambo for the third one (center and outside dots). Love it! Don’t stamp the center thorax piece until after you have cut it out. I found that if I stamped it now, sometimes it was up to high and others down to low. Using the Bold Butterflied Framelits (Bundle & Save) and the Big Shot, I cut it out! Woot Woot for not fussy cutting! Once it is cut out you can stamp the center piece in Basic Black! Of course I added the butterfly to the card with Stampin’ Dimensionals!

Butterfly Color Template, www.LaurasStampPad.com

Here are lots of butterfly color combinations that you can use!!! Also, you can check out more samples using the Watercolor Wings here, here and here! You can check out a Video Tutorial here!!!

Which one is your favorite?? Let me know in the comments below!

Happy Stampin’

~Laura


Simple & Stunning!!!

Posted on

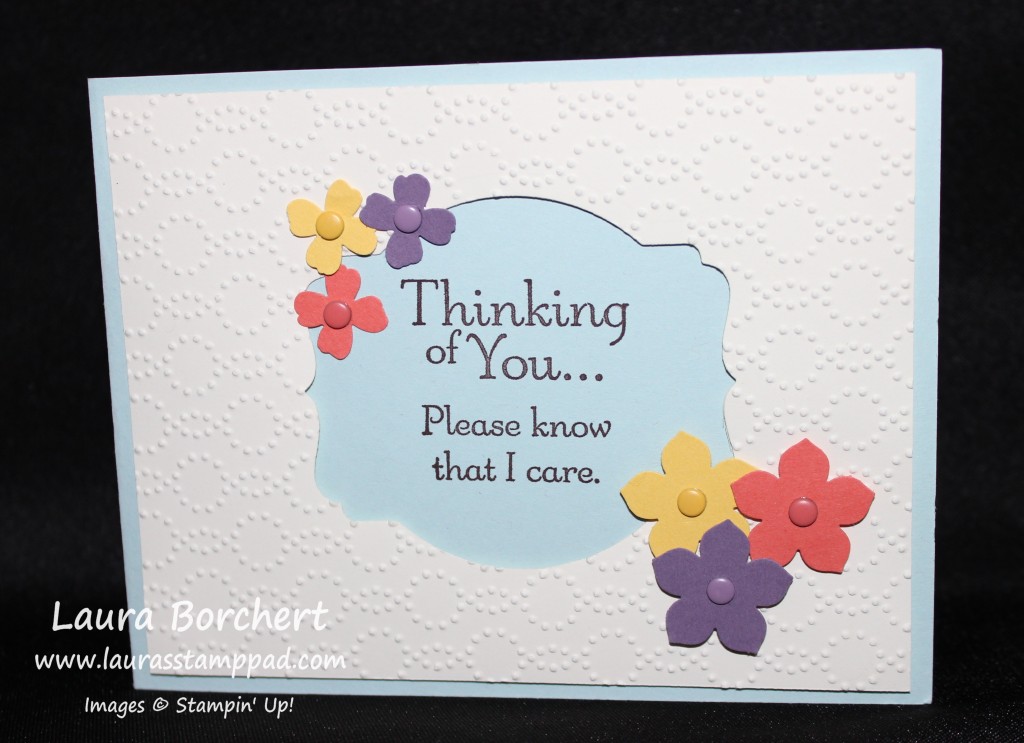
Emboss Cut Out, www.LaurasStampPad.com

This card is perfect for any occasion. You could make multiples of this one in no time at all and add a greeting as you need them! It also uses up scraps which I love!!! I started with a Soft Sky card base. Then I took a piece of Very Vanilla measuring 4″ x 5-1/2″ and placed the 2nd to smallest Deco Labels Framelit in the center and ran it through the Big Shot. You can use this cut out piece for another project and take the frame and place it into the Elegant Dots Embossing Folder and run it through the Big Shot again! Now this is your frame for your card!!! I used Stampin’ Dimensionals to adhere it to my card front BUT FIRST I laid it on the card front to stamp my greeting and then added the dimensionals and adhered it on. I did it in this order so that 1. I could line up my greeting in the center but not have it raised up hitting my greeting and 2. If I messed up the stamping, I could get another card base and try again without having do re-create the frame again as well. I used the greeting from the Thoughts & Prayers Stamp Set with Chocolate Chip ink. To finish off the card, I punched out Calypso Coral, Wisteria Wonder, and Daffodil Delight with the Petite Petals Punch and flower from the Itty Bitty Accents Punch! I added little Candy Dots to the center of the flowers coordinating with each color!! I really like how the Candy Dots add that little pop! Love it!!!

Happy Stampin’

~Laura


Wonderful Watercolor Wings!!!

Posted on

Watercolor Wings, www.LaurasStampPad.com

I am having so much fun making all kinds of butterflies! The Watercolor Wings Stamp Set is so amazing. It is a 3-Step Stamping Set so you can create amazing colors and a true masterpiece!!! I LOVE IT!!! All of these samples I’m showing today use all Whisper White cardstock – base, front piece and scraps for the butterfly. I embossed the front of the card base above with the Zig Zag Texture Embossing Folder. I stamped the butterfly in Daffodil Delight, Crushed Curry, and Tangelo Twist! I stamped the greeting from the Watercolor Wings Stamp Set in Tangelo Twist and I brushed the edges with Crushed Curry and a Sponge Dauber!!! I added the butterfly and the greeting piece to the base with Stampin’ Dimensionals!!! For the antenna, I stamped that in Basic Black onto the greeting piece and then placed the butterfly over it! Also, no fussy cutting necessary as there is a great Framelit Set to match – Bold Butterfly (Bundle & Save)!!!

Purple Butterfly, www.LaurasStampPad.com

I love these shades of purple!!! I used Wisteria Wonder, Perfect Plum, and Elegant Eggplant for this butterfly!! For the dots behind the butterfly, I used the image from the Watercolor Wings Stamp Set and stamped halfway from the left and halfway from the right. This way the meeting of the two images is hidden behind the butterfly. I used the Lovely Lace Embossing Folder for the card front and the greeting is from the Thoughts & Prayers Stamp Set. Butterflies are the perfect image for any occasion – sympathy, baby, wedding, anniversary, thinking of you, birthday and everything in between!

Butterfly on Bricks, www.LaurasStampPad.com

There is something about that Brick Embossed background that makes me LOVE this card. That and how the greeting fits so perfectly in that brick. Ahhh I just love it!!! The colors used on this butterfly are Pool Party, Lost Lagoon, and Island Indigo! The greeting is from the Watercolor Wings Stamp Set as well!

Butterfly Cards, www.LaurasStampPad.com

Here are three more cards in a similar pattern as the ones above. The far left one uses Mint Macaron, Cucumber Crush, and Basic Gray and the far right one uses Soft Sky, Marina Mist and Night of Navy. The middle one is the same as the first card up top. I used the Happy Together greeting from A Dozen Thoughts Stamps Set. Can you tell I had tons of fun making all kinds of cards with this set???

Butterfly Color Template, www.LaurasStampPad.com

Here is a color chart of the colors I found to be super fabulous!!!!

Bad Colors

Here are the color combinations I did not like!!!!

And of course I had to do a Video Tutorial on this stamp set and show you all the fun and excitement I am having so check that out here!!! Let me know your favorite color combination in the comments below!!!

Don’t forget to subscribe to My Channel so you don’t miss any videos!!! They are lots of fun!!!

Happy Stampin’

~Laura


Color Me Autumn!!!!

Posted on

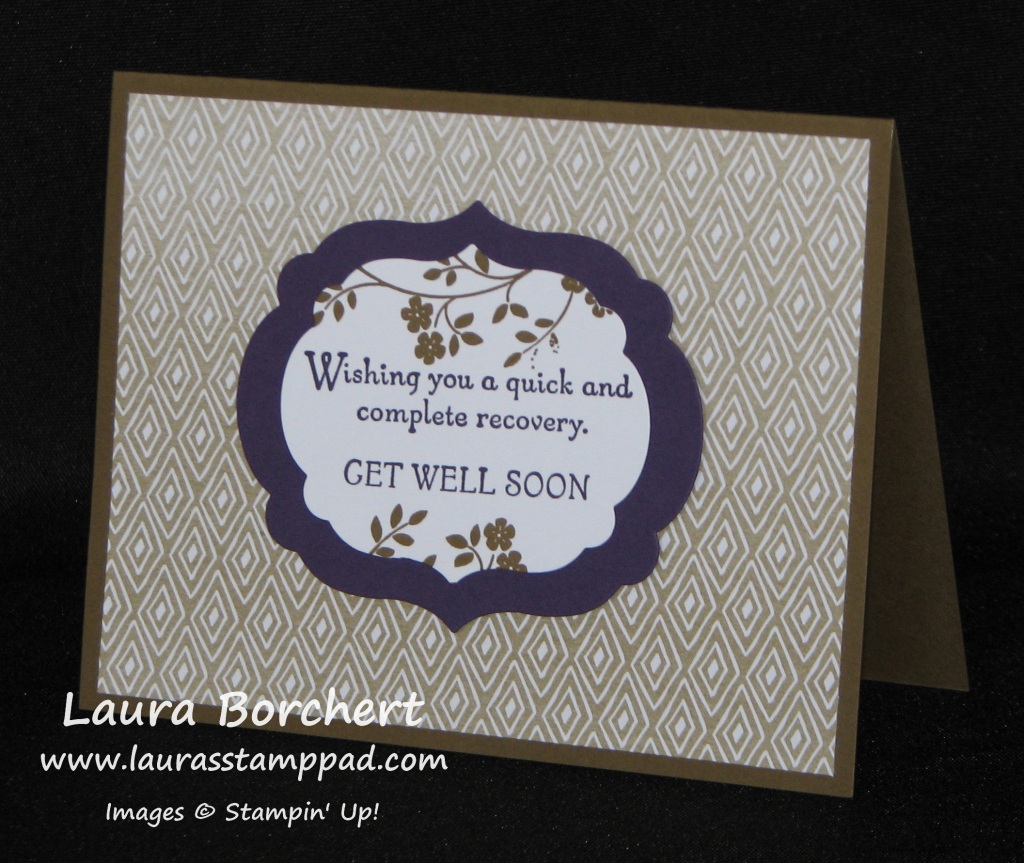
Thoughts & Prayers, www.LaurasStampPad.com

The Designer Series Paper that I used for this card is called Color Me Autumn and it has some great patterns and colors for all types of cards! This Get Well Soon card was created with Soft Suede and Elegant Eggplant. I love how Elegant Eggplant gives a pop of color without being too….poppy. Does that make sense? 🙂 It gives the card color but doesn’t scream look at me – a nice subtle look! I used a Soft Suede card base and added some Color Me Autumn Designer Series Paper. For the greeting, I stamped the greeting from the Thoughts & Prayers Stamp Set in Elegant Eggplant and added a few Soft Suede branches to the top and bottom from that same stamp set. I cut out the greeting with the Labels Collection Framelits and my Big Shot. I used the next Framelit up for the layering Elegant Eggplant piece. I love how the Framelit are so easy to use and give you that perfect layering look!

While Get Well Soon cards are not my favorite to make, they are always good to have on hand to send to someone who needs a little hand-stamped card to brighten their day!

Happy Stampin’

~Laura


How Many Punches Did I Use?

Posted on

Thoughts & Prayers Card, www.LaurasStampPad.com

How many punches did I use for this card??? You have 1 minute!

Times up! If you guessed 6 then you are correct!

I love the bright colors of this card because they are sure to brighten anyone’s day! That is why it is perfect for a Thinking of You, Get Well or Sympathy card! It really could be used for anything though – Birthday, Anniversary, etc. I started with a Crushed Curry card base and added some Night of Navy cardstock which I Scallop Punched the bottom border! I layered some Color Me Autumn Designer Series Paper onto that. For the tag, I punched the top with my Scallop Tag Topper Punch and since the top corners were rounded, I thought I would Round the bottom ones too! I stamped the beautiful branch from the Thoughts & Prayers Stamp Set onto my tag in Night of Navy! I wanted some pops of color so I took my flower from the Itty Bitty Punch Pack and punched some scrap pieces of Crushed Curry and Calypso Coral! I added those to the branch as well as a few Rhinestone! For the ribbon, I looped a piece of Calypso Coral Seam Binding through the punched slot and then tied a bow around it with some Whisper White Baker’s Twine! The seam binding is not tied, it is just held on with the Baker’s Twine! For the greetings, I used the stamp from the Thoughts & Prayers Stamp Set, punch it out with my Oval Punch and layered it onto a Scallop Oval Night of Navy piece! Of course I added the tag and greeting with Stampin’ Dimensionals! 🙂 Love it!!!!

Here and here and here are some more samples I have created with the Thoughts & Prayers Stamp Set! I have made multiples of each of these to have on hand, just in case!

Happy Stampin’

~Laura


Technique Tuesday – Coloring with Your Clear Blocks!

Posted on

Happy Tuesday!!! You know what that means…..I have a fabulous technique to share with you today! You know that the Clear Blocks are used with our Clear Stamp Sets. Just stick the stamp (cling side) onto the clear block and tap tap tap into the ink and then onto your paper! BUT did you know that you can tap tap tap your clear block into the ink and then stamp it on the paper???

Thoughts & Prayers, Clear Block Stamping, www.LaurasStampPad.com

This card is just amazing with beautiful branch image and the monochromatic color scheme! Are you wondering how I created that Pistachio Pudding square? With my Clear Block!!!!

Supplies Needed: Clear Block of you choice, Ink Pad

The supply list is short for this technique and it is really simple to do! Just tap your clear block into your ink pad color of choice. Tap Tap Tap! Then stamp the clear block onto your cardstock. Be sure to press firmly and all over the clear block to ensure better coverage. Disclaimer: This comes out different each time (kind of like watercoloring! Sometimes it comes out very bold, sometimes just an outline with a little ink in the middle, sometimes it is more solid and others it looks like there is a pattern to it. This one above came out very good! I then stamped the branch and greeting from the Thoughts & Prayers Stamp Set in Basic Black. I wrapped some Baker’s Twine around twice and tied a bow! To finish it off, I added a Pistachio Pudding butterfly that was punched with the Elegant Butterfly Punch and added a few Pearls!

Thoughts & Prayers, Clear Block Stamping, www.LaurasStampPad.com

You can see this one was created in Lost Lagoon and the block was a little more spotty and there is a line diagonal across the square. I am not sure how it got there but you just never know how this technique will turn out! I used some of the NEW Lost Lagoon Taffeta Ribbon on this card! I love that ribbon! To clean your clear block, you can just rub it on your Stampin’ Scrub or run it under water and use a paper towel to dry it off! Simple as that! Here is a quick Video Tutorial to show you this technique in action!

Let me know what you think of this technique in the comment below or give the video a thumbs up if you liked it!

Happy Stampin’

~Laura


Praying For You!!!

Posted on

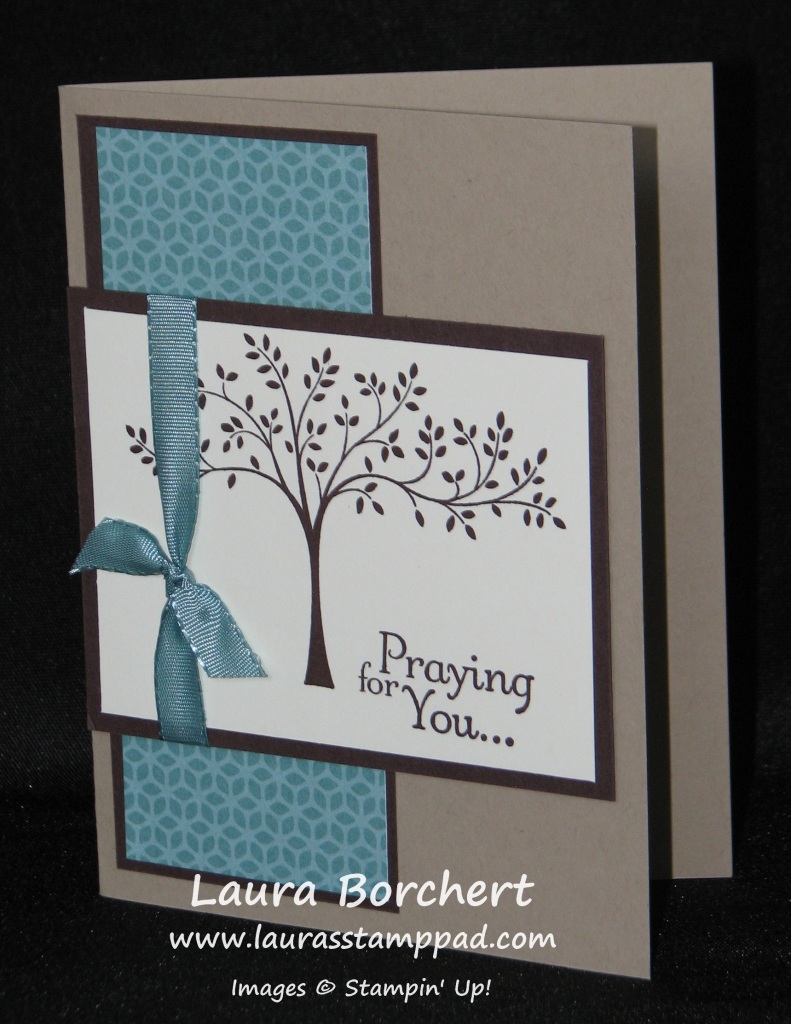
Thoughts & Prayers, www.LaurasStampPad.com

There is no better way to show someone you care than sending them a hand-stamped card! The Thoughts & Prayers Stamp Set has the most perfect greetings when you want to show you care but just don’t know what to say. There is also this elegant tree and a flower branch image in the set as well! This card is crumb cake with layered pieces of Very Vanilla, Chocolate Chip and a piece of the Flower Pot Designer Series Paper. I love the neutral colors with a pop of blues – very soothing and calming!!! I stamped the tree and greeting in Chocolate chip and added some Lost Lagoon Taffeta Ribbon. The Thoughts & Prayers Stamp Set has excellent greetings for the inside as well. I plan to keep this card on hand for that moment when I need to let a friend know I’m there for them! This card would also make a great man card for Birthdays and more!

Happy Stampin’

~Laura


Work of Art Background!

Posted on

We all know how AMAZING this Work of Art Stamp Set is….if you don’t check out this post, this one, this one, and this one and come back! Most of the cards I have done so far have been bright and colorful! Well today I thought I would take it down a notch and create something calming and thoughtful!

Thoughts & Prayers Work of Art, www.LaurasStampPad.com

Isn’t it amazing? Very calming and thoughtful, right? Also, I love how when I use the Work of Art Stamp Set the cards give a super WOW look but they are very simple to create! My card base is Chocolate Chip and I layered a piece of Very Vanilla (4″ x 5-1/4″) on top. I stamped the Work of Art swish in Soft Sky, Coastal Cabana, and Lost Lagoon (sort of an Ombre Look 😉 ) I then stamped the Tree and Greeting from the Thoughts and Prayers Stamp Set. This is an amazing stamp set because of the beautiful tree and flower branch but also the greetings are amazing. They are exactly what you want to say when you don’t know what to say! I love them!

Be on the lookout for more samples using the Thought & Prayers Stamp Set! What is your favorite stamp set that is very calming?

Happy Stampin’

~Laura