The Birthday Blast Bundle from the Occasions Mini Catalog is super fun for lots of occasions! Who doesn’t love bursting stars?!?! Check out this beauty!!!
Of course I had to add in some bling! It’s so amazing!!!!
I started with a Bermuda Bay card base. Then I took a piece of Whisper White (4″ x 5-1/4″) and stamped the star swirl image from the Birthday Blast Stamp Set! I used Bermuda Bay Ink. You will want to stamp this image as high up as you can but not falling off the top like I did in the video below (lol). Also make sure it is “centered” as best you can. Don’t stress over this part! It doesn’t have to be perfect! Next, I took a piece of Silver Glimmer Paper (4″ x 2-1/2″) and die cut it with the Star Blast Edgelits. Be sure to save all of the little stars that die cut out so you can use them all over your card! 😉 Also, don’t forget that you can get the Birthday Blast Bundle – Bundle & Save 10%!! I adhered the Glimmer piece onto the card with some Fine Tip Glue Pen. Then I added the leftover stars randomly around! I love that extra bling!
For the greeting, I waited to stamp it after I placed the glimmer piece on so I knew how much space I had left. I used the greeting from the Birthday Blast Stamp Set. To finish off the card, I die cut that adorable little swirl in Silver Glimmer Paper. It was added below the greeting using the Fine Tip Glue Pen. See how simple that was!!!
If you would like to see this all in action, check out the video tutorial below or click here! Don’t forget to give it a thumbs up if you liked it and be sure to subscribe if you are new!
Stay tuned as tomorrow I will be posting the other sample shown in the video!!!
Happy Tuesday!!! I have this fabulous Rock ‘N Roll technique to share with you today!!! It can be used with many different images and it’s super fun!!!
How cool are these flowers with the dark tipped petals?!?!?! It is a super fun and cool technique that you can do with any of your favorite images! Let’s get started!
I started with a Wisteria Wonder card base and layered on a piece of Elegant Eggplant (4″ x 5-1/4″). Next I took a piece of Whisper White (3-3/4″ x 5″) to stamp these beautiful flowers on. Using the Avant Garden Sale-A-Bration Stamp Set, I took the flower and placed it on Block B. You will want to use the smallest block to you can use on your image because otherwise your rock ‘n roll will just ink up the block and not your image if it’s much larger. I inked it up in the light color – Wisteria Wonder Ink and then I took Elegant Eggplant Ink and did the Rock ‘N Roll Technique. Just roll the edges of the images around on the darker color, avoiding the middle of the image.
Check out the video below to really see how this works as I’m not so sure I’m explaining it well! 🙂 Once you have inked it up, stamp it down on the cardstock towards the top and to the left side. I actually stamped it twice to get that lighter and darker shade. Also, then I didn’t have to do this whole thing 3 times. I do find that cleaning the stamp in between is good since you can’t really Rock ‘N Roll exactly the same each time.
After doing the 3 flowers, I stamped the stem and leaves in Cucumber Crush Ink. Some of them are stamped twice for that variation in color too! TIP: Use a mask to cover the bottom portion when you are stamping your flower stems so that they don’t go below the ribbon. Then you can cover up all of the overlaps of the stems with the ribbon! I used the Cucumber Crush Mini Striped Ribbon! I used the greeting from the Avant Garden Stamp Set and stamped it in Elegant Eggplant. Next, I added this to the card front with Stampin’ Dimensionals! To finish it off, I added little Elegant Eggplant Enamel Shapes.
If you would like to see this all in action, check out my Video Tutorial below or click here! Be sure to give it a thumbs up if you liked it and don’t forget to subscribe if you are new. I post a video every Tuesday and Thursday!
If you would like to see more samples using the Avant Garden Sale-A-Bration Stamp Set, click here, here, and here! You can get this stamp set for FREE with a $50 order till the end of the month! Don’t forget that the items are while supplies last so hurry up! You will also be earning Laura’s Loyal Stampers Stickers too!!!
I have really started to love coloring especially when you don’t have to color all of it! Coloring flowers to highlight the pattern like I did in this sample is just as powerful! It makes the flowers pop and the background of black and white is fabulous too! Less coloring means more time to make multiples!!! 🙂
I started with a piece of Melon Mambo for my card base. Then I cut each piece of the Inside the Lines Sale-A-Bration Designer Paper into 1-1/2″ x 1-1/2″ squares. I punched opposite corners with the Corner Rounder Punch for some added texture. Next, I colored the flowers to highlight the pattern with the Watercolor Pencils and a Blender Pen. You really don’t have to use the Blender Pens. If you like the pencil look or if you want the image to stay bold and dark (if you press hard), just color and stop there! Once all of the pieces were colored, I layered the squares onto a piece of Old Olive cardstock measuring 3-1/2″ x 3-1/2″. Next, I added this piece to a piece of Whisper White (3-3/4″ x 5″) with Stampin’ Dimensionals. I stamped the greeting at the bottom in Melon Mambo Ink from the Designer Tee Sale-A-Bration Stamp Set. Finally, this was then layered onto the Melon Mambo card base and I finished it off with some Brights Enamel Shapes (melon mambo and old olive).
If you would like to see this all in action, check out the video tutorial below or click here! Don’t forget to give it a thumbs up if you liked it and be sure to subscribe to my channel so you don’t miss out on future videos! I post every Tuesday and Thursday!
Do you like to color? Does it overwhelm you? Have you selected the Inside the Lines Designer Paper as one of your FREE Sale-A-Bration items? Let me know in the comments below!!! Also, don’t forget that as we come to the end of Sale-A-Bration, the items will run out so don’t wait till the last minute. The Card Tin is already gone!
Happy Tuesday!!! That means I have a fabulous technique to share with you today. It’s a fabulous one today – coloring with the Fine Tip Glue Pen!!! Check out this glossy frog…or toad!
How adorable is he? I colored him with some re-inker in my Fine Tip Glue Pen! I got this idea from the fabulous Sara Douglass, Stampin’ Up! CEO. Let’s get started!
~ Card Instructions ~
All you need for this technique of coloring with your Fine Tip Glue Pen is the glue and the color of your choice in Ink Refills! I have a few bottles of Fine Tip Glue so to not make a big batch, I poured as much as I could into the other 2 bottles. There was maybe 1/3 of the bottle left and I did 10 drips of Cucumber Crush and it was BRIGHT! I ended up adding some glue back to it. I would go with maybe 3-5 drops and then add more if you want a bolder color! You can always add more but you can’t take it out! 🙂 Shake well and then color with the fine tip! It’s super fun and simple because you are literally coloring with the fine tip and can get into small spaces too!
For this card, I stamped the toad from the You’re Sublime Stamp Set in Basic Gray Ink onto Whisper White. Then I took the colored Fine Tip Glue and filled him in. I actually did his eyes in regular/uncolored Fine Tip Glue. Allow this to dry. It will take at least an hour depending on how thick it was applied. As it dries you will notice the color is darker in certain spots! I love how that works! Coloring with the Fine Tip Glue Pen is super fun and there are endless possibilities! For my card base, I used Cucumber Crush and layered on a piece of Pacific Point that I ran through the Big Shot with the Seaside Embossing Folder. I added a few loops of Whisper White Baker’s Twine to the back of the toad and added it to the card front with Stampin’ Dimensionals.
If you would like to see this all in action, check out my Video Tutorial below or click here! Be sure to give it a thumbs up if you liked it and don’t forget to subscribe if you are new! I post every Tuesday and Thursday!
What color would you add to your Fine Tip Glue Pen?? Let me know in the comments below! I’m thinking I need to do Melon Mambo and do the tips of flowers for that dew and highlighted look! How amazing would that be?!?!?
How fabulous is this February 2017 Paper Pumpkin Kit?!?!?!?! I love the pull tab concept and the beautiful candle look with that gold glimmer flame! Love it!!! You can see the entire reveal of this kit on my video here!
This kit came with all of the goodies shown above – 2 ink spots (bonus), stamps, 9 envelopes, adhesive, and supplies for the 9 cards. The only thing included but not pictured above is the invitation inserts. The kit included little cards that said Date, Time, Place, Etc to use these cards as birthday invitations. Since I just did all birthday cards, I have those to use on future invites or as a white card using the back side!!!
Of course the instructions came with the kit as well. TIP: READ THE INSTRUCTIONS! I did not as I am more of a visual person and I thought while I was watching a video, I would fold and assemble all of the candle bases. After this was done, I read the instructions for the rest of the card and realized I was suppose to stick the flame in each one before sealing it closed. Opps! Crisis averted when I used my Paper Snips to open the little tops and slide in the candle flame! It was easy!
I actually pulled out my Crushed Curry Ink Pad as well for some more color! I really had fun decorating each of these and the envelope flaps! Also, there are little grooves so you can add a gift card or note! Super fun!!!
Did you get the February 2017 Paper Pumpkin Kit? Do you love it? Let me know in the comments below!
Did you know that you can get a 3 month subscription for Paper Pumpkin for $4. off AND you get to pick out a Sale-A-Bration item for FREE! Woot Woot! That means you will get 3 ink spots, 3 sets of stamps, 3 different projects and a Sale-A-Bration item all for $55! That’s 3 months of fun! Click here to purchase the subscription today and get started this month!!! Want to pay as you go with Paper Pumpkin and cancel at any time, click here to get started!
Banners are super cute and perfect for any occasion which is why these Any Occasion Banners are amazing! The Any Occasion Sale-A-Bration Stamp Set is made up of all types of banners – different greetings, tassels, scallops, flags, and so much more! They are perfect using them as decoration or as the greeting. Let’s get started on how I created this amazing card!
~ Card Instructions ~
I started with a Smoky Slate card base and took a strip of Elegant Eggplant measuring 1-1/2″ x 5-1/2″ and placed it on the card front as a guide for the scallop border! Using the little scallop image from the Any Occasions Stamp Set, I stamped it in Elegant Eggplant Ink all down the card. It is okay if it isn’t perfectly straight because you can place the strip down over all the edges. After the border is complete, adhere the strip to the card front. Then I punched some Silver Foil Paper with the 1-3/4″ Circle Punch. I used the 2″ Circle Punch to punch the Elegant Eggplant circle. The large Whisper White circle was die cut with the Layering Circles Framelits.
Now for stamping the banners. I laid the stamps down on the table for a second to allow them to keep their shape. Then I pressed the clear block over the top. If you place it on the clear block, it may result in it being straightened out or curved incorrectly and then it won’t stamp over the string correctly. I used Smoky Slate Ink, Basic Gray Ink, and Elegant Eggplant Ink. Just have fun with it and angle each of the banners side to side. You can add different banner greetings and decorations as you wish! I added the white circle to the card front with Stampin’ Dimensionals and the other two circles flat. I finished it off with a few Rhinestones. The card is simple and fabulous and you can mix the colors up as you wish!!!
If you would like to see this all in action, check out the video tutorial below or click here! Don’t forget to give it a thumbs up if you liked it and be sure to subscribe to my channel so you don’t miss out on future videos! I post every Tuesday and Thursday!
Which Sale-A-Bration item is your favorite?? Let me know in the comments below!
Happy Tuesday!!! You all know what that means!!! I have a super fun technique to share with you – creating a marbled background!!! Check this out!!
Isn’t the background super cool?? It is super easy as well. All you need are ink pads and baby wipes!!! I got this technique from fellow demonstrator, Sandy Jacobson! I love sharing ideas!!!
SUPPLIES NEEDED: Ink Pads, Baby Wipes
For creating the marbled background, I started with a piece of Shimmery White cardstock measuring 4″ x 5-1/4″. You can use regular Whisper White or Very Vanilla cardstock if you wish! It works the same with all but I liked the little hint of shimmer! Next, I took a wet baby wipe and balled it up and very lightly tapped it into an ink pad and then pounced all over the cardstock. I used Bermuda Bay Ink, Cucumber Crush Ink, and Pumpkin Pie Ink. You can pounce with each color as little or as much as you wish. It’s as simple as that! Super fun and comes out different each time. You can mix and match any color combination!
To finished the above card off, I placed it onto a Bermuda Bay card base. I stamped the birthday greeting in the lower right corner from the Balloon Adventures Stamp Set. The die cuts came from the Stitched Shapes Framelits in Cucumber Crush and a t-shirt from the T-Shirt Builder Framelits in Bermuda Bay. I stamped the front of the shirt with the Suite Sentiments Stamp Set. Next, I added the t-shirt to the square with Stampin’ Dimensionals to make it look a little more 3D. I added loops of Whisper White Baker’s Twine to the back of the square, securing it with Stampin’ Dimensionals and then adding it to the card front! Perfect Man Card!
I used Wisteria Wonder Ink and Rich Razzleberry Ink for this one. For the decoration, I stamped the lady from the Beautiful You Stamp Set in Basic Black and her dress in Rich Razzleberry. The greeting was done in Wisteria Wonder. I went over her dress with a Wink of Stella Pen which added a little shine and blended it together a bit. I used the leftover bit of ink on the tip to color in her hat. Then, I layered this piece onto Silver Foil Paper and added it to the card front. To finish it off, I added a few White Perfect Accents. Love it!
If you would like to see this all in action, check out the Video Tutorial below or click here! Don’t forget to give it a thumbs up if you liked it and be sure to subscribe if you are new! I post every Tuesday and Thursday!
Have fun trying this out yourself! What color combination will you use? Let me know in the comments below!
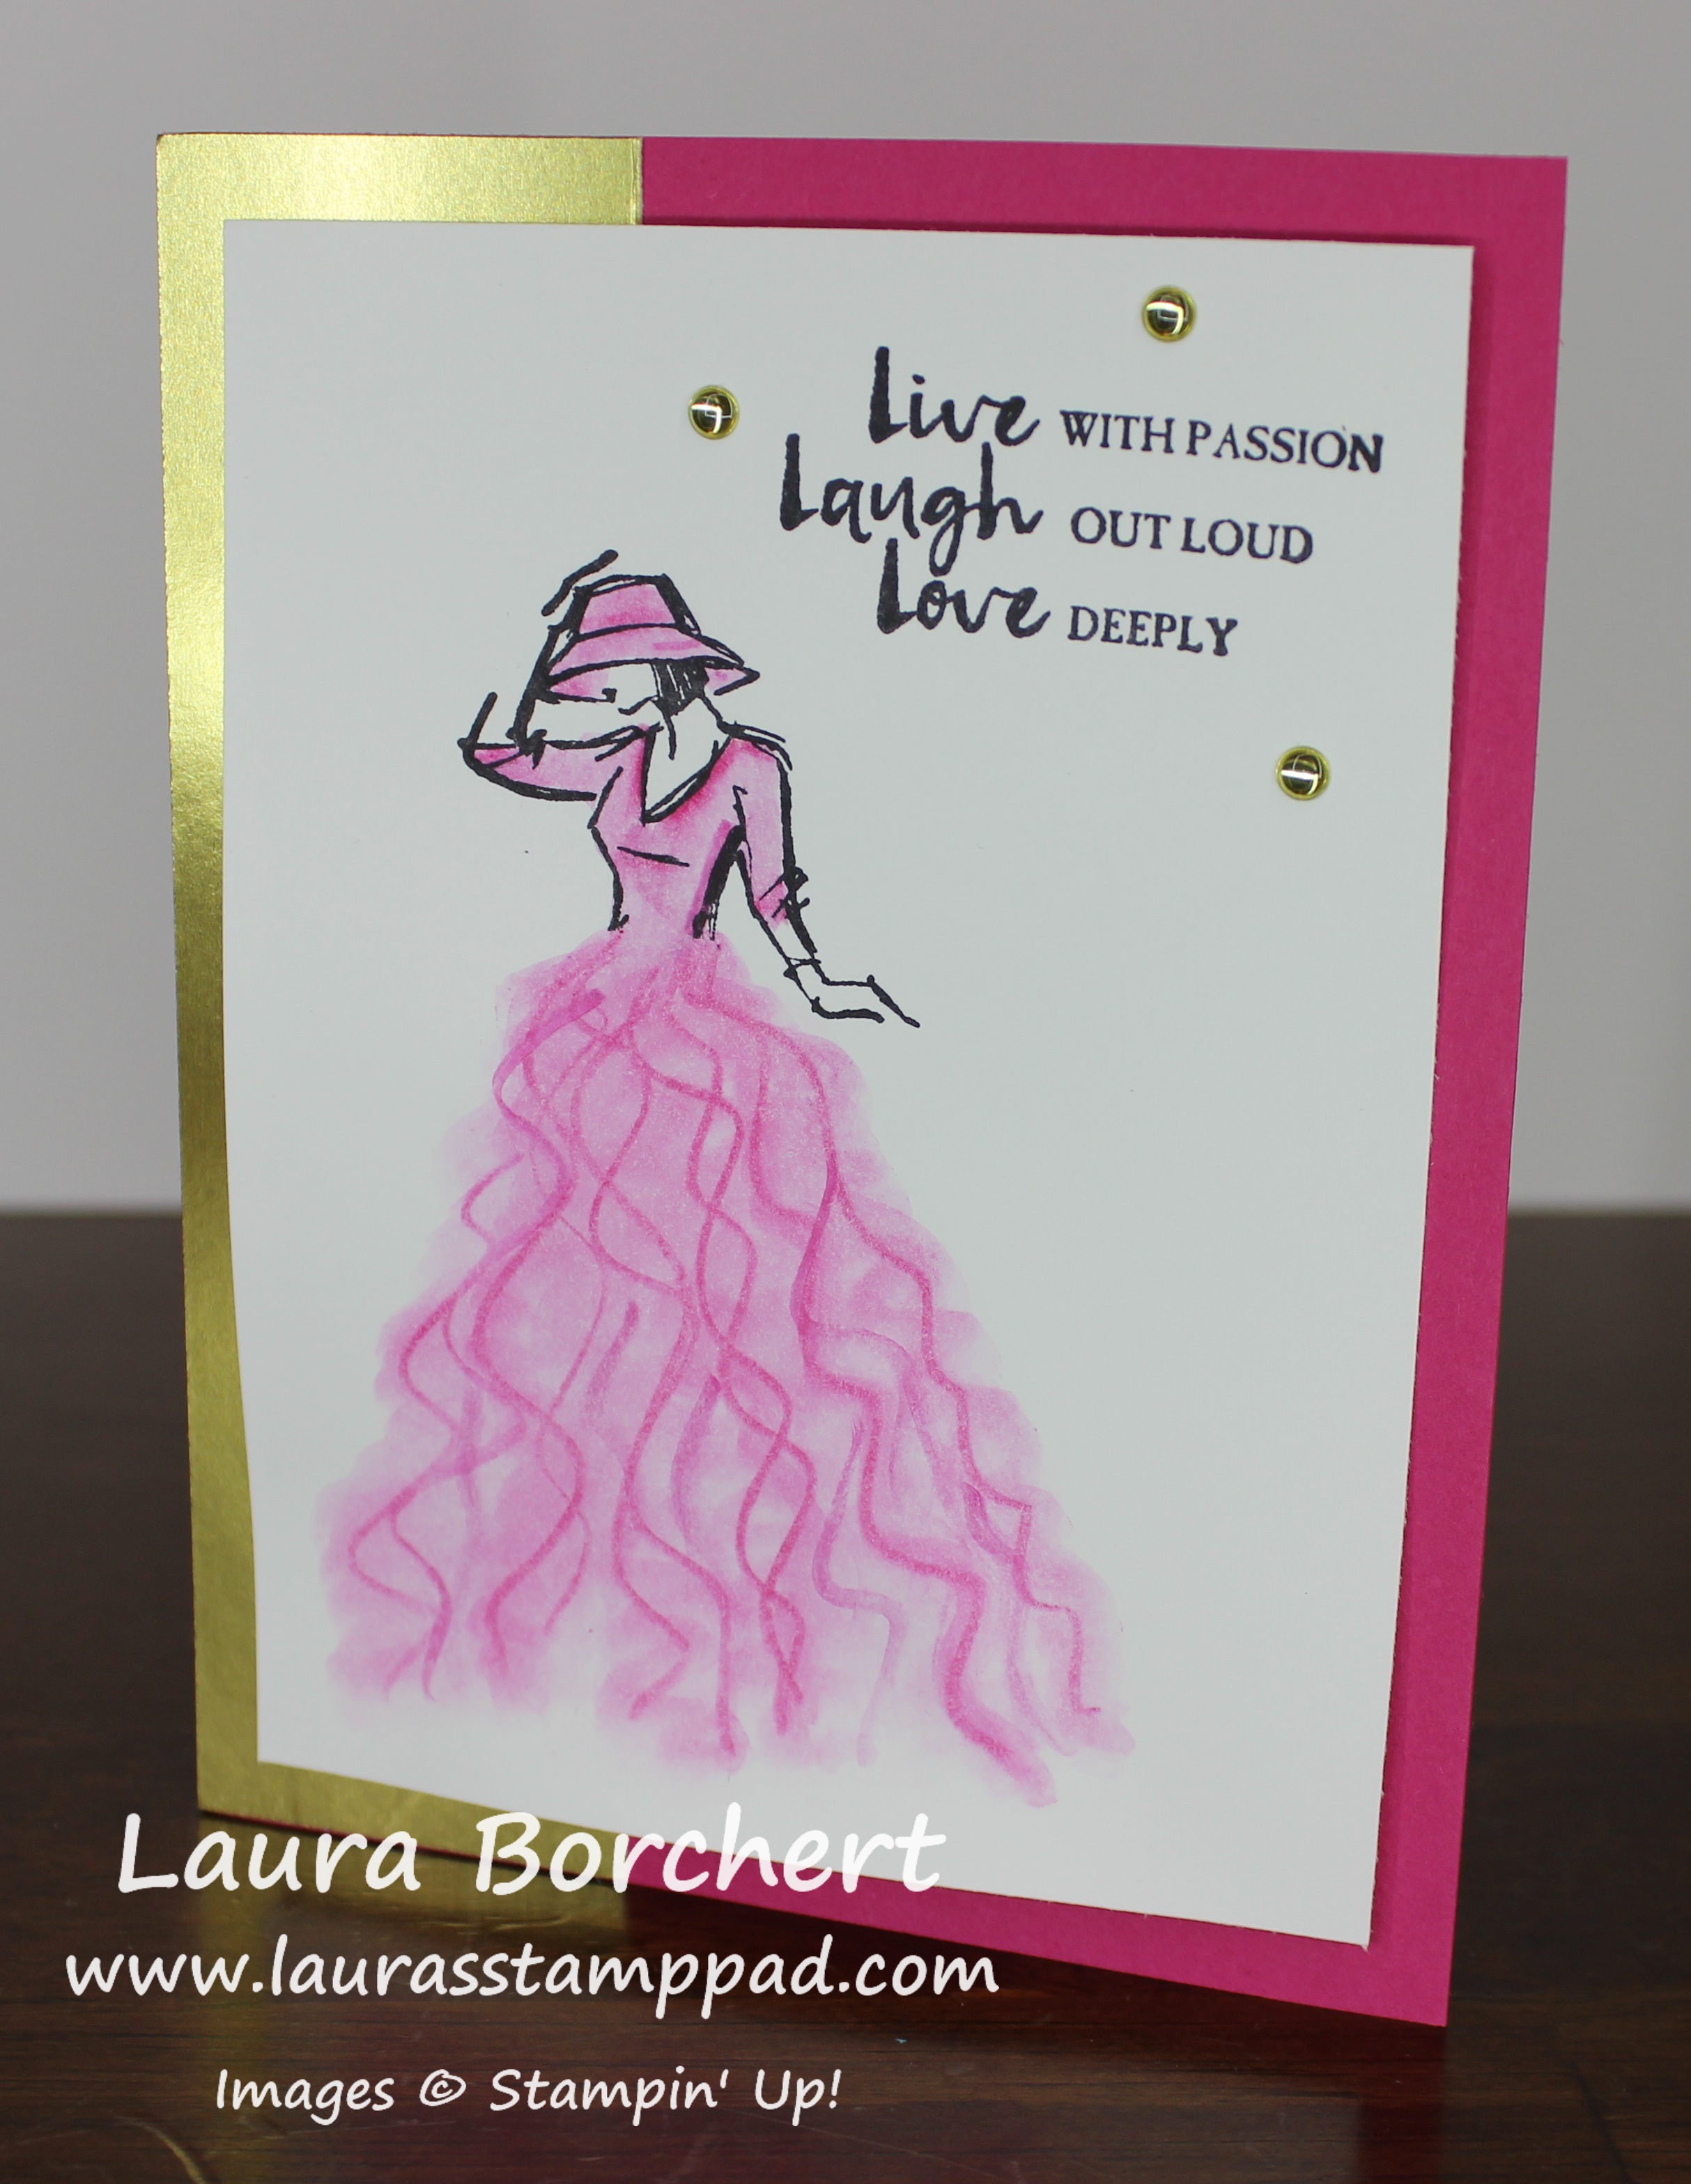
Happy Tuesday!!! You all know what that means! I have a fabulous technique to share with you today using the Watercolor Pencils. We will be creating a Ruffle Dress!!! Check out this beauty!!
I love this dress because it is PINK (of course) but it is also so big and beautiful! I went to my Junior year Prom in a huge baby blue Cinderella ball gown and it was amazing! Now I can create that amazing dress on the beautiful women in the Beautiful You Stamp Set! Love it!!! Thank you to Tandra Boyer for this amazing idea!!!
I started with a piece of Whisper White cardstock measuring 3-3/4″ x 5″. Next, I inked up the top portion of the lady from the Beautiful You Stamp Set with Basic Black Archival Ink. I used this ink because it won’t bleed when you watercolor. If you aren’t comfortable inking up just the top half of the stamp, you can always ink it all up and then mask over the bottom half with a piece of scrap paper!
After stamping her, I took the Melon Mambo Watercolor Pencil and make swirly lines starting at her waist and going down. Just keep adding squiggly lines until it looks full. I added a little bit of color along the lines of her shirt as well. Then I took the Aqua Painter and traced over the top of the swirly lines, allowing the color to bleed. Just keep swirling along each of those lines and color in the top as well. If it seems to get rather wet, you can always stop and allow it to dry a bit and then come back in with some some more color to accent or create shadows. You can make the skirt as full or straight as you wish! Just have fun with it!!
I created this ruffle dress with the Rich Razzleberry Watercolor Pencil! It is just so beautiful!
To finish off the card, I used a Melon Mambo card base and a strip of Gold Foil Paper along the left side (1-1/2″ x 5-1/2″). I stamped the greeting from the Beautiful You Stamp Set in Basic Black in the upper right corner and then added this piece to the card front with Stampin’ Dimensionals. I liked the added texture of the dimensionals and it hold the paper on real well since it can curl a bit after the watercoloring. To finish it off, I added a few Gold Metallic Enamel Shapes! I just love it!!! I might do the purple one with silver! 🙂
If you would like to see this all in action, check out the Video Tutorial below or click here! Be sure to give the video a thumbs up if you liked it and don’t forget to subscribe if you are new! I post every Tuesday and Thursday!!!
If you would like to see more samples using the Watercolor Pencils, click here and here! Have fun playing with the Watercolor Pencils!
I am in love with these 2-Step Stamped Succulent Flowers from the Oh So Succulent Stamp Set in the Occasions Mini Catalog! I know that some of you aren’t a big fan of 2-step stamping because it can be hard to line up the stamp sets but I have a few tips for you! You can also create the card without both stamped images. You can do just the flower base, just the outline, or both! It is all up to you and your personal preference!!!
As you can see in this sample, I didn’t do the 2-step stamping. I just did the solid background flower stamp in the full strength! Both of the cards look fabulous but the one up top has a lot more definition and texture with each flower!
I started with a Tip Top Taupe card base! Then I took a piece of Whisper White measuring 4″ x 5-1/4″. Using the Thank You from the So Very Much Sale-A-Bration Stamp Set, I stamped it in Tip Top Taupe Ink. I love this set for that big scroll-y font! It is just beautiful and you only need a little bit of decoration to create an amazing card! You can see another fabulous sample using this set here! Next I stamped the flowers from the So Succulent Stamp Set. I started with the biggest flower first and then filled in. I did the big flower in Sweet Sugarplum. Then the smaller flower in Calypso Coral and the greenery in Mint Macaron.
For the card at the top, I stamped outline first in full strength ink and then I stamped the solid inside of the flower after stamping off once. This gives that lighter shade and two tone look. I have found that it is easier to stamp the outline first since it is nice and dark. You can see that through the solid image. Also, since the solid image is stamped off once, it is lighter and easier to see through and line up with the outline image. Another way to get the images lined up perfectly is to use a Stamp-A-Ma-Jig! Once I had all of the flowers stamped, I adhered that piece to the card base and then you are all done!!!
I hope these tips help you when you are 2-Step Stamping with the Oh So Succulent Flowers! If you would like to see this all in action, check out the Video Tutorial below or click here! Be sure to give this video a thumbs up if you liked it and don’t forget to subscribe if you are new! I post every Tuesday and Thursday! Also, stay tuned for all of the other samples shown in the video!
Happy Tuesday and Happy Valentine’s Day!!! Today I’m going to share a fabulous technique in my favorite color! After all I LOVE Pink and today is all about love, right??
How amazing is this card?!?!?! All that Pink! That amazing background! I am in love although I probably won’t be making a ton of cards exactly like this…..that background was crazy! It’s always cool and fun to do something at least once though!!! Let’s get started!
I started with a Basic Black card base. Then I took a piece of Whisper White (4″ x 5-1/4″) and stamped the “Birthday To You” from the Happy Celebrations Stamp Set all over in Melon Mambo Ink. I just love black and white with a pop of pink! To get those various shades of pink on the greeting, I stamped a few times before going back to the ink. I would ink it up and then stamp in a random place, then move down and over and stamp again. Repeat this once more. Then I would go back to the ink and stamp the same but in reverse so that the darkest was now next to the lightest. Just keep filling in until it is all covered. Don’t worry about your spacing or being straight. It is made with love, not perfection and a lot of it is covered up so you can’t see the entire piece!
Once I was finished with this piece, I adhered it to the card front! Now for the Happy greeting!!! I took a piece of Whisper White (4-1/2″ x 2-1/4″) and ran it through the Big Shot in the Celebrations Duo Embossing Folder. This will give you that fabulous de-bossed Happy image. Now it’s time to add some color! I found that stamping with the piece on the Stampin’ Pierce Mat works best because then there is some give for the debossed image and you aren’t smashing it all. It gives a nice stamped image as well. Place the debossed image on the Stampin’ Pierce Mat and using the image from the Happy Celebrations Stamp Set, stamp over each letter with Melon Mambo Ink! When you stamp, you can see the ink touch the paper. Sometimes you will need to press a little more in certain spots to make sure the stamp touches the paper.
There other super cool thing is how you can create 2 projects from this technique. Once you stamp on the de-bossed image, you will notice the letter in your stamp because the ink is still there where the letter is de-bossed. You can then stamp that onto another piece of paper to get the cool look of the Happy in the photo above (bottom greeting). How cool is that??
Once I finished the de-bossed image, I layered it onto Basic Black measuring 2-3/4″ x 4-3/4″ with Stampin’ Dimensionals. I like using Dimensional when working with embossed images so it lays flat and adheres well…..and because I love them so much! Then I added this to my card front and finished it off with a few Rhinestones. Got to have some bling! I added a piece of Whisper White (4″ x 5-1/4″) to the inside of the card as well since it is hard to write on black cardstock! Love it!!!
If you would like to see this all in action, check out the Video Tutorial below or click here! Be sure to give it a thumbs up if you liked it and don’t forget to subscribe if you are new! I post a video every Tuesday and Thursday! You can also check out another sample I created with these folders here!
What color would you use to create this card?? Let me know in the comments below! I’m thinking I need to try Bermuda Bay or Cucumber Crush for a boy card!!!