So much texture!!!

Posted on

Flower Texture Layers, www.LaurasStampPad.com

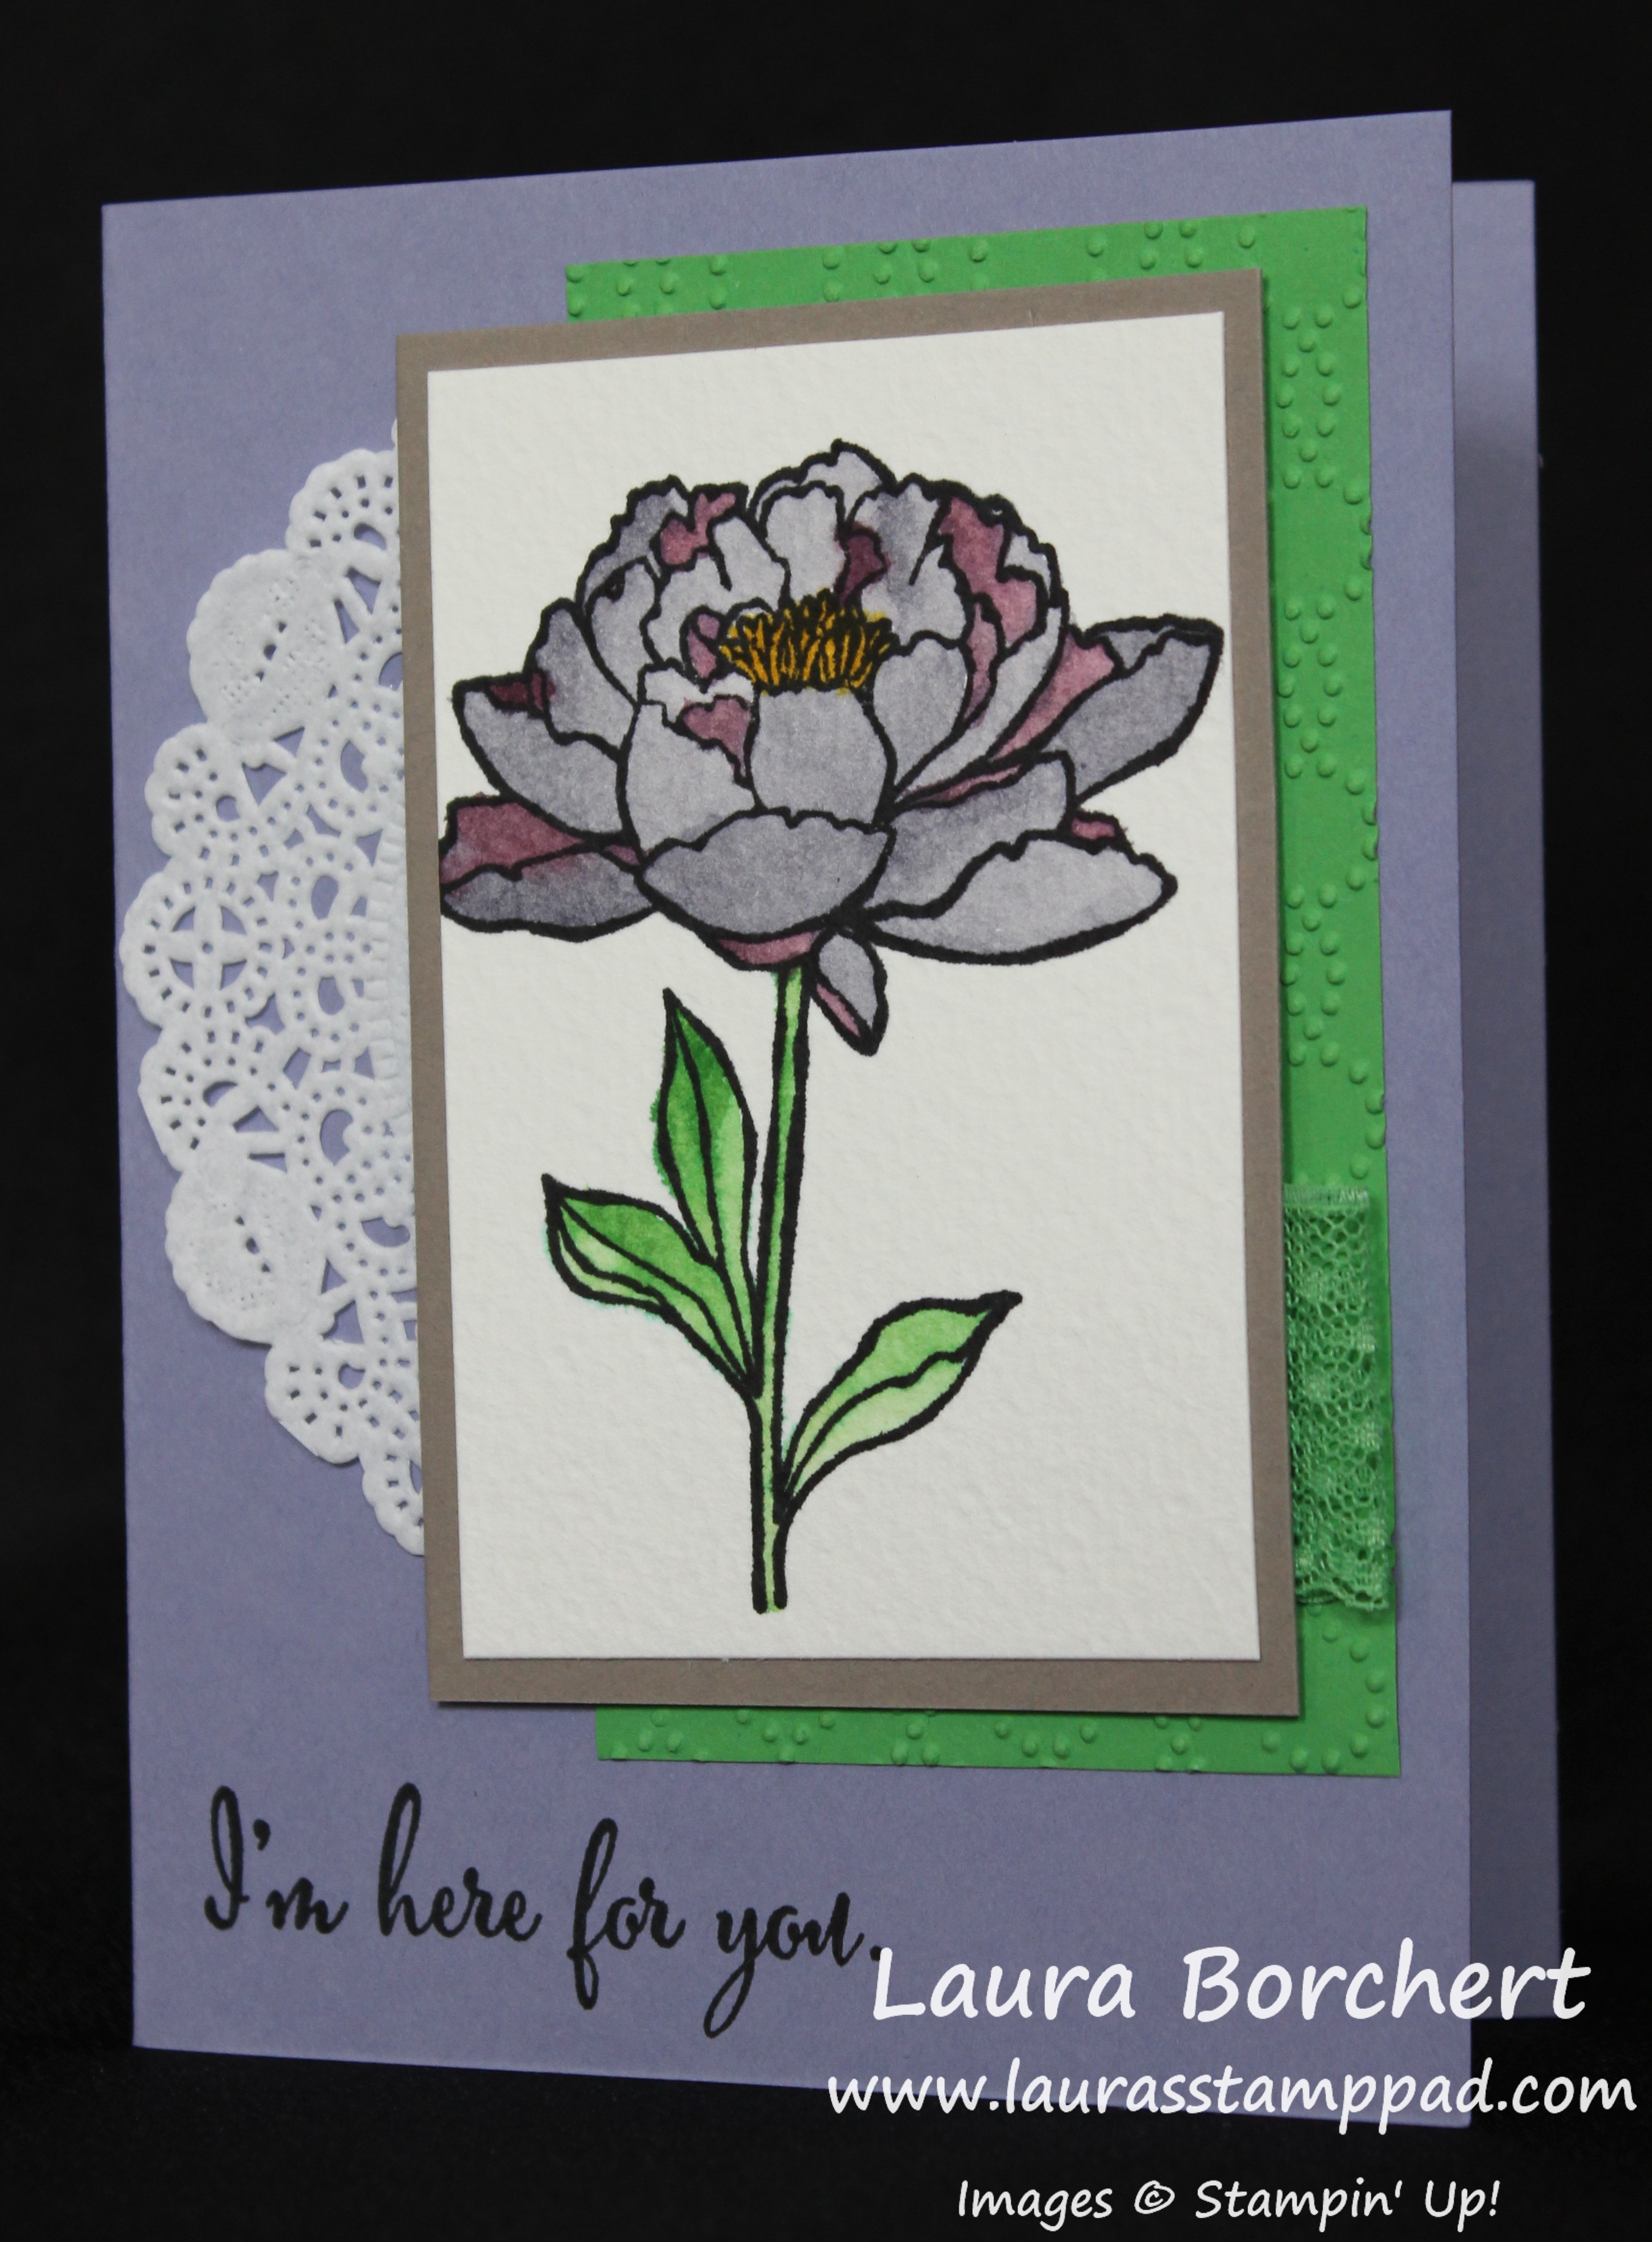
I feel like I mention it a lot but texture on a card can really make it go from nice to FABULOUS! This card is fabulous for sure to me! I love all of the textures with the doily, ribbon loop, and embossed cardstock. Do you think it is too much? Let me know in the comments below if you like texture or not!!!

I started with a Wisteria Wonder card base and stamped the greeting from You’ve Got This in Basic Black on the bottom. Then I took a piece of Cucumber Crush and ran it through the Big Shot in the Elegant Dots Embossing Folder and adhered it to the card on the right side. I added a 1/3 piece of a White Tea Lace Doily to the edge of the Cucumber Crush. You can cut the doily into 3 pieces and really get the most out of each one! 🙂 For the flower, I stamped it from the You’ve Got This Stamp Set in Stazon Black onto Watercolor Paper. I used an Aqua Painter to color in the flower in Wisteria Wonder, Rich Razzleberry, and Cucumber Crush! I love how it turned out with the shading and all. Watercoloring is something that usually something I feel like I either nail it or it’s ehhh! After the flower was completely dry, I layered it onto Tip Top Taupe with Tear and Tape because I like to use a strong adhesive to really hold down the watercolor paper since it isn’t always flat. I added a little loop of Cucumber Crush Lace Trim to the right hand lower side of the flower before adding it to my card front. This is a great way to use those little scraps at the end of a roll or that you trimmed off from another project! Love it!!!

You can check out more samples using this stamp set here, here and here!

Happy Water Colorin’

~Laura


Wedding Bliss!!!

Posted on

Black, Red, and White Wedding Invite, www.LaurasStampPad.comYou all know how much I love weddings and even more when they are friends or family of mine! Today, I’m going to share with you my friend, Megan’s wedding which was this past weekend! I started working with Megan on the invites a year ago. She knew exactly what she wanted after looking at a few samples of mine – Red, Black, and White and the pocket style invite! One of my favorite stamp sets – Baroque Motifs, which is retired, is one that I use a lot for wedding stationary. It is that perfect elegance to add to an invitation. You could also use the Flowering Flourishes Stamp Set. That image was stamped down the left hand side of the invitation as well as all of the cards in the pocket!

Pocket Cards for a Wedding Invite, www.LaurasStampPad.com

I love how it all turned out! For the belly band to wrap around the invitation, I used Read Red cardstock with some Organza White Ribbon. Then I added the Monogram Letter to the middle after punching it out with the Decorative Label Punch! I love it!

The two cards that are above the invitation were Thank You Notes that Megan wanted to match her Invitations. I simply stamped the baroque image in the center and added a monogram letter. The letter is punched out with the 2″ Circle Punch and layered onto the 2-3/8″ Scallop Circle Punch.

Wedding Card Box, www.LaurasStampPad.com

A few days before the wedding, Megan reached out to me asking for a banner that said Cards to place on this box. She left the design all up to me. I decided to keep the theme going. I used Black Satin Striped Ribbon to hang each of the tags. Each tag was punched at the top with the Scallop Tag Topper Punch and rounded on the bottom with the Corner Rounder Punch! I layered a piece of Whisper White on top and stamped the letters and a little corner of that Baroque image. I love it! I used Mini Glue Dots to hold each of the tags in their spot on the ribbon!

Thank You Notes, www.LaurasStampPad.com

A few weeks before the wedding, Megan asked for more thank you notes because she was out of the ones from before. I asked what design she would like and she sent me a photo of fabric that was black and white stripes with gold dots all over. These are what I came up with! I used the Neutrals Designer Series Paper for the polka dots and stripes onto a Whisper White card base. Then I added various sizes of circles punched out of Gold Glimmer Paper! The greeting is from the One Big Meaning Stamp Set! She loved them and ended up asking for more so that she could use them for wedding stuff and after!

Polka Dot Card, www.LaurasStampPad.com

After all of those circles and dots, I couldn’t stop myself and so I created this wedding card for the fabulous couple. I used some leftover scraps from the Neutrals Designer Series Paper, Real Red cardstock, and Silver Foil Paper! I loved it! The greeting is from the Blessed By God Stamp Set!

I love how it all turned out and it all came together perfectly! Megan, the bride, loved it all and was really excited each time I created another piece for her! It makes my heart happy when I can help a Bride create the wedding of their dreams. You can check out some more of my work at Weddings.LaurasStampPad.com. If you are getting married or know someone who is, feel free to pass my information along. I can work with any budget and create according to the wedding colors and theme!

I hope you enjoyed all of this and I know I have been randomly sharing bits and pieces of the wedding for a few months now! 🙂

Happy Stampin’

~Laura


WWYS Challenge – Among the Branches!!!

Posted on

Happy Monday!!! I hope you all had a wonderful weekend! Today, I’m participating in the What Will You Stamp Challenge using the Among the Branches Stamp Set! Here is what I created!

Among the Branches, www.LaurasStampPad.com

I love Bermuda Bay and when I saw those snowflakes I knew that I wanted to use that color. I started with a Bermuda Bay card base and then stamped snowflakes all over a piece of Pool Party measuring 4″ x 5-1/4″. The snowflake is from the Among the Branches Stamp Set. Then I took a piece of the White Glitter Ribbon and colored the backside of it with the Bermuda Bay marker! I love coloring ribbon! I attached this to the Pool Party cardstock and added it to my card base with Stampin’ Dimensionals! For the greeting, I stamped it in Bermuda Bay onto Whisper White cardstock and punched it out with the 2″ Circle Punch. Then I punched out a 2-3/8″ Scallop Circle of Silver Foil Paper! I layered the circle onto the scallop and then added it to my card front with Stampin’ Dimensionals!

Dazzling Details, www.LaurasStampPad.com

To finish it off, I added little dots of Dazzling Details to all of the little dots on the greeting stamp! This adds a little glitz and texture! I love it!!! If you would like to play along on these challenges you can check it out here!

wwys_34_Among the Branches, www.LaurasStampPad.com

Which greeting is your favorite – Spooky, Making Spirits Bright, or Autumn Wishes? Let me know in the comments below!

Happy Stampin’

~Laura


Using a Brayer on an Embossing Folder!

Posted on

Snowy Trees, www.LaurasStampPad.com

Day 3 of the Woodland Embossing Folder Tour!!! You can check out Day 1 here and Day 2 here! Today I’m going to show you how it looks to add ink to the other side of the Woodland Embossing Folder! Let’s get started!

For this technique, you will want to use your Brayer or just turn the ink pad upside down and ink up the side of the embossing folder that says Sizzix. This is the more solid background and not the trees. I found that the Brayer gave a more solid bold look to the folder and you won’t fall into the trees like you do when you use the ink pad. That’s just a personal preference. I’m just excited to finally use my brayer since it has been in the drawer for longer than I would like to admit and I just never knew what to do with it! Now I’m going crazy using it with this new technique. I used Pool Party ink in the samples today but you could use Basic Black for a night time look or even yellow/orange for a sunset/sunrise look or green for a forest look. There are so many possibilities. Once your folder is all inked up, you will place your cardstock inside and run it through the Big Shot. You might want to rub on the folder a little bit before opening it and pulling out your cardstock just to make sure you have good coverage! Now you can use it on your project!

For the sample above, I layered it onto Real Red cardstock and then a Pool Party card base. I used the greeting from the Sheltering Tree Stamp Set and cut the banner tips with the Banner Triple Punch! I added a little heart that I punched with the Itty Bitty Accents Punch and Red Glimmer Paper! I love it. This card could be used all winter long for any occasion!

Spring Time in the Forest, www.LaurasStampPad.com

I went for a more spring look with this card! I added little flowers from the Sprinkles of Life Stamp Set and coordinating Tree Builder Punch! I added these to the card with Mini Glue Dots! I thought I needed more color in this card so I added a piece of Calypso Coral cardstock at the bottom and tied some Whisper White Satin Ribbon around it. For the greeting, I used the Lovely Amazing You Stamp Set and punched it out with the 1-3/4″ Circle Punch. I layered it onto a 2″ Pool Party Circle. Of course the greeting was added to the card front with Stampin’ Dimesionals! I love the Spring look. Can we just jump from Fall to Spring???

If you want to see this technique in action, check out the Video Tutorial below or click here! Don’t forget to give it a thumbs up if you liked it!!!

Which of these cards that I shared over the past few days are your favorite? Brayer the Trees? Sponge the Trees? Brayer the Background? Let me know in the comments below!

Happy Stampin’

~Laura


Technique Tuesday – Ways to Use the Woodland Folder!

Posted on

Happy Tuesday!!! That means I have a fabulous technique to share with you! Even better…..it will continue til Thursday!!! That’s right; I will be showing you ways to use your Woodland Embossing Folder for 3 days!! Woot Woot!!!

Woodland Embossing Folder, www.LaurasStampPad.com

I love the rustic Man look of this card; perfect for lots of the men in my life who are hunters and farmers! This woodsy card is perfect for them or even a Holiday card!! I used the Woodland Embossing Folder from the Holiday Mini Catalog. I’m sure you are wondering how I got my tree trunks brown so let’s get started!

SUPPLIES NEEDED: Woodland Embossing Folder, Big Shot, Brayer

I started with a Mossy Meadow card base and then I cut a piece of Whisper White cardstock measuring 4″ x 5-1/4″. Using the Woodland Embossing Folder, I added Chocolate Chip ink to the trees (the side that doesn’t say Sizzix). You can add the ink with a Sponge Dauber (light), a direct to folder with the ink pad (not always clean), or a Brayer! I found that the Brayer worked the best for a bold image and I didn’t fall into the spots between the trees at all like I did with the ink pad (see left corner on the sample above). Once it is all inked up, place your white cardstock in and close it. Run it through the Big Shot like you normally would and when you are done, you will get these fabulous brown trees. Now since you are doing the trees and those are the images that pop forward, you will notice that your trees are de-bossed (meaning they are pressed in rather than popping out). That is how it is suppose to come out! 🙂 Now you can add it to your card front and decorate. I added some Mossy Meadow leaves using the Sprinkles of Life Stamp Set. For the greeting, I stamped Happy Birthday from the Teeny Tiny Wishes Stamp Set in Mossy Meadow and punched it out with the Word Window Punch. I layered that onto a Mossy Meadow Washi Label Punched piece. I layered this with Stampin’ Dimensionals onto a piece of frayed Burlap Ribbon. First I cut the ribbon in half length ways and then just pull out some of the stitching to get that frayed look. Very masculine and rustic looking!

If you would like to see a Video Tutorial on how to create this look, check out the video below or click here! Don’t forget to give it a thumbs up if you liked it and be sure to subscribe so you don’t miss the Part 2 tutorial!

Happy Stampin’ and see you back here tomorrow!!!

~Laura


September 2015 Paper Pumpkin!!!

Posted on

September 2015 Paper Pumpkin Contents, www.LaurasStampPad.com

Look at all of the fabulous goodies that came in the September Paper Pumpkin Kit! The theme is for sure fall with the kraft colored items and Cajun Craze Ink Spot!!! You can check out my excitement and reveal of this kit here! I couldn’t wait to bust into this kit and play with the stamp set! It is just so cute and perfect for all fall occasions with the leaves, acorn, pumpkin, witch’s hat, candy and greetings! I made a few of the treat bags into Hostess Gifts for my fall parties!

Hostess Gifts, www.LaurasStampPad.com

Some of these look a little oddly shaped because of the prize inside! 🙂 It was super simple to assemble these bags. The fringe already has adhesive on it and it was easy to wrap around the bag. I found that the raffia ribbon held better without and third hand when tying the bag. Some of the bags used just the Cajun Craze Thick Baker’s Twine and some used just the Raffia and some used both. I loved making the little tags. I used a few other ink colors – Cherry Cobbler, Garden Green, Chocolate Chip, and Soft Suede (as well as the Cajun Craze). That little filigree image is super fabulous!

Halloween Treats, www.LaurasStampPad.com

I made a few more with just candy in them for Trick or Treaters!!! Don’t worry about the size of these bags and thinking you need to really fill them. I found that these treat bags with less in them than the ones above turned out cuter!

Fringe Cards, www.LaurasStampPad.com

Then since I didn’t really need a ton of treat bags, I would I would create a few cards. These 2 cards used 1 of the fringe piece with some still left over. I ran a piece of Tear & Tape Adhesive into 3 lines on a piece of Crumb Cake Cardstock. Then I took the fringe and laid it down, trimmed it off, laid it down on the one above, trimmed it off and so on. For the last set (top one) I just torn off the adhesive backing that was already on there and stuck it down! I used both the Baker’s Twine and Raffia on these cards and added the tags! Super cute but since I used one of the fringe piece, I had to do this…….

Mini Lunch Bag, www.LaurasStampPad.com

I just folded the bag down and stapled it on either side and then tied some ribbon around it. It’s so cute and little!!! I still had some tags left so I created this little note card!

Truly Thankful Card, www.LaurasStampPad.com

This was super simple and I used up some small raffia pieces as well as one of the tags. This would be perfect for Thanksgiving! Even after all of these projects, I still had goodies left over! I love these kits!!!!

September Paper Pumpkin 2015, www.LaurasStampPad.com

Don’t forget to sign up for the October PINK Box before the 10th!!!! Stampin’ Up will donate $1 for all current subscribers and $2 for all new subscribers to Breast Cancer Awareness!!!! I love supporting a good cause and enjoying some crafting time!!! Win Win! Click here to subscribe today!!!!

You can see more samples using this kit in alternative ways here!

Of course, it isn’t a Friday without the Weekly Deals as well!

Weekly Deals 10.6

Have a fabulous weekend!!! See you back here on Monday!

Happy Stampin’

~Laura


Ornament Elegance!

Posted on

embellished ornaments, www.LaurasStampPad.com

I love using Purple for Christmas Cards. It might not seem traditional but it is just so elegant and royal and I love that!!! What color do you like to use the most for your Holiday Cards? Let me know in the comments below!

I started with a Blackberry Bliss card base. Then I took a piece of Whisper White measuring 4″ x 5-1/4″ and stamped the trees from the Wonderland Stamp Set (or you could use the Lovely As A Tree Stamp Set) in Mossy Meadow and stamped them at the top left corner. I stamped a few times before returning to the ink pad and made sure to take in different angles and some far in and others just a little bit. This will give a full tree look! I stamped the greeting from the Embellished Ornaments Stamp Set in Mossy Meadow in the bottom right corner. For the ornament, I took a piece of white scrap paper and stamped the ornament in Blackberry Bliss. Then I die cut it with the coordinating Thinlits – Delicate Ornament Thinlits (Bundle & Save 15%)! I also die cut the little ornament cap from the Thinlits using Silver Foil Paper. I used a Mini Glue Dot to attach that to the top of the ornament. I tied a bow with the Silver Ribbon and attached it with a Mini Glue Dot as well. I added the ornament to the card with Stampin’ Dimensionals! 🙂 I love it!! It is very simple and elegant!!

If you would like to see a Video Tutorial on how to create the tree branch, check out the video below or click here! Be sure to give it a thumbs up if you liked it!

Happy Stampin’

~Laura


Technique Tuesday – Ways To Use Ribbon!!

Posted on

Happy Tuesday!!! That means I have a fabulous technique to share with you today!! It is all about ribbon! Ribbon is my favorite embellishment!

Ways to Use Ribbon, www.LaurasStampPad.com

Look at all of these fabulous samples that use ribbon in lots of different ways!!!! Here are just a few of my favorites:

  1. Cut a strip and lay it across your card/project to add a little texture, cover up a distinct line between 2 pieces of cardstock or just for a little flare! See Thinking of You Butterfly Card which uses White Organza Ribbon or the You’re The Best which uses Whisper White Cotton Ribbon!
  2. Add it along the top or side of your card/project in a knot and add a few more knots of the same color or coordinating colors. This is a great way to use up scrap pieces and add texture and coverage to your card if it has a simple image or greeting! See Happy Birthday Candle Card which uses Melon Mambo, Pumpkin Pie, and Daffodil Delight Cotton Ribbon!
  3. Add a strip of ribbon along your card/project and then create a Fork Bow to add to the middle or side! You can also just add a fork bow to your project anywhere without the line of ribbon! Click here for a video tutorial on how to create one! See Purple Hi Card which uses Rich Razzleberry Cotton Ribbon!
  4. You can create a Faux Knot with the ribbon as well which usually it a little less bumpy and bulky on your card. You will take 2 strips of ribbon and create a t or cross on your card/project. You will want to adhere the ends of the horizontal piece to the back of your cardstock. With the vertical pieces you will tie a knot. This usually only requires one knot rather than a double knot which is why it is less bulky. See You Make My Heart Happy Card which uses Whisper White Satin Ribbon and this sample!
  5. You can use ribbon for a little texture and flare by making loops of it and sticking it to the back of your greeting or focal image. Click here to see a video tutorial on that. See Congrats Card which uses Black Baker’s Twine!
  6. You can tie a fairly loose knot in a strip of ribbon and tack the ends behind your cardstock for a simple knot on your card/project. See Simple Knot in the photo below and a sample in the video below!
  7. You can create a bow (bunny ear style) and attach it to your card like this one and this one!
  8. You can use it on gift boxes, treat bags, and so much more! See samples here, here, here and here!
  9. You can cut the ribbon ends straight across, diagonal or fold it in half and cut diagonally down from the fold to the end and you will create those perfect banner tips!
  10. You can see tons and tons of samples using ribbon when you click on the key word Ribbon along the right hand side of my blog or click here!

Types of Bows &.Knots, www.LaurasStampPad.com

You can also see a Video Tutorial on these bows down below or by clicking here! Don’t forget to give it a thumbs up if you liked it!!! Be sure to subscribe to my YouTube Channel – Laura’s Stamp Pad so you don’t miss out on any future videos and you can easily find my videos in the future! 🙂

I hope you enjoyed this Technique Tuesday and try out some of these ribbon ideas on your next project! Let me know in the comments below which one your favorite is!

Happy Stampin’

~Laura


Pink Perfection!!!

Posted on

Pink Butterfly, www.LaurasStampPad.com

I found another sample using the Watercolor Wings Stamp Set that I haven’t shared yet!!! You all know how much I love this one because it is so many fabulous shades of Pink!! (Don’t forget that Paper Pumpkin is going Pink this month!)

I started with a Pink Pirouette card base and then I took a piece of Rose Red and stamped the greeting from the Thoughts & Prayers Stamp Set! Then I took a White Tea Lace Doily and cut it in half and added adhesive to the center half circle and placed it on the top of the Rose Red. I didn’t like the edge of the Doily showing so I added a strip of Whisper White Organza Ribbon and adhered the ends to the back. Now you can place this onto your card front! For the butterfly, I took a piece of scrap Whisper White and used the Watercolor Wings Stamp Set! I used Pink Pirouette for the base, Rose Red for the second one (sides), and Melon Mambo for the third one (center and outside dots). Love it! Don’t stamp the center thorax piece until after you have cut it out. I found that if I stamped it now, sometimes it was up to high and others down to low. Using the Bold Butterflied Framelits (Bundle & Save) and the Big Shot, I cut it out! Woot Woot for not fussy cutting! Once it is cut out you can stamp the center piece in Basic Black! Of course I added the butterfly to the card with Stampin’ Dimensionals!

Butterfly Color Template, www.LaurasStampPad.com

Here are lots of butterfly color combinations that you can use!!! Also, you can check out more samples using the Watercolor Wings here, here and here! You can check out a Video Tutorial here!!!

Which one is your favorite?? Let me know in the comments below!

Happy Stampin’

~Laura


Adding Texture with Gold Thread!!!

Posted on

Gold Stripes & Thread, www.LaurasStampPad.com

See those little bits of Gold Metallic Thread peaking out adding texture and catching your eye! Isn’t it fabulous? I have seen this style in lots of cards lately and couldn’t wait to try it out! I really like the look….on some cards better than others, so I think that I still a little rusty on the look! Now let’s get started on this card!

I started with a Whisper White card base and then added a piece of 4″ x 5-1/4″ Winter Wonderland Specialty Designer Series Paper! I love those gold stripes! For the greeting, I actually cut out the label first rather than stamping first since the flower is large and needs to fall off. I used the Lots of Labels Framelits. I stamped the greeting from the Reason for the Season Stamp Set in Basic Black! Then I stamped the poinsettia border in Basic Black, the petals in Real Red, and the leaves in Mossy Meadow! If you wanted the all of the flower on your card, you could use one of the larger labels. Don’t forget that when stamping the flower you want to take note of where the arrow (or nubbin) is so that you can line up the petals and leaves easily as well. Now for the thread, wrap the Gold Metallic Thread around your hand 8-10 times or however many you wish! 😉 Now slip the loops off and place them on the back of the greeting label. Slowly move the loops around so they are popping out on all sides of the label. Add Stampin’ Dimensionals in various areas to hold your loops down and pop up your greeting. You all know how I love my Stampin’ Dimensionals so I used 5 on this one I think! I found out that I like the ends of the thread tucked in rather than sticking out. If you want them tucked in be sure to stick those under a dimensional. Now you can peel off the backs of the dimensionals and add it to your card front. I love it!!

If you would like to see the thread placement in action, you can check out the Video Tutorial below or click here. Be sure to give it a thumbs up if you liked it!

Have you tried this technique? What is your favorite thread or Baker’s Twine? Let me know if you have any tips to share on this technique in the comments below!

Happy Stampin’

~Laura