Falling In Love Suite!!!

Posted on

Falling In Love, www.LaurasStampPad.com

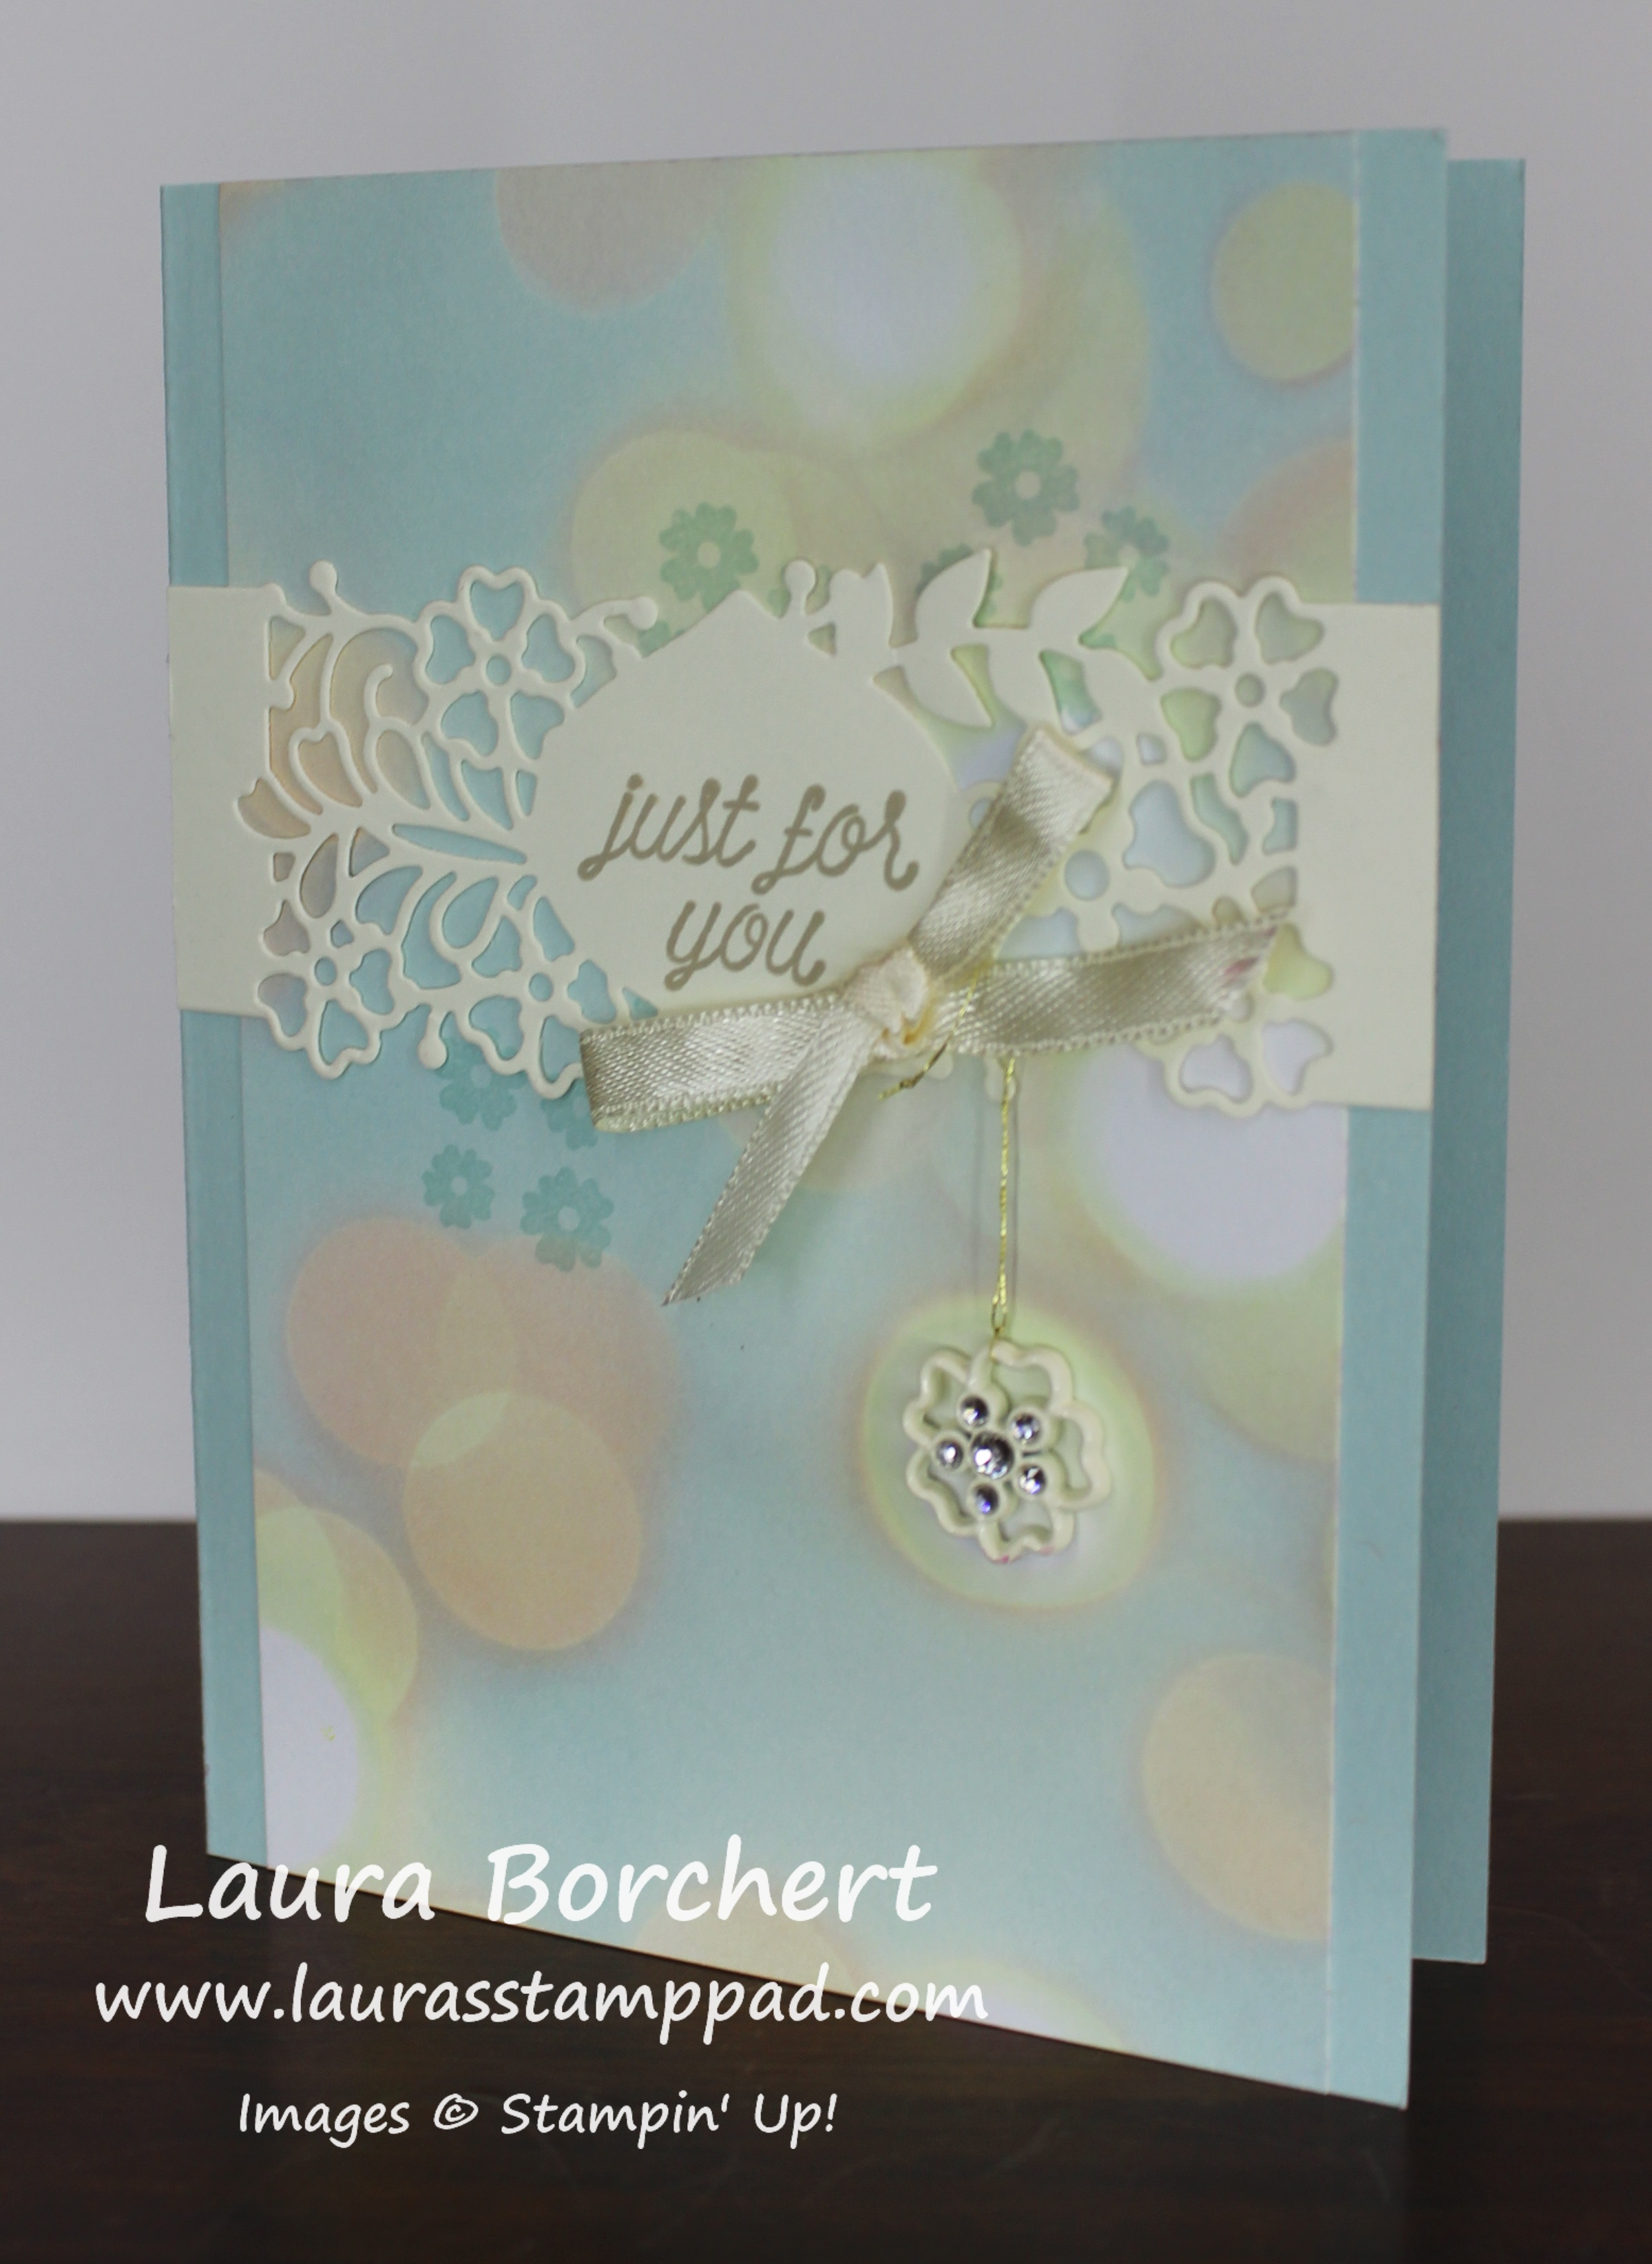
I’m falling in love with the Falling In Love Suite from the Occasions Mini Catalog! The Designer Paper, bling-y embellishments, stamps and framelits!!! I typically don’t care for the little embellishments but when I saw these in person, I was blown away. They are just so beautiful! Let’s get started on this beauty!

I started with a Soft Sky card base and added a piece of Falling In Love Designer Series Paper to the front! Using the flowers from the So In Love Stamp Set, I stamped a few onto the designer paper. I used Soft Sky Ink. This gives a fun little texture and pattern to the background! Next, I die cut the little belly band in Very Vanilla with the So Detailed Thinlit Dies. Technically, this piece is for a belly band to slide onto the card but I used just the front portion. I simply cut off the little tabs and adhered it to the card front. Using the coordinating So In Love Stamp Set, I stamped the greeting in the center of the belly band.

Detailed Jewels, www.LaurasStampPad.com

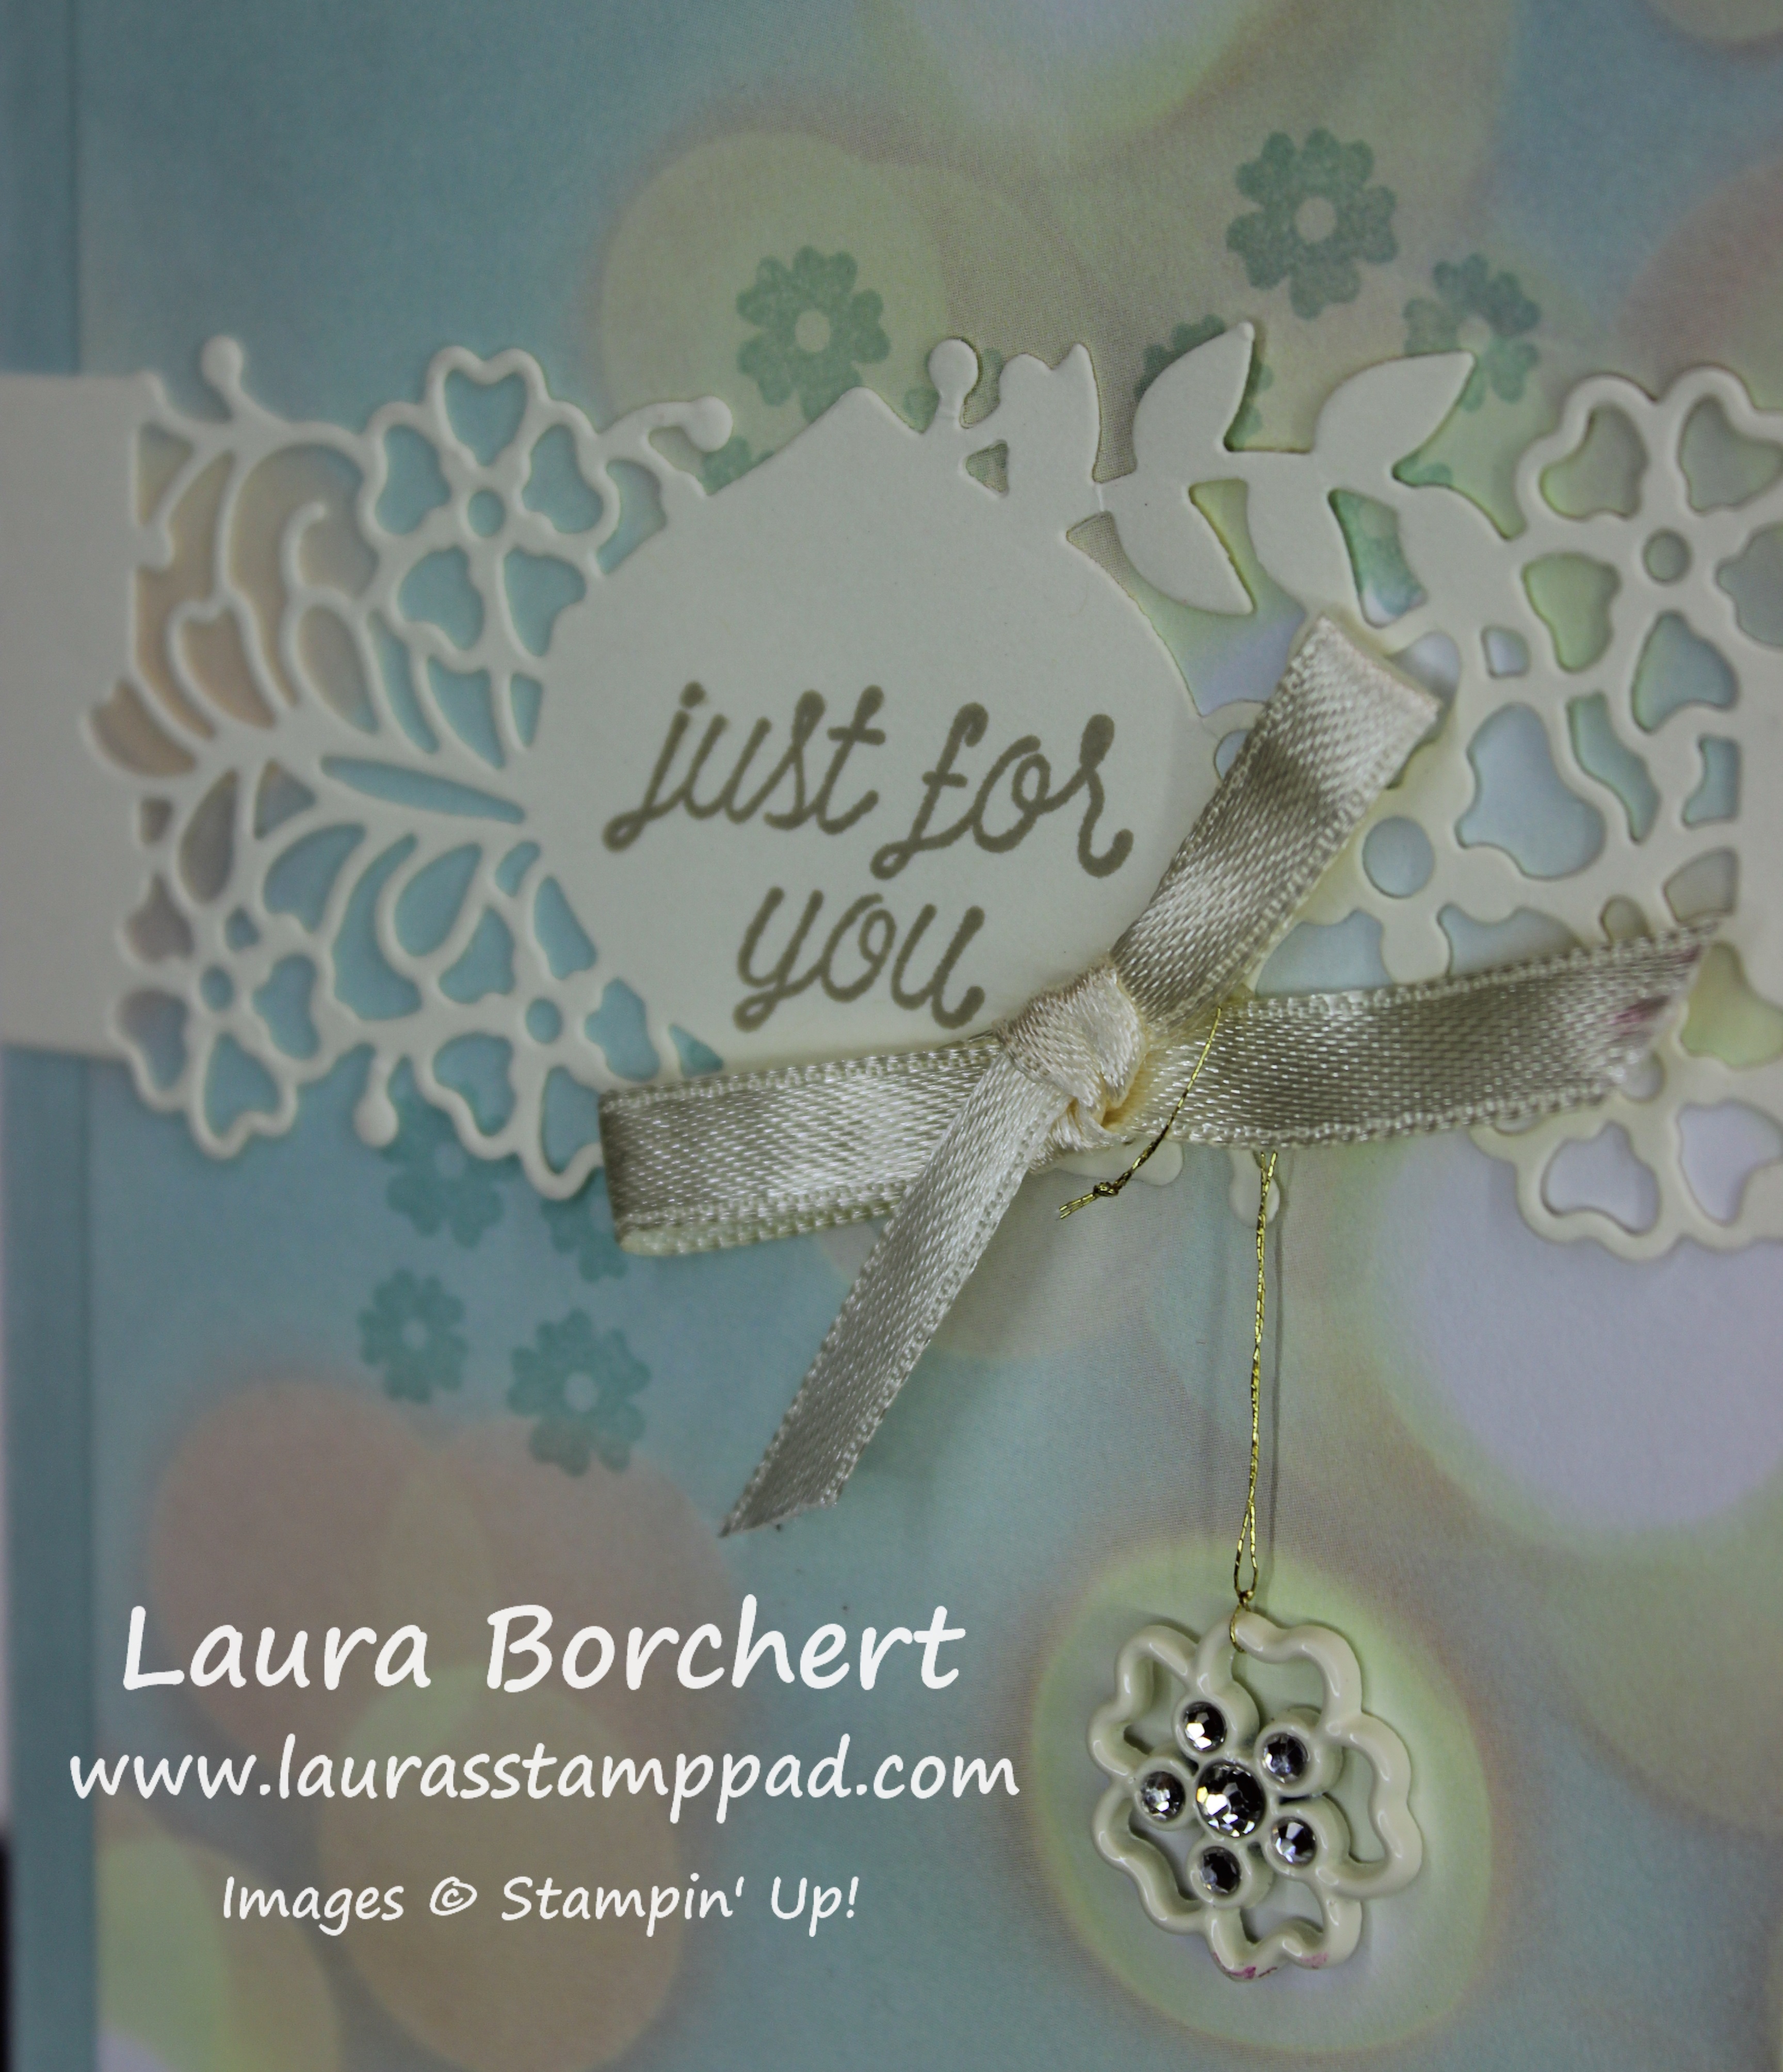
I finished off the card with a bow using the 1/4″ Very Vanilla Satin Ribbon. It was adhered to the card using Mini Glue Dots!!! For the little bling, I tied some Metallic Gold Thread around it and then around one of the loops on the belly band. That little Falling In Love Embellishment is just so beautiful! It is rather chunky and might not go through the mail very well but it’s fabulous! I love it!!!

You can purchase the So In Love Bundle (stamp set and thinlits) and save 10%!!! Click here for the set in clear! Click here for the set in wood! As if save 10% wasn’t enough, you can pick out a FREE Sale-A-Bration item when you get the wood bundle and if you add another item for $2.50 or more to the clear bundle! In fast, just get that amazing Falling In Love Designer Paper or Embellishments. Woot Woot! How amazing!!!! Don’t forget that Sale-A-Bration ends on March 31st and the items are while supplies last so get them before they are gone!

Have a wonderful weekend and I’ll see you back here on Monday!!!

Happy Stampin’

~Laura


Succulents Growing on a Brick Wall!!!

Posted on

Succulents Growing on a Brick Wall, www.LaurasStampPad.com

I have been having so much fun with the Oh So Succulent Bundle! These little succulents growing on a brick wall are one of my favorites! I went with the same color theme as the Succulent Garden Designer Paper. You can see more cards I created with these products here, here, and here! Now let’s get started on this card!

~ Card Instructions ~

I started with a Calypso Coral card base. Then I took a piece of Whisper White (4″ x 5-1/4″) and ran it through the Big Shot in the Brick Wall Embossing Folder! I stamped the greeting from the Any Occasion Sale-A-Bration Stamp Set in Calypso Coral Ink. Since that stamp is curved for a banner, I just straightened it out a little for this project!

For the succulents on a brick wall, I used the Oh So Succulent Stamp Set to stamp the outline images first and then I die cut them out with the coordinating Succulent Framelits. You can purchase these two items together a save 10%. Spend just $1.50 more and you can pick out a FREE Sale-A-Bration item too! 🙂 I did the 6 layered flowers in Old Olive cardstock and stamped the tips of the 3 largest flowers with the little “bean-looking” stamp in the set and Whisper White Craft Ink. To give the petals some curl, I ran them over my Bone Folder like curling ribbon! I used Sweet Sugarplum, Mint Macaron, and Calypso Coral for the other flowers. A few of the flowers were adhered flat and a few were popped up with Stampin’ Dimensionals! You can always do as many or as few flowers as you wish! I love it and the fun bright colors!!!

What is your favorite color to use for succulents? Let me know in the comments below! Also, don’t forget that this is the last month of  Sale-A-Bration. Every $50 order, you get to pick out a free Sale-A-Bration item! Woot Woot!

Happy Stampin’

~Laura


Technique Tuesday – Creating a Marbled Background!!!

Posted on

Happy Tuesday!!! You all know what that means!!! I have a super fun technique to share with you – creating a marbled background!!! Check this out!!

Best.Guy.Ever., www.LaurasStampPad.com

Isn’t the background super cool?? It is super easy as well. All you need are ink pads and baby wipes!!! I got this technique from fellow demonstrator, Sandy Jacobson! I love sharing ideas!!!

SUPPLIES NEEDED: Ink Pads, Baby Wipes

For creating the marbled background, I started with a piece of Shimmery White cardstock measuring 4″ x 5-1/4″. You can use regular Whisper White or Very Vanilla cardstock if you wish! It works the same with all but I liked the little hint of shimmer! Next, I took a wet baby wipe and balled it up and very lightly tapped it into an ink pad and then pounced all over the cardstock. I used Bermuda Bay Ink, Cucumber Crush Ink, and Pumpkin Pie Ink. You can pounce with each color as little or as much as you wish. It’s as simple as that! Super fun and comes out different each time. You can mix and match any color combination!

To finished the above card off, I placed it onto a Bermuda Bay card base. I stamped the birthday greeting in the lower right corner from the Balloon Adventures Stamp Set. The die cuts came from the Stitched Shapes Framelits in Cucumber Crush and a t-shirt from the T-Shirt Builder Framelits in Bermuda Bay. I stamped the front of the shirt with the Suite Sentiments Stamp Set. Next, I added the t-shirt to the square with Stampin’ Dimensionals to make it look a little more 3D. I added loops of Whisper White Baker’s Twine to the back of the square, securing it with Stampin’ Dimensionals and then adding it to the card front! Perfect Man Card!

Razzleberry Dress, www.LaurasStampPad.com

I used Wisteria Wonder Ink and Rich Razzleberry Ink for this one. For the decoration, I stamped the lady from the Beautiful You Stamp Set in Basic Black and her dress in Rich Razzleberry. The greeting was done in Wisteria Wonder. I went over her dress with a Wink of Stella Pen which added a little shine and blended it together a bit. I used the leftover bit of ink on the tip to color in her hat. Then, I layered this piece onto Silver Foil Paper and added it to the card front. To finish it off, I added a few White Perfect Accents. Love it!

If you would like to see this all in action, check out the Video Tutorial below or click here! Don’t forget to give it a thumbs up if you liked it and be sure to subscribe if you are new! I post every Tuesday and Thursday!

Have fun trying this out yourself! What color combination will you use? Let me know in the comments below!

Happy Stampin’

~Laura


Love Is In The Air!!!

Posted on
Love Is In The Air, www.LaurasStampPad.com

Ahhh, the weather has been warm and I’m loving every minute of it! Some say Spring is in the air but I say Love is in the Air!!! Spring is my favorite season. I love the new life of flowers, plants, and animals, that warm sun and cool breeze and all the bright colors!!! I can’t wait!!!

Card Instructions

For this card, I used a Calypso Coral card base. Then I took a piece of Whisper White (4″ x 5-1/4″) and stamped the 3 different clouds all over the background from the Lift Me Up Stamp Set. Marina Mist is the perfect blue for clouds! For the hot air balloon, I used the coordinating Up & Away Thinlits Dies to die cut out the pieces with the Big Shot! You can Bundle & Save 10% when you purchase these 2 together as a bundle. I did the detailed balloon in Calypso Coral. For the strips behind it, I did Marina Mist and Mint Macaron. I am loving this color combination. It is the perfect pastel collection. I used the Fine Tip Glue Pen to adhere the pieces to the back of the detailed balloon piece. You can also use a sponge and lightly pounce some glue from the Multi-Purpose Glue Pen onto the back. I added the hot air balloon to the card front with Stampin’ Dimensionals to give a little texture and 3D look to the balloon!

For the greeting, I added a piece of Marina Mist measuring 1/2″ x 4″ along the bottom. I stamped the greeting from the Lift Me Up Stamp Set onto a scrap piece of Whisper White. Using the Classic Label Punch, I punched it out and then added it to the card with Stampin’ Dimensionals. I used some of the skinny edge pieces. I just trimmed it to the correct length and it was perfect! To finish off the card, I added a few Enamel Shapes!! It is just perfect!!!

You can purchase the Lift Me Up Bundle in Clear and add on some Enamel Shapes or pack of Cardstock to get to the $50 order! Then you can pick out a FREE Sale-A-Bration item!!! If you purchase the Lift Me Up Bundle in Wood, you already have earned a Free Sale-A-Bration item!!! Now is the perfect time to get those favorites on your Wish List or stock up on items because every $50 order, earns you a Free Sale-A-Bration Item! Who doesn’t love FREE STUFF!?!?!? Click here to start shopping!!

If you would like to see more samples like this Love Is In The Air Card using the Lift Me Up Bundle, click here and here!

Happy Stampin’

~Laura


Technique Tuesday – Creating a Ruffle Dress!!!

Posted on

Happy Tuesday!!! You all know what that means! I have a fabulous technique to share with you today using the Watercolor Pencils. We will be creating a Ruffle Dress!!! Check out this beauty!!

Creating a Ruffle Dress, www.LaurasStampPad.com

I love this dress because it is PINK (of course) but it is also so big and beautiful! I went to my Junior year Prom in a huge baby blue Cinderella ball gown and it was amazing! Now I can create that amazing dress on the beautiful women in the Beautiful You Stamp Set! Love it!!! Thank you to Tandra Boyer for this amazing idea!!!

SUPPLIES NEEDED: Beautiful You Stamp Set, Basic Black Archival Ink, Watercolor Pencils, Aqua Painter

I started with a piece of Whisper White cardstock measuring 3-3/4″ x 5″. Next, I inked up the top portion of the lady from the Beautiful You Stamp Set with Basic Black Archival Ink. I used this ink because it won’t bleed when you watercolor. If you aren’t comfortable inking up just the top half of the stamp, you can always ink it all up and then mask over the bottom half with a piece of scrap paper!

After stamping her, I took the Melon Mambo Watercolor Pencil and make swirly lines starting at her waist and going down. Just keep adding squiggly lines until it looks full. I added a little bit of color along the lines of her shirt as well. Then I took the Aqua Painter and traced over the top of the swirly lines, allowing the color to bleed. Just keep swirling along each of those lines and color in the top as well. If it seems to get rather wet, you can always stop and allow it to dry a bit and then come back in with some some more color to accent or create shadows. You can make the skirt as full or straight as you wish! Just have fun with it!!

Purple Dress, www.LaurasStampPad.com

I created this ruffle dress with the Rich Razzleberry Watercolor Pencil! It is just so beautiful!

To finish off the card, I used a Melon Mambo card base and a strip of Gold Foil Paper along the left side (1-1/2″ x 5-1/2″). I stamped the greeting from the Beautiful You Stamp Set in Basic Black in the upper right corner and then added this piece to the card front with Stampin’ Dimensionals. I liked the added texture of the dimensionals and it hold the paper on real well since it can curl a bit after the watercoloring. To finish it off, I added a few Gold Metallic Enamel Shapes! I just love it!!! I might do the purple one with silver! 🙂

If you would like to see this all in action, check out the Video Tutorial below or click here! Be sure to give the video a thumbs up if you liked it and don’t forget to subscribe if you are new! I post every Tuesday and Thursday!!!

If you would like to see more samples using the Watercolor Pencils, click here and here! Have fun playing with the Watercolor Pencils!

Happy Stampin’

~Laura


Succulent Gardens!!!

Posted on
Succulent Gardens, www.LaurasStampPad.com

Succulent Gardens are all the rage right now and I am on that same train!!! Woot Woot!!! You all know I love flowers as it is but succulents are these cute little things that are just so precious! My Mom got me one for Christmas and so far it is still alive and cute as ever! Here’s hoping I can continue to keep it alive! 🙂

Now let’s get started on this beautiful card! You may have noticed that you can’t see the Old Olive on the front panel! I created this card in a fun way! I started with an Old Olive base measuring 4-1/4″ x 5-1/2″. Then I took a piece of Sweet Sugarplum measuring 4″ x 10-1/2″ and folded it in half like a card. I adhered this to the middle of the Old Olive base. This gives a fabulous little backing but a fun card base. You could always do this with a black base but a white card that you can write inside! You could do this with any card!

Now to decorate it, I used the Succulent Garden Designer Series Paper. I put a strip along the left side measuring 1-3/4″ x 5-1/4″. Then I layered another piece measuring 2-1/2″ x 3″. For the main point, I took a piece of Tip Top Taupe measuring 3-3/4″ x 2-1/4 and layered on a piece of Whisper White measuring 3-1/2″ x 2″. Before adhering it to the taupe, be sure to stamp the greeting from the Oh So Succulent Stamp Set in Tip Top Taupe Ink. It’s always best to stamp before assembling so you can flip it over if you make a mistake. I love that there are 2 sides to every piece of cardstock! 🙂

Next, I tied some of the Succulent Garden Ribbon Combo Pack around the cardstock. This ribbon is like soft and fuzzy. It’s a fun texture! For the flowers, I stamped them from the Oh So Succulent Stamp Set and die cut them out with the coordinating Succulent Framelits. You can bundle and save 10% when you purchase these two products together – click here to get the bundle! I did the large flower in Sweet Sugarplum and the small flower in Mint Macaron. The greenery pieces were done in Old Olive. I added the greenery flat to the cardstock and popped up the flowers with Stampin’ Dimensionals. Love it!!!

It was super easy to create this card and pick the colors because I just used the ones listed in the designer paper! The entire Succulent Suite is beautiful and goes together so well! You can see another sample here! When you purchase the bundle and save 10% as well as the coordinating Succulent Gardens Designer Paper, you can pick out a FREE Sale-A-Bration item!! Saving 10% and getting a free item is super fabulous! I love Sale-A-Bration time!!! Stock up on your favorite goodies before it ends on March 31st!!

Happy Stampin’

~Laura


Coloring With a Chalk Marker!!!

Posted on
Rustic Birthday Chalk Marker, www.LaurasStampPad.com

Happy Friday!!! Today we are going to be coloring with the White Chalk Marker! These markers are fun to use on black cardstock for that chalkboard look but you can use them for other projects like this one too!!! I love getting out tools and using them for more projects than the typical use! So get out that Chalk Marker and let’s play!!!

For this card, I used a Crumb Cake card base! Then I took a piece of Cucumber Crush (5-1/4″ x 4″) and ripped the top and bottom. You just want to do little tears all along, rather than one long rip!  Then I took another piece of Crumb Cake (5″ x 2-1/2″) and ripped the top and bottom of this piece as well. I stamped the Happy greeting from the Happy Celebrations Stampin’ Up Stamp Set in Crumb Cake Ink. After stamping the greeting, I used the White Chalk Marker and drew lines down each of the letters. I’m not the best at drawing and free-hand stuff so a simple line was enough for me but you could always decorate with dots, squiggles, or another design!

Now it is time to assemble! I adhered this piece to the Cucumber Crush piece and then stamped the “Birthday to You” in Cucumber Crush Ink in the lower right corner! Then I added this piece to the card front! To finish it off, I wrapped some Linen Thread around the top and tied it into a knot. Linen Thread is the perfect embellishment for a man card!!! Simple and fabulous!!!

You could always mix up the colors to match the recipients favorite color or based on the gender! If you would like to check out other samples using the Happy Celebrations Stamp Set by clicking here and here! If you would like to see more ways to color with the Chalk Marker, click here and here!

Don’t forget that Sale-A-Bration is still going on till the end of March! You can pick out a FREE item for every $50.00 that you order! You will also be earning Laura’s Loyal Stampers Stickers and after 10 stickers you will get a $40 Gift Certificate! Now is the perfect time to stock up on all the stamping goodies!!!

I hope you all have a wonderful weekend and I’ll see you back here on Monday!

Happy Stampin’

~Laura


2-Step Stamped Succulent Flowers!!!

Posted on
 2-Step Stamped Succulent Flowers, www.LaurasStampPad.com

I am in love with these 2-Step Stamped Succulent Flowers from the Oh So Succulent Stamp Set in the Occasions Mini Catalog! I know that some of you aren’t a big fan of 2-step stamping because it can be hard to line up the stamp sets but I have a few tips for you! You can also create the card without both stamped images. You can do just the flower base, just the outline, or both! It is all up to you and your personal preference!!!

Oh So Succulent, www.LaurasStampPad.com

As you can see in this sample, I didn’t do the 2-step stamping. I just did the solid background flower stamp in the full strength! Both of the cards look fabulous but the one up top has a lot more definition and texture with each flower!

I started with a Tip Top Taupe card base! Then I took a piece of Whisper White measuring 4″ x 5-1/4″. Using the Thank You from the So Very Much Sale-A-Bration Stamp Set, I stamped it in Tip Top Taupe Ink. I love this set for that big scroll-y font! It is just beautiful and you only need a little bit of decoration to create an amazing card! You can see another fabulous sample using this set here! Next I stamped the flowers from the So Succulent Stamp Set. I started with the biggest flower first and then filled in. I did the big flower in Sweet Sugarplum. Then the smaller flower in Calypso Coral and the greenery in Mint Macaron.

For the card at the top, I stamped outline first in full strength ink and then I stamped the solid inside of the flower after stamping off once. This gives that lighter shade and two tone look. I have found that it is easier to stamp the outline first since it is nice and dark. You can see that through the solid image. Also, since the solid image is stamped off once, it is lighter and easier to see through and line up with the outline image. Another way to get the images lined up perfectly is to use a Stamp-A-Ma-Jig! Once I had all of the flowers stamped, I adhered that piece to the card base and then you are all done!!!

I hope these tips help you when you are  2-Step Stamping with the Oh So Succulent Flowers! If you would like to see this all in action, check out the Video Tutorial below or click here! Be sure to give this video a thumbs up if you liked it and don’t forget to subscribe if you are new! I post every Tuesday and Thursday! Also, stay tuned for all of the other samples shown in the video!

Happy Stampin’

~Laura


Technique Tuesday – Poppin’ Pink!!!

Posted on
Celebrations Duo Embossing Folder, www.LaurasStampPad.com

Happy Tuesday and Happy Valentine’s Day!!! Today I’m going to share a fabulous technique in my favorite color! After all I LOVE Pink and today is all about love, right??

How amazing is this card?!?!?! All that Pink! That amazing background! I am in love although I probably won’t be making a ton of cards exactly like this…..that background was crazy! It’s always cool and fun to do something at least once though!!! Let’s get started!

SUPPLIES NEEDED: Celebrations Duo Embossing Folder, Big Shot, Happy Celebrations Stamp Set, Stampin’ Pierce Mat

I started with a Basic Black card base. Then I took a piece of Whisper White (4″ x 5-1/4″) and stamped the “Birthday To You” from the Happy Celebrations Stamp Set all over in Melon Mambo Ink. I just love black and white with a pop of pink! To get those various shades of pink on the greeting, I stamped a few times before going back to the ink. I would ink it up and then stamp in a random place, then move down and over and stamp again. Repeat this once more. Then I would go back to the ink and stamp the same but in reverse so that the darkest was now next to the lightest. Just keep filling in until it is all covered. Don’t worry about your spacing or being straight. It is made with love, not perfection and a lot of it is covered up so you can’t see the entire piece!

Once I was finished with this piece, I adhered it to the card front! Now for the Happy greeting!!! I took a piece of Whisper White (4-1/2″ x 2-1/4″) and ran it through the Big Shot in the Celebrations Duo Embossing Folder. This will give you that fabulous de-bossed Happy image. Now it’s time to add some color! I found that stamping with the piece on the Stampin’ Pierce Mat works best because then there is some give for the debossed image and you aren’t smashing it all. It gives a nice stamped image as well. Place the debossed image on the Stampin’ Pierce Mat and using the image from the Happy Celebrations Stamp Set, stamp over each letter with Melon Mambo Ink! When you stamp, you can see the ink touch the paper. Sometimes you will need to press a little more in certain spots to make sure the stamp touches the paper.

Double Happy, www.LaurasStampPad.com

There other super cool thing is how you can create 2 projects from this technique. Once you stamp on the de-bossed image, you will notice the letter in your stamp because the ink is still there where the letter is de-bossed. You can then stamp that onto another piece of paper to get the cool look of the Happy in the photo above (bottom greeting). How cool is that??

Once I finished the de-bossed image, I layered it onto Basic Black measuring 2-3/4″ x 4-3/4″ with Stampin’ Dimensionals. I like using Dimensional when working with embossed images so it lays flat and adheres well…..and because I love them so much! Then I added this to my card front and finished it off with a few Rhinestones. Got to have some bling! I added a piece of Whisper White (4″ x 5-1/4″) to the inside of the card as well since it is hard to write on black cardstock! Love it!!!

If you would like to see this all in action, check out the Video Tutorial below or click here! Be sure to give it a thumbs up if you liked it and don’t forget to subscribe if you are new! I post a video every Tuesday and Thursday! You can also check out another sample I created with these folders here!

What color would you use to create this card?? Let me know in the comments below! I’m thinking I need to try Bermuda Bay or Cucumber Crush for a boy card!!!

Happy Stampin’

~Laura


Birthday Present!!!

Posted on

Birthday Present, www.LaurasStampPad.com

This card is super adorable and can be changed up with any of your favorite Designer Series Paper. When you use Designer Paper in the same pack, then the colors always coordinate so that makes it super easy and fun to mix and match!!! I love it!!!

I started with a Whisper White card base and layered on a piece of Party Animal Designer Series Paper measuring 3-3/4″ x 5″! Then I took another piece of Party Animal Designer Paper (4″ x 3″) and added it to the card front with Stampin’ Dimensionals so that the present looks more 3D. I added a strip of Pacific Point (1/4″ x 4″) down the center of the card to look like ribbon. I used the Fine Tip Glue Pen since it is so little. I die cut the bow at the top from the Balloon Pop-Up Thinlit Dies in Pacific Point as well! I put a little piece of a Stampin’ Dimensional on the center of the bow and added it to the top of the present! I love it!! For the greeting, I stamped it from the Balloon Adventures Stamp Set in Tangerine Tango. The greeting was stamped onto Whisper White measuring 1″ x 3″. I punched the banner tips out with the Triple Banner Punch. I added the greeting to the present with Snail Adhesive but I lined up the edge of it with the edge of the background designer paper. Simple and fabulous!!!

You can Bundle & Save 10% when you order the Stamp Set and Thinlits together!!! You also get to pick out a Sale-A-Bration item for FREE when you order before March 31st! How amazing is that?!?!?! I love Sale-A-Bration because I love getting bonus freebies for every $50 I order! Click here to start shopping and earning your Sale-A-Bration items!

Happy Stampin’

~Laura