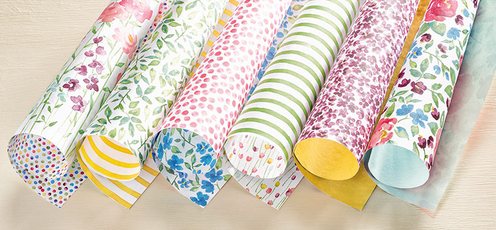
Painted Blooms & Friday the 13th!!!

Posted on

Happy Friday!!!! I hope you all had a wonderful week!!!! I just wanted to share this quick and simple FABULOUS card today to brighten your day!!!

Painted Blooms DSP, www.LaurasStampPad.com

This card uses the Painted Blooms Designer Series Paper from the Occasions Mini Catalog! I layered it onto some Rich Razzleberry and then a Blackberry Bliss card base! I added some Blackberry Bliss Satin Stitched Ribbon and the greeting is from the Label Love Stamp Set and coordinating Artisan Label Punch (Bundle & Save)!!! Perfect Anniversary or Wedding card!!!!

BONUS: I started my Laura’s Loyal Stampers this week and this weekend (Today, Saturday, & Sunday), if you place an online order you will earn double points. That means if you place an order for $25 or more, you will earn 2 points. If you place an order for $50 or more, you will earn 4 points and a Free Sale-A-Bration item!!!! Woot Woot!!! I’m so excited to start spoiling you all even more!!! How is that for Friday the 13th!?!?!?!

Of course, it’s not a Friday without the Weekly Deals!!!!

Weekly Deals 3.10

Also, I don’t want to have to say it but I feel you should know sooner rather than later. Stampin’ Up has discontinued the Blendabilities. As I stated last week, they turned the Blendabilities off because of a quality issue that Stampin’ Up and their customers were having. It seems this is a permanent defect in the pens that has microscopic holes in the barrels so they are drying out since they are alcohol. The manufacturer is unable to correct the problem to meet Stampin’ Up! high quality standards and provide a stable, long-term solution so they have been discontinued. 🙁 I am really sad about this but I won’t want to purchase or sell a defective product to all of you. Hopefully since these were super popular, Stampin’ Up will come out with a new Blendable pen soon! Fingers crossed!

Happy Stampin’

~Laura


Technique Tuesday – No DSP Waste!!!

Posted on

Happy Tuesday!!!! You know what that means…..I have a fabulous technique to share with you today! Today, I’m going to show you how to get the most out of your Designer Series Paper (DSP). After all when it is this gorgeous, you can bear to think some might go to waste. Have no fear, I’m here to cheer you on to USE that Designer Series Paper and use it ALL!

Painted Blooms

This is the Painted Blooms Designer Series Paper from the Occasions Mini Catalog! It is so amazing and beautiful….of course I would say that being a flower fanatic and all but still it is just fabulous! Well thanks to a fellow stamper friend of mine – Patty Bennett who showed off the perfect way to create 6 cards using the sheet of paper on the far left which is a field of flowers. Even Stampin’ Up didn’t want to cut this paper up and so they framed it!!!

Framed Blooms

So lets see how to create 8 cards with this one sheet of Painted Blooms Designer Series Paper!!!! First you will start with the top of the Designer Series Paper and measure 5-1/4″ down and cut all the way across. Then to the same again….measure from the cut line you just did 5-1/4″ down and cut all the way across. You will be left with a strip of flower stems that measures 1-1/2 inches wide. Now taking those two pieces that are 12″ x 5-1/4″, you will cut along the 12″ side at 4″. This will create 6 pieces measuring 4″ x 5-1/4″. With that bottom strip that is 1-1/2″, cut that along the 12″ side at 5-1/2 creating two pieces that measure 5-1/2″ x 1/1/2″. Those are your 8 pieces and you are only giving up that little corner piece but you could always find a use for that as well. Now you can adhere your Designer Series Paper to the card base color of your choice. I used Blackberry Bliss, Rose Red, Pool Party, & Whisper White!

Painted Blooms, www.LaurasStampPad.com

As you can see in the photo, the piece of paper was all used up! After you adhere the Designer Series Paper to your card base, you can decorate and embellish as you wish! I used the Million & One Stamp Set, Label Love Stamp Set and Lots of Thanks Stamp Set for my greetings. I used the Butterfly Thinlits on a few of them and thought that no greeting was necessary! I love how they turned out! Just beautiful!

Painted Blooms, www.LaurasStampPad.com

To see these cards in action and maybe understand the cutting a little bit better, I created a Video Tutorial for you! Be sure to give it a thumbs up if you enjoy it!

Don’t worry if you use up all of your Painted Blooms Designer Series Paper….I know where you can get more! 🙂 Want to see other ways to get lots of cards out of one sheet of Designer Series Paper? Check out this post!

Happy Stampin’

~Laura


Technique Tuesday – Rainbow Resist!!!!

Posted on

Happy Tuesday all! I hope you all had a wonderful weekend celebrating Valentine’s Day, Mardi Gras or just a nice weekend relaxing!!! Now it is time to get out those crafty supplies and create this amazing rainbow card because today is Technique Tuesday!!!

Rainbow Irresistibly Yours, www.LaurasStampPad.com

LOVE THIS! I think I like the stars better than the scallop but either way these cards are AMAZING!!!! Now let’s get started!

SUPPLIES NEEDED: Irresistibly Yours Designer Series Paper, Sponge Daubers, Ink Pads, Paper Towel, Greeting Stamp

You will start with a piece of Irresistibly Yours Designer Series Paper (Sale-A-Bration) measuring 4″ x 5-1/4″. Get out your ink pads and Sponge Daubers. I used Bermuda Bay, Tempting Turquoise, Mossy Meadow, Daffodil Delight, Pumpkin Pie, Melon Mambo, and Elegant Eggplant. Starting on one corner start with your Bermuda and go diagonal. Just add enough color for the look you want and you don’t need to go really wide. Take your next color and overlap it a little with the previous color so they blend together really well. I was able to use each color twice but as you can see in the two samples above, some colors are wider and my angles are different. That is okay!!!! Love it! Once you are all done adding your rainbow colors, you will take the paper towel to wipe off access ink that is sitting on top of those embossed images. You will really start to see your white embossed image POP right now! Now you can layer this onto your card front. I used Whisper White Cardstock. For my greetings, I used the Label Love Stamp Set and coordinating Artisan Label Punch (Bundle & Save!). The card on the left I used Pumpkin Pie Ink and for the card on the right, I used my markers in the same colors as the rainbow to color the stamp! LOVE IT!

If you would like to see this in action, check out my Video Tutorial! Be sure to give it a Thumbs Up if you liked it! 🙂 Also, if you would like to see more samples using the Irresistibly Yours Designer Series Paper, check those out here, here and here!

Happy Spongin’

~Laura


Technique Tuesday – Gift Card Holders

Posted on

Happy Tuesday!!!! December is officially here and that means the holidays are right around the corner! Today I’m sharing the technique of making adorable gift card holders!!!! This is another fabulous part of my Gift Packaging Series! You can check out other here, here, and here!

Gift Card Holders, www.LaurasStampPad.com

Aren’t these adorable?? Well they are quick and simple to make too and really spruce up the Gift Card!

SUPPLIES NEEDED: Cardstock, Sticky Strip, Score Blade, Corner Rounder Punch,  Designer Series Paper, Velcro and Stamps & Punches to decorate

Cut a piece of cardstock to 3 ½” x 8 ½” (you can make 3 gift cards holder from 1 piece of 8 1/2” x 11 cardstock)! Now score the cardstock along the 8-1/2″ side at 2 ½” from one end and 2” from the other end. Then cut 3 pieces of Designer Series Paper into the following: 3 ¼” x 1 ¾”, 3 ¼” x 2 ¼”, 3 ¼” x 3 ¾”. Fold on your score lines and you will place Sticky Strip along the edges of the 2-1/2″ side and adhere. This creates the bottom pocket! For the top flap, using your Corner Rounder Punch to round the two corners giving that soft look on the flap. You will want to round the corners on the smallest piece of Designer Series Paper too! Once you have done that, adhere that piece to the flap, the large Designer Series Paper piece to the back, and the medium piece to the pocket portion. Now take a little piece of velcro and place it on the top, middle of the pocket and close the flap to allow the top portion of the velcro to adhere to the flap. You can decorate the gift card holder as you wish! I like using my Label Love Stamp Set and matching Artisan Label Punch! The Designer Series Paper used in the photo above is the Trim the Tree Designer Series Paper Stack!!!! These are great for any occasion! If you would like to see this in action, check out the Video Tutorial below!!!! Don’t forget to give it a thumbs up if you like it!!!!

I hope you enjoyed this technique and try it out! Leave me a comment down below on which Designer Series Paper you like to use on your Gift Card Holders!

Happy Stampin’

~Laura


Santa Hershey Bars!!!

Posted on

Tis the Season for gifting and why not make the packaging just as special as the person you are giving it to!? You can check out some of my other posts and videos in this Gift Packaging Series by clicking here, here, and here! Today I’m going to show you how to decorate a Hershey Chocolate Bar (or any other large candy bar)!

Santa Hershey Bars, www.LaurasStampPad.com

How cute are these? They would make a cute, yet affordable gift for teachers, neighbors, co-workers, friends and family! Also, great stocking stuffers! I started out with a piece of Real Red cardstock measuring 5-1/2″ x 6-1/2″. You will place Sticky Strip along the 6-1/2″ side and wrap it around the Hershey Bar. WAIT….before wrapping it around, run it over your Bone Folder or over the edge of a table to break down the fibers of the paper a little and allow it to curve better. Then you will take a piece of Whisper White cardstock measuring 1-3/4″ x 5-1/2″ and using your Scallop Border Punch, punch both sides! Adhere this piece to the front of your Hershey Bar with Snail Adhesive. Using your 1/2″ Circle Punch, you will punch out 4 in Basic Black and adhere to your Whisper White piece (3 on top, 1 on the bottom) and you will leave space between the 3rd and 4th one for your Santa Belt. For the Belt, you will need a piece of Basic Black measuring 3/4″ x 6-1/2″. Again you will want to run it over your Bone Folder to break down the fibers and attach it to the Bar with Sticky Strip. I overlap the ends in the front so I can hide it behind the buckle, but you can put it in the back as well. Now for the buckle, I prefer the one of the right which was a piece of Silver Glimmer Paper punched out with the Curly Label Punch. Then I took the Petite Curly Label Punch and punched a black one to layer on top! The bar on the left was done with a square piece of Crushed Curry that has the Petite Curly Label Punch punched out of the middle. I did a few like that and then was browsing Pinterest and saw the other option on a project and fell in love. You know me and my bling! 🙂 You are all set now!!! To see this in action, check out the Video Tutorial below! Don’t forget to give it a thumbs up if you liked it!

Thank You Hershey Bars,  www.LaurasStampPad.com

Here are a few others that I created for Fall/Thanksgiving! I used the Color Me Autumn Designer Series Paper and added some Mossy Meadow Satin Stitched Ribbon. For the greeting, I used the Lots of Thanks Stamp Set and Curly Label Punch!

Birthday Hershey Bars, www.LaurasStampPad.com

Here are a few Hershey Bars that I created with some of the Sweet Taffy Designer Series Paper and Big News Stamp Set. The bottom right one was done with the Back to Black Designer Series Paper and Pool Party Cotton Ribbon! I love these because of the bright colors and MELON MAMBO!!!!

Baby Hershey Bars, www.LaurasStampPad.com

 Everyone loves Chocolate especially someone who just had a baby! What a great little treat to bring to the new parents or grandparents! These were done with the Lullaby Designer Series Paper and Label Love Stamp Set (Artisan Label Punch)!

I hope you enjoyed these cute little chocolates and use them for your next occasion! Let me know in the comments below which one is your favorite!

Happy Stampin’

~Laura


How Many Cards Can You Get from One Sheet???

Posted on

I did another set of One Sheet Wonder cards!!! I can’t help myself! It is so much fun and so simple to make a lot of cards in a little amount of time! I was able to get 15 cards out of this One Sheet of 12″ x 12″ piece of Birthday Basics Designer Series Paper (retiring soon)!!!!

One Sheet Wonder Cards, www.LaurasStampPad.com

Aren’t these just AMAZING! For this set, I used a lot of both sides of the paper! I just love this paper! My card bases were Bermuda Bay, Primrose Petal, Summer Starfruit, and one Crisp Cantaloupe!!! I used greetings from Label Love and Lots of Thanks! Of course I used the coordinating punch, the Artisan Label Punch too! Here is a more up-close look at most of them!

One Sheet Wonder Technique, www.laurasstamppad.com

Of course you can check out other One Sheet Wonder Samples here, here and here! And if you would like to see the Video Tutorial for dimensions and how-to, then click here!!!!

Happy Stampin’

~Laura


Spiral Flower Fun!!!!

Posted on

Spiral Flower Die, www.LaurasStampPad.com

How amazing is this treat bag? Don’t you just wish your mail came in something this cute every day? Or your dinner came all packaged up like this every day? That would just be fabulous! Okay back to reality….let’s make this treat bag and give it to someone that means the world to us and let them enjoy the fabulous treat!!!!

I used the Spiral Flower Die to make these amazing flowers! I used Raspberry Ripple for the solid one. I used Raspberry Ripple and Very Vanilla for the bi-colored one and I used Primrose Petal Core’Dinations (retiring) cardstock for the one on the right!

Now I am going to share some tips and tricks that I learned along the way:

Spiral Flower

  • You can cut 2-3 layers of cardstock at a time when running this through your Big Shot.
  • Run the die-cut image over your bone folder to break down the fibers of the cardstock. This will make it start to curl as well.
  • The middle of the flower is the smallest little scallop, not the bigger end. (That was a surprise to me, I totally thought start big and work your way down.
  • Fold the first (smallest) scallop back and then start rolling forward. This will create a nice flower center. You can see it in the Vanilla and Raspberry flowers below if you look closely in the middle.
  • Your hot glue gun and Silicone Mat will be your best friend for these!
  • When making a flower with 2 colors, just lay the 2 pieces together and start rolling! You can even do 2 of the same colors and roll them together for a nice full flower!
  • After you have rolled it all nice and tight, throw it in the air and let it bounce around a little to loosen up if you want a fuller, more open flower!
  • Add your hot glue glob to the last circle/scallop and press your flower rolls into that glob and hold for 10 seconds. You can then add some hot glue to the 2nd scallop to adhere it to the side of your flower if you want a tight look.
  • Once you are finished and it is dried/cooled, take a clear block and press it on the top of your flower (too much pressing can result in a ripped/smoothed flower). This will flatten the petals out a little and make your flower look more open. You can also use your bone folder to fold the petals out a little too!

Spiral Flower Die, www.LaurasStampPad.com

I hope these tips helped you create fabulous Spiral Flowers! If you have any questions or have some tips to share, leave a comment down below. I would love to hear from you!!! Also, don’t throw away the negative of your spiral flower. I will show you how to use that in an upcoming Technique Tuesday!!! 😉

Happy Stampin’ & Happy Memorial Day!

~Laura


Fabulous Friday!!!

Posted on

Happy Friday!!! There is are so many fabulous SPECIALS!!!!! You have to check these out! First of all…the Weekly Deals! Stock up on RIBBON!

Weekly Deals 5.22

Ribbon is for sure my go-to embellishment! I loving all of the ways you can use it:

  • Tying it around the card into a knot
  • Doing a faux tie (using 2 pieces laying down like a “t”, folding the ends of one piece to the back of your cardstock and tying a knot with the other ends)
  • Making bows!!!
  • Using it to wrap around boxes or stacks of cards
  • Adding to the top of a bookmark
  • And sooooo many more other ways

Another BIG SPECIAL going on right now is the Retired Stamps and Accessories Sale!!!! Some of the items are 25%, 30%, 40% and even 50% off which is just fabulous! Remember these items are while supplies last so if you see something you want/need (after all it is a NEED) 😉 be sure to get them right away!!!! You can check out which items are on sale by clicking the links below:

Retiring Stamps in PDF WITH SALE ITEMS!!!

Retiring Accessories in PDF WITH SALE ITEMS!!!

What: 50% off June’s My Paper Pumpkin Kit
When: Subscribe by Friday, May 23 – TODAY
Where: MyPaperPumpkin.com/signup  (Demonstrator #82500 – Laura Borchert)
How: Enter the promo code SHELLIDEAL

Trust me you will LOVE My Paper Pumkin! These kits are super fun!!!!

Label Love Stamp Set, www.LaurasStampPad.com

Of course, I couldn’t leave you without an adorable sample!!! Isn’t this super cute? It is also super simple! I used Smoky Slate for my card base, Kaleidoscope Designer Series Paper, and Strawberry Ruffled Ribbon. I used the Label Love Stamp Set and coordinating Artisan Label Punch for greeting! I sure have been reaching for that set a lot lately! Love it!

Hope you have a fabulous weekend! Stay safe and Happy Memorial Day!

Happy Stampin’

~Laura


More Wonderful One Sheet Wonder!!!!

Posted on

There was just too many amazing cards to make just one post about these amazing One Sheet Wonder cards so I am sharing more with you today!!!!

One Sheet Wonder Designer Series Paper, www.LaurasStampPad.com

The card on the right is the only one that I used the other side of the paper! I just LOVE those blue and green flowers and could hardly bare to cover them up even though the polka dots are fun too!!!

One Sheet Wonder Designer Series Paper, www.LaurasStampPad.com

I am loving the ripped paper look on these cards! See how they are all similar but just a bit different!!!

One Sheet Wonder Designer Series Paper, www.LaurasStampPad.com

It’s like a puzzle! I love how the image matches up and has just a bit of spacing between the pieces of Designer Series Paper!

One Sheet Wonder Designer Series Paper, www.LaurasStampPad.com

This card is so simple yet elegant – perfect for a Wedding, Bridal Shower or Engagement (I like how I went backwards with that one.) 🙂

I used Island Indigo, Gumball Green and Smoky Slate!!!! I used greetings from Label Love, Lots of Thanks, and Bring On The Cake (retiring)! Then I used my Artisan Label Punch and Decorative Label Punch!!! Click here to check out the Video Tutorial which has all the dimensions and information in it!!! Be sure to “LIKE” and “SUSCRIBE” to my videos to show some love!!!

You can check yesterday’s post for more samples!!!! You can also check out a One Sheet Wonder Stamped Sheet by clicking here and here!!!

Happy Stampin’

~Laura


Technique Tuesday – The Wonderful One Sheet Wonder!!!!

Posted on

Happy Tuesday!!!! You know what that means…..I am sharing a fabulous technique with you!!!! Every time I have had a One Sheet Wonder Class, everyone goes crazy for it!!!! I mean look at these fabulous cards!!!

One Sheet Wonder Designer Series Paper, www.LaurasStampPad.com

The reason it is called One Sheet Wonder is because you only use One Sheet!!! I used one sheet out of the Watercolor Wonder Designer Series Paper Pack (You can only get this for 12 more days, click here to order NOW!) I will be so sad when this paper is gone because I LOVE IT!!!! I created 12 cards with my One Sheet of Designer Series Paper but there are some leftover pieces so you could probably get about 14 or more out of the one sheet!

One Sheet Wonder Designer Series Paper, www.LaurasStampPad.com

After you cut your Designer Series Paper, pick one or more colors of solid cardstock for your card bases and start assembling!!! It is that easy!!! I used various greetings for all of my upcoming occasions!!!

One Sheet Wonder Designer Series Paper, www.LaurasStampPad.com

I used Island Indigo, Gumball Green and Smoky Slate!!!! I used greetings from Label Love, Lots of Thanks, and Bring On The Cake (retiring)! Then I used my Artisan Label Punch and Decorative Label Punch!!! For more on these cards and the dimensions, check out this Video Tutorial!!!

Be sure to check back tomorrow for more samples!!!! You can also check out a One Sheet Wonder Stamped Sheet by clicking here and here!!!

Happy Stampin’

~Laura