Happy Technique Tuesday!!! These fun cards use a two-tone ink technique that is fun and easy to recreate!!! Check it out!!!
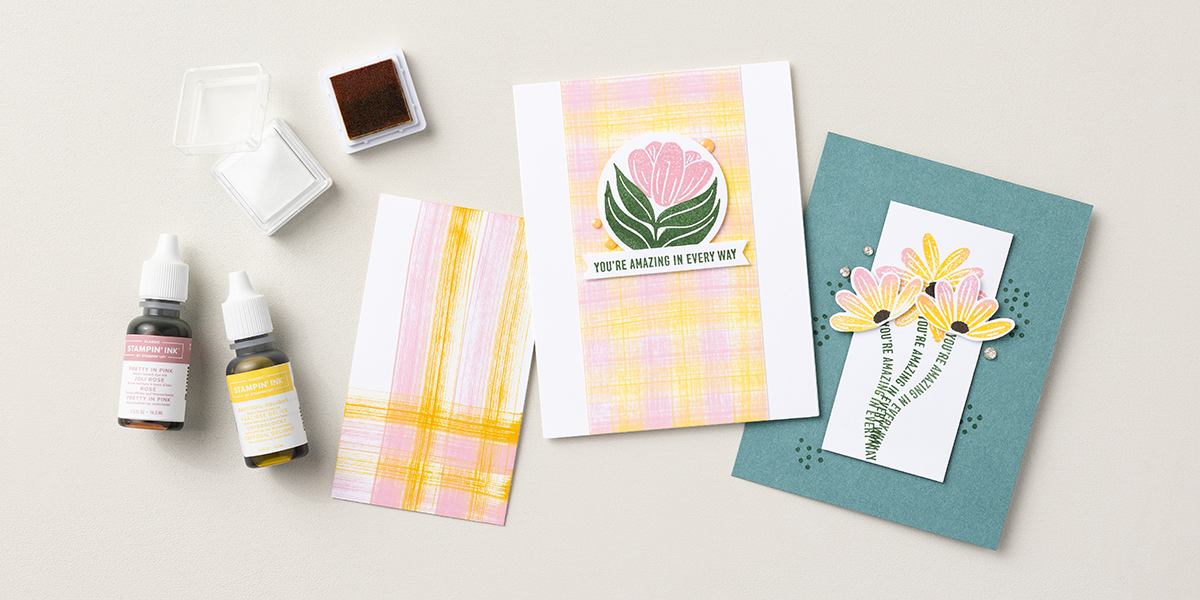
I am loving these Spring colors and that fun plaid look that will be perfect for any season with a color switch! Which color combination would you use?!? Check out these instructions for the You’re Amazing Plaid Card!
MEASUREMENTS:
Basic White Cardstock:
Card Base: 8-1/2″ x 5-1/2″
Layer: 2-1/4″ x 5″
Scrap Piece: 2-1/2″ x 2-1/2″
Greeting: 2-1/8″ x 1/4″
INSTRUCTIONS:
- Fold the 8-1/2″ x 5-1/2″ Basic White Cardstock in half to create the card base.
- Ink one half of an Uninked Stampin’ Spot with Pretty in Pink and the other half with Daffodil Delight Ink. Drag the ink pad across the Basic White Cardstock layer vertically and horizontally to form a plaid pattern.
- Stamp the flower and leaves image in Pretty in Pink and Garden Green ink on the Basic White Cardstock scrap piece.
- Punch it out using the 2″ Circle Punch, then adhere it to the card front with Stampin’ Dimensionals.
- Stamp the sentiment in Garden Green ink on the Basic White Cardstock strip and adhere it to the card front.
- Embellish with In Color Flat Pearls as desired!
Give this fun two-tone ink technique a try! Need some supplies? I have listed them below for easy shopping! Don’t forget that all orders of $40 or more (before tax and shipping) earn Fabulous Friends Club Perks and orders of $75 or more (before tax and shipping earn Fabulous Friends Club Perks as well as Laura’s Free Gift of the Month!!!
Happy Stampin’
~Laura
Product List![A Round Of Hellos Photopolymer Stamp Set (English) [ 167227 ]](https://assets1.tamsnetwork.com/images/EC042017NF/167227s.jpg "A Round Of Hellos Photopolymer Stamp Set (English) [ 167227 ]")
![Basic White 8 1/2" X 11" Cardstock [ 166780 ]](https://assets1.tamsnetwork.com/images/EC042017NF/166780s.jpg "Basic White 8 1/2\" X 11\" Cardstock [ 166780 ]")
![Garden Green Classic Stampin' Pad [ 147089 ]](https://assets1.tamsnetwork.com/images/EC042017NF/147089s.jpg "Garden Green Classic Stampin' Pad [ 147089 ]")
![Pretty In Pink Classic Stampin Pad [ 163807 ]](https://assets1.tamsnetwork.com/images/EC042017NF/163807s.jpg "Pretty In Pink Classic Stampin Pad [ 163807 ]")
![Daffodil Delight Classic Stampin' Ink Refill [ 119672 ]](https://assets1.tamsnetwork.com/images/EC042017NF/119672s.jpg "Daffodil Delight Classic Stampin' Ink Refill [ 119672 ]")
![Pretty In Pink Classic Stampin’ Ink Refill [ 163816 ]](https://assets1.tamsnetwork.com/images/EC042017NF/163816s.jpg "Pretty In Pink Classic Stampin’ Ink Refill [ 163816 ]")
![Uninked Stampin' Spots [ 141822 ]](https://assets1.tamsnetwork.com/images/EC042017NF/141822s.jpg "Uninked Stampin' Spots [ 141822 ]")
![2" (5.1 Cm) Circle Punch [ 133782 ]](https://assets1.tamsnetwork.com/images/EC042017NF/133782s.jpg "2\" (5.1 Cm) Circle Punch [ 133782 ]")
![2024 2026 In Color™ Flat Pearls [ 165266 ]](https://assets1.tamsnetwork.com/images/EC042017NF/165266s.jpg "2024 2026 In Color™ Flat Pearls [ 165266 ]")
![Stampin' Dimensionals [ 104430 ]](https://assets1.tamsnetwork.com/images/EC042017NF/104430s.jpg "Stampin' Dimensionals [ 104430 ]")
![Sweet Blooms Photopolymer Stamp Set (English) [ 165181 ]](https://assets1.tamsnetwork.com/images/EC042017NF/165181s.jpg "Sweet Blooms Photopolymer Stamp Set (English) [ 165181 ]")
![Pretty Florals Bundle [ 165179 ]](https://assets1.tamsnetwork.com/images/EC042017NF/165179s.jpg "Pretty Florals Bundle [ 165179 ]")
![Hole Punch Assortment [ 165409 ]](https://assets1.tamsnetwork.com/images/EC042017NF/165409s.jpg "Hole Punch Assortment [ 165409 ]")
![1-3/4" (4.4 Cm) Circle Punch [ 119850 ]](https://assets1.tamsnetwork.com/images/EC042017NF/119850s.jpg "1-3/4\" (4.4 Cm) Circle Punch [ 119850 ]")
![Granny Apple Green Stampin' Pad [ 147095 ]](https://assets1.tamsnetwork.com/images/EC042017NF/147095s.jpg "Granny Apple Green Stampin' Pad [ 147095 ]")
![Petunia Pop Classic Stampin Pad [ 163811 ]](https://assets1.tamsnetwork.com/images/EC042017NF/163811s.jpg "Petunia Pop Classic Stampin Pad [ 163811 ]")
![Secret Sea Classic Stampin' Pad [ 165285 ]](https://assets1.tamsnetwork.com/images/EC042017NF/165285s.jpg "Secret Sea Classic Stampin' Pad [ 165285 ]")
![Cloud Cover 12" X 12" (30.5 X 30.5 Cm) Two Tone Cardstock [ 166708 ]](https://assets1.tamsnetwork.com/images/EC042017NF/166708s.jpg "Cloud Cover 12\" X 12\" (30.5 X 30.5 Cm) Two Tone Cardstock [ 166708 ]")
![Petunia Pop 12" X 12" (30.5 X 30.5 Cm) Two Tone Cardstock [ 166690 ]](https://assets1.tamsnetwork.com/images/EC042017NF/166690s.jpg "Petunia Pop 12\" X 12\" (30.5 X 30.5 Cm) Two Tone Cardstock [ 166690 ]")
![Pretty In Pink 12" X 12" (30.5 X 30.5 Cm) Two Tone Cardstock [ 166693 ]](https://assets1.tamsnetwork.com/images/EC042017NF/166693s.jpg "Pretty In Pink 12\" X 12\" (30.5 X 30.5 Cm) Two Tone Cardstock [ 166693 ]")
![Misty Moonlight & White 1/4" (6.4 Mm) Starter Ribbon Pack [ 165276 ]](https://assets1.tamsnetwork.com/images/EC042017NF/165276s.jpg "Misty Moonlight & White 1/4\" (6.4 Mm) Starter Ribbon Pack [ 165276 ]")
![Linen Thread [ 104199 ]](https://assets1.tamsnetwork.com/images/EC042017NF/104199s.jpg "Linen Thread [ 104199 ]")
![2025–2027 In Color™ Flat Pearls [ 165192 ]](https://assets1.tamsnetwork.com/images/EC042017NF/165192s.jpg "2025–2027 In Color™ Flat Pearls [ 165192 ]")


![Adopt A Pet Kit [ 167256 ]](https://assets1.tamsnetwork.com/images/EC042017NF/167256s.jpg "Adopt A Pet Kit [ 167256 ]")
![Lots To Love Kit [ 167263 ]](https://assets1.tamsnetwork.com/images/EC042017NF/167263s.jpg "Lots To Love Kit [ 167263 ]")
![Butterfly Garden Kit (English) [ 167266 ]](https://assets1.tamsnetwork.com/images/EC042017NF/167266s.jpg "Butterfly Garden Kit (English) [ 167266 ]")


![Pop Up Petals Bundle (English) [ 168010 ]](https://assets1.tamsnetwork.com/images/EC042017NF/168010s.jpg "Pop Up Petals Bundle (English) [ 168010 ]")
![Stylish Shapes Dies [ 159183 ]](https://assets1.tamsnetwork.com/images/EC042017NF/159183s.jpg "Stylish Shapes Dies [ 159183 ]")
![Florals In Bloom 12" X 12" (30.5 X 30.5 Cm) Designer Series Paper [ 165175 ]](https://assets1.tamsnetwork.com/images/EC042017NF/165175s.jpg "Florals In Bloom 12\" X 12\" (30.5 X 30.5 Cm) Designer Series Paper [ 165175 ]")
![Tuxedo Black Memento Ink Pad [ 132708 ]](https://assets1.tamsnetwork.com/images/EC042017NF/132708s.jpg "Tuxedo Black Memento Ink Pad [ 132708 ]")
![Daffodil Delight Stampin' Blends Combo Pack [ 154883 ]](https://assets1.tamsnetwork.com/images/EC042017NF/154883s.jpg "Daffodil Delight Stampin' Blends Combo Pack [ 154883 ]")
![Old Olive Stampin' Blends Combo Pack [ 154892 ]](https://assets1.tamsnetwork.com/images/EC042017NF/154892s.jpg "Old Olive Stampin' Blends Combo Pack [ 154892 ]")
![Pecan Pie Stampin’ Blends Combo Pack [ 161674 ]](https://assets1.tamsnetwork.com/images/EC042017NF/161674s.jpg "Pecan Pie Stampin’ Blends Combo Pack [ 161674 ]")
![Foam Adhesive Strips [ 141825 ]](https://assets1.tamsnetwork.com/images/EC042017NF/141825s.jpg "Foam Adhesive Strips [ 141825 ]")
![Mini Stampin' Dimensionals [ 144108 ]](https://assets1.tamsnetwork.com/images/EC042017NF/144108s.jpg "Mini Stampin' Dimensionals [ 144108 ]")
![Take Your Pick [ 144107 ]](https://assets1.tamsnetwork.com/images/EC042017NF/144107s.jpg "Take Your Pick [ 144107 ]")
![Layers Of Beauty Photopolymer Stamp Set (English) [ 163514 ]](https://assets1.tamsnetwork.com/images/EC042017NF/163514s.jpg "Layers Of Beauty Photopolymer Stamp Set (English) [ 163514 ]")
![Basic White 8 1/2" X 11" Thick Cardstock [ 159229 ]](https://assets1.tamsnetwork.com/images/EC042017NF/159229s.jpg "Basic White 8 1/2\" X 11\" Thick Cardstock [ 159229 ]")
![Strawberry Slush Classic Stampin' Pad [ 165286 ]](https://assets1.tamsnetwork.com/images/EC042017NF/165286s.jpg "Strawberry Slush Classic Stampin' Pad [ 165286 ]")
![Blending Brushes [ 153611 ]](https://assets1.tamsnetwork.com/images/EC042017NF/153611s.jpg "Blending Brushes [ 153611 ]")
![Opal Rounds Assortment [ 163298 ]](https://assets1.tamsnetwork.com/images/EC042017NF/163298s.jpg "Opal Rounds Assortment [ 163298 ]")
![Mini Alphabet Dies [ 162934 ]](https://assets1.tamsnetwork.com/images/EC042017NF/162934s.jpg "Mini Alphabet Dies [ 162934 ]")

![Extraordinary Flora Bundle (English) [ 165245 ]](https://assets1.tamsnetwork.com/images/EC042017NF/165245s.jpg "Extraordinary Flora Bundle (English) [ 165245 ]")
![Lost Lagoon Classic Stampin' Pad [ 161678 ]](https://assets1.tamsnetwork.com/images/EC042017NF/161678s.jpg "Lost Lagoon Classic Stampin' Pad [ 161678 ]")
![Pecan Pie Classic Stampin' Pad [ 161665 ]](https://assets1.tamsnetwork.com/images/EC042017NF/161665s.jpg "Pecan Pie Classic Stampin' Pad [ 161665 ]")
![Daffodil Delight Classic Stampin' Pad [ 147094 ]](https://assets1.tamsnetwork.com/images/EC042017NF/147094s.jpg "Daffodil Delight Classic Stampin' Pad [ 147094 ]")
![Old Olive Classic Stampin' Pad [ 147090 ]](https://assets1.tamsnetwork.com/images/EC042017NF/147090s.jpg "Old Olive Classic Stampin' Pad [ 147090 ]")
![Very Vanilla 8 1/2" X 11" Cardstock [ 166784 ]](https://assets1.tamsnetwork.com/images/EC042017NF/166784s.jpg "Very Vanilla 8 1/2\" X 11\" Cardstock [ 166784 ]")
![Basic Beige 8 1/2" X 11" Cardstock [ 164511 ]](https://assets1.tamsnetwork.com/images/EC042017NF/164511s.jpg "Basic Beige 8 1/2\" X 11\" Cardstock [ 164511 ]")
![Lost Lagoon 12" X 12" (30.5 X 30.5 Cm) Two Tone Cardstock [ 166658 ]](https://assets1.tamsnetwork.com/images/EC042017NF/166658s.jpg "Lost Lagoon 12\" X 12\" (30.5 X 30.5 Cm) Two Tone Cardstock [ 166658 ]")
![Lemon Lolly 12" X 12" (30.5 X 30.5 Cm) Two Tone Cardstock [ 166659 ]](https://assets1.tamsnetwork.com/images/EC042017NF/166659s.jpg "Lemon Lolly 12\" X 12\" (30.5 X 30.5 Cm) Two Tone Cardstock [ 166659 ]")
![Blender Pens [ 102845 ]](https://assets1.tamsnetwork.com/images/EC042017NF/102845s.jpg "Blender Pens [ 102845 ]")
![Antique Pearls [ 164679 ]](https://assets1.tamsnetwork.com/images/EC042017NF/164679s.jpg "Antique Pearls [ 164679 ]")
![Extraordinary Flora Washi Tape [ 165269 ]](https://assets1.tamsnetwork.com/images/EC042017NF/165269s.jpg "Extraordinary Flora Washi Tape [ 165269 ]")


![Florals In Bloom Suite Collection (English) [ 165193 ]](https://assets1.tamsnetwork.com/images/EC042017NF/165193s.jpg "Florals In Bloom Suite Collection (English) [ 165193 ]")
![Floral Impressions 12" X 12" (30.5 X 30.5 Cm) Designer Series Paper [ 165603 ]](https://assets1.tamsnetwork.com/images/EC042017NF/165603s.jpg "Floral Impressions 12\" X 12\" (30.5 X 30.5 Cm) Designer Series Paper [ 165603 ]")
![Garden Green 8-1/2" X 11" Cardstock [ 102584 ]](https://assets1.tamsnetwork.com/images/EC042017NF/102584s.jpg "Garden Green 8-1/2\" X 11\" Cardstock [ 102584 ]")
![Secret Sea 8 1/2" X 11" Cardstock [ 165624 ]](https://assets1.tamsnetwork.com/images/EC042017NF/165624s.jpg "Secret Sea 8 1/2\" X 11\" Cardstock [ 165624 ]")
![To The Point Label Punch [ 164568 ]](https://assets1.tamsnetwork.com/images/EC042017NF/164568s.jpg "To The Point Label Punch [ 164568 ]")