Father’s Day is around the corner and this card would be perfect!!! It also makes a great birthday card too!!!
This is a fun and simple card that could be done in various color combinations! I did use one of the retiring color – Lemon Lime Twist!!
I started with a Lemon Lime Twist card base measuring 11″ x 4-1/4″. Next, I took a piece of Whisper White (3-1/2″ x 5-1/2″) and adhered it down the center. Using a piece of the Graceful Glass Designer Vellum, I sponged Blueberry Bushel Ink onto the back for some color. Be sure to allow it to dry a bit or you can use the Heat Tool to set the ink. Once it was ready, I adhered it to the left side!
For the focal point, I stamped the car and greeting onto a Whisper White rectangle measuring 3-1/4″ x 2-1/4″. These were stamped in Blueberry Bushel Ink. They are from the Geared Up Garage Stamp Set!! Next, I layered them onto a piece of Lemon Lime Twist measuring 3-1/2″ x 2-1/2″. This layer was added to the card front with Stampin’ Dimensionals for some texture!!!
Click the supplies listed below to make this You’re A Classic card!!! Some of these items are retiring so get them before they are gone! What color combinations would you use?
We are getting closer and closer the the reveal of the NEW Annual Stampin’ Up Catalog. I thought I would take a break from Technique Tuesday to share more designer paper in preparation!!! Today, I am sharing the Mosaic Mood Specialty Paper!!! This is STUNNING!!! The colors are beautiful and one side of each sheet is clear embossed for extra shine!
Blue and yellow are just so pretty together and this paper has so many shades of both. It is amazing!!! The shades of green on the sheet with leaves all over is going to make a perfect background for any card with flowers on it. You all know I love flowers!!! 🙂 The New In-Color Terracotta Tile color (burnt orange) is used in this paper as well!!
There is an entire suite of coordinating products with this paper including stamps, ribbon, embellishments, and an embossing folder! I can’t wait to start playing with it!
If you would like to see all of these sheets of Mosaic Mood Specialty Paper in a full piece, check out the video below or click here! Be sure to give the video a thumbs up if you liked it and don’t forget to subscribe if you are new. If you would like a notification when I post a new video, be sure to click the bell right next to the subscribe!!!
This is the card I gave to my Mom for Mother’s Day!!! The greeting is perfect!! As women we tend to do it all, multi-tasking at it’s finest!!! This beautiful card is the perfect way to celebrate and acknowledge that.
This beautiful card uses the retiring Floral Romance Designer Series Paper. This card is also one of the cards in my latest Laura’s Quick Kits!!! You can put any greeting on this card for any occasion!
I started with a piece of Mossy Meadow as the card base. Next, I took a piece of Whisper White (3-7/8″ x 5-1/8″) and adhered it to the front. This is just a hair smaller than the Floral Romance Vellum which is 4″ x 5-1/4″. I did this so that it wouldn’t match up perfectly but instead have that gradual fade on the edges. You can also put the adhesive on the vellum anywhere because it doesn’t show through. This was a game changer for me! In the past when I used vellum, it was a pain to try to hide the adhesive behind your focal point or something. Not with this paper!!!
For the decoration, I punched out a 2″ Circle in Crumb Cake and ran it through the Big Shot in the Basket Weave Embossing Folder. I love this little big of texture behind those flowers. The flowers were punched out using the Bitty Blooms Punch Pack. When assembling, I placed the circle down first and then the greeting. This was stamped from the Strong & Beautiful Stamp Set and punched out with the Triple Banner Punch! Next, I gathered the little flowers over that straight edge of the greeting. The pink flowers are on Stampin’ Dimensionals. The leaves are from the Leaf Punch!
On the inside, I added a layer of Whisper White (4″ x 5-1/4″) and stamped the greeting from the Strong & Beautiful Stamp Set. Then I added a few more punched flowers on the corners! It is just so beautiful and was the perfect card for my Mom!!!
Loving this look?? Check out my Laura’s Quick Kits and you can make 2 of these as well as 4 others. All of the supplies are included, you just need to stamp a greeting and assemble!
Happy Friday!!! With Graduations, Bridal Showers, and Claire’s Birthday coming up…..Make It A Sweet Celebration!!!! I just thought this card captured it all! It’s quick, simple, and fabulous!!! After all, every day should be a sweet celebration!
This card is super simple and a create way to use up designer paper and ribbon!!!
I started with a Whisper White card base. Next, I stamped the greeting from Sweetest Thing Stamp Set at the bottom in Gorgeous Grape. I also stamped some gummy bears on the inside of the card too!!! Next, I took a piece of Coastal Cabana and ripped one edge. Then I adhered the How Sweet It Is Designer Series Paper (2″ x 5-1/2″) closer to the cut edge. I added this to the card front and then tied the Granny Apple Green/Coastal Cabana Reversible Ribbon around the card. I like to do that so it is more secure around the card and not just around the layer. That is all you need to do!
Simple and fabulous, right?? Check out the supplies below as some are retiring on June 3rd so get them before they are gone!!!
The Stampin’ Up Annual Catalog is coming on June 4th so that means lots of new products. There are so many amazing new designer papers that I can’t wait to play with and show you!! Per request, I’m going to do the reveal videos again so you can see the full sheet and not just the little swatch in the catalog! Today, check out the beautiful Magnolia Lane Designer Series Paper!!!
You all know how much I love flowers so of course I’m loving this pack. Those soft colors are perfect for any occasion! The other thing that I am loving about this set is the simple green patterned pieces. Those are perfect for masculine cards or great backgrounds for any type of flower card! I love it!!!
If you would like to see all of these sheets of Magnolia Lane Designer Series Paper in a full piece, check out the video below or click here! Be sure to give the video a thumbs up if you liked it and don’t forget to subscribe if you are new. If you would like a notification when I post a new video, be sure to click the bell right next to the subscribe!!!
I’m so excited to have another one of Laura’s Quick Kits to roll out! This one is Laura’s Quick Kits – Floral Romance because it uses the Floral Romance Designer Series Paper!
This fabulous kit has that beautiful floral look but the green card on the left can be a masculine card too! The awesome thing about this kit is that everything comes in the kit and you just need to stamp the greeting! Any greeting stamp set would work perfectly. I used the Strong & Beautiful Stamp Set! Fresh Fig is the ink color I used. Petal Pink, Mossy Meadow, and Pear Pizzazz can also be used as they are in the designer paper and details!
Click the link above to purchase your Laura’s Quick Kits – Floral Romance Kit!!! Each kit comes with all of the supplies to make 2 each of the 3 cards in the photo above, including envelopes!!! You will also get a complete video tutorial of the cards! It is like a personal stamp class in the comfort of your own home and any time you want!!!
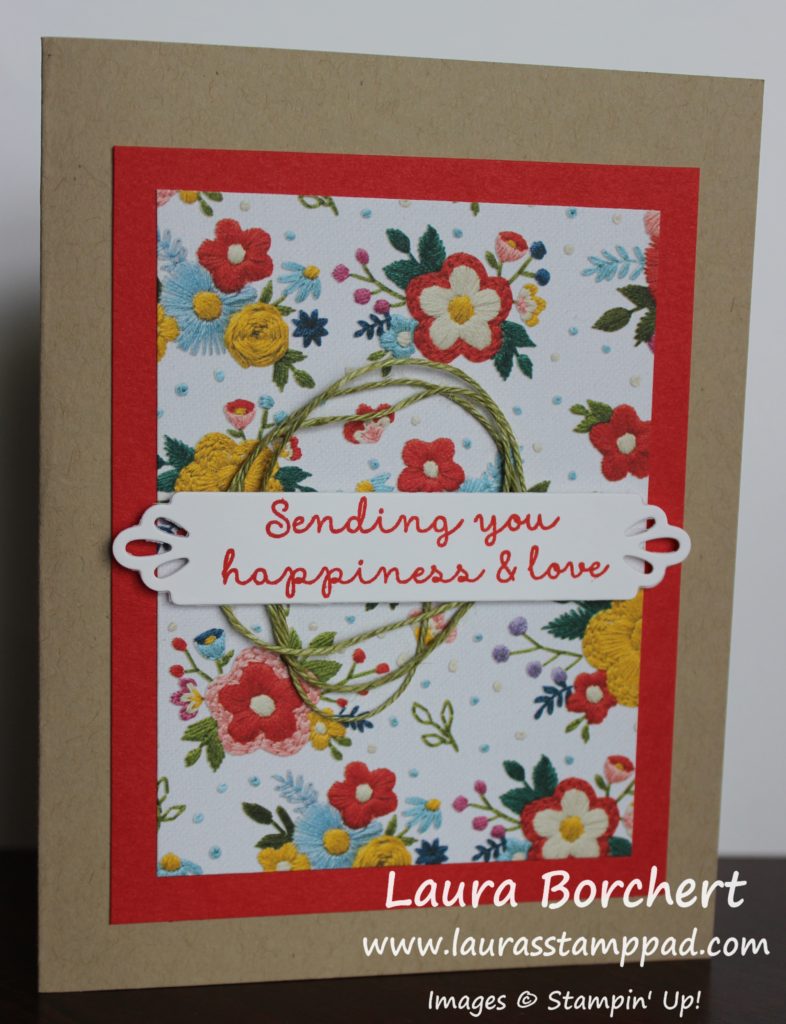
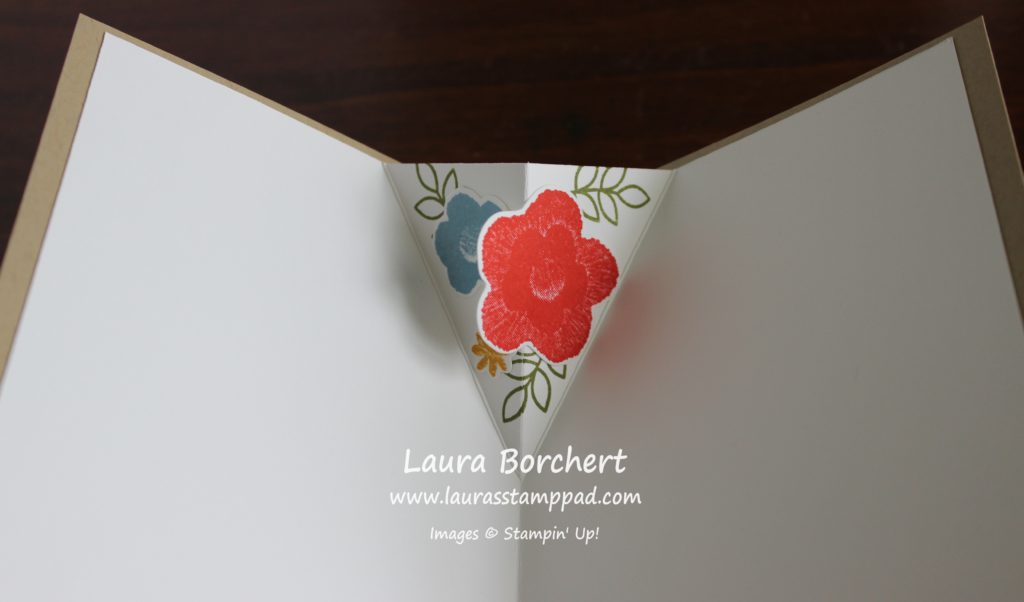
Happy Tuesday!!! You all know what that means! I have a fabulous technique today that I got from the amazing stamper Ronda Wade!!! This Pop Out Insert really takes a card up a notch. I went simple on the front since the inside is so fabulous!!!
I used the Needlepoint Nook Suite from the Occasions Mini Catalog for this card and it is just fabulous! The images look so real and that just blows my mind!!
I started with a Crumb Cake card base. Next, I layered on a piece of Poppy Parade (3-1/2″ x 4-1/2″) with some Needlepoint Nook Designer Series Paper on top (3″ x 4″). For the greeting, I die cut out the label from the Needlepoint Elements Framelits. Using the greeting from the Needle & Thread (Bundle & Save 10%), I stamped it in Poppy Parade Ink. Before attaching it to the card front, I added a few loops of Old Olive Linen Thread.
Now for the real fabulous part!!! The inside of the card has this beautiful pop out insert. This is something that can be inside any of your cards. Simply score, fold, and decorate!!! I started with a piece of Whisper White measuring 5-1/4″ x 8″ and folded it in half at 4″. Then with a pencil, I marked 1-1/2″ on either side of that center score line. Measuring 2-1/2″ down the center score line, I made another mark with my pencil. Then using the score blade on the Stampin’ Trimmer or a ruler and Bone Folder, score from the 2-1/2″ mark to the 1-1/2″ mark. This creates a little triangle. Next, I folded on all of the lines to create that pop out.
Be sure to decorate before adding it to the card. I stamped a few leaves first. Next, I stamped and die cut the flowers from the Needle & Thread Bundle. These images can hang off the top of the cardstock because they are folding down when the card closes so they won’t hang out the top.
When adding the insert to the card, I used Tear And Tape because it is super strong. Once the tape it on, place it inside the card, open the card flap, peal off the tape backing and then press the card closed. This ensures that the insert will still allow the card to close flat. Next, flip over the card and repeat. Again be sure to press the card closed to seal the adhesive for that perfect look. When you open the card it might not go all the way to the fold or seem a little off on the sides but that is okay. The important part is that it closes flat.
If you would like to see this all in action, check out the video below or click here! Be sure to give the video a thumbs up if you liked it and don’t forget to subscribe if you are new. If you would like a notification when I post a new video, be sure to click the bell right next to the subscribe!!!
Happy Monday!!! I hope you all had a wonderful weekend!!! Today, I’m sharing a fabulous card and when I look at it, all I can think is crisscross applesauce. Who doesn’t say crisscross without applesauce following??? Unless maybe you were a big fan of the band!! Let me know in the comments if you were!
This is a simple card and a great way to use up designer series paper. Adding the stitched look to the rectangles and fun linen thread just makes it that much more special!!!
I started with a Fresh Fig card base and stamped the little flower all over in Fresh Fig Ink. The flower is from the Bloom By Bloom Stamp Set. Next, I took 2 pieces of the Floral Romance Designer Series Paper and die cut them with the Stitched Rectangle Framelits! Then, I stamped the greeting on the wooden one in Fresh Fig Ink. This greeting is from the Strong & Beautiful Stamp Set.
On the smaller rectangle, I wrapped Linen Tread down the rectangle and back again creating that fun crisscross pattern. I used Stampin’ Dimensionals on the back side to hold it all in place and for adhering to the card. This gives a little texture too. I finished it off with a little Frosted Flower Embellishment!
For the inside of the card, I rounded 2 corners with the Detailed Trio Punch. Using that same flower from the front, I stamped a few in Petal Pink and the coordinating greeting in Fresh Fig!!! I love the little decorated inside that just makes the card look so fabulous! After all, you can’t write on Fresh Fig cardstock anyway so why not add in some more fun!
Check out the supplies listed below so you can recreate this card! Many of these items are retiring so get them before they are gone!
Happy Friday, everyone!!!! How will you be celebrating Mother’s Day this weekend?? I think every women should celebrate because I’m sure you have mothered someone in your life whether it is your child or a friend/family members or a fur baby! Also, to all of the women who are dreaming of having a baby in their arms, may you celebrate today too! (Hugs to you all!) As women, we have all been motherly to someone so let’s celebrate that!
This Mother’s Day is super special to me because I have little Claire in my arms!!! Two years ago I had just lost my 1st baby and Mother’s Day was very difficult. Last year, I was so anxious to have Ziggy arrive as my due date was just 5 days later. This year, I get to hug, snuggle, and kiss this little amazing baby girl of mine! I’m so excited!
I hope you all have a wonderful weekend celebrating Mother’s Day and how amazing you are!!! You are a rockstar!
If you family is looking for the perfect gift for you, I offer Gift Certificates or you can sign up for the May Paper Pumpkin. Today, is the last day to get the amazing Shelli Kit. This kit is going to be super fabulous with 12 full size greeting cards that are elegant, Springy, and have birds! That’s all we have been told so far. Click here to try out or gift Paper Pumpkin!
You all know I love organization!!! Today, I’m sharing with you a few ways to store your Paper Pumpkin Stamps. Believe it or not, my way is probably the least “organized” but it works for me and my space. I hope you find these useful and let me know if you store your Paper Pumpkin stamps this way!
Each month, I get a little stamp set in plastic like shown above for Paper Pumpkin. These stamps are fabulous because they have a little bit of everything in there. After a year or even a few months, you have have basic greetings like Birthday, Thinking of You, etc. As time goes on you even get the holidays like Valentine’s Day, Christmas, Thanksgiving, etc. I go back to these stamps A LOT for specific holidays because I know I have variety in there. This also helps me not have to buy another stamp set from the Annual Catalog for that holiday. This is super handy when I really only want to make 1 or 2 cards. Try out Paper Pumpkin, even for just a month or 2. Click here to try it out!
Okay so back to the topic….what do you do with these little sets of stamps each month?? For me, I have a plastic shoe box that I throw them all into. Nothing fancy or super detailed. The little shoe box can be found at a big box store for less than $1. I added a label on the side and end and toss the set in each month! It works for me and I have room for it like this for now!
There is a more organized, pretty way to store your stamps too!!! Each month, Stampin’ Up sends an email after Paper Pumpkin has arrived (around the 20th of the month). This email has details for buying refill kits, alternative options for using the kit pieces, AND a printable stamp set image. This can be printed a trimmed down to fit in a Clear Mount Stamp Case like the photo on the right.
It can also be dropped into a 3 ring binder sleeve with the stamps and even the color flyer from the kit. The awesome thing about this print out is that it shows the samples of the cards and the entire stamp set. Now you know if an image is missing or you can quickly see what the stamps are without having to dig through a box. You can also print it in color but I used my B&W printer.
How do you store your Paper Pumpkin Stamps?? Are you going to try out one of these 3 options?? Let me know in the comments below!
If you would like to see this all in action, check out the video below or click here! Be sure to give the video a thumbs up if you liked it and don’t forget to subscribe if you are new. If you would like a notification when I post a new video, be sure to click the bell right next to the subscribe!!!