Technique Tuesday – Make Your Own Stencil!

Posted on

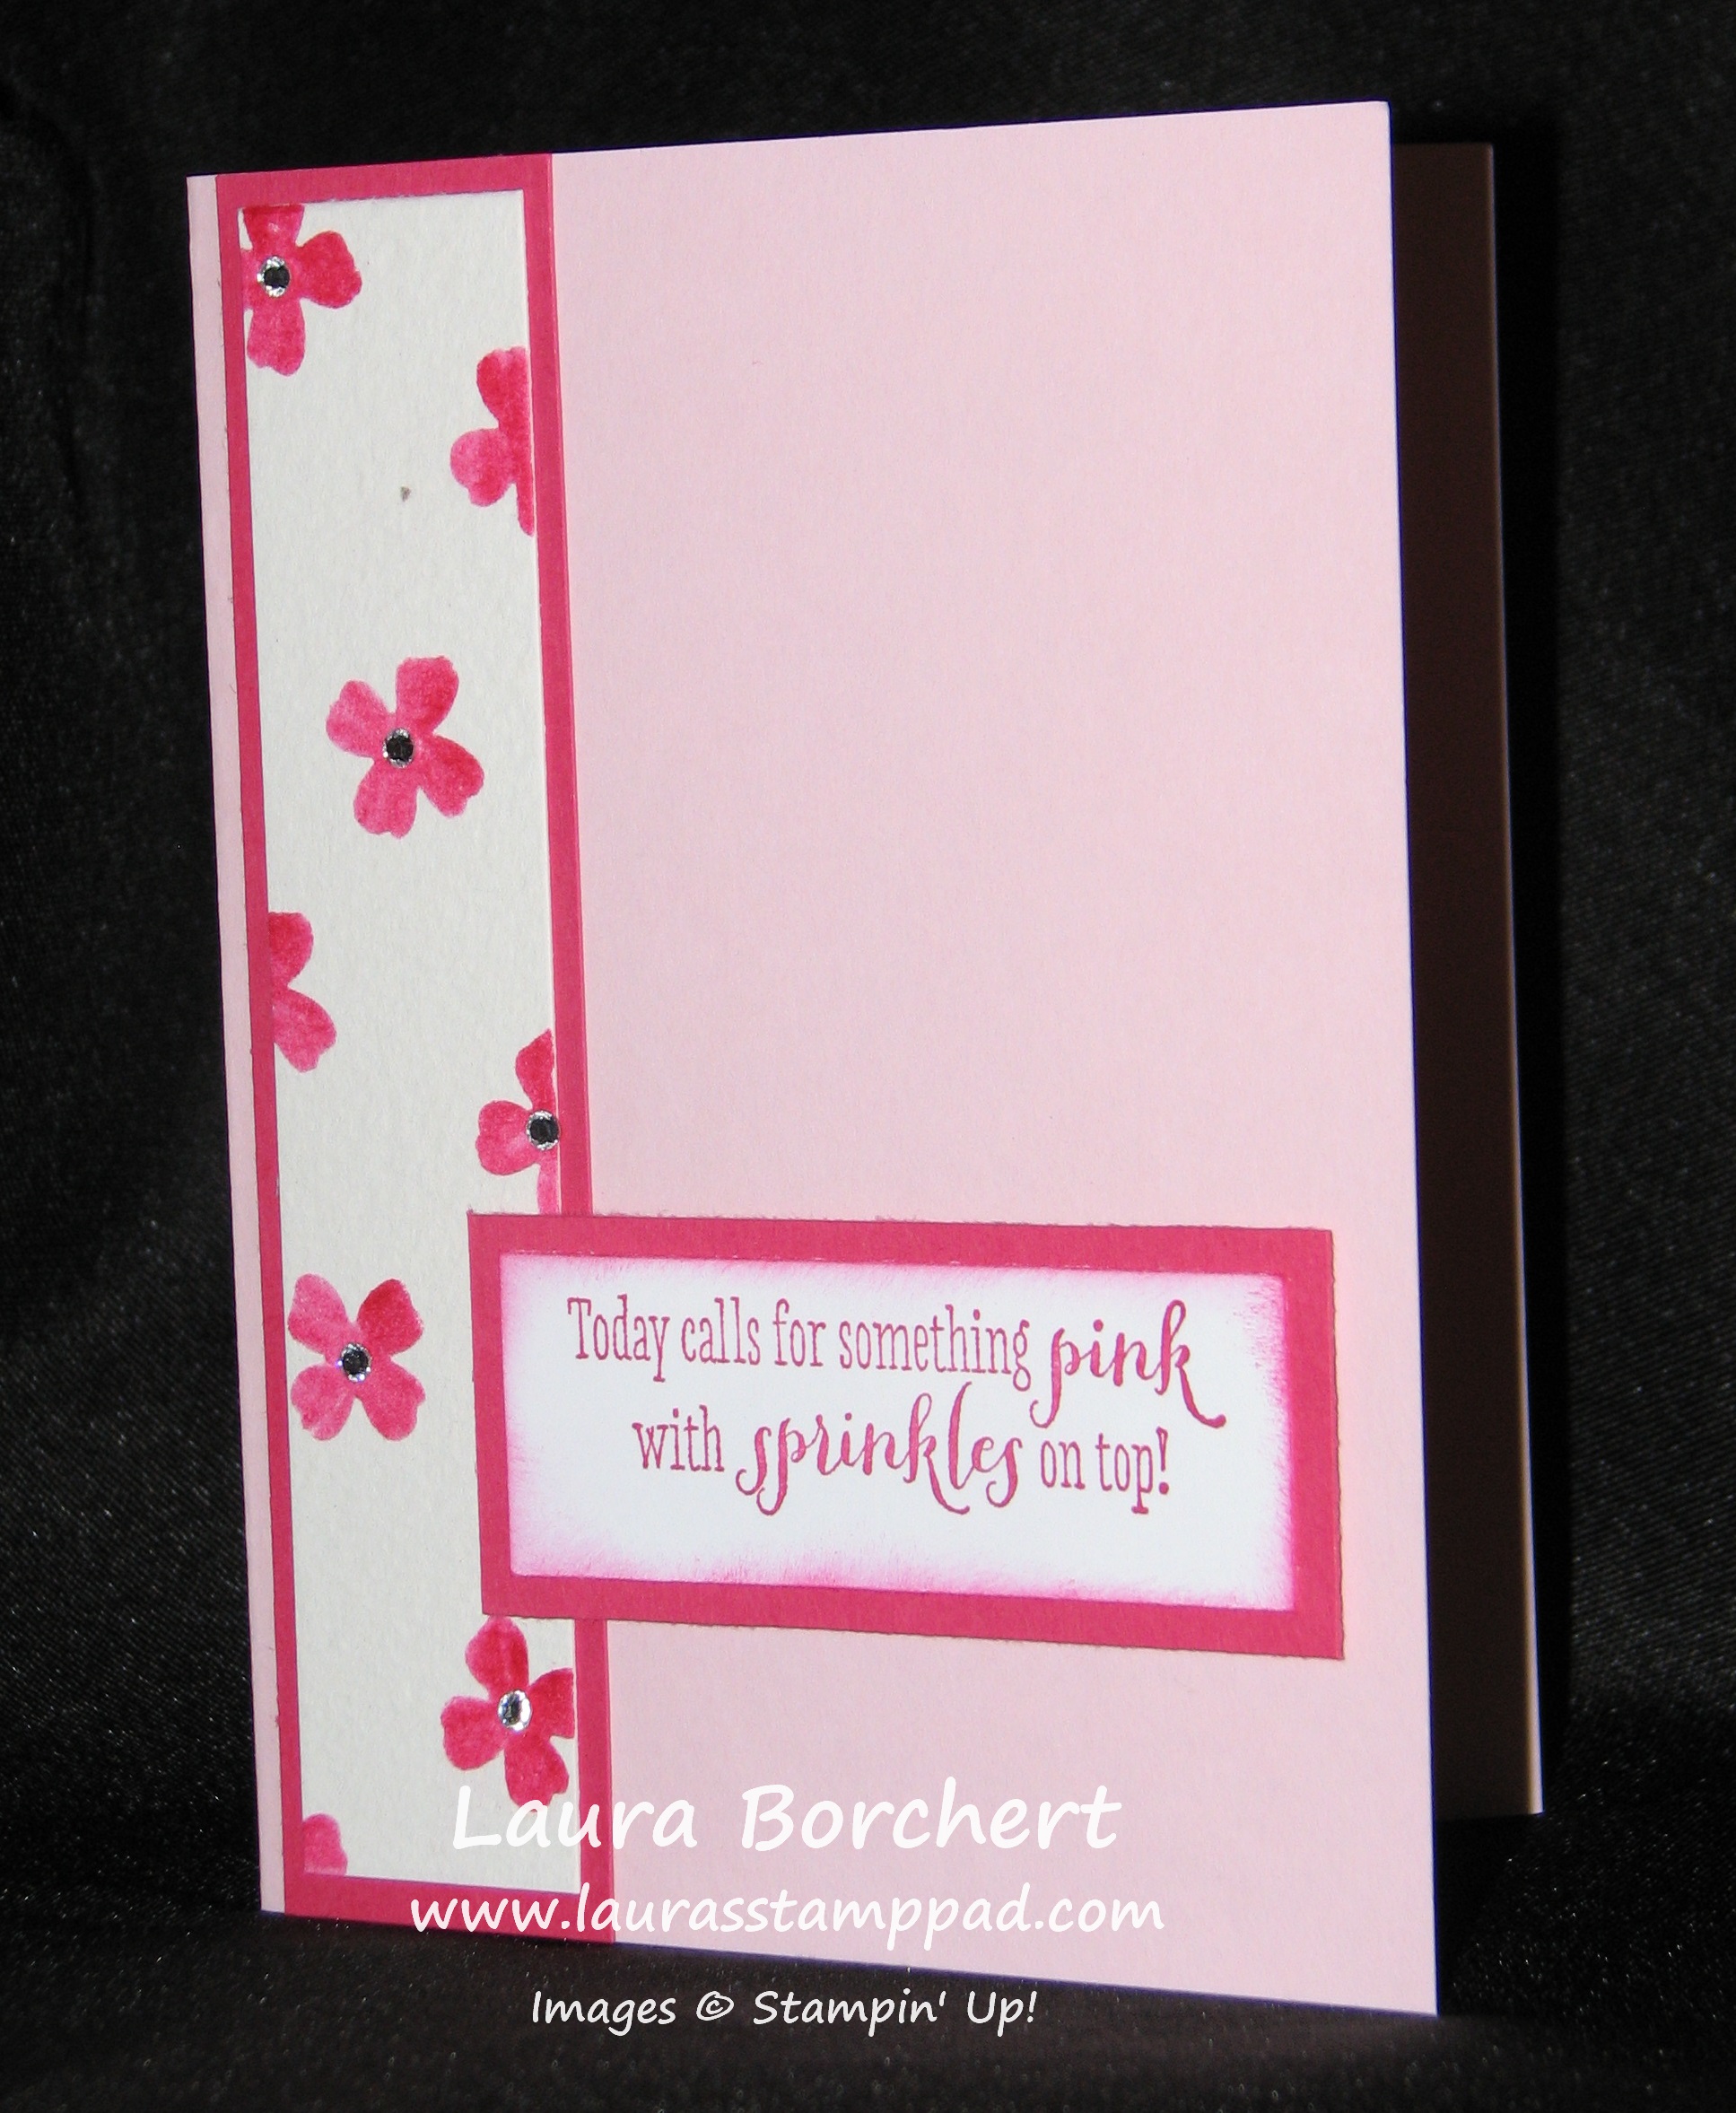
Happy Tuesday!!! That means I have a fabulous technique to share with you today!!! I’m going to show you how to create your own stencils because how cute is this card?

Punch Stencil Card, www.LaurasStampPad.com

Okay so I know this card is super cute already because its PINK, has flowers, has some bling, and says the word sprinkles in the greeting! Love it! Now let me know tell you how to create this amazing card!

Supplies Needed: Itty Bitty Punch Pack, Scrap Paper, Watercolor Paper or regular cardstock, Sponge Dauber, Blender Pens, or a Maker

I used the Flower from the Itty Bitty Punch Pack for my sample but you could really use any punch image. Punch the image from a piece of scrap paper! This is not your stencil! For the sample above, I used Watercolor Paper and my Blender Pens to get the look! You could use regular cardstock and a marker or your SPONGE DAUBERS! You know how I love my sponge daubers. I then moved the stencil all over the paper for a random look (some falling off the edges or in the corners). Also, I used my sponge daubers for the edge of the greeting just to add a little color! How simple is that? So you may be asking, why can’t you just punch the image in any color of cardstock for the same look? You can most certainly do that as well. It would give a more textured look because each punched image would be raised up! So many fabulous possibilities!!! Here is another sample created by Vel at one of my stamp classes!!!!

Punch Stencil Card, www.LaurasStampPad.com

I love the colors together! So beautiful and the Daffodil Delight really pops and brightens the card up! This card is sure to brighten anyone’s day! We both used the Remembering Your Birthday Stamp Set for our greetings! Both cards have a coordinating greeting on the inside as well! I hope you try this out with some of your punches and leave a comment down below or send me your photos! I would love to hear and see what you come up with!

Happy Stampin’

~Laura


Summertime Sunflower!!!

Posted on

The Sunflower just screams summer time doesn’t it? The bright yellow color and amazing image is perfect for a summer time wedding too!!! I recently was able to help out a Bride with her Wedding!!!! You all know how much I love weddings! 🙂 Eeee

Sunflower Cards Wedding Suite, www.LaurasStampPad.com

I worked with this Bride to create the perfect Wedding Invitations and of course we had to add in a matching RSVP card. After she saw how amazing the two went together, she asked if I could create Thank You Notes as well! Of course!!!! I created two different styles so she could use one for her Bridal Shower and one for her Wedding. I even stamped the sunflower on the inside corner as well! I love how the sunflower theme was carried out through all of the items.

Sunflower Cards Wedding Suite, www.LaurasStampPad.com

I used Pacific Point & Daffodil Delight for this card. Of course you can see I used my Modern Label Punch & Word Window Punch! Love it!!

Sunflower Cards Wedding Suite, www.LaurasStampPad.com

If you are planning a Birthday Party, Wedding, Anniversary Party, or any other type of party, I can help you customize the perfect invitation, party favor, or thank you note for your event! Together we can come up with the perfect piece to match your colors or theme. I can create the sample and help you get the supplies for you to be crafty and create the perfect piece or I can create it all for you!!!! Email me today if you need help with you upcoming event! For more samples, check out this page!

Happy Stampin’

~Laura


Fabulous Friday!!!

Posted on

While I am excited that it is Friday and this weekend is going to be FABULOUS, today is kind of dreary. Vacation is officially over and we are back to our routine which is nice but oh the carefree days on vacation were nice too! Also, the weather today is very gray and dreary….that means I need to pull the shades to hide it and get to my stamp room for some fun because lots of amazing things are coming up and I need to get ready!!! First off we have a family wedding tomorrow and I still need to make my card and wrap the gift!! Then on Sunday, I am participating in the Gateway Bridal Fair!!!! WEDDING WEDDING WEDDING! Oh yeah I’m loving it! You all know how I love weddings! 🙂

But first let me share some specials with you! Here are this week’s Weekly Deals!

Weekly Deals 8.8.2014

I am loving these items because the Ink Pads are some of my go-to colors right now! I love love love Bermuda Bay and have noticed I have been reaching for Pear Pizzaz a lot lately too! I find it so weird how we change our favorite colors so often and some colors just reach out to us! I also love embossing folders sooooo much because they really make a card or project POP! I will admit I have had the Alphabet Press Folder for a few months now and haven’t used it yet. HELP! I need inspiration. Leave me a comment down below or send me your creation!!!

Big Shot Promotion

Don’t forget about the AMAZING Big Shot Promotion going on this month too! Do you have a Big Shot already?? Check out the Bundles which are 15% off!!!

AND there is the Paper Pumpkin Special too!!!! If you would like 50% off of your August and September Kits, you need to sign up before August 10th (so like TODAY!! 😉 ). Use the Promo Code: HALFOFF2. If you would like your September & October Kits 50% off, then you need to sign up next week using the same Promo Code!!!!! Click here to sign up!

Okay I’m off to the stamp room to play with my NEW Holiday Mini Catalog items and plan Fall Classes! Hope you all have a fabulous weekend!!!

Happy Stampin’
~Laura


Puddles of Ink!!!!

Posted on

Who doesn’t love inky fingers? Wait, am I the only one who does LOVE inky fingers? 🙂 Ahh It washes off eventually and it is just so much fun being messy! Well this technique I am going to show you is for sure messy but so much fun and super cool!

Ink Dropper Card, www.LaurasStampPad.com

Disclaimer: No 2 Watercolor Cards come out alike! Playing with watercolors is always a toss up on the outcome! 

I felt I needed to put that disclaimer out there because I can’t really teach you how to achieve this EXACT look because they all come out different. I’m not going to lie this one did come out amazing – I love the colors, I love those white spots on the top left, it’s perfect to me! I have done a few others and my fellow stampers like the ones I don’t like and don’t like the ones I do like so you never know what you might get! Okay let me tell you about this technique!!!

I started with some re-inkers and my Silicone Mat! In the card above I used Pool Party, Coastal Cabana, Bermuda Bay, and Tempting Turquoise! Drop dots of the re-inker all over the silicone mat. You can make some of the drops touch or keep them all apart. Then you will take a Spritzer with alcohol or water and give it about 5 spritzes or so. Enough to add some liquid to the mat and to make a few dots bleed a little. Then you will place your Watercolor Paper right on top. Feel free to instantly pick it back up for lots of white areas, press it all around and let ink really soak in, or press in only a few spots. Now you will pick it up and turn it over to see what you have!

Reinker Watercolor, www.LaurasStampPad.com

Again here you can set it aside to dry, tilt it around to mix the colors, use your finger to move some color around and fill in white spots, whatever you decide! You can also get multiple watercolor pieces out of one set of re-inker drops. Just lay another piece down! I have also added a few drops of a preferred color or added a few spritzes to get it more wet! Here is another set that I did in Melon Mambo, Pumpkin Pie, and Hello Honey! I thought I would love these but for the most part….ehhh not my favorites!

Reinker Watercolor, www.LaurasStampPad.com

I will have a Video Tutorial for you to see this technique in action, but we decided to stay an extra day on vacation so I will be posting the video later today! 🙂 Thank you for understanding!!! Be sure to subscribe to my Channel though so you don’t miss out on this one and other videos!

Happy Spritzin’

~Laura


Love Is In The Air!!!!

Posted on

Summer time is definitely wedding season! We had one in June, another in July and we have one in August!!!! I love love love weddings though so I’m okay with that. AND then I get to use the fabulous Big New Stamp Set for my wedding cards!!!! I am really loving this set because of the giant greetings and I love the sayings!!!

Big New Wedding Card, www.LaurasStampPad.com

How cute is this? I used Pacific Point and Soft Sky for the colors! These colors matched my wrapping paper ;)! You could always match it to the wedding or just use whatever paper is your favorite color that day!

Wedding Card, www.LaurasStampPad.com

I embossed the background with my Beautifully Baroque Embossing Folder which I love because it has this elegant pattern to it! Then I stamped my greeting and added a little heart from the Itty Bitty Punch Pack on the front and inside!!! This is a MUST for your next order if you don’t have it! A little heart, star, and flower…..they are just perfect for a little something added to your project! Perfect size and perfect images! Love them!!!! I will be making lots of these for all of my upcoming weddings! Stay tuned!

Happy Stampin’

~Laura


Technique Tuesday – Coloring Ribbon!

Posted on

Happy Tuesday!!! That means I have a fabulous technique to share with you! This technique is one of those Ah Ha moments! If you need a specific color of ribbon and either don’t have it on hand or the ribbon doesn’t come in that color….no worries anymore! All you need is Whisper White Satin or Organza Ribbon or another type of white ribbon!

Ribbon Coloring, www.LaurasStampPad.com

See how I have matched the ribbon to the card! It’s so much fun!

Supplies Needed: White Ribbon (Satin, Organza, Baker’s Twine, Seam Binding, & Cotton), Markers or Spritzers or Sponge Daubers

Now this technique has the Ah Ha moment because you only need a few supplies and it is the easiest thing ever to color your ribbon. You will wonder why you hadn’t thought of this before. You can color your ribbon either by coloring it with your markers, tapping your sponge dauber in the ink and rubbing it on, or spritzing it with your Spritzer. For the Spritzer, you will just add Re-inker and Alcohol (70 Proof or less) and spritz away! 🙂 I have found that the colors sometimes come out lighter or darker than you may expect so sometimes you might need to go light or pick a lighter color to match your project!

In the photo above, I used my Crisp Cantaloupe, Rich Razzleberry, and Rose Red Markers to color the Organza Ribbon! For the card on the right and left, I used my Work of Art Stamp Set (LOVE), Small Butterfly Punch, Moonlight Designer Series Paper Stack, and Rhinestones! For the middle card, I used the Hello There Hostess Stamp Set!

Ribbon Coloring Technique, www.LaurasStampPad.com

Here I used my Red Marker on the Organza Ribbon and the Spritzer on the Satin Ribbon.

I hope you try this out the next time you need a specific color of ribbon! Let me know what you think in the comments below!

Happy Colorin’

~Laura


Precious Baby Boy!!

Posted on

Epic Baby Card, www.LaurasStampPad.com

Or Girl!!! Is this card not precious or what? I created this for a friend of mine who is going to be a Grandma to a little baby boy! I used the Epic Alphabet Stamp Set which is a photopolymer set so that means it is completely clear and you can see your stamping placement perfectly!!! Love it! I stamped the letters in Stazon so I could color them in with my Pear Pizzazz & Pool Party markers! I added the “it’s a boy” greeting from A Dozen Thoughts Stamp Set (which also has an it’s a girl greeting)! You could always leave off the gender greeting and make this card in yellow and gray or another gender neutral color to have on hand for your next baby card need! I thought the card needed just a little something more so of course I pulled out my Itty Bitty Punch Pack star punch and added a little Daffodil Delight star on there! Adorable!!!!

What are some of your favorite saying or words that you like to spell out on your cards with the Alphabet Stamps? Leave me a comment down below! I’m having a hard time coming up with short words although I did do this super cute card!!!

Happy Stampin’

~Laura


Fabulous Friday!!!

Posted on

Happy Friday!!! This week has been super busy and tonight I have a fabulous stamp event with 16 ladies! I am so pumped for an evening of fun and stamping!!! There is no better way to start the weekend!!!! Also, today starts my BIRTHDAY MONTH! I like to celebrate all month long. 😉 There is also a fabulous special going on this month too!!!!

Big Shot Promotion

I love love love my Big Shot and always think about buying a second one….not sure why because one is enough but I just LOVE IT! You can emboss and die cut! You can give texture to your project, pop out an image (rather than fussy cut) and make boxes and other 3D items! It is so quick and simple! With this special, you get a FREE Bundle (Stamp Set and matching Framelits) which means you can get started as soon as it arrives! I love that! Check out this video for the basics on the Big Shot! Click here to buy yours today! If you already have the Big Shot, click here to save on the Bundles!

Another fabulous Special……if you have thought about becoming a demonstrator for the fabulous discount, the fun and friends, the extra income for you and/or your family, or for the opportunity to have a creative outlet? To join, you will pay $99 and you get to pick out $125 worth of amazing product! If you pick the Big Shot, you will have $25 left to pick out other fabulous goodies and you will still get the Bundle for FREE! That’s over $200 in product for just $99 (and FREE shipping)! How amazing is that? Click here to learn more or feel free to ask me any questions you might have!

Here are this week’s Weekly Deals!

Weekly Deals 7.29

Also, don’t forget about the fabulous Paper Pumpkin Special too! If you want your August and September Kits 1/2 off, you need to sign up before August 10th! If you want September and October, sign up after August 10th! Click here to get started!!!

Hope you all have a wonderful weekend!

Happy Stampin’

~Laura


Watercoloring with your Markers!!!!

Posted on

I love my big box of markers! I take them with me to every event I do because if I forget a stamp pad, I still have my markers. They are great for a multi-colored look on your stamps, coloring in and now watercoloring!!!!

Watercolor with Markers, www.LaurasStampPad.com

The colors in the card are like that of a sunset (sunrise, neither?)!!! The various shades of yellow, coral, red, and orange and the messiness of the colors that you just can’t achieve if you tried. That’s what watercoloring is all about – you can never do the same look twice and you never know how it will come out!

To create this card, I started with a 4″ x 5-1/4″ piece of Watercolor Paper and took my markers (Daffodil Delight, Calypso Coral, Tangerine Tango, and Pumpkin Pie) and colors swatches. I did the colors in lightest to darkest and colored them either matching up or with a small gap. Once you have your swatches colored, you will spritz it with water or alcohol (70 Proof or less so the alcohol doesn’t eat the plastic in the spritzer). Spritz the heck out of it and you can either let it do it’s thing, pick it up and tilt it around to allow it to bleed, or use your finger to move the ink around. Set it aside and allow it to dry completely before assembling it to your card. When using watercolor paper, I like to use Fast Fuse or Sticky Strip to adhere it to my card because it holds nice and strong even when the paper is curling! To complete my card, I layered my Watercolor Paper onto a piece of Basic Black (4-1/8″ x 5-3/8″) and then onto a Tangerine Tango card base (4-1/4″ x 11″). For the stamping, I used my Bloom with Hope Hostess Stamp Set which has amazing flowers (perfect for watercoloring or blendabilities) and great sayings! Of course, you will want to stamp on your watercolor paper with Stazon Ink so it won’t bleed!

Here is another Sample that I created using shades of Purple – Blackberry Bliss, Elegant Eggplant, Rich Razzleberry, and Perfect Plum! Remember how I said you never know how it might turn out…..how this happened I do not know!

Purple Markers Watercoloring, www.LaurasStampPad.com

I thought about cutting it off but I didn’t want an awkward size of paper for my card. When I was showing my stampers, some loved it and some did not. They gave me the idea to cover it with ribbon so…..

Purple Markers Watercoloring, www.LaurasStampPad.com

See even the ones you think didn’t turn out, still look amazing!!!! Here I added some Satin Stitched Ribbon in Blackberry Bliss & the greeting from Million & One!!!

Marker Watercolor, www.LaurasStampPad.com

Here is another sample that I did with shades of Green – Pear Pizzaz, Old Olive, Garden Green & Mossy Meadow!

To watch this technique in action, check out my Video Tutorial by clicking here or the video below! Don’t forget to give it a thumbs up if you like it!!!

Happy Watercolorin’

~Laura