I have been donating to the Ronald McDonald House for a few years now. I just love to box up those goodies each time! You can see some of the past ones here, here, and here!
This month, I was able to send a box full of cards to the local Ronald McDonald House! The little house that sits in our kitchen filled up with tabs and I was able to send those, too! Every time the little house fills up, I send a batch! I can’t thank my fellow stampers for their support as well. Many of you sent me cards (homemade and store bought) to send and I couldn’t be more grateful. Thank you!!! As always, those of you who donate cards, tabs, or any other items will receive a $10 Gift Certificate from me. You can use it on your next stamp order or one of my classes!
In case you aren’t aware of what the Ronald McDonald House is or does, I thought I would share. It is a house located near a hospital for those to live in while with a loved on in the hospital. Many time these people are in the hospital for an extended stay. It is hard to get a hotel or travel back and forth each day just so they can be with their loved ones. Ronald McDonald House offers a place for these people to sleep and eat and get rest!
I had the opportunity twice to go to the local Ronald McDonald House to provide a meal. I did a breakfast on a Saturday once and a Dinner on a weekday once. This was an amazing experience. I got to sit and chat with some of the families and I really felt like I was making a difference. If you would like more information on this or to donate, feel free to reach out to me here or let me know in the comments below!
I hope you all have a wonderful weekend! See you back here on Monday!
Would you like a sneak peak at some of the NEW In-Colors coming in the 2017-2018 Annual Catalog? Would you like to see some of the new products as well?? You are in luck because Stampin’ Up! is releasing an entire product Suite in May!!!! Woot Woot!!!!
Aren’t these items just FABULOUS?!?!?! The three ink pads are 3 of the 5 New In-Colors coming out in the 2017-2018 Annual Catalog. Lemon Lime Twist is a neon green/lime color! It will be perfect for Summer time!!! Fresh Fig is a deep purple similar to the retired Blackberry Bliss we all loved! I think it is a smidge lighter in shade though! The third one is Tranquil Tide which is a forest green/blue green. Can’t wait to share the other 2 colors!!!!
The Eastern Palace Suite includes the Eastern Beauty Stamp Set and coordinating Eastern Medallions Framelits. While it may look like it is just random images, they build together to make amazing images. I have played with a few and fallen in love with the endless possibilities. Also, I love a good greeting and image stamp set all in one! The Framelits are so detailed and amazing. No worries about poking out all of the pieces, just make sure you have the Big Shot Die Brush on hand! 🙂
The Eastern Palace Specialty Designer Series Paper is gorgeous! There are 2 pieces that have fabulous gold foil on them! A lot of the pieces are peacock inspired and the color combination is amazing!!! I have played with this paper on a One Sheet Wonder so stay tuned for that!
The embellishments include some Tassels and Gold Vinyl Stickers!!! These items coordinate perfectly with the stamp set and colors! I do have to say that the tassels are super soft and not as bulky as I thought that would be. Tassels seem to be so in right now too! I love it!!!
You can purchase these items starting on May 1st! There are 2 different options to get these goodies.
Starter Bundle is $60.50 (US) and includes the following:
Eastern Beauty Photopolymer Stamp Set
Eastern Gold Vinyl Stickers
Lemon Lime Twist Classic Stampin’ Pad (New In Color!)
Tranquil Tide Classic Stampin’ Pad (New In Color!)
Fresh Fig Classic Stampin’ Pad (New In Color!)
Eastern Palace Specialty Designer Series Paper
Very Vanilla Note Cards & Envelopes (New!) FREE!
Premier Bundle is $103.50 (US) and includes the following:
Eastern Beauty Photopolymer Stamp Set
Eastern Palace Specialty Designer Series Paper
Mini Tassels Assortment
Eastern Gold Vinyl Stickers
Eastern Palace Cardstock Pack
Lemon Lime Twist Classic Stampin’ Pad (New In Color!)
Tranquil Tide Classic Stampin’ Pad (New In Color!)
Fresh Fig Classic Stampin’ Pad (New In Color!)
Eastern Medallions Thinlits Dies
Very Vanilla Medium Envelopes FREE!
Very Vanilla Thick Cardstock (New!) FREE!
Or you can purchase each item individually but you have to wait till June 1st!!!! Don’t forget that you will earn Laura’s Loyal Stampers Stickers for any type of order you place – online or by sending it to me! You can also earn Hostess Benefits when your order reaches $150!!! Make that wish list and be ready on May 1st!!!
To see these items in action, check out my unboxing and reveal of the Eastern Palace Suite below or click here! Don’t forget to give this video a thumbs up if you liked it and be sure to subscribe as I post every Tuesday and Thursday!!!
Let me know in the comments below what your favorite New In-Color is!!!! Mine is the Lemon Lime, I think…..maybe!
This is every stamper’s perfect T-Shirt! Of course some may be in different colors of a different style but this one is perfect for me. I love PINK and I love that baseball tee look!!!
I started with a Daffodil Delight card base. Next I took a piece of Whisper White (4″ x 5-1/4″) and stamped all over the background. Melon Mambo, Pumpkin Pie, and Daffodil Delight Inks are the colors I used! I simply stamped a few times on the 1/3 of the piece and then a few into the next 1/3″. This makes the pattern look like it blends into the next color.
Now for the focal point, I die cut the Pumpkin Pie square with the Stitched Shapes Framelits. I love how the little stitching adds so much texture to the card! I added this to the center of the card. For the shirt, I stamped the girl’s shirt in Basic Black Ink onto a scrap piece of Whisper White. All of these stamps are from the Custom Tee Stamp Set. I stamped the “baseball tee accents” in Melon Mambo Ink and die cut the shirt with the T-Shirt Builder Framelits. I added the shirt to the card front with Stampin’ Dimensionals. To finish off the card, I added a few pops of color with some Brights Enamel Shapes!
I just love this card and it’s perfect for any stamper friend! The T-Shirt Builder Bundle is great for either gender and any age because there are so many options! Check out yesterday’s post where I showed off another sample and a video tutorial!
This bundle is retiring as well as many others. Check out the retiring list here and start shopping now because all of these items are while supplies last.
Happy Tuesday!!! That means I have a fabulous technique to share with you using the T-Shirt Builder Bundle from the Occasions Mini Catalog! I love how this set is perfect for all ages and both men and women!!!
This card is perfect for Father’s Day or change up the greeting and make it a Birthday Card!!! Either way, it’s the perfect Man Card and I really struggle with those! Let’s get started!
I used the T-Shirt Builder Bundle for this entire card! Starting with the shirt, I stamped the men’s shirt, buttons down the front, and the collar. All of them are stamped in Basic Black onto Pear Pizzazz. I stamped the tie in Basic Black onto Whisper White. Using the T-Shirt Builder Framelits, I die cut the shirt, collar, and tie. I thought the tie needed a pop of color so I colored in every other stripe with the Pacific Point Marker.
For the card, I started with a Pear Pizzazz card base. Next, I took a piece of Pacific Point cardstock (4″ x 5-1/4″) and stamped the tie on the background in Pacific Point Ink. This gives the background a some pattern. After stamping the background, I adhered it to the card base. Then I took a piece of Crumb Cake (4″ x 2″) and ripped around the top edge for a little texture. I stamped the greeting from Custom Tee Stamp Set. The set actually says RAD DAD but I omitted the Rad part but just inking Dad. I stamped it below the #1! Then I adhered it to the bottom of the Pacific Point on the card . Then I added the shirt. The actual shirt was added flat to the card but I added the collar with a Stampin’ Dimensional to make the shirt look more real!
If you would like to see this all in action, check out my Video Tutorial below or click here! Don’t forget to give it a thumbs up if you liked it and be sure to subscribe if you are new. I post a new video every Tuesday and Thursday! Check back tomorrow as I will be posting another sample using the T-Shirt Builder Bundle!
Stamping your own designer paper is fun and makes endless possibilities for all of your projects! I used the So In Love Stamp Set for this beauty!!!
You all know I just love flowers and this card just makes my heart happy! The color combination is fabulous too – Mint Macaron, Blushing Bride and Rose Red!
I started with a Mint Macaron card base. Next I took a piece of Very Vanilla (3-3/4″ x 5″) and stamped all over the background using the So In Love Stamp Set. The largest flower was stamped in Rose Red Ink. The set of four smaller flowers were stamped in Blushing Bride Ink. The greenery was stamped in Mint Macaron Ink. Be sure that when you are stamping your own designer paper that you fall off the edges so it looks like the pattern continues!
Once it was all stamped, I layered it onto a piece of Rose Red measuring 4″ x 5-1/4″! Then I wrapped some Mint Macaron Sheer Linen Ribbon around it and tied it into a knot. Because of the ribbon, I added this layer to the card front with Stampin’ Dimensionals. This way it lays nice and smooth! For the greeting, I die cut a circle from the Stitched Shapes Framelits and stamped it in Rose Red Ink. I added it to the card front with Stampin’ Dimensionals and finished it off with some Pearls!
This card would be perfect for so many different occasions. If you changed up the colors it would be fit each season too! Also, that color combination is just fabulous! Let me know your favorite color combo in the comments below! I need some new ones to try!!!
Happy Stampin
~Laura
Don’t forget that the Stampin’ Up! Retired List is out and items are selling out fast! You can check out the complete list here:
Some of these items are sold out already so you can just start shopping here! Not only do you get to enjoy getting some great products before they are gone (and at a discount for some), you will also be able to earn Laura’s Loyal Stampers Stickers!!!
Happy Friday!!! I’m have so many fabulous updates and excitement to share with you that I thought I would make it an entire blog post!!! Are you ready???
Last Friday, I did the drawing for the Ink Pad Giveaway and it was Sheila!!!! I’m so happy for her and she selected the Subtles Collection. Little funny side note: I took the picture of her name with my ink pads before telling her she won. Yet, somehow I did it in front of the Subltes Collection and that’s what she picked. Hehehe I love little things like that!
Speaking of Giveaways, let me know in the comments below what you would like the new giveaway to be. I have done the Big Shot and now the Ink Pad Collection. Would you like a repeat of those or something different?? Can’t wait to hear your suggestions!
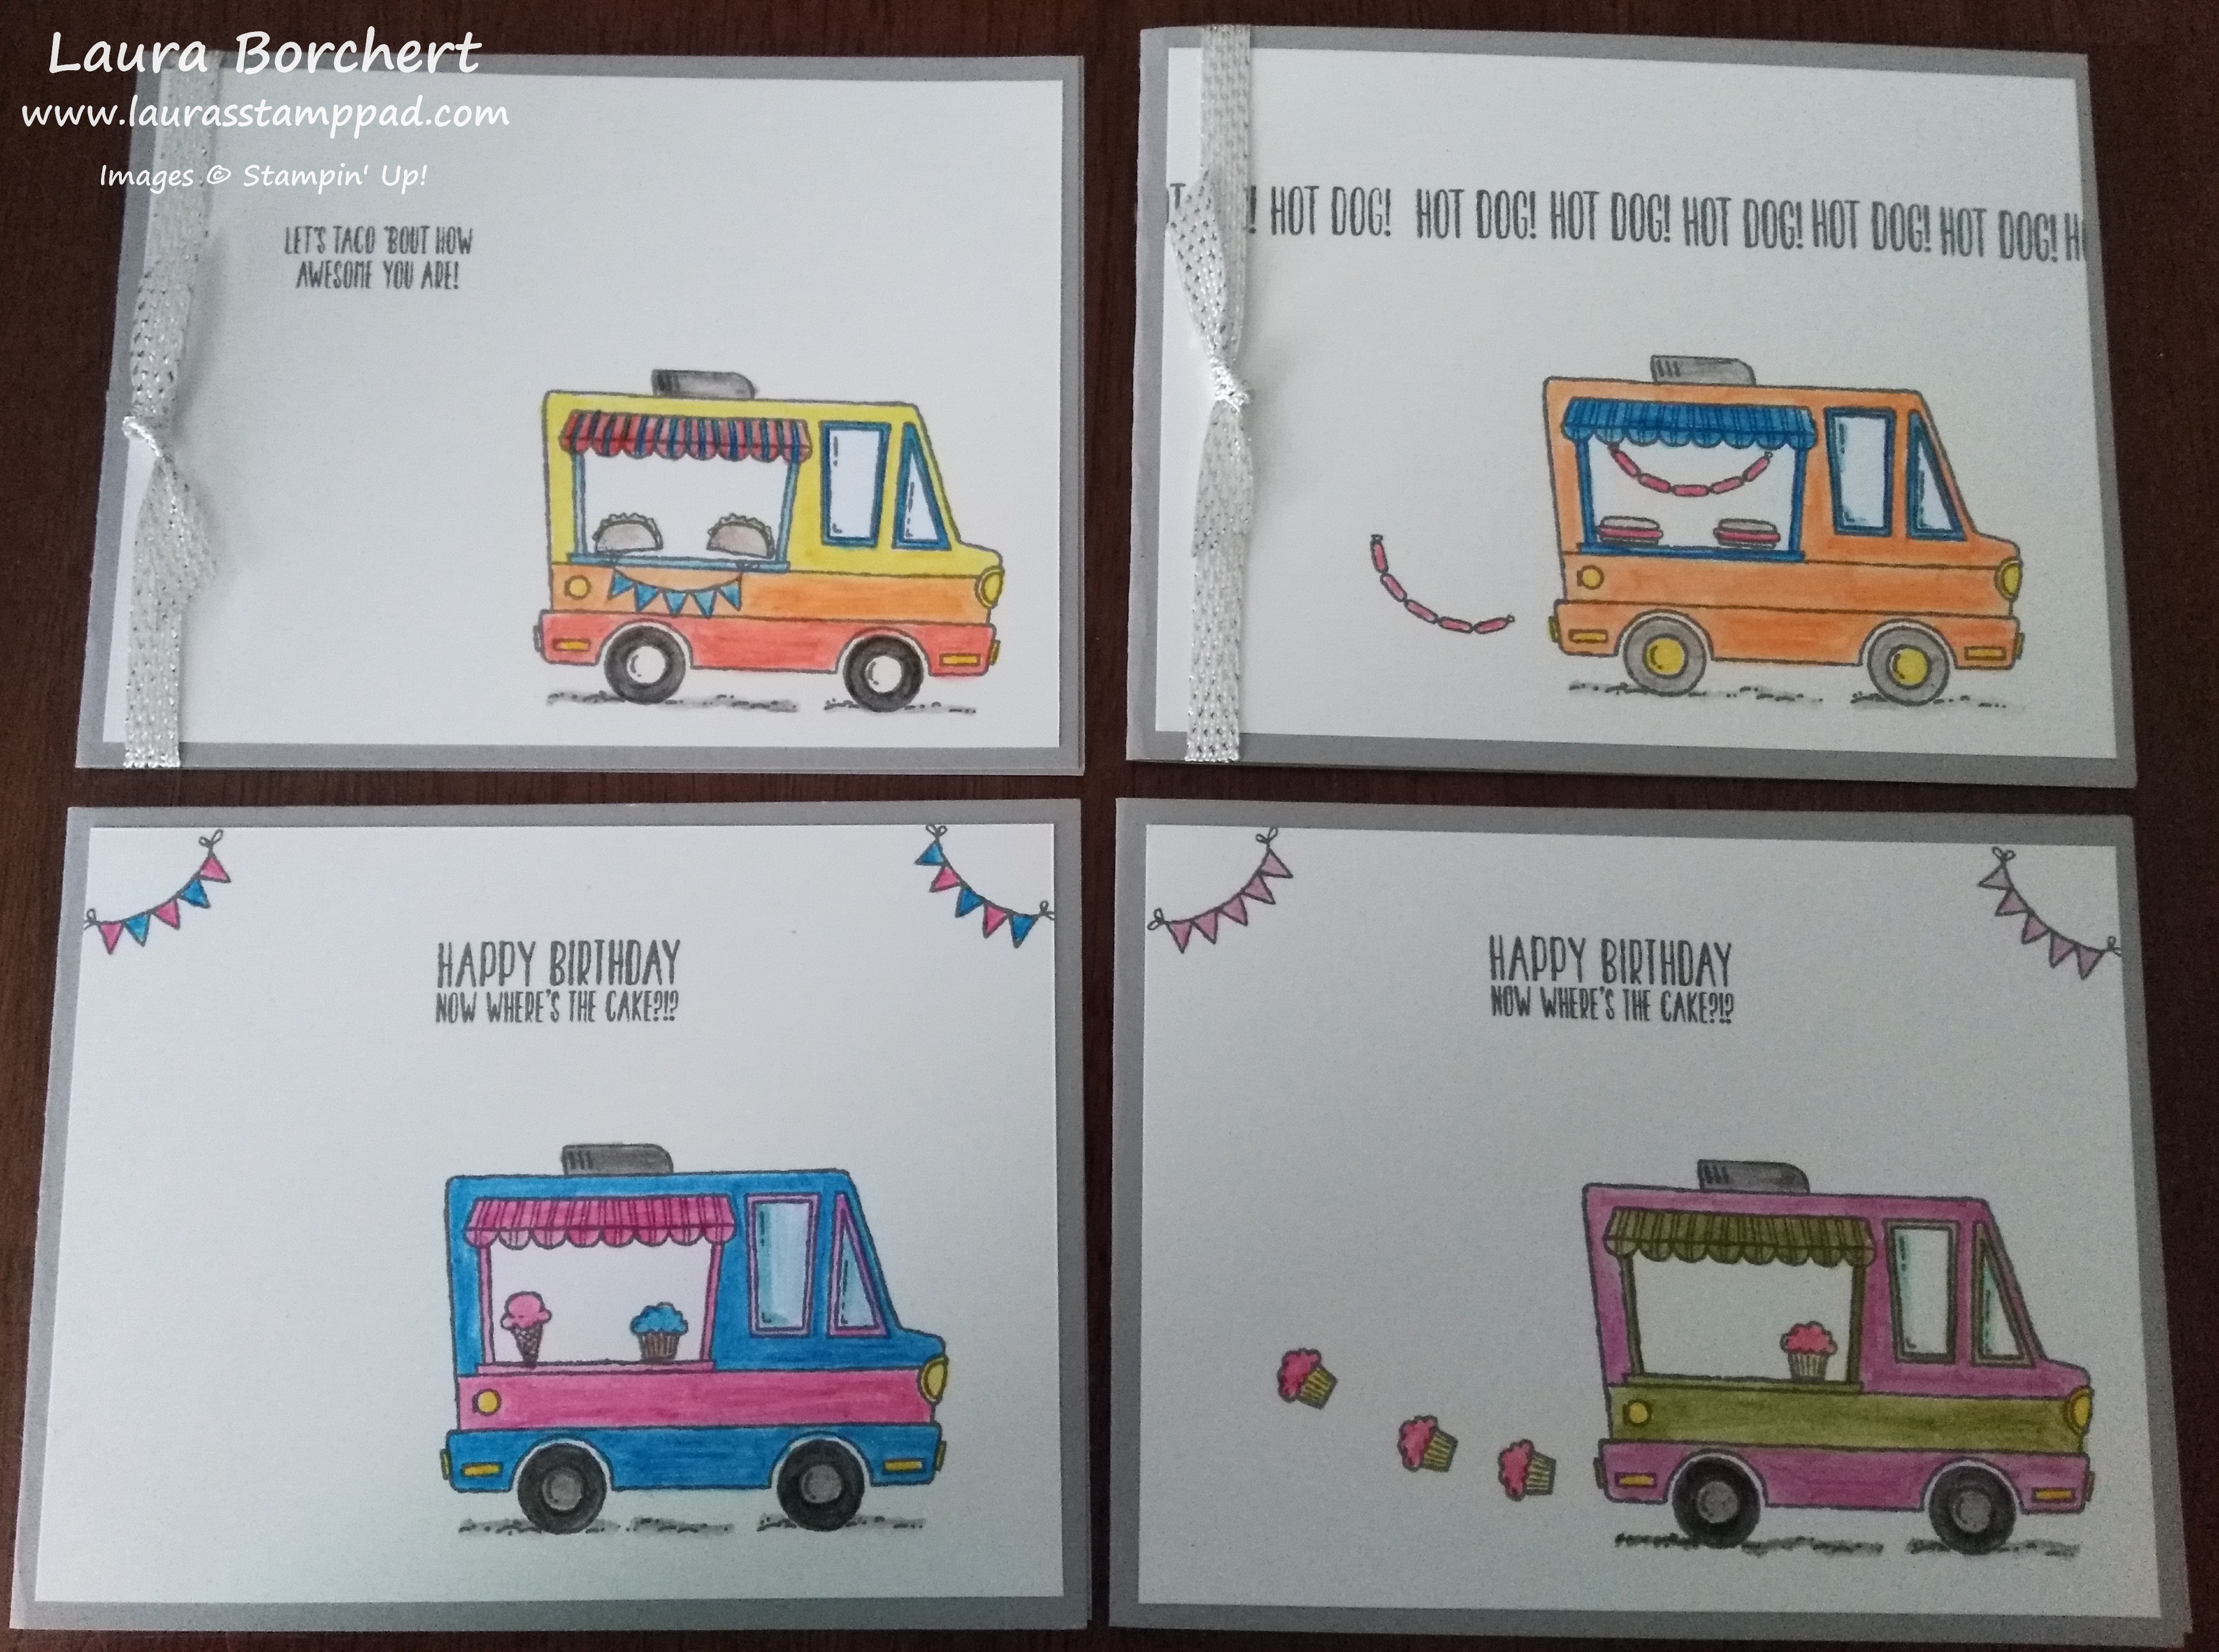
So even though Sale-A-Bration is over and you can’t get the adorable Tasty Trucks Stamp Set, I just had to share these. I had some leftover cards already cut so I created them! Coloring with the Watercolor Pencils and Blender Pens is just so much fun!!! Eeee I love them all!
Don’t forget that the Stampin’ Up! Retired List is out and items are selling out fast! You can check out the complete list here:
Some of these items are sold out already so you can just start shopping here! Not only do you get to enjoy getting some great products before they are gone (and at a discount for some), you will also be able to earn Laura’s Loyal Stampers Stickers!!!
And another fun announcement……I have handed out my FIRST $40 Gift Certificate for Laura’s Loyal Stampers Stickers!!!! Congratulations Vickey M. for earning the first one!!!! Woot Woot!!! Will you be the next one?!?!?!
I hope you all have an amazing weekend and I’ll see you back here on Monday!!!
This baby bunny is just precious and I used Basket Bunch Stamp Set which is Easter themed! I love using a stamp set in out of the box way! To see a few other samples with this set, click here and here!
You could always create this little baby bunny card in pink, blue, or even yellow. Go with the color that you enjoy the best!
I started with a Whisper White card base! Next I die-cut a scallop oval and smooth oval using the Layering Ovals Framelits. With the smooth oval and the card base, I pounced the Embossing Buddy over the top to reduce any static on the paper before heat embossing. Next, I stamped the greeting from the Tin of Cards Stamp Set and bunny from the Basket Bunch Stamp Set in Versamark Ink. I poured Gold Embossing Powder over the top and heated it with the Heat Tool. Oh how I love watching the powder melt! It’s so magical every time! Check out this Video for the basic on Heat Embossing!
Now that the heat embossing is all complete, it’s time to add color! I stamped the dotted splatter on the background twice in Melon Mambo Ink using the Happy Celebrations Stamp Set. To color in the bunny, I used some Melon Mambo Ink and an Aqua Painter. I love how the embossed image acts like a little barrier to keep the ink/water in! To assemble the card, I layered the bunny oval onto the scallop oval. Then I took some Gold Thread and wrapped it around my fingers a few times (10-12), slid the loops off my fingers and twisted in the middle. Next, I placed this on the back of the scallop oval and secured it with some Stampin’ Dimensionals. I always like to add more dimensionals to really make my gold thread fan out just so. Peel the backs off of the Stampin’ Dimensionals and adhere to the card! It’s just so precious!!!
I know today is Thursday and I normally do a Video on Thursday but I did a special one yesterday for my Stampin’ Anniversary. You can check that out here!
Don’t forget that the Stampin’ Up! Retired List is out and items are selling out fast! You can check out the complete list here:
Some of these items are sold out already so you can just start shopping here! Not only do you get to enjoy getting some great products before they are gone (and at a discount for some), you will also be able to earn Laura’s Loyal Stampers Stickers!!!
I just can’t believe it is my 13th Anniversary with Stampin’ Up! today! How crazy is that?!?!?! Thirteen years seems like a long time but yet this has been an amazing and fun journey! I have enjoyed every moment of it!!! In celebration (and tradition), I am doing my 13 Favorite Stampin’ Up! items right now today!
My 13 Favorite Stampin’ Up! Items!!!
~Enamel Shapes – I love the shape of these and the little POP of color they add to a project!
~Perfect White Accents – I honestly just found out about these things and I’m in love! They are flat and smooth and perfect for a card!
~Lift Me Up Stamp Set – I just love these greetings. Sending Smiles Across the Miles is my favorite. You can check out samples here, here, and here!
~Watercolor Pencils – My new favorite coloring tool! These things are amazing. Check out some samples here, here, and here!
~Blender Pens – Since I have been playing with the Watercolor Pencils so much, these work perfectly to blend the colors for the perfect look like in this sample and this one!
~Flirty Flamingo Ruched Ribbon – I love pink and this ribbon has a fabulous texture and it’s easy to use. There isn’t a big knot when you use it on a card!
Are any of these your favorites?? Let me know in the comments below!
If you would like to see this all in action, check out my Video Tutorial below or click here! Don’t forget to give it a thumbs up if you liked it and be sure to subscribe if you are new. I post a new video every Tuesday and Thursday (or when my Anniversary falls on a Wednesday)!!!!
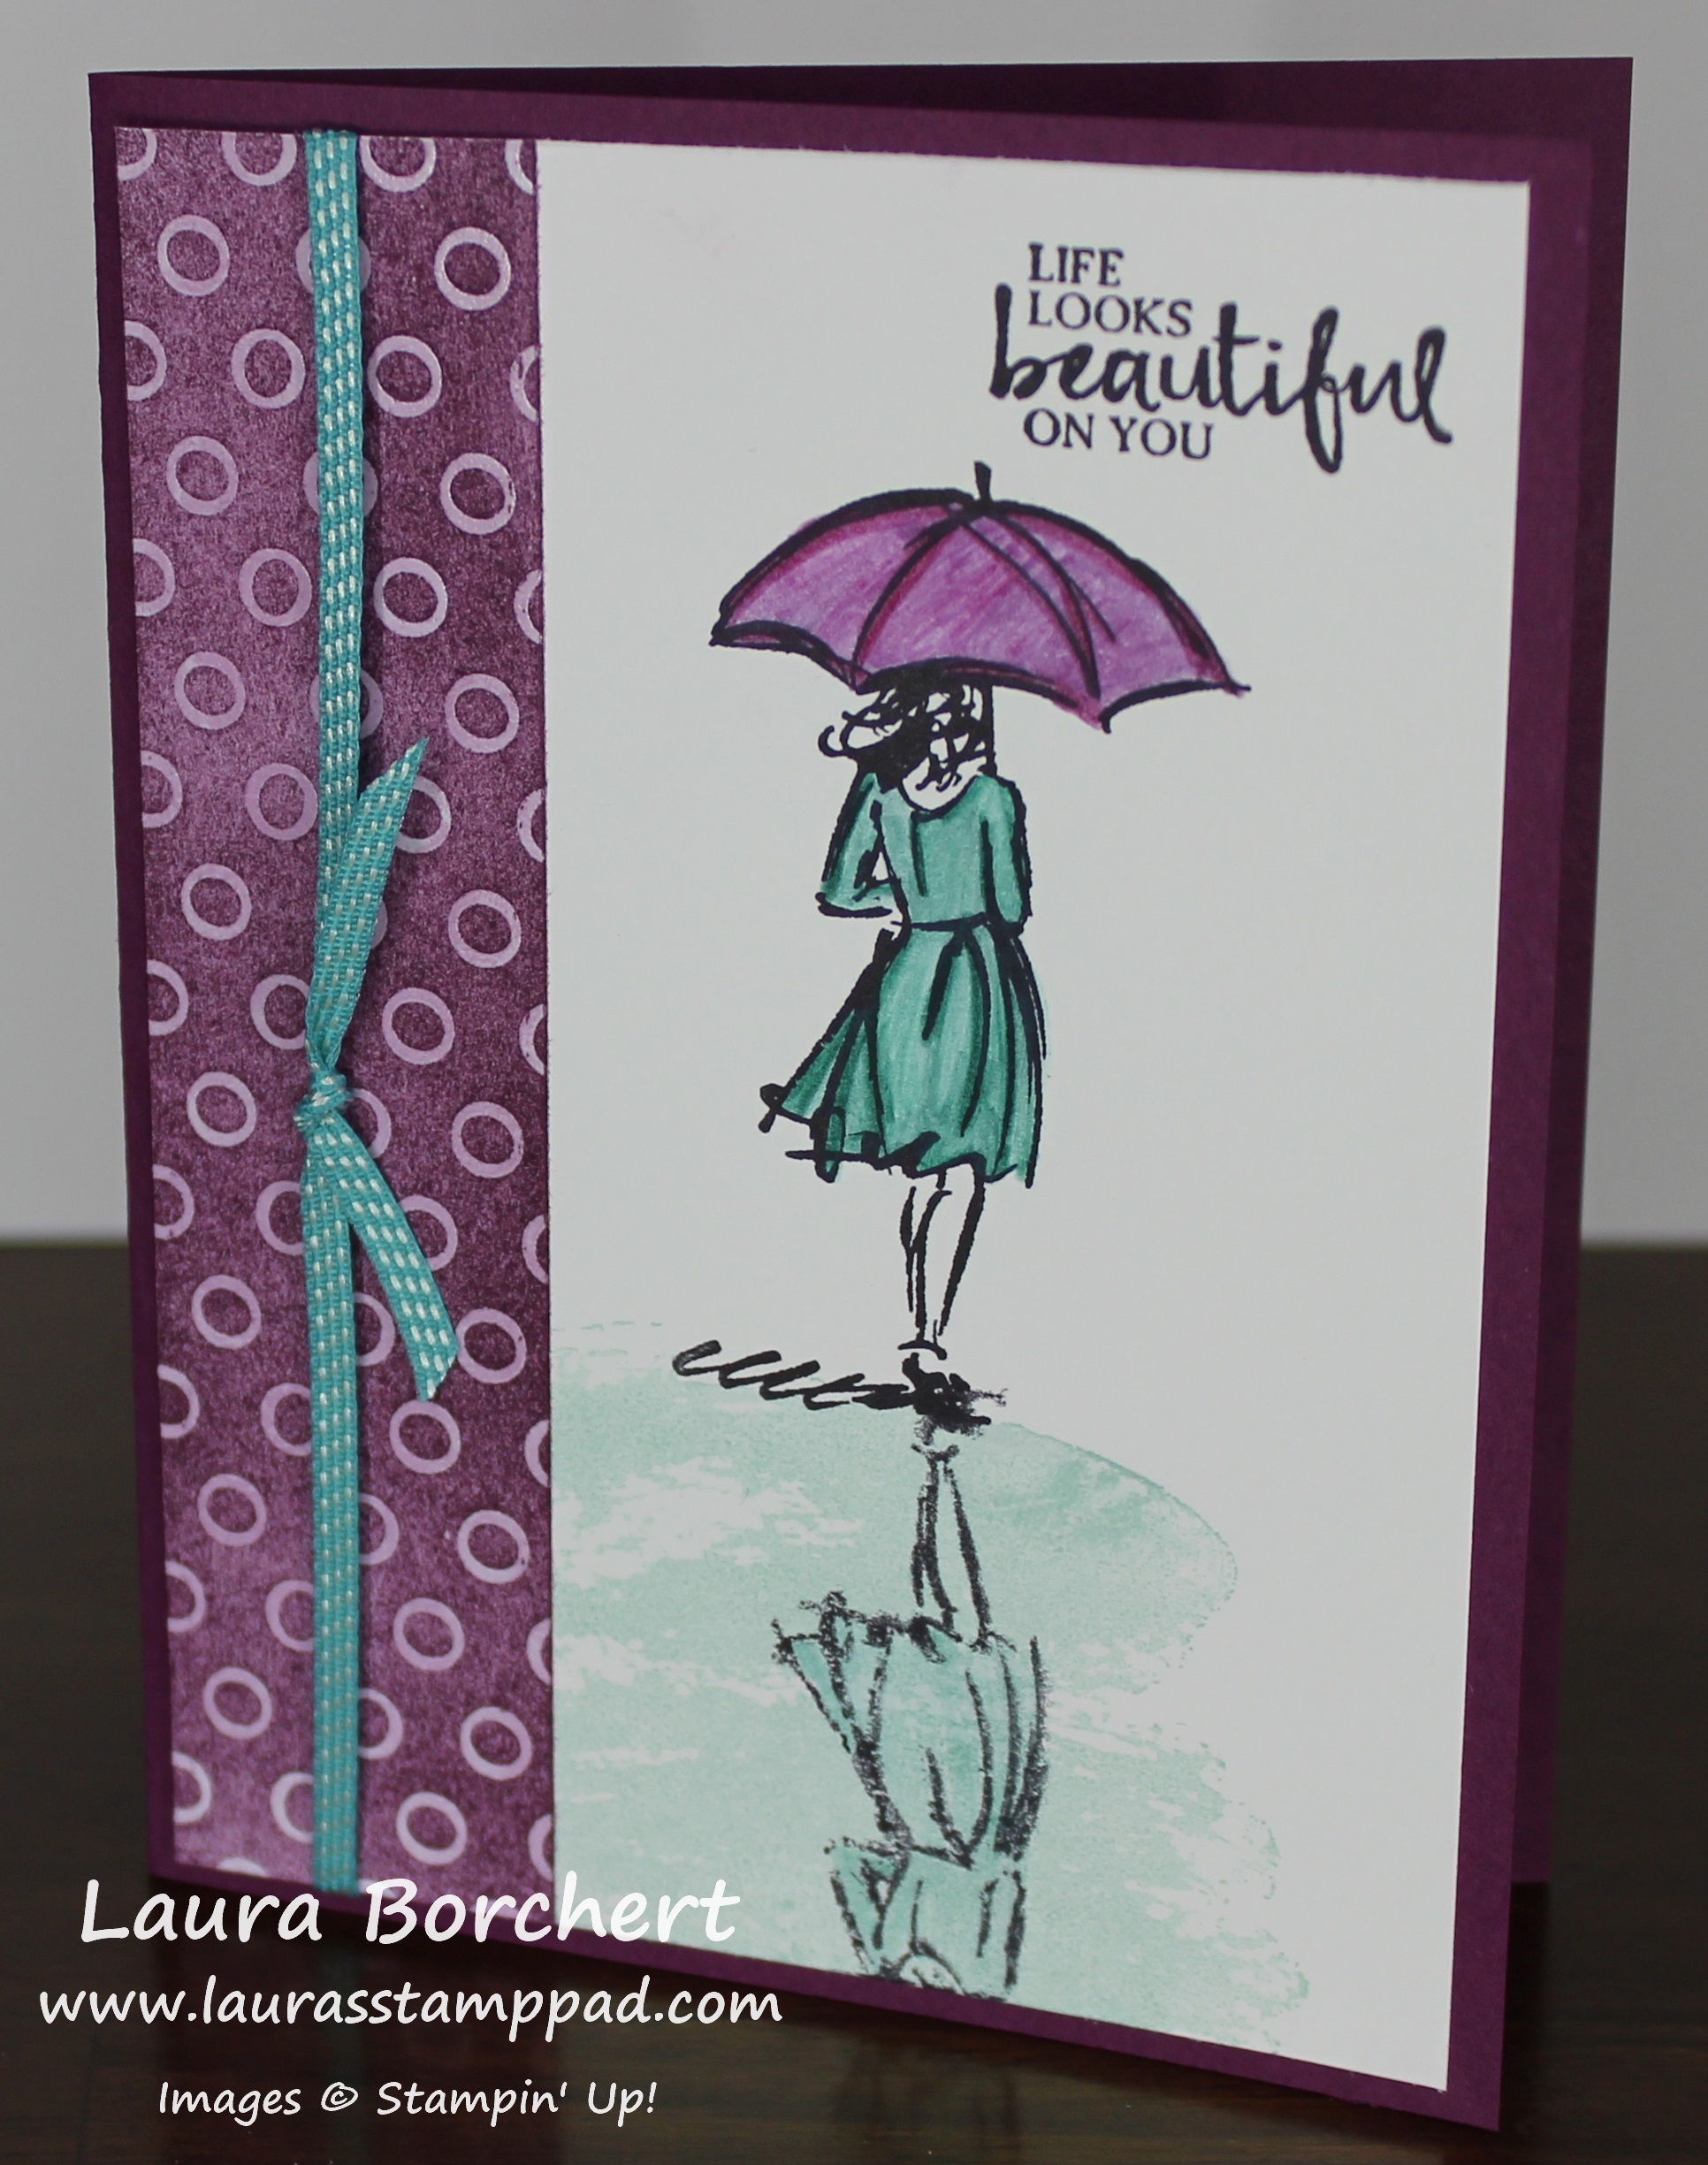
Happy Tuesday!!! That means I have a fabulous beautiful reflection technique to share with you today! I am super loving the Beautiful You Stamp Set. Check out more samples here, here, and here!
Isn’t this card just stunning? It’s beautiful and peaceful! I just love it so let’s get started!
I started with a piece of Whisper White (4″ x 5-1/4″) cardstock and stamped the greeting from the Beautiful You Stamp Set at the top. I did it after the fact in mine but it helps to do it first! Next, I stamped the girl from the same stamp set in Basic Black Ink onto the cardstock and then onto a piece of Window Sheet. Be careful when you stamp on the Window Sheet because it is slick! Then I flipped the Window Sheet over and placed it on the cardstock, matching it with the black squiggle on the bottom. Press over the window sheet to make sure the ink transfers to the cardstock. I love how it looks foggy and incomplete because that is how it would look as a reflection. Also, it helps make your card still look good when it doesn’t come out perfect! 🙂
For coloring, I used the Watercolor Pencils to color her dress and umbrella (Bermuda Bay & Rich Razzleberry). I used the Blender Pen to blend the color around! Then I went back through and added accents with the pencils. I didn’t trust myself to get the perfect watercolor wash for the puddle so I used the Watercolor Wash Stamp Set and Pool Party Ink. I stamped off once for a lighter look!
I really wanted a piece of Designer Series Paper for the left hand side but didn’t have any that was Rich Razzleberry. Then I realized I could make my own with the Irresistibly Floral Designer Series Paper. Using the Sponge Brayer and Rich Razzleberry Ink, I colored the Designer Paper to match! Be sure to wipe off any excess ink to really make the embossed design pop! I added this piece to the left hand side of the card and tied some Bermuda Bay Stitched Ribbon around it! Next I adhered this piece to a Rich Razzleberry card base! I just love it!!!
If you would like to see this all in action, check out my Video Tutorial below or click here! Don’t forget to give it a thumbs up if you liked it and be sure to subscribe if you are new. I post a new video every Tuesday and Thursday!
These Lace Doilies are so amazing and I’m super sad to see them retiring. They are perfect because they are white on one side and vanilla on the other side!!! LOVE IT!!!
I started with a So Saffron card base. Then I took a piece of Very Vanilla (4″ x 5-1/4″) and adhered some Falling In Love Designer Series Paper (2″ x 5-1/4″) to the left side. I really feel like the flowers have a hint of yellow in them and this card really made it pop! For the greeting, I used one of the Lace Doilies (retiring in May) in the center. I adhered it with a little bit of Snail Adhesive in middle. Then I die cut a scallop circle using the Layering Circles Framelits and stamped the greeting from the So In Love Stamp Set.
I added the scallop greeting to the card front with Stampin’ Dimensionals. To finish off the card, I added a few So Saffron Enamel Shapes for some random pops of color! A simple and elegant card for any occasion. The perfect one to always have on hand!
Don’t forget that the Stampin’ Up! Retired List is out and items are selling out fast! You can check out the complete list here:
Some of these items are sold out already so you can just start shopping here! Let me know in the comments what items you are sad to see go! These Lace Doilies are high on my list! Another item that I am sad to see go is the Decorative Label Punch.
Not only do you get to enjoy getting some great products before they are gone (and at a discount for some), you will also be able to earn Laura’s Loyal Stampers Stickers!!! Just one way for me to show my appreciation to you!!! 🙂