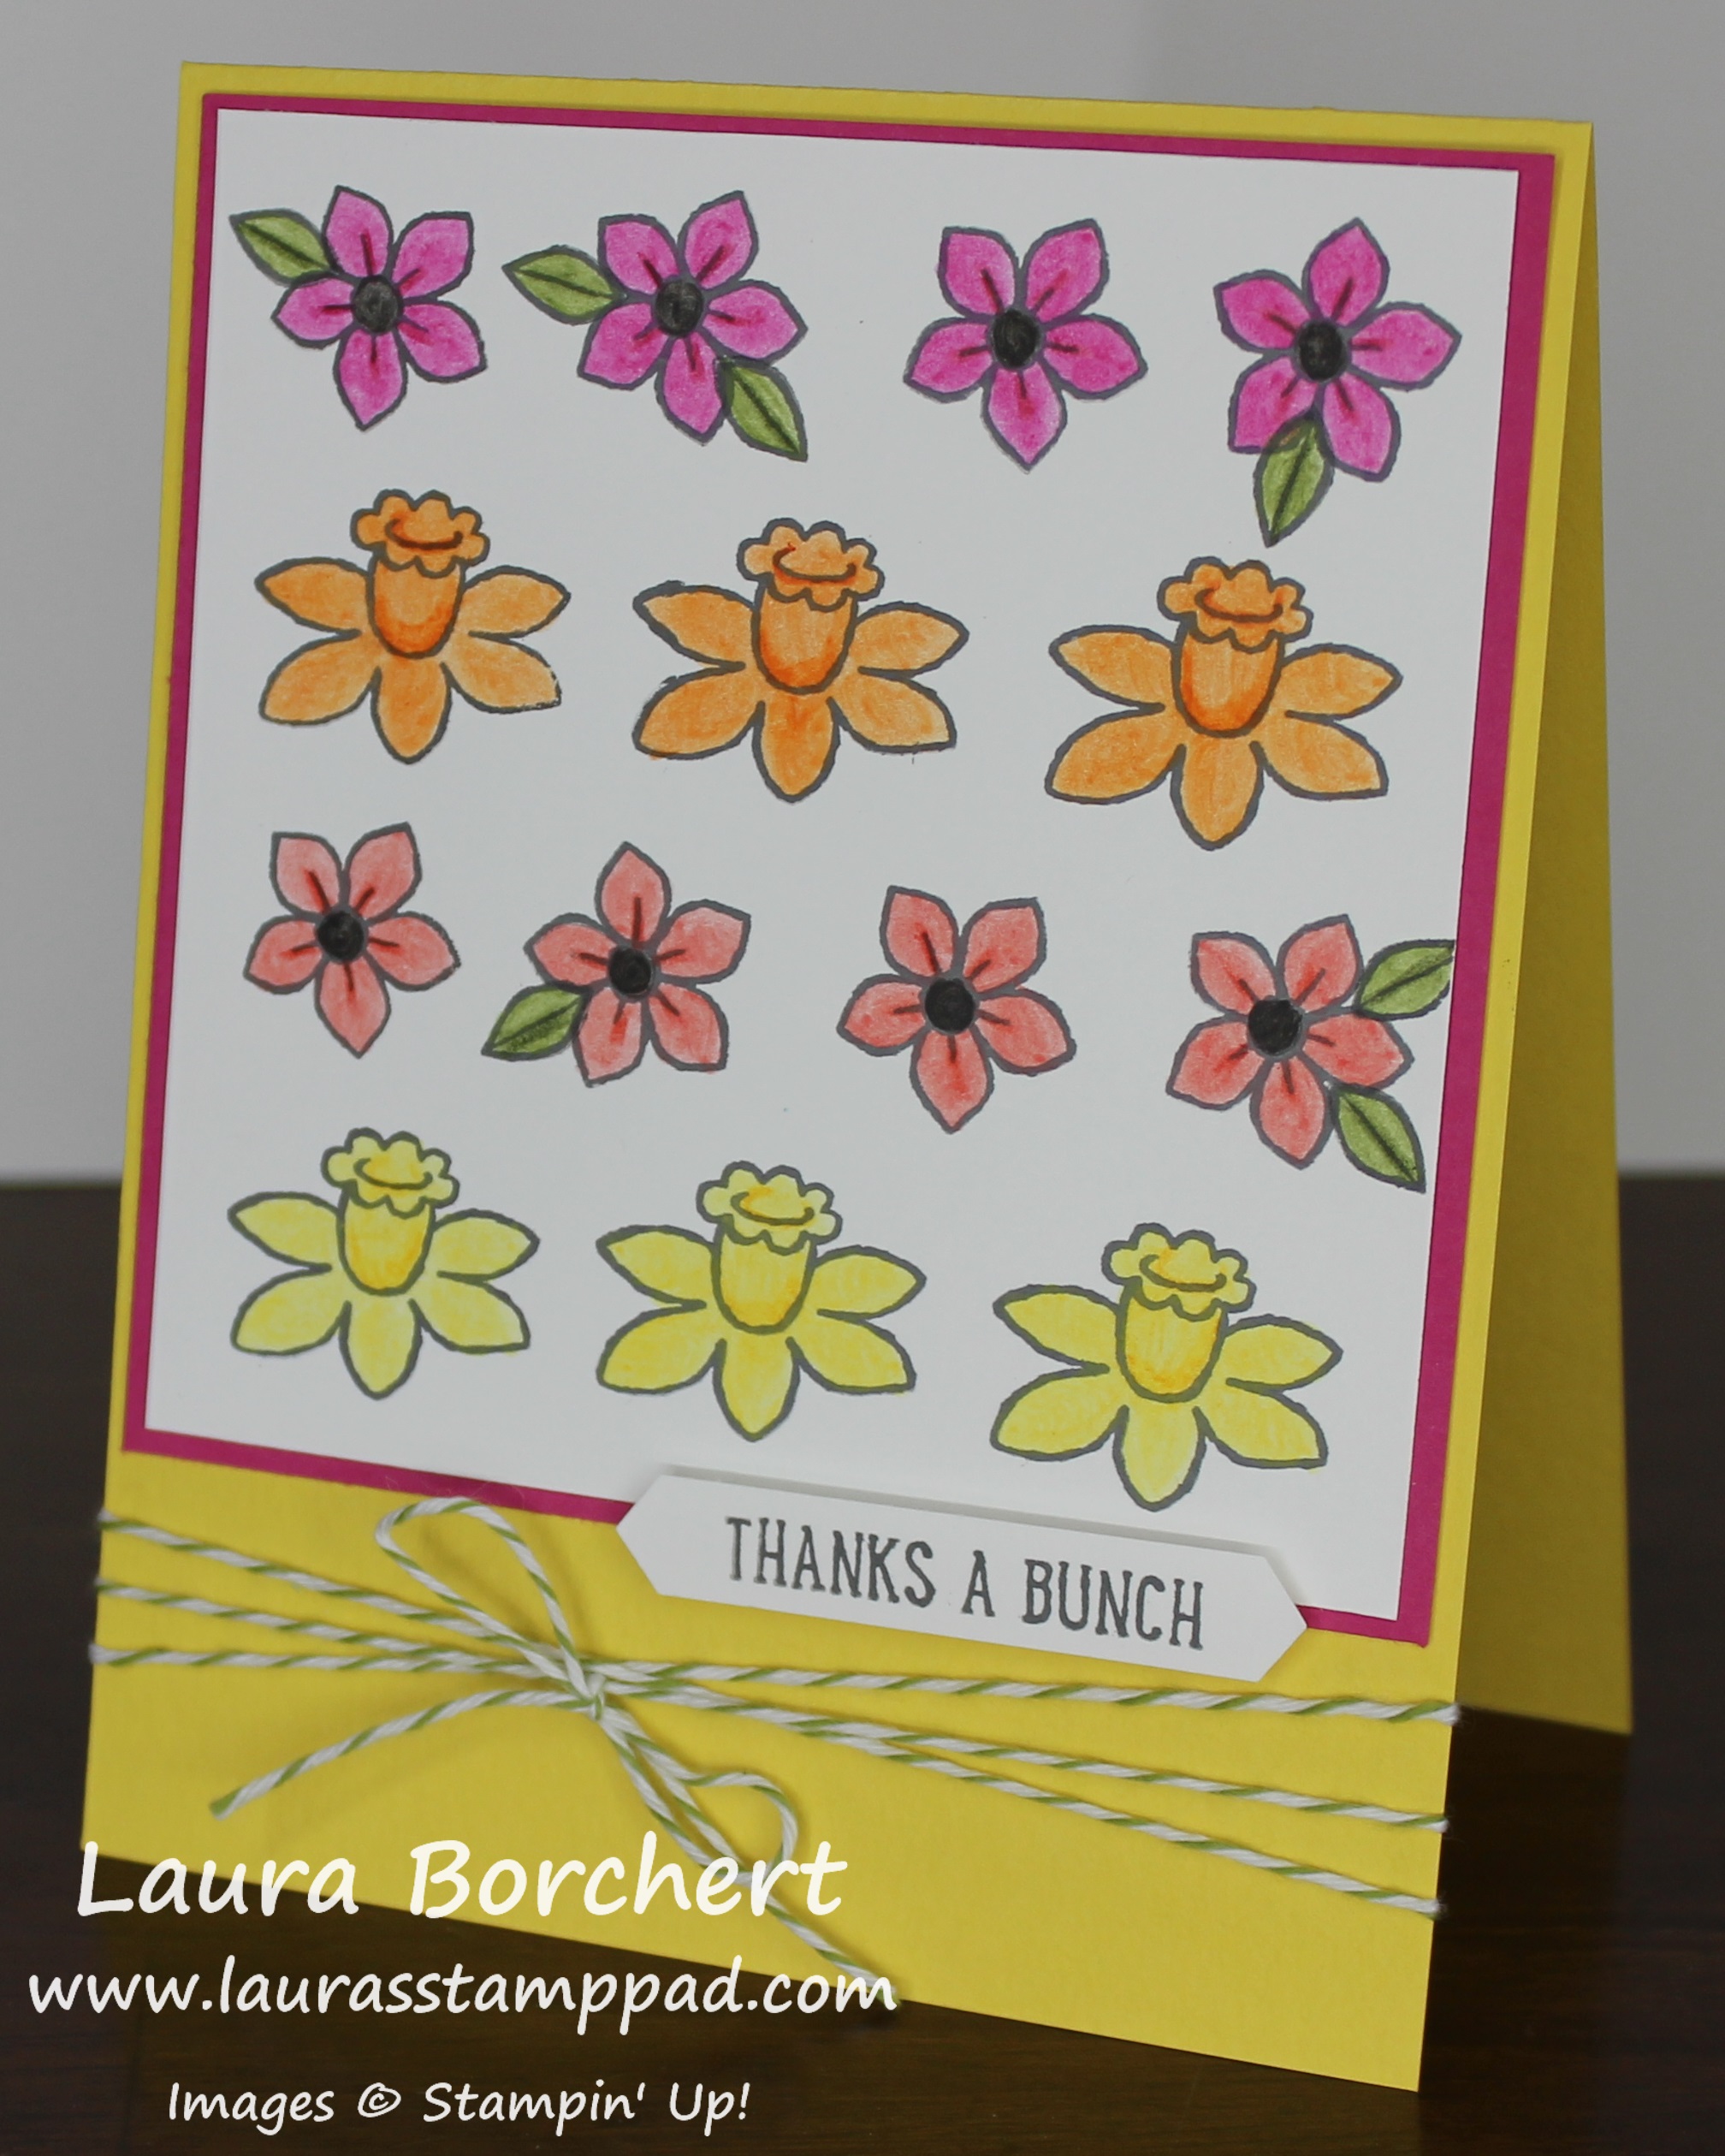
Fill Your Basket of Colorful Flowers!!!

Posted on

Easter is almost here and some may be filling their baskets with eggs while others fill a basket of colorful flowers!!! I love these colors and Spring look!!! Spring is my favorite Season and Easter is my favorite holiday!!!
Basket of Colorful Flowers, www.LaurasStampPad.com

I started with a Daffodil Delight card base! Then I took a piece of the Sending Love Designer Series Paper (5-1/4″ x 4″) and placed it on the card front diagonal. The look is super fun but sometimes I wonder if it just looked like I messed up and make it crooked. 🙂 I’ll take it!

Next, I took a piece of Whisper White (5″ x 3-3/4″) and adhered 2 pieces of grass die cut from the Basket Builder Framelits. When I placed the grass down, I just left the gap in the middle where I planned on putting the basket so you can’t actually see it! As for adhesive, I just ran some Snail along the bottom of the grass and stuck it down! I stamped the greeting in the upper left corner from the Basket Bunch Stamp Set. I used Basic Gray Ink and stamped twice before going back to the ink pad for that shadow look. Next, I added this to the card front diagonal and worked on the focal point!

For the focal point, I stamped the basket, flowers, and leaves (from the Basket Bunch Stamp Set) in Basic Gray Ink onto Whisper White scraps. I like to use gray for that softer look! I die cut out all of the pieces with the coordinating Basket Builder Framelits (Bundle & Save 10%). Die-cutting out the pieces before coloring is best so that if you cut them incorrectly, you haven’t wasted coloring time! For the coloring, I used the Watercolor Pencils and Blender Pens!

For the basket, I placed the handle on the back and secured  the ends with a Stampin’ Dimensional on either side and one at the bottom. Don’t place a dimensional in the middle because you will want to stick your greenery down in the basket! I wrapped some Crushed Curry Baker’s Twine around the basket and and tied it into a bow and placed it on the card front! Now it’s time to assemble the flowers and greenery using Mini Glue Dots and Stampin’ Dimensionals. You can fill the basket as much as you want!

This card could be created for any occasion or season just by changing the greeting and colors! What is your favorite flower? Let me know in the comment below! Mine is a Peony but I do love all bright flowers! They make me smile!

Happy Stampin’

~Laura


The Stunning Glimmer Floral Lace!!!

Posted on

This card is just stunning with that glimmer floral lace detail using the So In Love Bundle!!! I think this card is perfect for weddings, anniversaries, birthdays and so much more. It is just amazing!!!

Glimmer Floral Lace, www.LaurasStampPad.com

I started with a Very Vanilla card base! Next, I layered a piece of the Falling In Love Designer Series Paper (4″ x 5-1/4″) onto a piece of Blushing Bride cardstock (4-1/8″ x 5-3/8″). I placed this on the card front! For the amazing glimmer floral lace detail, I used the Blushing Bride Glimmer Paper and the So Detailed Thinlits. It is best to place the thinlit on the backside of  the glimmer paper to run through the Big Shot. When I did this I found that I could use the Big Shot Die Brush to pop all of the pieces out. If I run it through face up and use the brush, it scruffs up the glimmer and sometimes makes it come off! This  is the perfect solution.

Die Cut Pretties, www.LaurasStampPad.com

I just love how all of the pieces popped out and look so amazing! Now it is time to adhere it to the card front. I put it on the left hand side and used the Multi-Purpose Glue to adhere it. Just use a sponge and some of the glue to pounce all over the details for that perfect amount of glue without any messes! I love it!!! Next, I added some Very Vanilla Satin Ribbon around the card and into a knot.

Floral Lace, www.LaurasStampPad.com

For the greeting, I used the Layering Ovals Framelits and the So In Love Stamp Set! I added the greeting to the card with Stampin’ Dimensionals. Oh how I am just in love with this card and this bundle! Don’t forget that you can purchase the So In Love Stamp Set and So Detailed Thinlits as a Bundle and you will save 10%. Stay tuned as I have a lot more samples coming soon!

If you would like to see this all in action, check out my Video Tutorial below or click here! Don’t forget to give it a thumbs up if you liked it and be sure to subscribe if you are new. I post a new video every Tuesday and Thursday!

Today is the last day to get entered into the Ink Pad Giveaway! I will be drawing a name for a Color Family of Ink Pads (10 total) tomorrow!!! Click here for all the details!!!

Ink Pad Collection Giveaway, www.LaurasStampPad.com

Happy Stampin’

~Laura


I Love Bright Spring Flowers!!!

Posted on

These bright Spring flowers on this card scream Spring!!! I just love it! It’s my favorite season for sure! Flowers are always my favorite to stamp on cards!!! This card is just so amazing!

Bright Spring Flowers, www.LaurasStampPad.com

I started with a Daffodil Delight card base. Then I took a piece of Whisper White (4″ x 4″) and stamped the flowers from the Basket Bunch Stamp Set in Basic Gray Ink. I like using gray for the more subtle look! Using the Watercolor Pencils and Blender Pens, I colored in the flowers! After blending the color, I went back in with the pencil and added some accents! I have really been loving the Watercolor Pencils! You can check out so more fun samples here, here, and here!

Now that I have the flowers colored, I layered this onto a piece of Melon Mambo measuring 4-1/8″ x 4-1/8″ and added it to the top of the card base! For the greeting, I stamped it in Basic Gray from the Basket Bunch Stamp Set. Then I punched it out with the Classic Label Punch! I added the greeting with some Stampin’ Dimensionals. Since the greeting is so skinny, I used some of the dimensional border and trimmed it to fit! To finish off the card, I wrapped some Old Olive Baker’s Twine around the card and tied it into a bow. TIP: Tie it into a double knot first so it is nice and tight around the card before tying the bow!

Do you love bright Spring Flower too or do they make your allergies flare up?? Let me know in the comments below!!!

Don’t forget that tomorrow is the last day to get in the Ink Pad Giveaway!!! Click here to learn more and click here to start shopping with the Hostess Code: FCCVREYF. I can’t wait to draw the winners name on Friday!!! I’m so excited!!

Ink Pad Collection Giveaway, www.LaurasStampPad.com

Happy Stampin’

~Laura


Technique Tuesday: The Baby Wipe Technique with Butterflies!!!

Posted on

Happy Tuesday!!! That means I have a fabulous technique to share with you – the Baby Wipe Technique!!! I have done this many times before but each time it looks so amazing! Just playing with different stamp sets makes it so much fun! I just love it!!!

Baby Wipe Technique, www.LaurasStampPad.com

Butterflies are just so uplifting and beautiful! While I would love to make them in reds, yellows, and oranges, I thought I would branch out and use different colors! Now let’s get started on this super cool, easy technique – the Baby Wipe Technique!

I took a wet baby wipe and folded it a few times. Be sure the size is still bigger than the image you are going to stamp on it. Then I took a few ink refills and randomly dripped dots of ink on the baby wipe creating a big inky blob. The colors I used were Pacific Point, Cucumber Crush, and Soft Sky. This is now what I used as my ink pad for my butterflies!

Using the Watercolor Wings Stamp Set, I stamped the image into my “baby wipe ink pad” and then onto Whisper White scraps. Sometimes it takes a few stamps to get the colors to mingle together and then you get fabulous ones! You don’t have to worry about cleaning the stamp before going back to the “ink pad” because it’s not like you are going to ruin it. In fact, it will only make it more fun!! After stamping the butterflies, I die cut them with the coordinating Butterflies Thinlits! I did not stamp the center part of the butterfly until I die cut it out. I have found that I usually stamp too high or low and it get cut off so doing it afterwards is best!

Butterflies Baby Wipe, www.LaurasStampPad.com

Now to assemble the card, I started with a Pacific Point card base. Then I took a piece of Soft Sky (4″ x 5-1/4″) and stamped the three dots from the Watercolor Wings Stamp Set all over the background using my “baby wipe ink pad.” I adhered that to the card front and placed my butterflies on the card (no adhesive yet) and stamped the antennas. Then I added Stampin’ Dimensionals to the butterflies and placed them right next to their stamped antennas! For the greeting, I took a piece of scrap Whisper White 3/4″ wide and stamped the greeting from the Watercolor Wings Stamp Set in Basic Black Ink. I added those three little dots as well for an extra pop. Next, I cut the banner tips on the end and cut it as long as it needed to be for the greeting and dots. This can vary card to card. I layered it onto Pacific Point 1″ wide and long enough to layer. The greeting is on the lower left hand side of the card!

If you would like to see this all in action, check out my Video Tutorial below or click here! Don’t forget to give it a thumbs up if you liked it and be sure to subscribe if you are new. I post a new video every Tuesday and Thursday!

Only 2 more days to get entered into the Ink Pad Giveaway! I will be drawing a name for a Color Family of Ink Pads (10 total) on Friday!!! Click here for all the details!!!

Ink Pad Collection Giveaway, www.LaurasStampPad.com

Happy Stampin’

~Laura


Just Cut Off a Little Bit!!!

Posted on

This card may not seem any different than other cards but it is. I just cut off a little bit of the card front and let the focal point hang over. You can see a bit of the inside of the card which is super cool!

Just Cut Off a Little Bit, www.LaurasStampPad.com

I got this card idea from fellow stamper, Terri Gaines! After seeing this idea I feel in love and did a few exactly like her’s and then changed it up a bit like this one! I used a different piece of the Succulent Garden Designer Series Paper and added Calypso Coral Enamel Shapes!

I started with a piece of Mint Macaron measuring 5-1/2″ x 8-1/2″. Then I folded it like a regular card base and cut off 1″ from the front of the card. See…just cut off a little bit! This is the peek-a-boo part that we now get to see the inside of the card! Next, I added a piece of the Succulent Garden Designer Series Paper measuring 3″ x 5-1/4″ to the front panel. I didn’t do it in this sample photo but I did add a piece of Whisper White to the side of the card (4″ x 1-14″). This really makes the card POP more and your greeting on the inside is easier to read!

Now for the focal point! I cut a piece of Mint Macaron (3-1/4″ x 2-1/2″) and Whisper White (2-1/4″ x 2-1/2″). Using the Oh So Succulent Stamp Set, I stamped the large flower in Mint Macaron Ink. I stamped the outline in full strength and the solid flower stamp after stamping off once. Be sure you are stamping at the top of  the Whisper White so there is room for the greeting down below! Next, I placed this onto Mint Macaron towards the top! Using the Whisper White Baker’s Twine I wrapped it around and tied it into a bow!

Very Special Person, www.LaurasStampPad.com

To finish it off, I added a few Calypso Coral Enamel Shapes. Terri used the White Perfect Accents! There are so many different options on colors to use depending on the piece of designer paper you choose! I added the focal point to the card by placing 3 Stampin’ Dimensionals along the left hand side and placing it on the card. You want to make sure the dimensionals don’t fall off the front part of the card and seal it shut!

I just love this card concept and plan on using it again for another card style! If you would like to see another sample using a similar concept, check out this one! Do you like making basic cards or ones where you just cut off a little bit or fancy folds? Let me know in the comments below!

Have an amazing weekend and I’ll see you next Monday!

Happy Stampin’

~Laura


Today & Everyday, I Celebrate You!!!

Posted on

I love this card for the bright colors and that amazing greeting, Celebrate You! This greeting is perfect for so many different occasions – Birthday, Graduation, Promotion, or just being fabulous on any given day! I love it!!!

Celebrate You, www.LaurasStampPad.com

I started with a Whisper White card base and stamped the scroll-y stars image from the Birthday Blast Stamp Set in Bermuda Bay Ink!!! Stamp one going to the left and the other going to the right! Next I took a piece of Crushed Curry (2″ x 6″) and White White (1-1/4″ x 5-1/2″)) and punched the ends with the Banner Triple Punch! It is best to punch before your stamp so you don’t end up punching your stamped image! I added the Crushed Curry piece to the card front and then layered on a Silver Metallic Doily! Next, I layered on a Real Red Circle punched out with the 2″ Circle Punch.

For the greeting, I stamped it in Real Red from the Birthday Blast Stamp Set! I added a few stars in Bermuda Bay as well! This banner was added to the card front with Stampin’ Dimensionals! I finished off  the card with a few Real Red Enamel Shapes! I love it!!! This card is perfect for any occasions but it also uses up some of your smaller scrap pieces of cardstock in different colors! You could also do a more simple version like this one too!

Simple Celebrate You, www.LaurasStampPad.com

This card was created in Pacific Point and Pumpkin Pie! You can see more of the scroll-y start image. I used a 2-1/2″ Circle from the Layering Circles Framelits and one of the small doilies. After I made so many of the cards up above,  I had lots of the small doilies in the pack left over. Just cut one in half and place part of it at the top of the circle and  the other half on the lower part of the circle! Two great samples using the same basic style. Which one do you prefer? Let me know in the comments below!

Don’t forget about my Ink Pad Giveaway that I have! It runs through the April 13th and every $50 order using the Hostess Code: FCCVREYF will get your name in the drawing. You can see all of the details on this giveaway here and check out the Video about it below! Click here to start shopping!

Happy Stampin’

~Laura


It’s an Egg-Stra Special Easter!!!

Posted on

Easter is just around the corner and this card is perfect!!! This is my favorite holiday of the year so to me it is an Egg-Stra Special Easter! 🙂 How cute is that greeting!?!?!? I just love it!!!
Egg-Stra Special Easter, www.LaurasStampPad.com

I don’t typically send a lot of Easter cards but I do send a few and like to make treat bags for my nieces and nephews! The Basket Bunch Bundle is perfect for Easter but I have been making SO MANY OTHERS too. Check out yesterday’s fabulous post! I have even more amazing samples coming soon too!

I started with a Wild  Wasabi card base. Then I took a piece of Whisper White measuring 2″ x 5 1/2″ and stamped the grass from the Basket Bunch Stamp Set in Wild Wasabi Ink all along bottom. I stamped the Easter eggs and bunny in Basic Gray Ink so I could watercolor them and for the softer look. There are lots of great images in the stamp set to decorate your card with! The Watercolor Pencils are super fun for coloring all of these beauties! I used the Blender Pens for a nice even look of color! I just love all the bright colors!

Next, I took a piece of Rich Razzleberry (3-1/2″ x 5-1/2″) and ripped the top and bottom for a little texture. Depending on how much you rip off, you could start with a 3-1/4″ wide piece or smaller.  I added this piece to the card front and tied some Crushed Curry Baker’s Twine around and into a bow! For the greeting, I stamped it from the Basket Bunch  Stamp Set onto Daffodil Delight and punched  it out with the Duet Banner Punch! Of course, I added the greeting to the card with Stampin’ Dimensionals!

Do you like to make Easter Cards or Easter Treats??? Another more important question…..Do you like Peeps? I feel like you either love them (ME) or hate them (my husband)? Which side are you on?? Let me know in the comments below!!

Happy Stampin’

~Laura


Loving this Bushel Basket of Apples!!!

Posted on

Happy Tuesday!!! Today I have a fabulous technique to share with you today! It’s a bit out of the box but super cool! This bushel basket of apples was created with the Basket Bunch Bundle from the Occasions Mini Catalog

Bushel Basket of Apples, www.LaurasStampPad.com

I got the idea for this card from the amazing, Shelli Gardner who showed it at the Stampin’ Up Event last November!! It sold me on this set….the outside the box ways to use the Basket Bunch Stamp Set. This looks like an Easter Stamp Set but I got so many other styles of cards out of  it! These apples, a baby card  with the bunny and many others can be created! Now let’s get started on this one!

I started with a scrap piece of Very Vanilla and stamped lots of leaves and the smaller solid outline Easter egg. All of these come from the Basket Bunch Stamp Set and stamped in Basic Gray Ink! I like the softer look of gray over black. Next, I die cut out each of them using the coordinated Basket Builder Framelits (Bundle & Save 10%). A little tip for die cutting lots of little pieces, use a  post-it note to hold the die to the cardstock! After I had all of the pieces die cut, I colored them with Real Red and Emerald Envy Ink and an Aqua Painter!

Watercolor Apples, www.LaurasStampPad.com

It’s time to assemble!!! I die cut the basket bottom (solid & detailed) in Crumb Cake. I stuck the two basket pieces together with some cut pieces Stampin’ Dimensionals. This gives the basket a bit of a 3D look! Next, I adhered the basket to a piece of Very Vanilla that I die cut with the Stitched Shapes Framelits! I love the rustic look of the stitches! TIP: Be sure to only add adhesive to the basket on the bottom half so that you can tuck in the “apples”! I placed some of the apples on with pieces of Stampin’ Dimensionals. So that I didn’t have to die cut so many of the leaves, I actually stamped a few of the leaves directly onto the vanilla and colored them in! Just be sure to tuck the “apples” in deep enough that they look like apples and not eggs!

After the bushel basket is all complete, I added this  to a layer of Chocolate Chip cardstock and then to the center of a Crumb Cake card base! The greeting from the Basket Bunch Stamp Set is stamped in the lower right corner in Chocolate Chip Ink. To finish off the card, I wrapped some Linen Thread around the card and tied it into a bow! I love it!

If you would like to see this all in action, check out the Video Tutorial below or click here! Be sure to give it a thumbs up if you liked it and don’t forget to subscribe if you are new!!!

Happy Stampin’

~Laura


I love the Birthday Bright Project Kit!!!!

Posted on

Looks at those little black bows! PRECIOUS!!! I just love this Birthday Bright Project Kit! It has soooo much goody in  it and the cards and tags are perfect to have on hand all year long!!! The coordinating Birthday Bright Stamp Set works perfectly with this kit but it’s great to have on hand for other projects too!
Birthday Bright Project Kit, www.LaurasStampPad.com

This kit comes with 4 of each of the items shown above plus this amazing large gift box! You can see all the contents in my unboxing video here! Now I will show each individual piece!!!

Confetti Candle Cards, www.LaurasStampPad.com

This is my favorite of the 3 cards!!! I love that it is a shaker card and that beautiful confetti is amazing!!! This card was super simple, just make sure you stamp before you assemble. It is really hard to stamp on cardstock that is popped up with dimensionals! 🙂 I used the Fine Tip Glue Pen to adhere the silver glimmer birthday greeting! I just love!!!

Pop Out Birthday Cake, www.LaurasStampPad.com

This card  is so colorful and amazing! Believe it or not, I actually read and followed directions on this kit! The picture directions really help as I am more of a visual person! My tip for this one, don’t add adhesive all the way across the banner because you want it to float in the middle and not stick down! 🙂 Also, there are tons of enamel shapes so have fun with them and put them all over!!!

Wish Big, www.LaurasStampPad.com

This  was my least favorite of the 3 cards. I really struggled with all those little triangles. First you fold them over the string and it feels like there is a million and one of them! Then some of mine kept popping open! I used the Fine Tip Glue Pen and adhered them closed and adhered them to the card front. Then I placed the large clear block over them over night to get a strong hold. That worked perfectly!

Bow Tags, www.LaurasStampPad.com

These are my favorite tags because those little bows are just so small and precious! They came already made too! Super simple tags to create!!!

Birthday Present Tags, www.LaurasStampPad.com

I love these little tags too! I love that they look like presents and the Baker’s Twine ties to the top bow! Adorable!

Birthday Tags, www.LaurasStampPad.com

These were the most intricate of the tags! The hardest part for me was opening those honeycombs…..without smashing them! Oh how that was a task! 🙂 I love the details and layers and cute design!!!

I hope you enjoyed all of these projects from the Birthday Bright Project Kit! It is super fun and comes with so much product! I hope you get one and enjoy it as much as I did!

Happy Stampin’

~Laura


Happy Friday, Gorgeous!!!

Posted on

Happy Friday, Gorgeous!!!! It’s finally here….Friday that is! On the other end, Sale-A-Bration is coming to an end today. So here is one last sample using the amazing Sale-A-Bration Metallic Ribbon!
Happy Friday, Gorgeous, www.LaurasStampPad.com

This is a quick and simple card that I created! I love this simple layout and have used it MANY times with different stamp sets and designer paper. You can check out those here, here, and here!

I started with a piece of Whisper White measuring 4-1/4″ x 11″ for the card base! Then I took a piece of Night of Navy (4″ x 4″) and layered on a piece of the Floral Boutique Designer Series Paper (3-3/4″ x 3-3/4″). I added this piece to the card front towards the top. For the Happy Birthday, Gorgeous, I stamped it from the Beautiful You Stamp Set in Night of Navy Ink. I added some Silver Metallic Sale-A-Bration Ribbon around the card and tied it into a knot! Simple and fabulous!!! This card is perfect to send to all the women in your life!!

Today is the last day for you to enjoy the Sale-A-Bration benefits of a free item for every $50 you spend! ANOTHER bonus, if you use the Hostess Code: FCCVREYF then your name will be entered in the drawing for an entire color family of ink pads (10 total ink pads). You can check out more information on that here! Start shopping now – click here!

Valerie's 5 Anniversary, www.LaurasStampPad.com

Of course, since it’s Friday and that’s a day for celebrating! Here is my fabulous downline, Valerie with her Blushing Bride Glimmer Paper in celebration of her 5 Year Anniversary with Stampin’ Up!!! I’m so happy for her!!! Congratulations, Valerie! I’m so glad  Stampin’ Up has brought us together! 🙂 If you would like to join the Fabulous Friends Team, click here for more information. If you sign up today, you get to pick out $125 in product PLUS 2 additional stamp sets, all for just $99.00!

Hope you all have a wonderful weekend! I’ll see you back here on Monday!

Happy Stampin’

~Laura